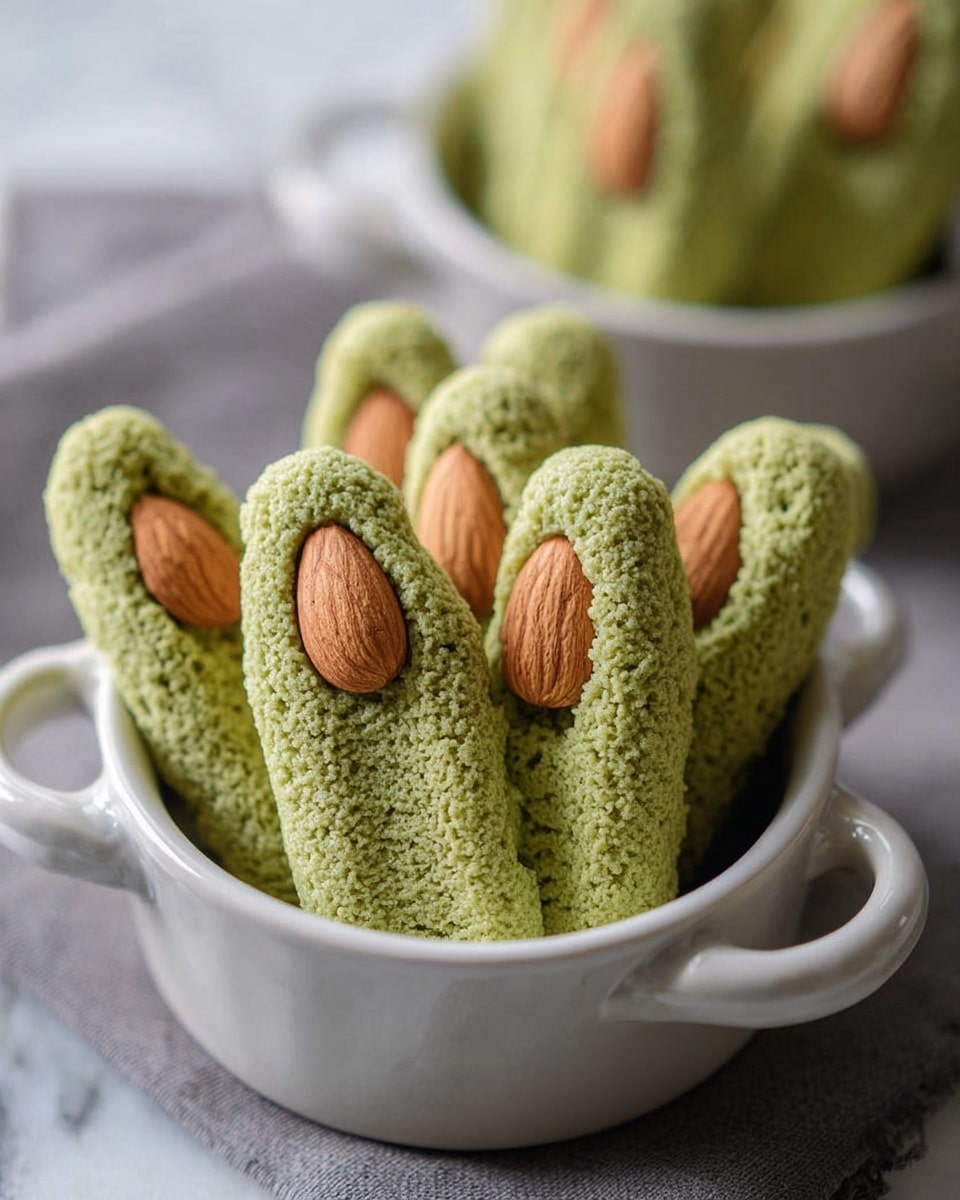
Witches’ Fingers Cookies Recipe
If you’re looking for a spooky, fun treat that’s surprisingly light and packed with flavor, you’ve gotta try my Witches’ Fingers Cookies Recipe. These creepy green cookies shaped like gnarled witch fingers, topped with an almond “fingernail,” are not just perfect for Halloween – they’re utterly addictive any time you want something unique. Plus, the subtle matcha green tea flavor adds this unexpected twist that’s totally fan-freaking-tastic. Stick with me, and I’ll walk you through every crumbly, crunchy, sweet step!
Why This Recipe Works
- Light & Airy Texture: Whipping the egg whites with cream of tartar creates a delicate meringue base that makes these cookies practically melt in your mouth.
- Matcha Flavor Twist: Using matcha powder adds a beautiful green color plus a subtle, earthy taste – a fun surprise for anyone expecting just a sugary cookie.
- Visual Impact: The piped “fingers” with almonds as nails make these cookies instantly recognizable and perfect for festive occasions.
- Low & Slow Baking: Baking at a low temperature keeps the cookies crisp without browning or burning, preserving that eerie green hue.

Ingredients & Why They Work
Every ingredient in this Witches’ Fingers Cookies Recipe plays a vital role that’s easy to overlook but so important for the final cookie’s texture and flavor. I find using good-quality matcha powder and fresh egg whites makes all the difference, plus a tiny bit of cream of tartar helps stabilize the meringue as you whip it.
- Egg Whites: The heart of your cookie meringue, whipping them perfectly is key for the structure.
- Cream of Tartar: Stabilizes the whipped egg whites so your cookies keep their shape.
- Vanilla Extract: Adds a comforting warmth that complements the matcha.
- Matcha Powder: Not only colors the dough but infuses it with that signature earthy, grassy flavor that’s both unique and delicious.
- Powdered Sugar: Dissolves smoothly into the mix, sweetening without graininess.
- Whole Almonds: The perfect “fingernail” to finish off the witchy look—choose ones with pointy ends for the creep factor!
Tweak to Your Taste
I love playing around with this Witches’ Fingers Cookies Recipe to fit the occasion or my mood. Sometimes I swap vanilla for almond extract to amplify the nutty vibes, or sprinkle a little coarse sugar on top just before baking for extra texture and sparkle. Don’t be afraid to make this recipe your own!
- Chocolate-Dipped Variation: I once dipped the finger ends in dark chocolate for a rich finish—it made these even more irresistible at a spooky party.
- Matcha-Free Version: If you’re not into matcha, try using a few drops of green food coloring and lemon extract instead for a more classic sweet finger.
- Nut Allergy Adjustment: Skip the almonds or substitute with small pieces of dried cranberries or Halloween-themed sprinkles as nail alternatives.
Step-by-Step: How I Make Witches’ Fingers Cookies Recipe
Step 1: Whip Those Egg Whites Like a Pro
Start by separating your egg whites carefully—no yolk allowed, or the whites won’t whip properly. Add your egg whites and cream of tartar to your mixer bowl, then whip on high speed until soft peaks form. You want the tips to be just a little floppy when you lift the beaters—this sets the stage for a light cookie.
Step 2: Blend in Matcha & Vanilla
Once you have those soft peaks, stir in the vanilla extract along with your beautiful green matcha powder. This step gives the dough its vibrant color and signature earthy flavor. Make sure it’s fully combined for an even look and taste in every bite.
Step 3: Sweeten with Powdered Sugar
Next comes the powdered sugar, which you add gradually, about a tablespoon at a time. This slow addition helps keep the egg whites light while sweetening the mixture. Keep whipping until your peaks become stiff – now when you lift your beater, you should see sharp peaks that hold their shape perfectly.
Step 4: Pipe Out Your Witchy Fingers
Fill a piping bag with your glossy green batter and line baking sheets with parchment paper. Pipe squiggly finger shapes about 3 inches long each – the uneven lines give them that authentic creepy vibe! Place a whole almond at the tip of each finger, pointing the narrow end out like a fingernail.
Step 5: Bake Low & Slow
Bake your fingers at a low 225°F for a solid 60 to 90 minutes. This slow baking dries out the cookies without browning them, so they stay crisp and keep that spooky green color. Keep an eye on them after the hour mark – pull them out as soon as the edges look set and the fingers feel crisp to the touch.
Step 6: Cool, Admire, Then Munch!
Let the cookies cool on the tray for at least 15 minutes; they’ll firm up even more after coming out. This is when you get to really appreciate the creepy almond nails and the subtle matcha aroma. Then it’s time to enjoy—don’t blame me if you find yourself sneaking more than one!
Pro Tips for Making Witches’ Fingers Cookies Recipe
- Egg White Freshness Matters: For best results, use eggs that are as fresh as possible; room temperature eggs whip up better too.
- Avoid Over-Piping: Keep fingers about 3 inches long and don’t pipe too thick—they won’t dry out properly at higher thicknesses.
- Low Oven Temperature: Resist the urge to crank up the heat to speed things up; the slow bake locks in crispness and color without browning.
- Watch Bake Time Closely: Check at the 60-minute mark and every 10 minutes after to prevent burning, especially if your oven runs hot.
How to Serve Witches’ Fingers Cookies Recipe
Garnishes
I usually keep garnishes minimal because these cookies speak for themselves, but if I’m feeling extra festive, I dust a little powdered sugar around the plate like “spooky cobwebs” or drizzle some melted dark chocolate for that gothic vibe. It’s a fun way to elevate their presentation without overwhelming the flavors.
Side Dishes
Pair your witches’ fingers with a hot cup of chai tea or a creamy latte to balance the matcha’s earthiness. For Halloween parties, I’ve also set them beside a bowl of berry compote or dark berry jam, which adds an eerie, blood-red splash of color and a sweet tang.
Creative Ways to Present
If you want to wow your guests, arrange these cookies sticking out of a “witch’s hand” shaped bowl or nestle them in faux moss or dry ice for a spooky effect. For kid-friendly fun, add little cocktail stick “bones” poking out and serve alongside a cauldron of punch.
Make Ahead and Storage
Storing Leftovers
Once cooled completely, store your Witches’ Fingers Cookies in an airtight container at room temperature. They stay crisp for up to a week, though in my house, they hardly last that long! If they soften, a short re-bake can bring back some crunch.
Freezing
I’ve successfully frozen baked fingers in a sealed container for up to a month. When it’s time to enjoy again, just let them thaw at room temperature – they keep their texture surprisingly well!
Reheating
If your cookies lose their crispness, a quick 5-minute toast in a 300°F oven refreshes that crunchy exterior without drying them out. Just keep a close eye to avoid any browning.
FAQs
-
Can I use regular sugar instead of powdered sugar for Witches’ Fingers Cookies Recipe?
Powdered sugar is crucial here because it dissolves smoothly into the egg whites, helping create that glossy, stable meringue. Granulated sugar won’t blend as well and can give a gritty texture, so it’s best to stick with powdered sugar for these cookies.
-
What if I don’t have cream of tartar?
If you don’t have cream of tartar, you can substitute with a few drops of lemon juice or vinegar which also stabilize egg whites. However, cream of tartar is preferred for its neutral flavor.
-
How long can I store Witches’ Fingers Cookies?
Stored in an airtight container at room temperature, these cookies last about a week while staying crisp. Freezing them extends life for up to a month without major loss of texture.
Final Thoughts
Honestly, this Witches’ Fingers Cookies Recipe has become one of my favorite quirky treats to share—not just because they look wickedly cool, but because the matcha and crispy crunch keep me coming back for more. I hope you’ll give them a try and maybe even put your own personal twist on them. Join me in making Halloween (and any day!) a little more magical, one creepy finger at a time.
Print
Witches’ Fingers Cookies Recipe
- Prep Time: 20 minutes
- Cook Time: 1 hour 30 minutes
- Total Time: 1 hour 50 minutes
- Yield: 12 servings
- Category: Dessert
- Method: Baking
- Cuisine: American
- Diet: Vegetarian
Description
Witches’ Fingers Cookies are spooky, crunchy meringue treats flavored with matcha powder to add a unique twist and vibrant green color. These delicate cookies shaped like fingers are topped with whole almonds to resemble fingernails, making them perfect for Halloween or themed parties.
Ingredients
Dry Ingredients
- 2 tablespoons matcha powder
- 1/2 cup powdered sugar
- 1/4 teaspoon cream of tartar
Wet Ingredients
- 4 separated egg whites (about 1/2 cup)
- 2 teaspoons vanilla extract
Topping
- 1/2 cup whole almonds
Instructions
- Prepare the meringue base: Working with either the base of your stand mixer or a bowl and your hand mixer, add the egg whites and cream of tartar. Whip on high until soft peaks form (they’ll flop over slightly).
- Add flavor and color: Add the vanilla extract and matcha powder, blend until combined evenly through the mixture.
- Incorporate the powdered sugar: Carefully add the powdered sugar about 1 tablespoon at a time, mixing after each addition until all is incorporated and you have stiff peaks (the mix will hold a peak on your finger or mixer when pulled out).
- Pipe the cookies: Spoon the mixture into a piping bag. Line a couple of baking sheets with parchment paper. Pipe about 3-inch squiggly-lined rows of the green meringue mixture until it is used up. Press one whole almond onto the end of each green line, pointing the almond’s pointy end outward to resemble a fingernail.
- Bake the cookies: Bake at 225 degrees Fahrenheit for 90 minutes, keeping an eye on them and removing if they appear to be burning. These low-temperature baked cookies become crisp and dry.
- Cool and serve: Remove from the oven and let cool for at least 15 minutes before serving to allow them to set properly and become crunchy.
Notes
- Ensure egg whites are at room temperature for better volume when whipping.
- Use fresh matcha powder for the best vibrant color and flavor.
- Adding cream of tartar stabilizes the egg whites for a better meringue structure.
- Low and slow baking at 225°F is essential to dry out the cookies without browning or burning them.
- The almonds can be lightly toasted for extra flavor if desired.
- Store cookies in an airtight container to maintain crispness.
Nutrition
- Serving Size: 1 cookie
- Calories: 60 kcal
- Sugar: 8 g
- Sodium: 5 mg
- Fat: 1 g
- Saturated Fat: 0.1 g
- Unsaturated Fat: 0.5 g
- Trans Fat: 0 g
- Carbohydrates: 12 g
- Fiber: 0.5 g
- Protein: 1 g
- Cholesterol: 0 mg


