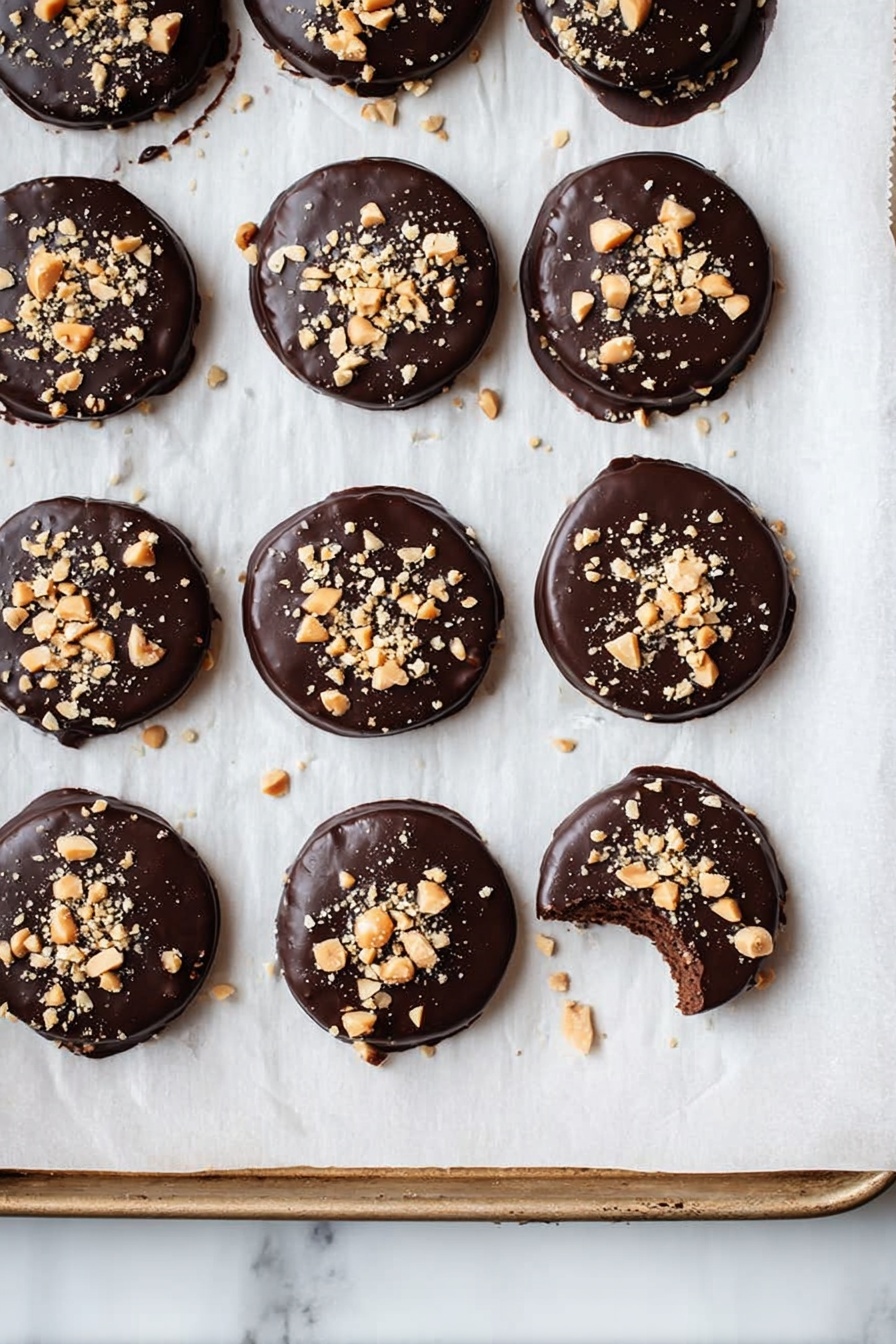
Vegan Chocolate-Coated Peanut Butter Cracker Sandwiches Recipe
If you’re a fan of quick, indulgent snacks that combine creamy, crunchy, and chocolatey all at once, you’re going to adore this Vegan Chocolate-Coated Peanut Butter Cracker Sandwiches Recipe. It’s one of those treats I keep coming back to when I want something easy, vegan-friendly, and downright satisfying. Plus, it’s super fun to make—perfect for when you want to whip up a batch in no time and impress friends or family with minimal fuss.
Why This Recipe Works
- Simple Ingredients: You only need a handful of pantry staples, making it super accessible and budget-friendly.
- Perfect Texture Combo: Crunchy crackers, smooth peanut butter, and silky vegan chocolate create an irresistible mouthfeel.
- Quick Assembly: Less than an hour from start to fridge means you get homemade treats fast without the wait.
- Customizable: Easy to tweak with toppings or fillings, so it suits your taste or any occasion perfectly.
Ingredients & Why They Work
Each ingredient here has a job, and together they create a delightful harmony of flavors and textures. I always recommend grabbing your favorite vegan chocolate chips and some crunchy snack crackers for the best results—you can’t rush a good peanut butter sandwich, but keeping the peanut butter smooth and spread thin avoids overwhelming the crackers.

- Vegan chocolate chips: Opt for quality brands with a rich cocoa flavor—they melt beautifully and harden into a crisp shell.
- Smooth peanut butter: Go for smooth, not crunchy, so it spreads evenly and pairs seamlessly with the crackers.
- Snack crackers (like Ritz or Late July): These provide just the right size and crunch; I love using Ritz for their buttery taste, but Late July if you want gluten-free options.
- Crushed nuts or sprinkles (optional): A fun touch that adds a bit of extra texture or festive color when you need it.
Tweak to Your Taste
This Vegan Chocolate-Coated Peanut Butter Cracker Sandwiches Recipe is like a blank canvas, and I love playing around with little twists depending on my mood or who I’m sharing with. Don’t hesitate to customize—it only makes the experience more fun and your snack more personal.
- Jelly Surprise: I once added a thin layer of my favorite jam inside the peanut butter before sandwiching—game changer for classic PB&J lovers who want more oomph!
- Sea Salt Flakes: Sprinkling a pinch just after dipping in chocolate amps the flavor by adding that delightful salty contrast.
- Vegan White Chocolate Drizzle: I sometimes drizzle melted vegan white chocolate over the top for a pretty, fancy-looking finish that’s surprisingly simple.
- Banana Slices: For a healthier upgrade, add thin banana slices inside the sandwich; it’s a great way to sneak in some fresh fruit.
- Cracker Choice: Sometimes I swap out classic round crackers for graham crackers for a sweeter base—both work beautifully.
- Sandwich Pops: Stick a bamboo skewer into the centers after coating and chilling, perfect for parties or kid-friendly mess-free treats.
Step-by-Step: How I Make Vegan Chocolate-Coated Peanut Butter Cracker Sandwiches Recipe
Step 1: Prep Your Peanut Butter Crackers
First up, scoop out your smooth peanut butter and spread it thinly and evenly on half of your snack crackers. Keeping the peanut butter layer thin is key—it keeps the sandwich delicate and lets the crackers stay crisp. Once spread, top each with another cracker to form little peanut butter sandwiches. I like doing this assembly on a large plate or tray so it’s ready for dipping.
Step 2: Melt Vegan Chocolate Chips
Next, grab a microwave-safe bowl or set up a double boiler and gently melt your vegan chocolate chips. Stir every 30 seconds to avoid overheating—chocolate can get grainy if melty mishaps happen. You’re looking for smooth, shiny melted chocolate that’s perfect for dipping.
Step 3: Dip and Decorate
Using a fork or dipping tool, dunk each peanut butter cracker sandwich into the melted chocolate, making sure it’s fully coated. Let any excess chocolate drip off then place it onto a baking sheet lined with parchment paper. If you’re feeling fancy, sprinkle crushed nuts, colorful sprinkles, or even a little sea salt while the chocolate is still wet.
Step 4: Chill Until Set
Pop the tray of chocolate-coated sandwiches into your fridge for about 30 to 45 minutes. This chilling step is crucial—it helps the chocolate harden into that perfectly crisp shell you want. Leaving them chilled until serving keeps them firm and less messy.
Pro Tips for Making Vegan Chocolate-Coated Peanut Butter Cracker Sandwiches Recipe
- Choose the Right Chocolate: I recommend using high-quality vegan chocolate chips—they melt smoother and harden with a beautiful shine.
- Thin Peanut Butter Layer: Spreading the peanut butter thin stops the crackers from getting soggy and keeps them crisp even after chilling.
- Work Quickly When Dipping: Chocolate cools fast, so dip sandwiches promptly and don’t overcrowd the tray to prevent sticking.
- Avoid Melting Chocolate Twice: Repeated melting can cause chocolate to lose its texture—melt just enough chocolate for your batch size.
How to Serve Vegan Chocolate-Coated Peanut Butter Cracker Sandwiches Recipe
Garnishes
I love to top these chocolate-coated sandwiches with a light sprinkle of crushed roasted peanuts or flaky sea salt right after dipping—those little touches make the flavors pop and add a crunchy surprise in each bite. For holidays, colorful vegan sprinkles add a festive vibe that’s so fun, especially with kids around.
Side Dishes
These treat-style sandwiches shine best on their own but pair wonderfully with a tall glass of almond milk or your favorite plant-based yogurt. For an afternoon snack, I sometimes serve them alongside fresh veggie sticks or fruit slices to balance out the indulgence.
Creative Ways to Present
For small gatherings, I’ve turned these into fun sandwich pops by sticking bamboo skewers vertically into the finished sandwiches before they harden. Arrange them standing upright in a pretty jar or cup. Another one of my favorite ways: stack them on a dessert plate with a drizzle of vegan white chocolate and a dusting of cocoa powder for an elegant touch.
Make Ahead and Storage
Storing Leftovers
I usually keep these sandwiches stored in an airtight container in the fridge. They’ll stay fresh and hold their crunch for up to 5 days. If you live somewhere warmer, refrigeration is especially important to avoid the chocolate melting or getting sticky.
Freezing
Freezing works surprisingly well! I place the sandwiches in a single layer on a tray first, freeze until firm, then stack them in a freezer-safe container with parchment paper between layers. They keep great for up to a month. Just thaw in the fridge when ready to eat for the best texture.
Reheating
I actually don’t recommend reheating these because the chocolate coating may soften and lose its snap. Instead, I pop them straight from fridge or freezer and enjoy them chilled—there’s something satisfying about that cool, firm chocolate shell contrasted by creamy peanut butter inside.
FAQs
-
Can I use crunchy peanut butter instead of smooth in this recipe?
Absolutely, you can! Crunchy peanut butter will add extra texture inside your sandwiches, which some people love. Just keep in mind that it can be a bit harder to spread thinly, so take your time to avoid cracking the crackers.
-
What type of crackers work best for this recipe?
Classic buttery snack crackers like Ritz work splendidly because of their size, flavor, and crunch. If you’re gluten-free, I suggest brands like Late July. Graham crackers or other lightly sweetened crackers also make delicious variations.
-
Can I substitute peanut butter with any other nut or seed butter?
Yes, sun butter, almond butter, or cashew butter can be used if you want to switch it up—just choose smooth versions for best spreading and texture. Flavors will vary but remain delicious!
-
Do I have to refrigerate these sandwiches?
Yes, refrigeration helps the chocolate harden and keeps the peanut butter fresh. Plus, it maintains that satisfying crispness of the cracker until you’re ready to dig in.
-
Can I make these ahead for a party?
For sure! They make excellent make-ahead snacks. Prepare them, chill until firm, then store covered in the fridge. You can even freeze them if you want to prep days in advance.
Final Thoughts
This Vegan Chocolate-Coated Peanut Butter Cracker Sandwiches Recipe has become one of my go-to treats for those moments I want something sweet but fuss-free. It’s always a hit with friends, and I love how versatile it is—you can dress it up or keep it simple. I hope you’ll enjoy making these as much as I do! Trust me, once you try the crunchy-with-peanut-butter-meets-chocolate combo, you’ll keep coming back for more.
Print
Vegan Chocolate-Coated Peanut Butter Cracker Sandwiches Recipe
- Prep Time: 10 minutes
- Cook Time: 0 minutes
- Total Time: 40 minutes
- Yield: 12 patties
- Category: Snack
- Method: No-Cook
- Cuisine: American
- Diet: Vegan
Description
Peanut Butter Cracker Sandwiches are a delightful no-bake treat featuring creamy peanut butter sandwiched between crunchy snack crackers, dipped in smooth vegan chocolate, and chilled to perfection. These easy-to-make snacks combine sweet, salty, and rich flavors with optional decorative toppings for a fun and tasty bite-sized dessert or snack.
Ingredients
Main Ingredients
- 1 ¼ cups vegan chocolate chips
- ½ cup smooth peanut butter
- 1 sleeve snack crackers (such as Ritz or Late July)
Optional Toppings
- Crushed nuts or sprinkles for decoration (optional)
Instructions
- Prepare the Sandwiches: Spread a thin layer of smooth peanut butter on half of the crackers and then top each with a matching cracker to form sandwiches. Keep the peanut butter layer thin to avoid messiness.
- Melt the Chocolate: Gently melt the vegan chocolate chips in a microwave-safe bowl or over a double boiler until smooth and glossy. Line a baking tray with parchment paper to prepare for dipping.
- Dip the Sandwiches: Dip each peanut butter cracker sandwich fully into the melted vegan chocolate, coating it evenly. Place the coated sandwiches carefully on the prepared parchment-lined baking tray.
- Chill to Set: Once all sandwiches are coated, refrigerate the tray for 30 to 45 minutes until the chocolate hardens and sets completely.
- Serve: Keep the sandwiches chilled until ready to serve for the best texture and taste.
Notes
- You can use vegan white chocolate instead of vegan chocolate chips or drizzle it on top for decoration.
- Sprinkle sea salt flakes on the chocolate coating for an extra salty-sweet flavor contrast.
- Add a layer of sweet jelly inside the sandwich for a peanut butter and jelly variation.
- Include sliced bananas with the peanut butter for a wholesome and satisfying treat.
- Substitute the round crackers with graham crackers for a slightly sweeter twist.
- Insert bamboo skewers into the hardened sandwiches to create fun sandwich pops that are easier and less messy to eat.
Nutrition
- Serving Size: 1 patty
- Calories: 150 kcal
- Sugar: 10 g
- Sodium: 120 mg
- Fat: 9 g
- Saturated Fat: 2 g
- Unsaturated Fat: 7 g
- Trans Fat: 0 g
- Carbohydrates: 15 g
- Fiber: 2 g
- Protein: 4 g
- Cholesterol: 0 mg


