Valentine Heart Cookies with Chocolate Dip Recipe
If you’re looking for the perfect sweet treat to wow your special someone (or just indulge yourself), let me share my absolutely fan-freaking-tastic Valentine Heart Cookies with Chocolate Dip Recipe. These little heart-shaped delights are buttery, tender, and come with a luscious chocolate dip that’s so good, you’ll want to double the batch. Stick around, because I’m about to walk you through every step, sharing all my tips so your cookies turn out just right—and maybe even better than mine!
Why This Recipe Works
- Balanced Texture: The butter and sugar create a tender, melt-in-your-mouth cookie that isn’t too crumbly or tough.
- Simple Yet Delicious Chocolate Dip: Using melting wafers makes dipping easy and gives a smooth, glossy finish every time.
- Easy Dough Handling: Chilling the dough just 15 minutes keeps it firm for clean, crisp heart shapes without frustration.
- Fun and Festive Presentation: Adding nonpareils right after dipping makes these cookies pop visually and adds a slight crunch.

Ingredients & Why They Work
Every ingredient in this Valentine Heart Cookies with Chocolate Dip Recipe plays a role—not just in flavor but in texture and ease of preparation. I’ve found that using good quality butter and the right chocolate wafers really lifts this recipe, so don’t skimp! Also, a few handy tips for shopping will save you time.
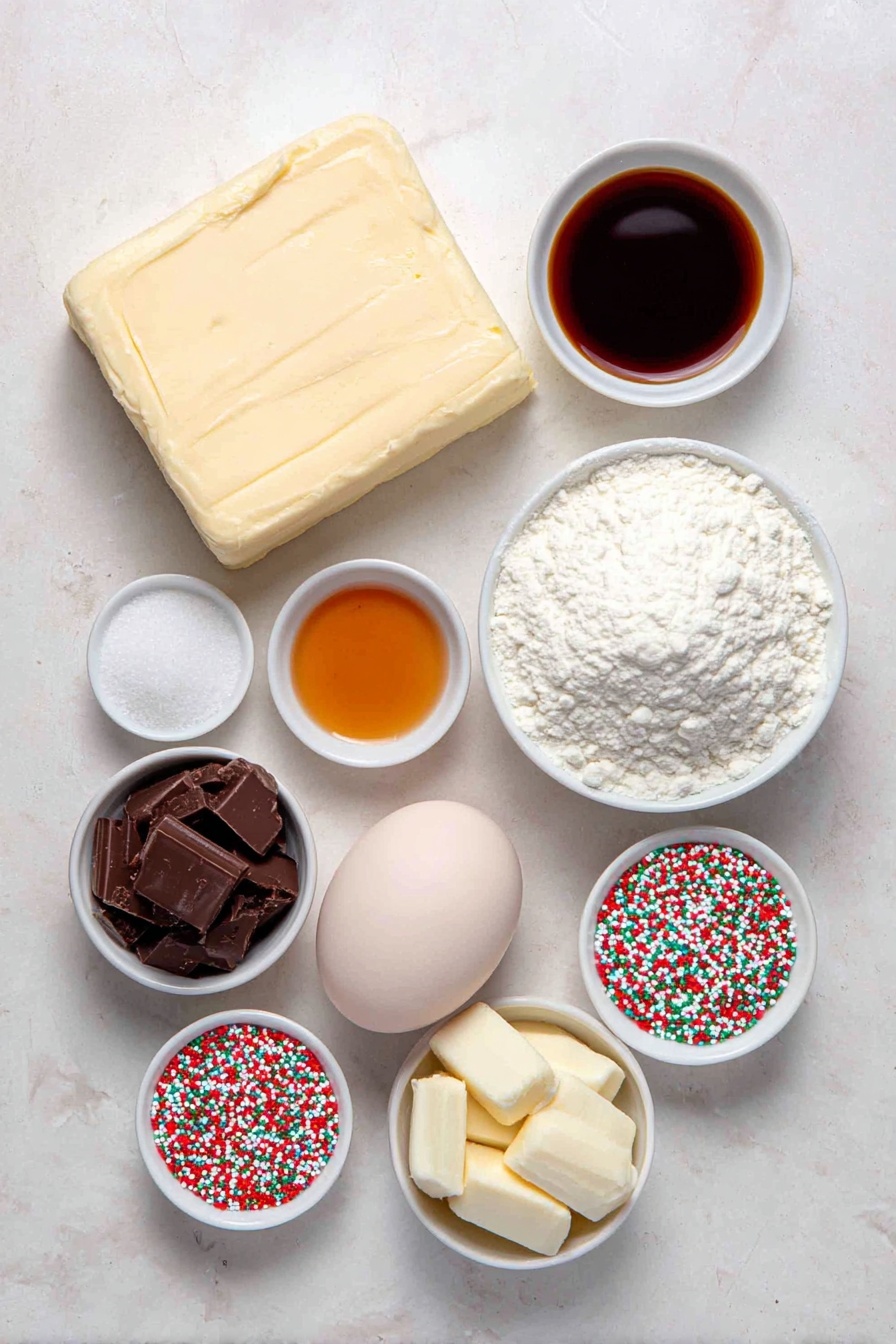
- Unsalted Butter: Softened butter adds richness and helps achieve that perfect tender crumb without overpowering the taste.
- Sugar: I use granulated sugar for just the right amount of sweetness and a slight crispness on the edges.
- Vanilla Extract: Enhances the flavor beautifully—don’t skip it, and use pure vanilla for best results!
- Salt: Balances the sweetness and enhances all the other flavors in the dough.
- Egg Yolk: Adds moisture and richness, binding everything together without making the dough too sticky.
- All-Purpose Flour: The backbone of the cookie, providing structure while keeping it tender.
- Dark and White Chocolate Melting Wafers: These melt smoothly and harden with a glossy finish—perfect for dipping and decorating.
- Nonpareils for Decoration: I love these tiny sprinkles for the festive touch and a fun pop of color.
Tweak to Your Taste
I love how this Valentine Heart Cookies with Chocolate Dip Recipe invites creativity. Feel free to swap in different chocolates or toppings to match your vibe or dietary needs. Here are a few ways I’ve jazzed these up over the years.
- Dark Chocolate Only: When I’m feeling rich and intense, I skip the white chocolate and just dip all cookies in the dark—perfect for the true chocolate lover.
- Gluten-Free Version: I’ve tried this with a gluten-free flour blend—just watch the dough consistency; it might need a tiny extra splash of liquid.
- Festive Sprinkles Variations: Besides nonpareils, crushed peppermint or edible glitter add a cool twist, especially during Valentine’s week.
- Extra Zest: A teaspoon of finely grated orange zest in the dough gives a fresh, vibrant flavor that pairs wonderfully with the chocolate dip.
Step-by-Step: How I Make Valentine Heart Cookies with Chocolate Dip Recipe
Step 1: Cream the Butter and Sugar Until Silky
Start by tossing your softened butter and sugar into a stand mixer bowl (or grab that trusty hand mixer) and beat them until the mixture feels light, fluffy, and silky smooth—about 3-5 minutes. This step is key to that soft cookie texture you’re after, so don’t rush it! I usually scrape down the sides once or twice to make sure every bit gets well-mixed.
Step 2: Mix in the Vanilla, Salt, and Egg Yolk
Next, stir in your vanilla extract and salt, making sure they’re evenly combined—this is where the cookie’s depth starts to develop. Then add the egg yolk and beat until just incorporated. The dough may look a little soft here; don’t worry, the flour is on its way to fix that.
Step 3: Slowly Add Flour and Form Your Dough
On a medium-low speed, gradually add your all-purpose flour. This part is a bit of a workout because the dough gets dry and crumbly as the flour mixes in. I always stop to scrape down the sides and bottom several times—it really helps everything come together nicely. Once all combined, dump the dough onto a clean surface and gently knead with your hands until it forms a smooth, cohesive ball.
Step 4: Chill and Roll Out Your Dough
Press your dough ball into a disk about 1 inch thick, cover it tightly with plastic wrap, and pop it in the fridge for 15 minutes. This chilling step is a game-changer—it relaxes the gluten, firms up the butter, and makes rolling out much easier. When it’s time, lightly flour your surface and rolling pin. Roll the dough out to about ¼ inch thickness, then start cutting out your sweet little hearts. I always re-roll the scraps to make the most of every bit, so nothing goes to waste!
Step 5: Bake to Golden Perfection
Place your hearts on an ungreased baking sheet lined with parchment paper. Bake in a 350°F (175°C) oven for 10-12 minutes. Keep an eye on them—the edges should just start turning a light golden brown. That subtle color shift is your cue that these cookies will have that lovely tender crunch. Let cookies cool completely; if you dip them warm, the chocolate won’t set properly, and you’ll have a mess.
Step 6: Melt Chocolate and Dip
Melt your dark and white chocolate wafers separately according to package instructions—usually quick bursts in the microwave or a gentle double boiler do the trick. I line a cookie sheet with wax paper (trust me, this saves cleanup) and hold each cooled cookie firmly at the base. Dip the heart into the chocolate, letting the excess drip off, then immediately place it chocolate-side up on the wax paper. Don’t forget to sprinkle your nonpareils right after dipping while the chocolate’s still wet—it’s the best time to get them to stick.
Alternate between dark and white chocolate dips for a charming mix. Let everything harden completely before you dig in—it usually takes about 20-30 minutes at room temperature.
Pro Tips for Making Valentine Heart Cookies with Chocolate Dip Recipe
- Use Room Temperature Butter: It creams better with sugar, creating a lighter dough and fluffier cookie.
- Don’t Skip Dough Chilling: It prevents spreading, helping your hearts keep their shape perfectly.
- Flour Your Workspace and Tools: This keeps the dough from sticking and helps cut out cleaner shapes.
- Cool Cookies Completely Before Dipping: Otherwise, your chocolate won’t set properly, and you’ll be left with a sticky mess.
How to Serve Valentine Heart Cookies with Chocolate Dip Recipe

Garnishes
I love using rainbow nonpareils for that classic Valentine’s vibe, but you can get creative with edible glitter, colored sugar crystals, or even tiny heart-shaped sprinkles. If you’re feeling extra fancy, a light dusting of powdered sugar right before serving gives a lovely snowy effect and an inviting touch of sweetness.
Side Dishes
Pair these cookies with a light cup of coffee or hot cocoa—trust me, the bitterness balances the sweet chocolate dip so well. I sometimes serve them alongside vanilla ice cream or fresh berries to round out a charming Valentine’s dessert platter.
Creative Ways to Present
For a special occasion, I like arranging these heart cookies in a layered glass jar or wrapping a plate with cellophane and a big red bow, making them perfect for gifting. Putting them on a wooden board alongside rose petals and candles spices up your dessert table instantly!
Make Ahead and Storage
Storing Leftovers
Store any uneaten Valentine Heart Cookies with Chocolate Dip Recipe in an airtight container at room temperature. I found that layering them between sheets of parchment helps keep the chocolate from sticking and keeps cookies fresh for up to five days—if they last that long!
Freezing
I’ve successfully frozen these cookies after baking but before dipping in chocolate. Wrap them tightly to avoid freezer burn, and when you’re ready, thaw fully before dipping. Alternatively, you can freeze fully decorated cookies in a single layer on a baking sheet, then transfer to a sealed container. Just mind the sprinkles—they can lose a bit of their pop after freezing.
Reheating
Since these cookies are best served at room temp, I usually just let frozen or chilled ones sit out for 20-30 minutes. If you want to warm them slightly, zap them for just 5-7 seconds in the microwave but watch carefully—the chocolate can melt off.
FAQs
-
Can I use regular chocolate instead of melting wafers for the dip?
Yes, you can melt regular chocolate, but it may take a bit more care when melting to avoid seizing or burning. Chocolate chips sometimes don’t melt as smoothly as wafers. If you go this route, use a double boiler and stir constantly. Adding a little coconut oil or shortening (about 1 tablespoon per cup) helps create the silky, glossy finish perfect for dipping.
-
Why do my cookies spread too much when baking?
This usually happens if your butter is too warm or the dough hasn’t been chilled properly. Make sure to chill the disk of dough for at least 15 minutes before rolling it out. Also, avoid oven temperatures that are too low; baking at 350°F (175°C) helps the cookies set quickly and hold their shape.
-
How do I prevent the chocolate from cracking after it hardens?
Temperature changes can cause chocolate to crack. Store your cookies at room temperature away from strong heat or cold drafts. Also, allowing the chocolate to harden fully at room temperature rather than refrigerating too quickly helps maintain a smooth, durable coating.
-
Can kids help make these Valentine Heart Cookies with Chocolate Dip Recipe?
Absolutely! Kids love cutting out the heart shapes and decorating with the sprinkles after dipping. Just make sure an adult handles the chocolate melting and baking parts for safety. It’s a fun activity to enjoy together.
Final Thoughts
This Valentine Heart Cookies with Chocolate Dip Recipe has become one of my absolute favorites because it’s simple, sweet, and perfect for sharing love in cookie form. I still remember making these for my family years ago and how the kitchen filled with that warm vanilla and fresh cookie scent—the best kind of kitchen memory. Whether you make them for Valentine’s Day, an anniversary, or just because, I promise you’ll love how these little hearts bring smiles around the table. Now go ahead, get baking, and enjoy every chocolaty, buttery bite!
Print
Valentine Heart Cookies with Chocolate Dip Recipe
- Prep Time: 30 minutes
- Cook Time: 12 minutes
- Total Time: 42 minutes
- Yield: 45 cookies
- Category: Dessert
- Method: Baking
- Cuisine: American
Description
Delicious Valentine Cookies featuring a buttery, tender dough decorated with melted dark and white chocolate and festive nonpareils, perfect for celebrating the season of love.
Ingredients
Cookie Dough
- 1 cup (226 g) unsalted butter softened
- ¾ cups (150 g) sugar
- 1 teaspoon vanilla extract
- ½ teaspoon salt
- 1 large egg yolk
- 2 ¼ cups (295 g) all-purpose flour
Chocolate Coating
- 1 cup (170 g) dark chocolate melting wafers
- 1 cup (170 g) white chocolate melting wafers
- Nonpareils for decoration
Instructions
- Cream Butter and Sugar: Combine butter and sugar in the bowl of a stand mixer (or large bowl with electric hand mixer) and beat until well-creamed.
- Add Vanilla and Salt: Stir in vanilla extract and salt until thoroughly combined, scraping down the sides of the bowl to incorporate all ingredients.
- Add Egg Yolk: Beat in the egg yolk until just combined.
- Add Flour: With mixer on medium-low speed, gradually add flour until well-incorporated, scraping down sides and bottom of the bowl multiple times as the dough will be dry and crumbly.
- Form Dough Ball: Transfer dough to a clean surface and use hands to form a cohesive ball, then flatten it into a disk about 1 inch thick.
- Chill Dough: Cover the disk with clear wrap and chill in the refrigerator for 15 minutes.
- Preheat Oven and Prepare Sheets: Preheat oven to 350°F (175°C) and line cookie sheets with parchment paper.
- Roll Out Dough: On a lightly floured surface, roll out chilled dough to ¼ inch thickness using a floured rolling pin.
- Cut Shapes: Lightly flour cookie cutters and cut out shapes, transferring them to the ungreased cookie sheets. Re-roll scraps to maximize cookie yield.
- Bake Cookies: Bake in the oven at 350°F for 12 minutes or until edges just start to turn lightly golden brown.
- Cool Cookies: Allow cookies to cool completely on wire racks before decorating.
- Melt Chocolate: Place dark chocolate melting wafers in one bowl and white chocolate wafers in another, melting both according to package instructions.
- Dip Cookies: Holding each cookie by the base, dip the surface into melted chocolate, then place chocolate side up on wax paper-lined cookie sheet.
- Decorate: Immediately sprinkle dipped cookies with nonpareils or sprinkles to decorate.
- Set Chocolate: Allow the chocolate coating to harden completely before serving.
Notes
- Chilling the dough helps make the cookies easier to roll and cut.
- Baking time may vary depending on the size and thickness of cookies; watch for lightly golden edges.
- Use good quality melting wafers or chocolate chips for smooth coating.
- Nonpareils add a festive touch and a slight crunch, but you can substitute with other sprinkles or decorative toppings.
- Re-roll cookie scraps carefully to avoid tough cookies from overworking the dough.
- Store cookies in an airtight container at room temperature for up to 5 days.
Nutrition
- Serving Size: 1 cookie
- Calories: 150 kcal
- Sugar: 10 g
- Sodium: 70 mg
- Fat: 8 g
- Saturated Fat: 5 g
- Unsaturated Fat: 3 g
- Trans Fat: 0 g
- Carbohydrates: 18 g
- Fiber: 1 g
- Protein: 2 g
- Cholesterol: 25 mg


