Spooky Halloween Chocolate-Covered Oreos Recipe
If you’re looking for a ridiculously fun and festive treat to wow your guests this season, I can’t recommend this Spooky Halloween Chocolate-Covered Oreos Recipe enough. These little bites are as cute as they are delicious, combining crunchy Oreos with smooth, colorful candy melts that let you get creative with spooky designs. Whether you’re throwing a Halloween party or just want a sweet snack to get into the festive spirit, these chocolate-covered Oreos are a total crowd-pleaser, and I can’t wait to share all my tips with you!
Why This Recipe Works
- Simple Ingredients: You only need a handful of pantry staples and candy melts to make these festive treats.
- Customizable Designs: The recipe lets you personalize each Oreo with different candy melts and spooky sprinkles, so no two cookies have to look the same.
- Quick and Easy: From start to finish, these take about 20 minutes—perfect for last-minute party prep or fun kitchen time with the kids.
- Eye-Catching Presentation: The colorful candy coatings and fun Halloween toppings make these treats a feast for the eyes as well as the taste buds.

Ingredients & Why They Work
Picking the right ingredients makes all the difference here. The classic Oreos provide that crunchy, chocolaty base everyone loves, while the candy melts bring vibrant Halloween colors and smooth textures that harden just perfectly. I always recommend getting good-quality candy melts because they smoothly coat the Oreos without cracking.
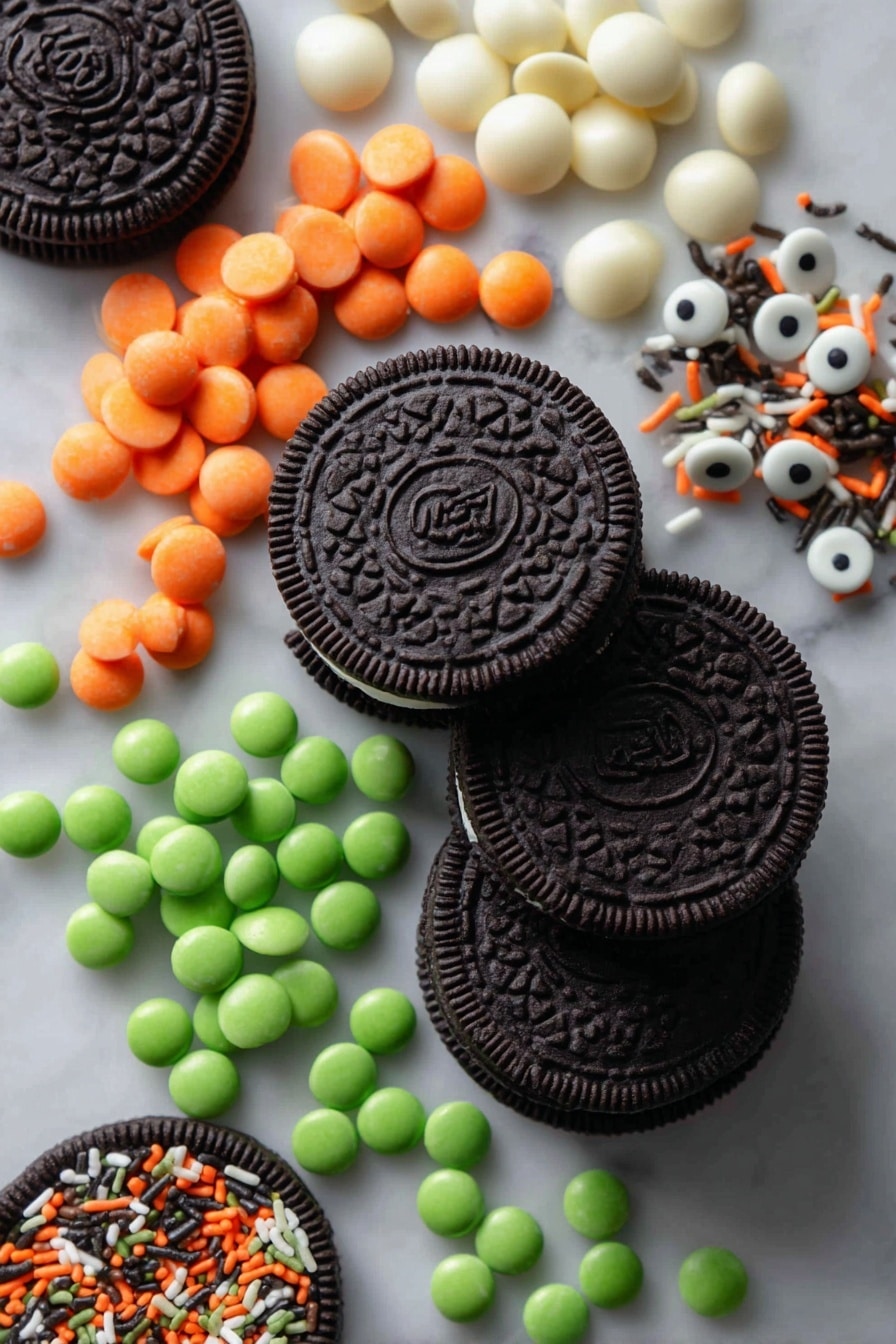
- Oreos: The star cookie! Classic chocolate sandwich cookies work best because their cream filling complements the candy coating.
- White Candy Melts or White Chocolate: Great for making mummy designs and bright details; melts smoothly and hardens nicely.
- Orange Candy Melts: Perfect for that classic Halloween pumpkin vibe; bright and eye-catching.
- Chocolate Chips or Black Candy Melts: Create spooky, dark designs and contrast—black candy melts are easier to handle than chocolate chips for dipping.
- Green Candy Melts: Add extra color and creepy accents—think witchy vibes or monster hues.
- Assorted Halloween Sprinkles (Candy Eyes, Sprinkles): These little accents bring the creepy-cute factor to life and make each Oreo truly festive.
Tweak to Your Taste
I like to switch things up depending on the mood—sometimes adding ghostly white drizzle over the orange Oreos or going all out with a green Frankenstein monster theme. Feel free to experiment with different sprinkle shapes or even add edible glitter for some extra sparkle. The best part? You can take this base recipe as spooky or simple as you want.
- Variation: Once, I swapped the green candy melts with purple and added some little bat sprinkles—super fun and just as delicious.
- Dietary swaps: Using dairy-free or vegan candy melts works just as well if you prefer plant-based treats.
- Make it kid-friendly: Skip the scary sprinkles for little ones and opt for cute stars or hearts instead for a less spooky, more festive vibe.
Step-by-Step: How I Make Spooky Halloween Chocolate-Covered Oreos Recipe
Step 1: Set Up Your Space
I always start by lining a baking sheet with parchment paper—this is your Oreo’s landing zone after dipping, so don’t skip it! It keeps the cookies from sticking and makes cleanup a breeze. Have all your candy melts measured and ready because you’ll be melting one color at a time, and timing is key so the melts don’t harden before you dip all the Oreos.
Step 2: Melt Your Candy
Pop your first set of candy melts in a microwave-safe bowl. I melt mine in 30-second bursts, stirring between each round to get that silky smooth texture without burning. If your melts seem too thick, add a teaspoon of vegetable oil or shortening to loosen them up. Remember, it’s best to melt one color completely and use it all before moving on to the next.
Step 3: Dip the Oreos
Using a chocolate-dipping fork (or a sturdy fork if you don’t have one), dunk each Oreo into the melted candy, flipping to cover both sides. Lift it out and gently tap the fork on the edge of your bowl to shake off excess chocolate—too much coating can make the candy crack when it hardens. Then, place the dipped Oreo on your parchment-lined baking sheet.
Step 4: Add Spooky Details
This is the fun part! While the candy is still soft, quickly add your candy eyes, sprinkles, or other decorations. For the mummy effect, I dip the Oreo in white candy melts first, press on the eyeball candies, chill until set, then drizzle more white candy melts across the top like wrappings before chilling again. It creates layers that really pop!
Step 5: Chill and Set
Pop your decorated Oreos in the fridge for about 10-15 minutes to let the candy harden fully. This step ensures your designs stay perfect and the coating is nice and firm for handling or packaging.
Pro Tips for Making Spooky Halloween Chocolate-Covered Oreos Recipe
- Use Room Temperature Oreos: Cold cookies can cause the candy melts to seize or crack, so keep your Oreos at room temp.
- Work Quickly With Decorations: Candy melts harden fast, so add your eyeballs and sprinkles immediately after dipping to get them to stick.
- Double Dip for Thick Coating: If you want a thicker candy shell, dip each Oreo twice, letting the chocolate set between dips.
- Avoid Humidity: High moisture can cause your candy coating to bloom or get sticky, so make these on a dry day or use an air-conditioned room if possible.
How to Serve Spooky Halloween Chocolate-Covered Oreos Recipe
Garnishes
I usually load mine up with candy eyeballs because they bring an instant creepy-cute vibe, but orange, black, and green sprinkles or edible glitter all add great texture and sparkle. For a little extra flair, I sometimes dust a tiny pinch of edible shimmer dust on top just before serving—it makes them look incredible under party lights!
Side Dishes
These Oreos work beautifully with other Halloween treats like pumpkin spice cupcakes, caramel apples, or a bowl of spooky punch. If you want to put together a themed dessert table, adding fresh fruit and nuts balances the sweetness nicely too.
Creative Ways to Present
I’ve found that arranging these Oreos on a tiered dessert stand decked out with miniature pumpkins and fake cobwebs really amps up the Halloween spirit. You can also package them in clear treat bags tied with orange and black ribbon for easy party favors. One year, I even displayed them standing upright in a styrofoam block covered with black fabric—everyone loved that spooky surprise!
Make Ahead and Storage
Storing Leftovers
I like to store leftover chocolate-covered Oreos in an airtight container at room temperature, away from heat or direct sunlight. They stay fresh for about a week, and the candy coating keeps its crispness without getting sticky. If your kitchen is warm, pop them in the fridge but know that condensation can sometimes dull the shine on your candy melts.
Freezing
Freezing is definitely an option! Just wrap each Oreo individually in plastic wrap and place them in a freezer-safe container. When you’re ready to indulge, thaw them at room temperature to avoid moisture buildup on the candy coating. They hold up surprisingly well and are great to prep well ahead of time if you’re hosting a big Halloween bash.
Reheating
These Oreos don’t really need reheating, but if you want to soften them slightly, leaving them at room temperature for about 15 minutes works best. Avoid the microwave as it can melt the candy coating unpredictably, turning your spooky treats into a messy goo.
FAQs
-
Can I use regular chocolate instead of candy melts for the Spooky Halloween Chocolate-Covered Oreos Recipe?
You absolutely can! However, candy melts are designed to harden with a smooth, shiny finish and come in fun colors, which is perfect for spooky designs. Using regular chocolate works, but it may require tempering for the best results and won’t be as vivid in color.
-
How do I prevent the candy melts from seizing while making this recipe?
Melting candy melts gently in 30-second intervals and stirring between each ensures smooth texture. Adding a small amount of vegetable oil or shortening helps loosen the melt if it gets too thick. Avoid adding water or letting steam get into the bowl, as moisture causes seizing.
-
What decorations work best for the Spooky Halloween Chocolate-Covered Oreos?
Candy eyes, Halloween-themed sprinkles, edible markers for drawing on details, and colored sugar crystals are all fantastic options. Just make sure to add decorations while the coating is still wet so they stick well.
-
How long will these chocolate-covered Oreos last?
Stored properly in an airtight container at room temperature, they stay fresh 5-7 days. Refrigeration can extend that but might affect the candy coating’s texture and shine.
Final Thoughts
This Spooky Halloween Chocolate-Covered Oreos Recipe has been one of my favorite go-to treats for years—not just because it’s adorable and festive, but because it’s so simple to pull off even if you’re not a baking pro. Each batch feels like a little creative project that definitely impresses trick-or-treaters and party guests alike. So grab those Oreos, get your candy melts ready, and have some fun crafting these spooky delights—you’ll be so glad you did!
Print
Spooky Halloween Chocolate-Covered Oreos Recipe
- Prep Time: 20 minutes
- Cook Time: 0 minutes
- Total Time: 20 minutes
- Yield: 36 servings
- Category: Dessert
- Method: No-Cook
- Cuisine: American
Description
Create festive and spooky Halloween chocolate covered Oreos using colorful candy melts and fun sprinkles. This easy no-bake treat transforms classic Oreos into delightful holiday desserts perfect for parties and trick-or-treaters.
Ingredients
Main Ingredients
- 1 package (36 count) Oreos
- 6 oz white candy melts or white chocolate
- 6 oz orange candy melts
- 6 oz chocolate chips or black candy melts
- 6 oz green candy melts
- Assorted Halloween sprinkles such as candy eyes and colored sprinkles
Instructions
- Prepare the Workstation: Line a baking sheet with parchment paper and set aside to place the dipped Oreos for chilling and decorating.
- Melt Candy Melts: In a microwave-safe bowl, melt one color of candy melts (start with any desired color) in 30-second increments, stirring between each until smooth. Use one color at a time for dipping.
- Dip Oreos: Using a chocolate dipping fork, dip each Oreo into the melted candy melts, flipping to coat both sides evenly. Lift the Oreo and tap the fork on the bowl edge to remove excess coating. Place the coated Oreo on the prepared baking sheet.
- Decorate and Chill: While the coating is still wet, decorate with Halloween sprinkles like candy eyes, sprinkles, or other themed decorations. For mummy designs, dip Oreos in white candy melts, add candy eyes, chill to set, then drizzle additional melted white candy melts on top and chill again for a layered effect.
- Repeat for Other Colors: Repeat the dipping, decorating, and chilling process for the remaining Oreos using different candy melt colors to create a variety of spooky designs.
- Set and Serve: Once all Oreos are dipped and decorated, chill them in the refrigerator until the coating is fully set before serving or packaging.
Notes
- Use a chocolate dipping fork or a fork with small spacing to easily dip the Oreos without breaking them.
- Work with one color of candy melts at a time to prevent mixing colors and to keep the melts smooth.
- Chill Oreos between decorating steps to help candy melts set quickly and maintain design integrity.
- Substitute candy melts with colored white chocolate melts if preferred.
- Store the finished chocolate covered Oreos in an airtight container in a cool place or refrigerate for up to one week.
- If candy melts thicken while working, remelt them in 10-second bursts to maintain the right consistency.
Nutrition
- Serving Size: 1 Oreo
- Calories: 150 kcal
- Sugar: 15 g
- Sodium: 90 mg
- Fat: 7 g
- Saturated Fat: 4 g
- Unsaturated Fat: 2 g
- Trans Fat: 0 g
- Carbohydrates: 22 g
- Fiber: 1 g
- Protein: 1 g
- Cholesterol: 0 mg


