Spooky Halloween Chocolate Covered Oreos Recipe
If you’re looking for a fun, festive treat to really wow at your next Halloween party, you’ve got to try this Spooky Halloween Chocolate Covered Oreos Recipe. These little beauties are not only adorable with their fun designs but also delightfully delicious—perfect for satisfying that sweet tooth while getting into the Halloween spirit. I promise, once you make these, they’ll be the centerpiece of your spooky spread. So stick with me, and I’ll walk you through everything to make these treats just right!
Why This Recipe Works
- Easy and Fun to Make: Melting and dipping Oreos is simple enough for all skill levels but feels playful enough for a festive activity.
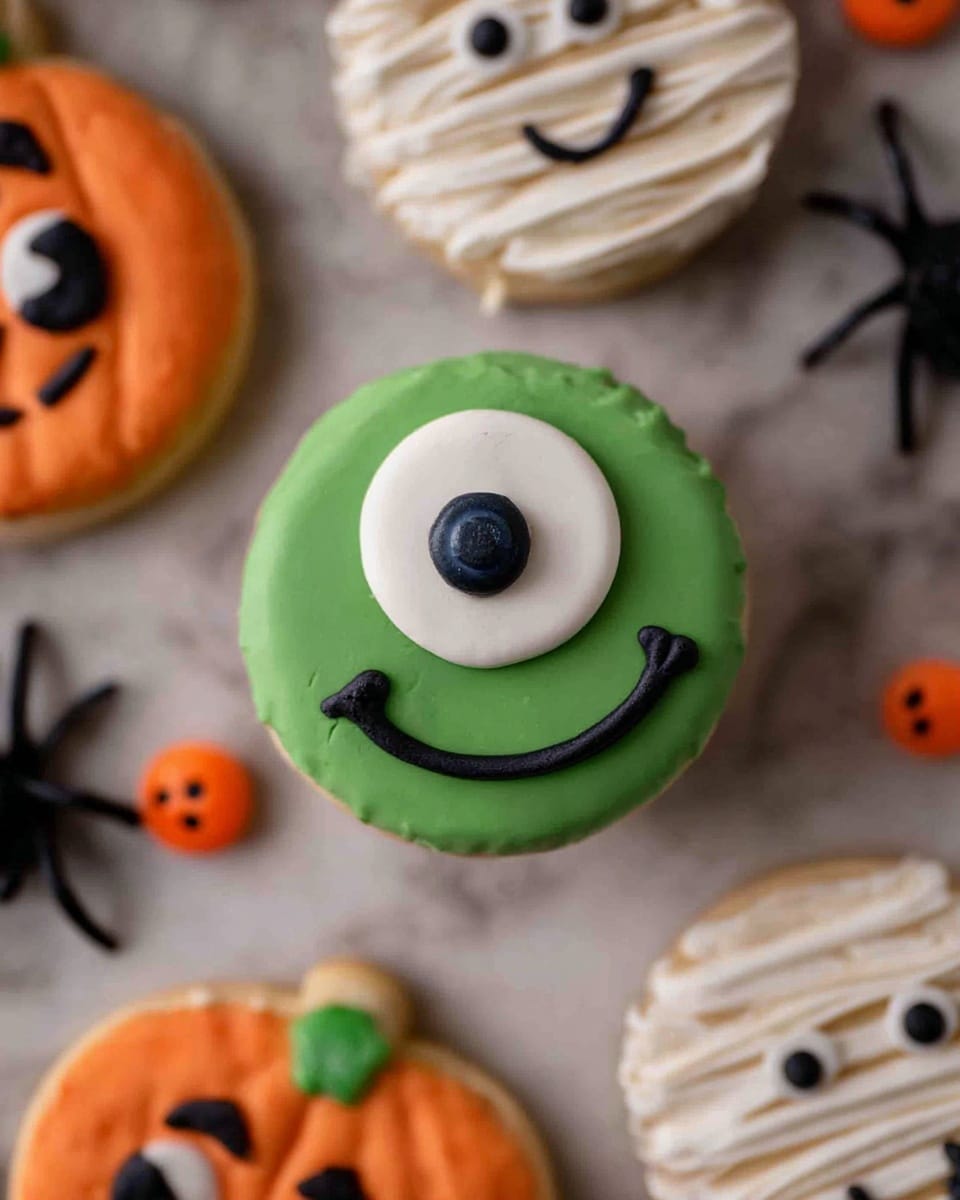
- Multiple Color Options: Using different colored candy melts lets you get creative with spooky designs like mummies, pumpkins, and monsters.
- Perfect Balance of Crunch & Sweetness: The classic Oreo crunch combined with smooth chocolate melts in your mouth every time.
- Festive Decorations: Adding candy eyes and sprinkles gives your treats that extra wow-factor with minimal effort.

Ingredients & Why They Work
This Spooky Halloween Chocolate Covered Oreos Recipe uses simple ingredients that really complement each other—classic Oreos for the perfect cookie base, along with white, orange, green, and black candy melts that provide vibrant colors and smooth coating. These candy melts make decorating a breeze since they melt easily and harden quickly for holding your designs in place.
- Oreos: The all-time favorite cookie that holds the entire treat together with that iconic chocolate crunch and creamy filling.
- White Candy Melts: Great for creating spooky mummy wraps or ghostly bases thanks to their bright, smooth finish.
- Orange Candy Melts: Perfect for pumpkin-themed Oreos, adding the classic Halloween color with ease.
- Chocolate Chips or Black Candy Melts: These give you a rich contrast and work wonderfully for spider webs, bats, or outlining designs.
- Green Candy Melts: Awesome for monster or alien blobs with that eerie green hue everyone loves during Halloween.
- Assorted Halloween Sprinkles and Candy Eyes: Small details like candy eyes and sprinkles bring your Oreos to life with fun, spooky personality.
Tweak to Your Taste
One of the best parts about this Spooky Halloween Chocolate Covered Oreos Recipe is how flexible it is. I love to add my own twist depending on the mood or who’s eating them. You can totally make this recipe your own by swapping out colors, adding different sprinkles, or mixing in flavors you like best.
- Variation: I once made a batch using dark chocolate candy melts instead of black—they gave a deep richness but kept the spooky vibe. It was a hit with my older kids!
- Dietary Twist: Use vegan Oreos and dairy-free candy melts if you want a plant-based option that still amazes.
- Seasonal Mix: While this is perfect for Halloween, I sometimes swap the eyes and sprinkles for hearts and red candies to make these for Valentine’s Day.
- Difficulty Level: If you’re short on time, you can skip the drizzle decorations and just dip with one color, still super tasty and quick.
Step-by-Step: How I Make Spooky Halloween Chocolate Covered Oreos Recipe
Step 1: Prep Your Workspace
Start by lining a baking sheet with parchment paper—trust me, this makes cleaning up a breeze and stops your Oreos from sticking. Then, separate your Oreos and get your candy melts ready. Having everything at arm’s reach saves time and keeps the process smooth. I like to melt one color at a time so the candy melts don’t harden before I use them.
Step 2: Melt Candy Melts Carefully
Place 6 oz of your chosen candy melt in a microwave-safe bowl. Microwave in 30-second bursts, stirring in between, to avoid burning. Perfectly melted candy melts will be silky smooth—no clumps! I’ve found if you rush this part, the chocolate can seize up, so patience is key here.
Step 3: Dip and Decorate Like a Pro
Using a chocolate-dipping fork or toothpicks works beautifully for dipping your Oreos. Dip each Oreo fully, flip it to coat both sides, then gently tap the fork against the bowl’s edge to remove extra chocolate. Place the coated Oreo on the parchment-lined sheet. For the mummy design, dip in white candy melts, stick on candy eyes while it’s still wet, chill to set, then add a thin drizzle of the same white candy melt for wrapping effect. Let that chill again until firm.
Step 4: Repeat and Chill
Repeat the dipping and decorating process with all Oreos. Place the tray in the fridge for about 15–20 minutes to let the chocolate harden completely. This chill time is essential so your decorations don’t slide off and your Oreos keep that professional, spooky look.
Pro Tips for Making Spooky Halloween Chocolate Covered Oreos Recipe
- Use Candy Melts, Not Chocolate Chips: Candy melts are designed to harden smoothly and hold their shape at room temp, unlike regular chocolate that can melt and get soft.
- Work Quickly But Carefully: Candy melts harden fast, so dip and decorate a few Oreos at a time to avoid clumps or streaks.
- Add Sprinkles While Wet: Place your Halloween sprinkles, especially candy eyes, immediately after dipping to ensure they stick securely.
- Avoid Humidity: I learned the hard way that humidity can make the candy melts sticky—try to keep your kitchen cool and dry for best results.
How to Serve Spooky Halloween Chocolate Covered Oreos Recipe
Garnishes
I love to finish off these chocolate covered Oreos with a few of my favorite Halloween sprinkles—candy eyeballs, edible glitter, or even little bat and pumpkin shapes. They’re super easy to find around this time of year, and they really add to the spooky vibe. Plus, kids LOVE picking out their favorite eyes and sparkles to decorate their own cookies.
Side Dishes
These Oreos shine as a standalone treat, but if you want to round out your spooky spread, I like pairing them with a big bowl of popcorn (maybe sprinkled with orange and black sugar) or some freshly brewed hot apple cider. The cider’s warmth balances the sweet, crunchy cookies perfectly.
Creative Ways to Present
For a party, arranging your Spooky Halloween Chocolate Covered Oreos Recipe on a tiered dessert stand instantly amps up their wow factor. I’ve also placed them in a black cauldron bowl surrounded by faux spider webs and plastic spiders—it’s a total hit with guests. If you want to get extra crafty, placing each Oreo in a mini cupcake liner or wrapping them in clear gift bags tied with orange ribbon makes them adorable favors too!
Make Ahead and Storage
Storing Leftovers
If you have leftovers—and I bet you will—store your chocolate covered Oreos in an airtight container layered between parchment paper. I keep mine at room temperature if it’s a cool day, but if it’s warm and humid, the fridge works best. Just remember to let them come to room temp before serving so the chocolate softens slightly for the perfect bite.
Freezing
I’ve frozen these chocolate covered Oreos for up to a month with great success. Just layer them carefully in a freezer-safe container with parchment between layers to avoid sticking. When you’re ready, transfer them to the fridge overnight to thaw gently—this helps maintain their texture and flavor.
Reheating
Since these are no-bake treats, reheating isn’t really necessary. But if you want a warm melt-in-your-mouth effect, pop one in the microwave for 5-7 seconds at a time—just don’t let the chocolate get too hot or it’ll lose its shape. A warm Oreo bite is surprisingly good!
FAQs
-
Can I use regular chocolate instead of candy melts for this recipe?
You can use regular chocolate chips, but candy melts are easier to work with because they’re designed to harden smoothly and quickly without tempering. Regular chocolate might be a bit trickier—it can seize or take longer to set—so if you want the best results with minimal fuss, stick with candy melts.
-
How long do these Spooky Halloween Chocolate Covered Oreos stay fresh?
Stored in an airtight container at room temperature, these treats stay delicious for about 3-5 days. If you refrigerate them, they can last up to a week, but make sure to bring them back to room temp before enjoying for the best texture.
-
What’s the best way to attach candy eyes so they don’t fall off?
Place candy eyes on the Oreo right after dipping it in melted candy before the coating sets—that way, the eyes stick firmly as the chocolate hardens. If you try to add them after the candy melt is dry, they won’t adhere well.
-
Can I double or triple this recipe for a bigger crowd?
Absolutely! You can easily scale up your batches—just melt one color at a time in larger bowls or multiple batches to avoid candy melt hardening before use. Making these in batches ensures each Oreo gets perfect coverage and decorations.
Final Thoughts
This Spooky Halloween Chocolate Covered Oreos Recipe holds a special place in my heart because it turns something so simple—Oreos and candy melts—into a festive project that brings people together. Whether you’re baking with kids or just want a quick and adorable dessert, these treats deliver every time. I hope you enjoy making (and eating) them as much as I do. Give them a try—you’ll be impressed at how easy and fun Halloween baking can be!
Print
Spooky Halloween Chocolate Covered Oreos Recipe
- Prep Time: 20 minutes
- Cook Time: 0 minutes
- Total Time: 20 minutes
- Yield: 36 servings
- Category: Dessert
- Method: No-Cook
- Cuisine: American
Description
Create festive and spooky Halloween treats with these chocolate covered Oreos, dipped in colorful candy melts and decorated with fun Halloween-themed sprinkles and candy eyes. Perfect for parties and trick-or-treaters, this simple no-bake recipe transforms classic Oreos into delightful spooky snacks.
Ingredients
Chocolate Coatings
- 6 oz white candy melts or white chocolate
- 6 oz orange candy melts
- 6 oz chocolate chips or black candy melts
- 6 oz green candy melts
Base
- 1 package Oreos (36 Oreos)
Decorations
- Assorted Halloween sprinkles like candy eyes and festive sprinkles
Instructions
- Prepare Baking Sheet: Line a baking sheet with parchment paper and set it aside to place the dipped Oreos as you decorate.
- Melt Candy Coatings: In a microwave-safe bowl, melt one color of candy melts or chocolate at a time. Heat in 30-second increments, stirring between each until completely smooth and melted.
- Dip Oreos: Using a chocolate dipping fork, dip each Oreo into the melted coating, flipping to fully coat both sides. Lift the Oreo out and tap the fork on the bowl edge to remove excess chocolate.
- Decorate: Place each dipped Oreo on the prepared baking sheet. While still wet, decorate with spooky candy eyes or Halloween-themed sprinkles to your liking.
- Make Mummy Design: For the mummy design, dip the Oreo in white candy melts, place an eyeball candy on it, then chill on the baking sheet until set. Finish by drizzling more melted white candy melts over the Oreo to create a bandage effect, then chill again until fully hardened.
- Repeat Process: Continue dipping and decorating the remaining Oreos with different colors and decorations as desired.
- Chill to Set: Chill the decorated Oreos in the refrigerator until all coatings are fully set and firm before serving.
Notes
- Melt only one candy color at a time to prevent hardening and to keep coatings smooth for dipping.
- Use a dipping fork for easy coating and to reduce excess chocolate drip on the Oreos.
- Chill Oreos between layers when doing designs like the mummy to ensure coatings set properly without mixing colors.
- Substitute candy melts with colored white chocolate if preferred.
- Store decorated Oreos in an airtight container to keep them fresh and prevent moisture from ruining the candy coating.
Nutrition
- Serving Size: 1 Oreo
- Calories: 150 kcal
- Sugar: 15 g
- Sodium: 120 mg
- Fat: 7 g
- Saturated Fat: 4 g
- Unsaturated Fat: 2 g
- Trans Fat: 0 g
- Carbohydrates: 20 g
- Fiber: 1 g
- Protein: 1 g
- Cholesterol: 0 mg
