Snowman Face Cookies Recipe
If you’re looking for a charming cookie that’s as fun to decorate as it is delicious to eat, you’ve got to try this Snowman Face Cookies Recipe. These little winter-themed treats are perfect for holiday gatherings, gifting, or just cozying up with a cup of cocoa on a chilly day. I’ve made these countless times, and honestly, they never fail to bring a smile – partly because they’re so adorable and partly because they taste great! The best part? You don’t have to be a pro baker to make them look fantastic. Stick with me and I’ll walk you through it all.
Why This Recipe Works
- Simple Ingredients: Uses accessible pantry staples and a cake mix base for easy prep without sacrificing flavor.
- Fun & Customizable: Decorating is easy and fun, letting you make each snowman uniquely yours.
- Timely: Quick bake time means you’ll have festive cookies fresh in just about 30 minutes.
- Kid-Friendly: Perfect for making with kids — the assembly and decorating bring out everyone’s creativity.

Ingredients & Why They Work
This Snowman Face Cookies Recipe comes together with a wonderful balance of texture and flavor. The white cake mix keeps the dough soft and tender, while the buttercream frosting adds creamy sweetness that sticks perfectly to the sanding sugar for a wintry sparkle. Each decorating ingredient adds character and personality to your snowmen, making the whole experience a joy from start to finish. Here’s what you’ll need and why I like each choice.
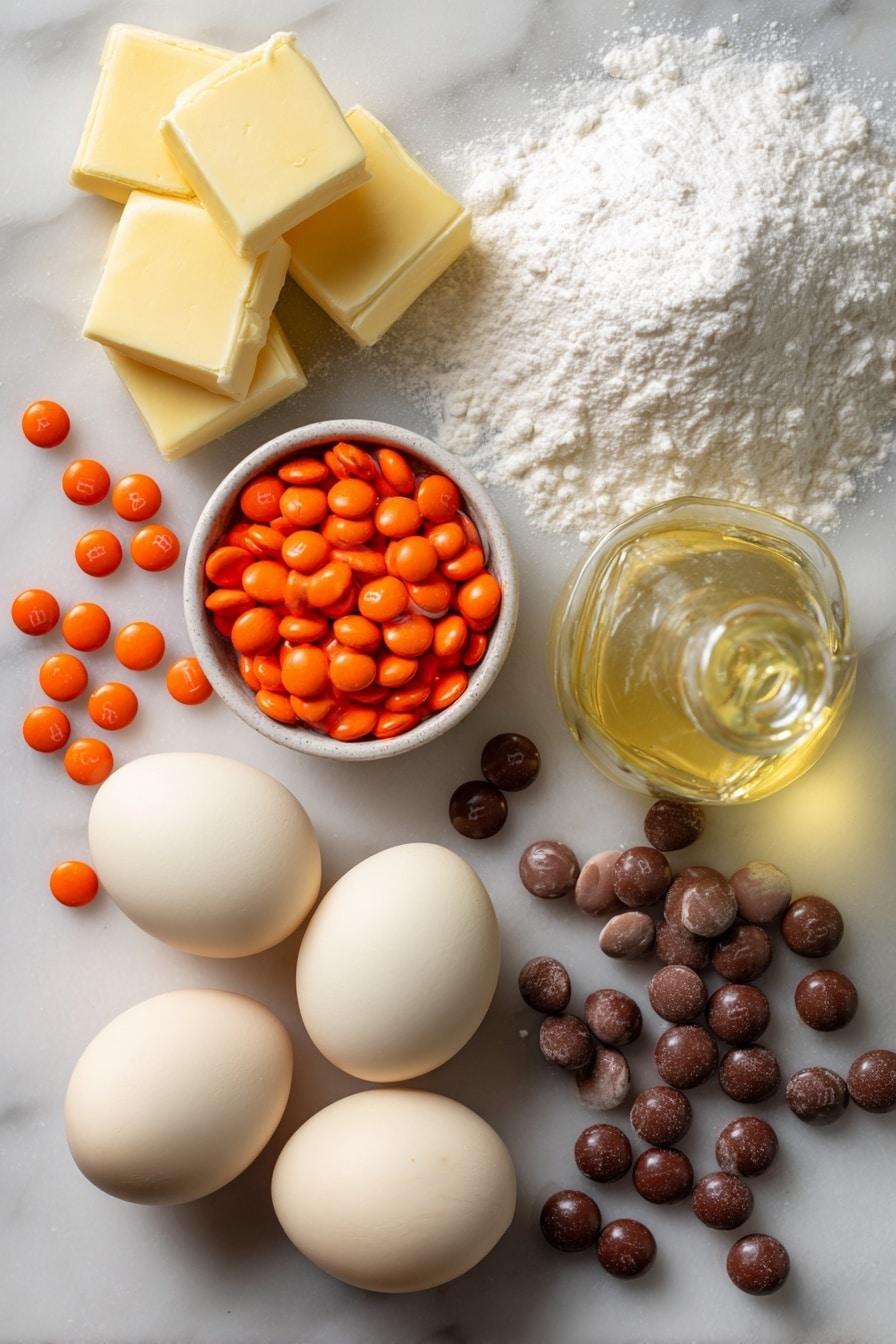
- White cake mix: The foundation for the cookie dough — it keeps things moist and gives these cookies a tender crumb.
- Eggs: Helps bind the dough together, creating the perfect consistency to scoop and bake.
- Canola oil: Adds moisture and keeps the cookies soft but slightly chewy on the edges.
- Unsalted butter (softened): The base for the buttercream frosting — softened for easy beating and creamy texture.
- Powdered sugar: Sweetens and thickens the frosting beautifully, providing that silky finish.
- Vanilla extract: Adds a warm, comforting flavor that pairs perfectly with the sweetness of the cookies.
- Salt: Just a pinch to balance the sweetness and elevate flavors.
- Milk or cream: Adjusts frosting consistency for easy spreading.
- White sanding sugar: For that festive snow sparkle and a little crunch on top.
- Orange Dot candies: Use as the cute little carrot noses — they pop color and flavor!
- Regular brown M&Ms: For the eyes — dependable, tasty, and easy to work with.
- Mini brown M&Ms: Perfect for creating the curved mouths — their size makes all the difference for expression.
Tweak to Your Taste
The beauty of this Snowman Face Cookies Recipe is how straightforward it is to personalize. Over the years, I’ve tried swapping out a few ingredients to suit different occasions or dietary needs — and each time the fun of decorating remains front and center. Don’t be shy about making this cookie design your own.
- Variation: I once swapped orange Dot candies for mini candy canes as noses — gave the snowmen a fun peppermint twist that friends loved.
- Dietary Modification: Use dairy-free butter and plant-based milk to make the frosting vegan-friendly without losing texture or flavor.
- Seasonal swap: For non-winter celebrations, swap brown M&Ms for colorful ones and orange noses for red or green candies to match your theme.
Step-by-Step: How I Make Snowman Face Cookies Recipe
Step 1: Mix Your Cookie Dough
Start by preheating your oven to 350°F and lining two baking sheets with parchment paper — trust me, this makes cleanup a breeze! In a large bowl, combine the white cake mix, eggs, and canola oil until you have a cohesive dough. It’ll be soft but scoopable. Using a medium cookie scoop (I love this tool for uniform cookie sizes), portion the dough onto your sheets about 2 inches apart. This spacing helps them bake evenly without sticking.
Step 2: Bake and Cool the Cookies
Bake for 9-11 minutes, keeping a close eye to ensure the edges are set but the centers are still soft for that perfect tender bite. Once out of the oven, let them cool on the baking sheet for a few minutes because they’re delicate when hot, then transfer carefully to a wire rack to cool completely. Patience here pays off — frosting warm cookies can melt your hard work!
Step 3: Whip Up the Buttercream
While your cookies cool, it’s frosting time! Beat your softened butter with an electric mixer until it’s super smooth and creamy. Gradually add powdered sugar, vanilla, salt, and 1 tablespoon of milk or cream. The frosting might look stiff initially, but keep mixing and add a little more milk if needed until it’s spreadable but not runny. A soft, creamy texture makes it easy to frost without tearing the cookies.
Step 4: Decorate Your Snowman Faces
Spread a nice layer of buttercream on each cooled cookie using a small offset spatula or knife. Immediately after frosting, sprinkle white sanding sugar over the top to give that snowy sparkle effect. Now for the fun part — use an orange Dot candy in the center for the nose, place two regular brown M&Ms for the eyes, and arrange the mini brown M&Ms in a friendly curved smile. Don’t worry if your first few aren’t perfect — each snowman has its own charm!
Step 5: Let Your Creations Set
Give your frosted cookies a bit of time to let the frosting set before stacking or serving. This makes them easier to handle and helps the decorations stay put. Then, you can either enjoy immediately or store them as explained below.
Pro Tips for Making Snowman Face Cookies Recipe
- Perfect Cookie Size: Use a medium cookie scoop to ensure all cookies bake evenly and fit your decorating layout perfectly.
- Frost When Cool: Always frost fully cooled cookies to avoid melting the buttercream and losing your sanding sugar’s sparkle.
- Work Quickly with Decorations: Sprinkle the sanding sugar right after frosting so it sticks before the frosting firms up.
- Store in Airtight Containers: Keeps your cookies fresh and soft for days; I learned this the hard way after letting one batch go stale!
How to Serve Snowman Face Cookies Recipe
Garnishes
I usually keep the garnishes simple since the cookies themselves make a big statement. But, if I’m feeling extra festive, I like adding a light dusting of powdered sugar over the whole tray to mimic fresh snow. Sometimes, a few edible glitter sprinkles add a magical winter sparkle that makes these cookies feel super special.
Side Dishes
These snowman cookies are perfect alongside a cozy cup of hot chocolate topped with marshmallows. They also pair beautifully with mulled cider or a spiced chai latte, making them the ultimate treat for a winter afternoon snack or holiday party platter.
Creative Ways to Present
For gift-giving, I love packaging these cookies in a clear cellophane bag tied with a festive ribbon and a cute snowman-themed gift tag. When serving at parties, arrange them on a snowflake-shaped platter or nestle them among pine branches to create an eye-catching wintery display. If you’re baking with kids, turning decorating into a “build your own snowman” station is always a hit.
Make Ahead and Storage
Storing Leftovers
I store leftover decorated cookies in a single layer inside an airtight container at room temperature. They stay fresh and soft for 3-4 days, which lets me enjoy a few without worrying about them getting stale. If you live somewhere humid, pop a small silica packet in the container to keep moisture levels in check.
Freezing
I’ve also frozen the plain cookies (undecorated) for up to 3 months by sealing them tightly in a freezer bag. When I’m ready, I just thaw them at room temperature and then frost and decorate fresh. This approach is perfect if you want to prep cookies ahead for a party or event.
Reheating
Since these are cookies, you really don’t need to reheat them. But if you prefer a slightly warm cookie, gently microwave a frosted one for about 10 seconds — just enough to soften the frosting a bit without melting it. This makes for a cozy, fresh-out-of-the-oven experience any time.
FAQs
-
Can I use a different cake mix flavor for this Snowman Face Cookies Recipe?
Absolutely! While white cake mix gives a nice neutral base that mimics classic sugar cookies, you can experiment with vanilla or even funfetti cake mixes for a colorful twist. Just note that colors and flavors might slightly change the final look and taste.
-
How do I prevent the buttercream from melting when decorating?
The key is to make sure your cookies are completely cool before you spread on the buttercream. Warm cookies cause the frosting to melt and lose its shape. Also, work in a cool room and avoid handling the frosting too long outside the fridge if your kitchen is warm.
-
Can I make these cookies gluten-free?
To make this Snowman Face Cookies Recipe gluten-free, simply swap the white cake mix for a gluten-free version that you trust. Make sure the other ingredients like candies are also gluten-free certified to keep everything safe.
-
What’s the best way to store decorated cookies for gifting?
Layer your decorated cookies between sheets of parchment paper inside an airtight container. For gifting, pack them gently in a sturdy box and tie with festive ribbons. Keep in a cool, dry place and try to give your gifts within a week for best freshness.
Final Thoughts
Honestly, this Snowman Face Cookies Recipe has become a feel-good staple in my kitchen during the colder months. It’s a simple treat that brings a lot of joy — whether you’re making it with friends, family, or just as a little self-care moment. The ease of the recipe combined with the endless decorating possibilities makes it a win for pretty much any occasion. I hope you’ll give it a try and see your own snowmen come to life with personality! Happy baking and have fun spreading some sweet winter cheer.
Print
Snowman Face Cookies Recipe
- Prep Time: 20 minutes
- Cook Time: 11 minutes
- Total Time: 31 minutes
- Yield: 18 cookies
- Category: Dessert
- Method: Baking
- Cuisine: American
- Diet: Vegetarian
Description
Delightfully festive Snowman Face Cookies made from a simple white cake mix cookie base, topped with creamy vanilla buttercream and decorated with colorful candies to create charming snowman faces. Perfect for holiday gatherings and winter celebrations, these cookies combine easy baking and fun decorating.
Ingredients
Cookies
- 1 (15.25 ounce) box white cake mix
- 2 large eggs
- 1/2 cup canola oil
Buttercream
- 1/2 cup unsalted butter, softened
- 2 cups powdered sugar
- 1 teaspoon vanilla extract
- 1/4 teaspoon salt
- 1-2 tablespoons milk or cream
Decoration
- 1/2 cup white sanding sugar
- 18 orange Dot candies for noses
- 36 regular brown M&Ms for eyes
- 90 mini brown M&Ms for mouths
Instructions
- Preheat Oven: Preheat your oven to 350 degrees Fahrenheit and line two baking sheets with parchment paper to prevent sticking and ensure even baking.
- Prepare Cookie Dough: In a large bowl, combine the white cake mix, 2 large eggs, and 1/2 cup canola oil. Mix thoroughly until a smooth dough forms.
- Portion Dough: Use a medium cookie scoop to drop dough portions onto the prepared baking sheets, spacing each cookie about 2 inches apart to allow for spreading.
- Bake Cookies: Bake the cookies for 11 minutes or until the edges are set and slightly golden. Remove from oven and allow to cool on the baking sheet for a few minutes.
- Cool Cookies: Transfer cookies to a wire rack to cool completely before frosting to prevent melting.
- Make Buttercream: In a large bowl, beat 1/2 cup softened unsalted butter with an electric mixer until smooth and creamy. Gradually add 2 cups powdered sugar, 1 teaspoon vanilla extract, 1/4 teaspoon salt, and 1 tablespoon milk or cream. Beat until smooth, adding up to 1 more tablespoon milk or cream if needed to reach spreadable consistency.
- Frost Cookies: Spread a layer of the buttercream on each cooled cookie using a knife or small offset spatula for even coverage.
- Decorate: Immediately sprinkle 1/2 cup white sanding sugar over the frosted cookies. Place one orange Dot candy in the center of each cookie to represent the nose. Add two regular brown M&Ms for eyes, and arrange mini brown M&Ms in a curved pattern to form the smiling mouths.
- Set and Serve: Allow the buttercream to set before serving. Enjoy your festive snowman cookies!
Notes
- Store cookies in an airtight container at room temperature to maintain freshness for 3-4 days.
- Undecorated cookies can be frozen for up to 3 months; thaw at room temperature before decorating.
- Substitute canola oil with vegetable oil if preferred.
- Adjust milk or cream in buttercream to achieve desired frosting consistency.
- For a gluten-free version, use a gluten-free white cake mix.
Nutrition
- Serving Size: 1 cookie
- Calories: 180 kcal
- Sugar: 16 g
- Sodium: 130 mg
- Fat: 9 g
- Saturated Fat: 4 g
- Unsaturated Fat: 4 g
- Trans Fat: 0 g
- Carbohydrates: 22 g
- Fiber: 0.5 g
- Protein: 1 g
- Cholesterol: 20 mg

