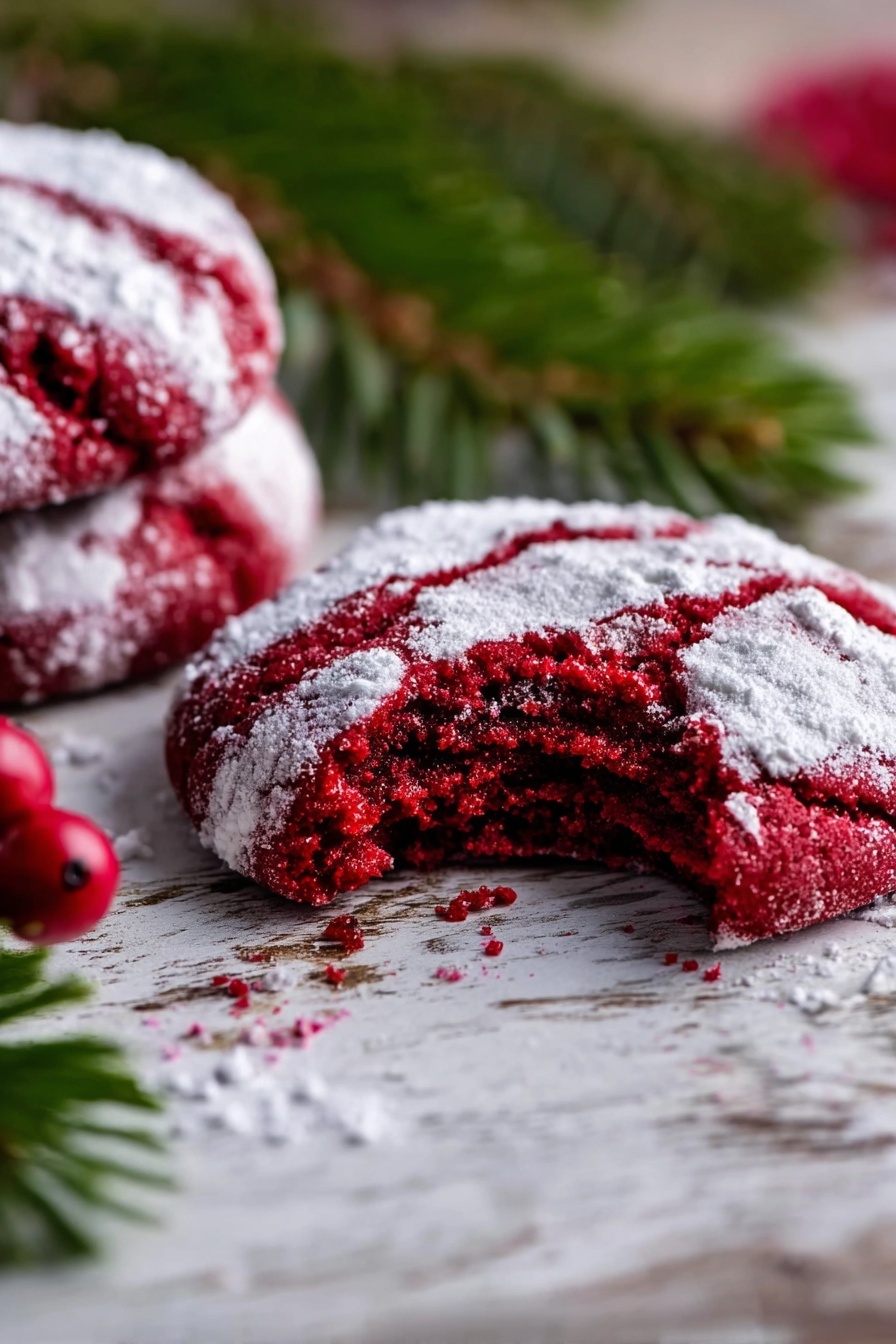
Red Velvet Crinkle Cookies Recipe
If you adore the classic flavors of red velvet cake but want a fun, hand-held treat, you’re going to flip for this Red Velvet Crinkle Cookies Recipe. These cookies have that perfect balance of soft and chewy with a dreamy cocoa undertone wrapped in a delicate crackled powdered sugar crust. Seriously, every bite feels like a tiny celebration, and once you try this recipe, I bet you’ll make it your go-to for holidays, gift giving, or anytime you crave a sweet little pick-me-up!
Why This Recipe Works
- Perfect Texture Balance: The combination of baking powder and baking soda gives these cookies a tender, fluffy inside with just the right chew.
- Classic Red Velvet Flavor: Cocoa powder and vanilla blend seamlessly with red food coloring for that signature look and taste.
- Chilled Dough for Easy Handling: Chilling the dough makes shaping so much simpler and helps the cookies keep their crinkle shape while baking.
- Powdered Sugar Coating: Rolling the dough balls in powdered sugar creates that irresistible crinkle effect and a slight sweetness on the exterior.

Ingredients & Why They Work
Each ingredient in this Red Velvet Crinkle Cookies Recipe has a purpose to build flavor and texture. Knowing why helps you appreciate how everything comes together — plus I’ll share tips to get your best batch every time.
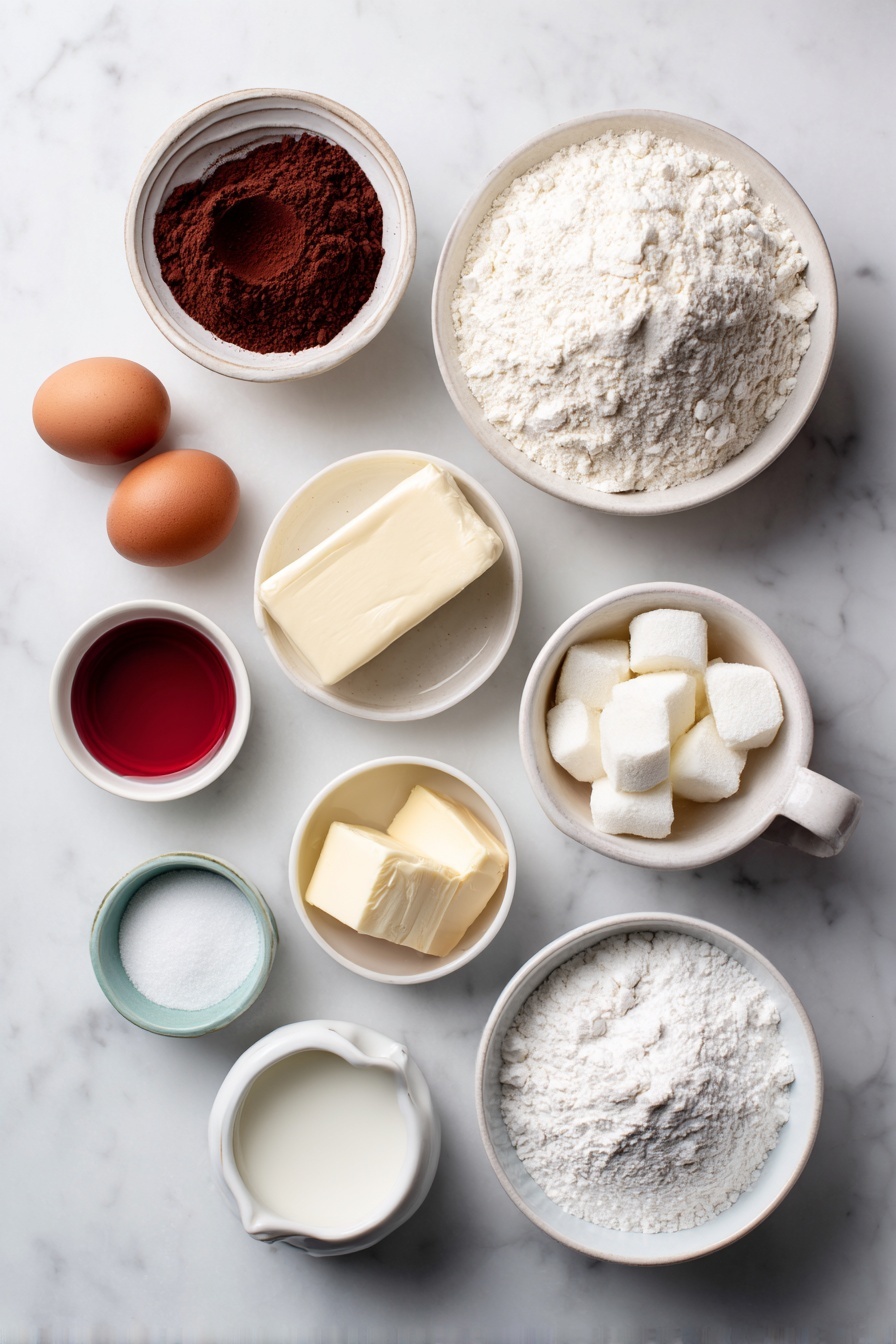
- All-purpose flour: The sturdy base for your cookies; don’t skimp on measuring accurately for the right chew.
- Unsweetened cocoa powder: Adds that subtle chocolate flavor essential to red velvet — use Dutch-processed for a deeper color if you like.
- Baking powder and baking soda: Work together to give the cookies lift and tenderness.
- Salt: Enhances the chocolate and balances sweetness.
- Unsalted butter: Softened butter whips air into the dough for a light, tender cookie.
- Granulated sugar: Sweetens without weighing down the dough.
- Eggs: Provide structure and richness, added one at a time for better mixing.
- Milk: Adds moisture to keep the dough soft and easy to form.
- Vanilla extract: Brings warmth and depth to the flavor.
- Red food coloring: The star of the show; gel colors work best for vibrant hue without thinning the dough.
- Powdered sugar: For coating, creating that classic crackled appearance and a hint of extra sweetness.
Tweak to Your Taste
I love to make this Red Velvet Crinkle Cookies Recipe my own by playing with a few fun variations — and you can, too! Don’t hesitate to mix it up based on what you have or your flavor preferences.
- White Chocolate Chips: Adding a handful to the dough gives the cookies sweet pockets of creamy goodness; it’s my go-to for extra indulgence.
- Less Food Coloring: If you’re not into a super bright red, just cut back the food coloring a bit — the flavor still shines through.
- Gluten-Free Flour Blend: I swapped in a 1:1 gluten-free blend once, and the texture stayed soft and lovely with just a smidge more crumbly charm.
- Vegan Version: Use dairy-free butter and flax eggs — it takes a couple tries to nail the texture, so be patient and tweak as you go.
Step-by-Step: How I Make Red Velvet Crinkle Cookies Recipe
Step 1: Mix your dry ingredients with care
I always start by whisking together the flour, cocoa powder, baking powder, baking soda, and salt in a small bowl — this ensures everything is evenly distributed and prevents any bitter pockets of cocoa powder. Set that aside because you’re going to want it ready when you start combining wet ingredients.
Step 2: Whip the butter and sugar to cloud-like fluff
Using your mixer, beat the softened unsalted butter and granulated sugar until the mixture is light and fluffy — I usually do this for about 3-5 minutes. This step is key to those soft cookies, so don’t rush it! If your butter’s too cold, the texture won’t be right, so it’s worth letting it sit out until perfectly soft.
Step 3: Add eggs and flavorings slowly
Next, mix in the eggs one at a time, making sure each is fully incorporated before adding the next. Then stir in the milk, vanilla extract, and that gorgeous red food coloring. I personally love using gel color for a vibrant red without washing out the dough.
Step 4: Bring it all together gently
Slowly add your dry ingredients to the wet mix on low speed, just until combined. Overmixing here can make the cookies tough, so stop as soon as you don’t see any flour. Then pop the dough in the fridge for about 1 ½ hours to make it firm enough to handle.
Step 5: Shape, coat, and bake
Preheat your oven to 350°F (175°C). Pour powdered sugar into a small bowl. Scoop dough using a tablespoon or cookie scoop (I like about 2 tablespoons per cookie) and, with slightly buttered hands to prevent sticking, roll each ball in powdered sugar until fully coated. Place them on a Silpat or parchment-lined baking sheet and press each ball lightly to flatten just a bit.
Bake for 13–14 minutes, watching that they keep their shape but don’t over-brown—you want the crinkles and that soft center. Let them rest on the sheet for 5 minutes before transferring to a wire rack to cool completely. This step helped me avoid breaking cookies when moving them hot.
Pro Tips for Making Red Velvet Crinkle Cookies Recipe
- Butter Softness Matters: Let your butter come to room temperature naturally; using the microwave often melts it too much, changing your cookie texture.
- Chill That Dough Well: Don’t skip the chilling — it makes the rolling and coating so much easier and helps cookies hold their signature crinkle.
- Even Coating with Powdered Sugar: Use a deep bowl for rolling so the dough balls get fully dusted, creating dramatic cracks and a beautiful snowy finish.
- Watch Your Oven Time: These cookies can go from perfect to overdone fast; start checking at 13 minutes for that tender middle and soft edges.
How to Serve Red Velvet Crinkle Cookies Recipe
Garnishes
While I love these cookies plain and dusted with powdered sugar, adding a sprinkle of edible glitter really amps up the festive vibes for special occasions. Sometimes I even press a small white chocolate chip or a festive candy heart gently on top right after baking — it melts slightly and looks darling!
Side Dishes
Pair these crinkle cookies with a cold glass of milk or a steaming latte for a cozy treat. I also enjoy serving them alongside rich vanilla ice cream or even a dollop of whipped cream during dessert gatherings — it’s like a mini red velvet party on your plate.
Creative Ways to Present
For holidays, I arrange the Red Velvet Crinkle Cookies in a circle on a festive platter dusted with cocoa powder, adding fresh mint leaves in the center for a pop of color. Wrapping a handful in cellophane tied with a rustic twine bow also makes for a charming homemade gift. I’ve even layered them in a glass jar with red and white candy cane bits for a stunning edible centerpiece!
Make Ahead and Storage
Storing Leftovers
Store your baked cookies in an airtight container at room temperature. I usually keep mine in a single layer with parchment paper in between if stacking, so they don’t stick. They’ll stay fresh and soft for about 4-5 days, perfect for enjoying during the week or sharing with friends.
Freezing
If you want to prep ahead, the dough freezes beautifully. After chilling but before rolling, portion the dough into balls and freeze them on a baking sheet before transferring to a zip-top bag. When you’re ready, just bake from frozen, adding a minute or two to the baking time. This trick saved me during busy holidays more than once!
Reheating
Leftover cookies warm up like a dream — just pop them in the microwave for 15 seconds or the oven at 300°F for 5 minutes. They come out with that fresh-baked softness and you’ll swear they just came from the oven.
FAQs
-
Can I use natural cocoa powder instead of Dutch-processed for this Red Velvet Crinkle Cookies Recipe?
Yes, you can use natural cocoa powder, but it might result in a slightly different color and flavor. Dutch-processed cocoa is less acidic and gives a deeper red color, while natural cocoa can give a tangier chocolate taste that is still delicious.
-
Why do I need to chill the dough for these red velvet crinkle cookies?
Chilling firms up the dough, making it easier to roll into balls and preventing the cookies from spreading too much in the oven. It also enhances the flavor and texture, giving you those signature crinkles and a soft inside.
-
Can I make these cookies without red food coloring?
Absolutely! The red food coloring is mostly for that classic red velvet look. Without it, you’ll still get tasty cocoa-flavored cookies, just not as vibrant. You can also experiment with natural coloring alternatives like beet juice, though results vary.
-
How do I store leftover Red Velvet Crinkle Cookies?
Store leftovers in an airtight container at room temperature for up to 5 days. If you want longer storage, freezing the baked cookies in resealable bags works great — just thaw to room temp before eating.
Final Thoughts
Honestly, this Red Velvet Crinkle Cookies Recipe holds a special spot in my kitchen and heart. It brings together that nostalgic red velvet charm in a quick, easy, and oh-so-yummy cookie form you can share with family, friends, or treat yourself. Once you bake a batch, you’ll see why these cookies become an instant favorite — warm, comforting, and utterly delightful. I can’t wait for you to try them and join my little red velvet cookie fan club!
Print
Red Velvet Crinkle Cookies Recipe
- Prep Time: 15 minutes
- Cook Time: 15 minutes
- Total Time: 2 hours
- Yield: 24 servings
- Category: Dessert
- Method: Baking
- Cuisine: American
Description
Delight in these Red Velvet Crinkle Cookies, perfect for any occasion with their soft, chewy texture and iconic powdered sugar crackled exterior. Rich with cocoa and a vibrant red hue, these cookies combine classic flavors and a charming presentation that’s sure to impress your guests or satisfy your sweet tooth.
Ingredients
Dry Ingredients
- 3 cups all-purpose flour
- 1/4 cup unsweetened cocoa powder
- 2 tsp baking powder
- 1/4 tsp baking soda
- 3/4 tsp salt
Wet Ingredients
- 3/4 cup unsalted butter, softened
- 1 1/3 cups granulated sugar
- 3 large eggs
- 1 Tbsp milk
- 1 1/2 tsp vanilla extract
- 5 tsp red food coloring
Coating
- 1 cup powdered sugar
Instructions
- Mix Dry Ingredients: In a small mixing bowl, whisk together the all-purpose flour, unsweetened cocoa powder, baking powder, baking soda, and salt until evenly combined. Set aside.
- Cream Butter and Sugar: In the bowl of a stand mixer or using a hand mixer, beat the softened unsalted butter and granulated sugar until light and fluffy, about 3-4 minutes.
- Add Eggs and Flavorings: Add the eggs one at a time, mixing well after each addition to fully incorporate. Then, add the milk, vanilla extract, and red food coloring, mixing until uniform in color and consistency.
- Combine Dry and Wet Ingredients: Gradually add the dry ingredients to the wet mixture on low speed, mixing just until combined to avoid overworking the dough.
- Chill the Dough: Cover the bowl tightly with plastic wrap and refrigerate for 1 hour 30 minutes or until the dough is firm enough to handle and shape.
- Preheat Oven and Prepare Coating: Preheat your oven to 350 degrees Fahrenheit. Pour the powdered sugar into a small bowl for rolling the cookies.
- Shape and Coat Cookies: Using buttered or lightly greased hands, scoop approximately 2 tablespoons of dough and roll into balls. Coat each ball thoroughly in powdered sugar to create the classic crinkle effect.
- Arrange and Bake: Place the coated balls on a baking sheet lined with a Silpat mat or parchment paper, spacing them apart. Flatten each ball slightly with your hand or the back of a spoon. Bake in the preheated oven for 14 minutes until the edges are set but the cookies remain soft.
- Cool Cookies: Allow the cookies to cool on the baking sheet for 5 minutes to set further, then transfer to a wire rack to cool completely and maintain their chewy texture.
- Store Properly: Once cooled, store the Red Velvet Crinkle Cookies in an airtight container to keep them fresh for up to 5 days.
Notes
- For even rolling, grease your hands with butter or oil to prevent dough from sticking.
- Ensure the dough is well chilled before shaping to maintain structure during baking.
- Use a Silpat or parchment paper to prevent sticking and promote even baking.
- Red food coloring can be adjusted to achieve your preferred intensity of color.
- These cookies freeze well: freeze unbaked dough balls coated in powdered sugar or baked cookies in airtight containers.
Nutrition
- Serving Size: 1 cookie
- Calories: 150 kcal
- Sugar: 15 g
- Sodium: 120 mg
- Fat: 7 g
- Saturated Fat: 4 g
- Unsaturated Fat: 3 g
- Trans Fat: 0 g
- Carbohydrates: 20 g
- Fiber: 1 g
- Protein: 2 g
- Cholesterol: 40 mg

