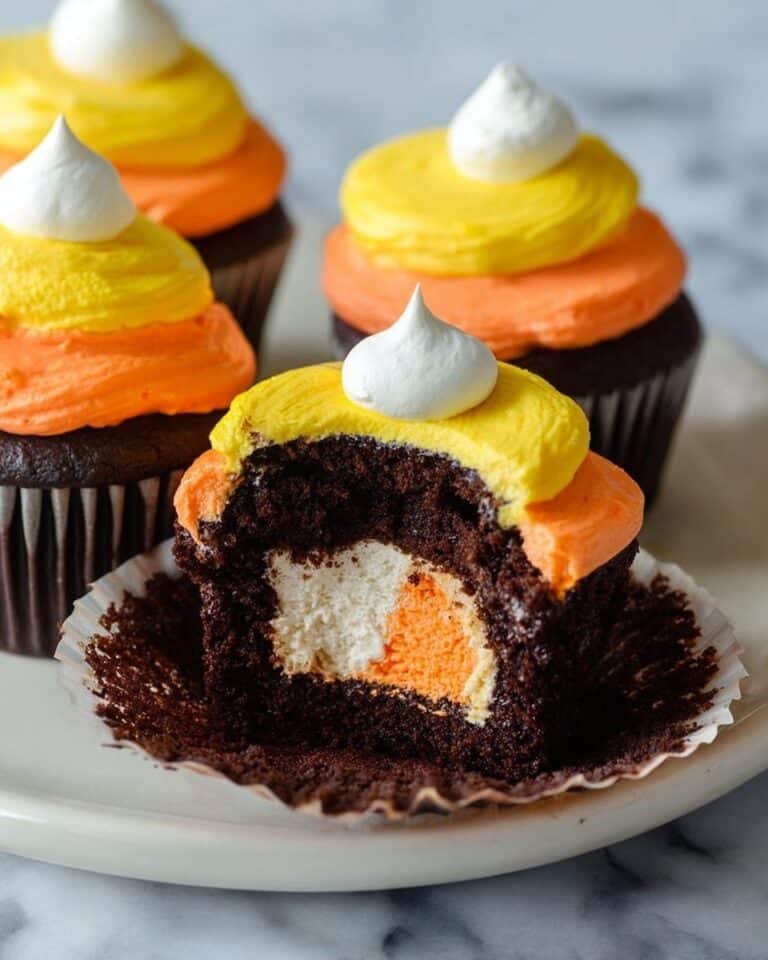
Peppermint Kiss Cookies Recipe
When the holidays roll around, there’s nothing quite like a batch of festive cookies to brighten the mood. That’s why I’m so excited to share this Peppermint Kiss Cookies Recipe with you—it’s a delightful twist on classic sugar cookies, bursting with a refreshing peppermint flavor and topped with those iconic candy cane Hershey’s Kisses. These cookies not only look adorable with their sprinkle-coated exteriors but also offer a soft, buttery bite that melts in your mouth. Trust me, once you try this recipe, it’ll be a seasonal favorite you’ll want to bake again and again.
Why This Recipe Works
- Perfect Balance of Flavors: The peppermint extract pairs beautifully with the vanilla and buttery cookie base for a festive yet subtle taste.
- Soft and Tender Texture: Creaming the butter and sugar properly ensures these cookies stay soft, never dry or crumbly.
- Fun, Festive Presentation: Rolling the dough balls in nonpareil sprinkles adds a colorful crunch and that charming holiday vibe.
- Easy Finish with a Twist: Pressing a candy cane Hershey’s Kiss on top after baking creates a show-stopping look and a little peppermint surprise in every bite.

Ingredients & Why They Work
The ingredients in this Peppermint Kiss Cookies Recipe come together to create a cookie that’s both festive and foolproof. The combination of baking essentials with peppermint extract and those candy cane kisses delivers that winter holiday magic in every bite. Plus, I’ve added a few tips to help you pick the best versions of these ingredients.
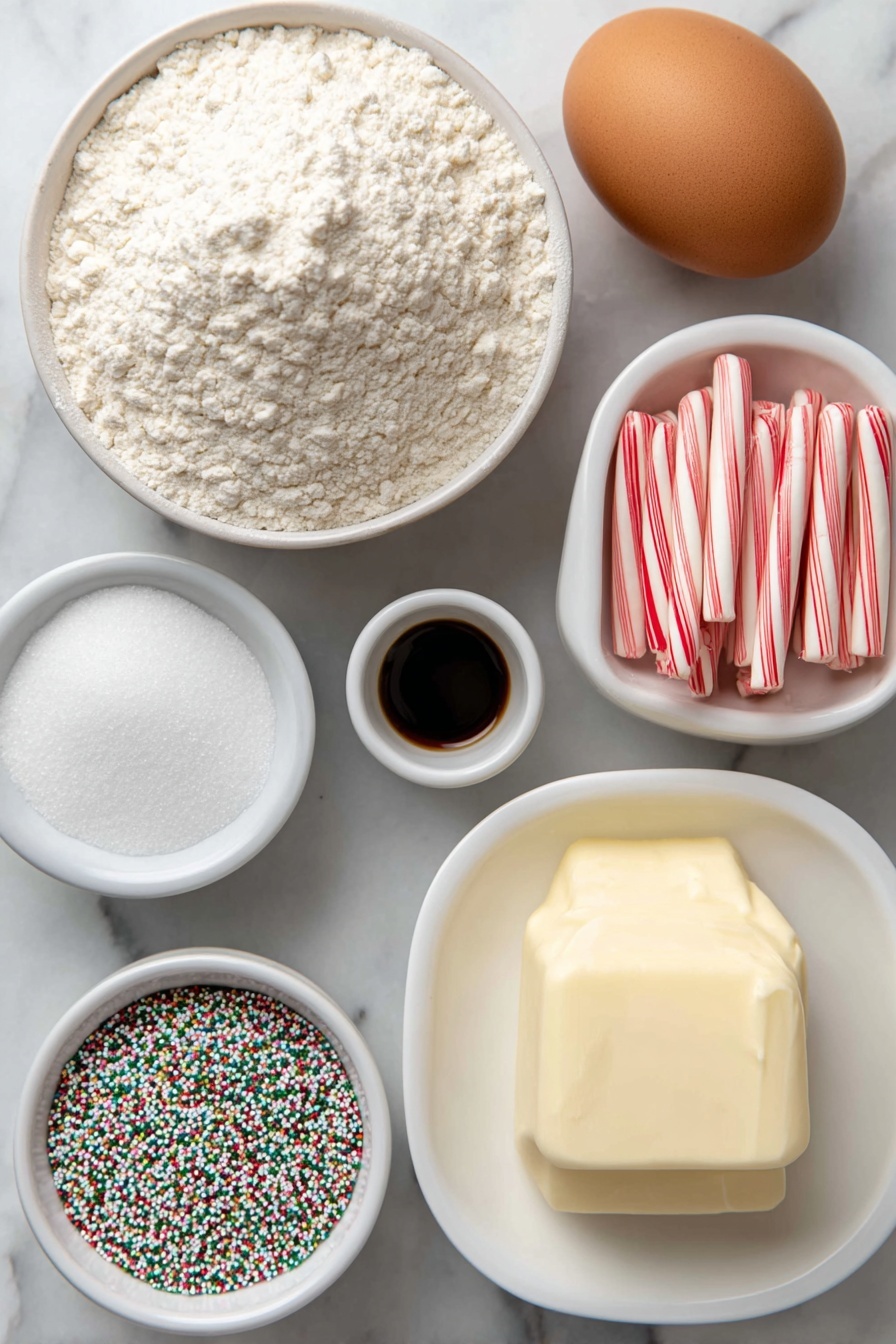
- All-purpose flour: This is your classic cookie base, giving structure without weighing the cookie down.
- Baking powder: Adds just the right lift to keep the cookies soft and slightly pillowy.
- Salt: Balances the sweetness and enhances other flavors.
- Unsalted butter: Using room temperature butter is key for that creamy texture when you cream it with sugar.
- Granulated sugar: Provides sweetness and helps with the cookie’s tender crumb.
- Large egg: Binds everything together and adds moisture.
- Vanilla extract: Rounds out the flavors beautifully, adding warmth and depth.
- Peppermint extract: The star of the show; just a little brings that cool, festive kick.
- Nonpareil sprinkles: Tiny and colorful, they stick well to the dough and add festive flair.
- Candy cane Hershey’s Kisses: The perfect candy topping—minty and chocolatey. If you can’t find candy cane flavor, classic chocolate works too.
Tweak to Your Taste
One of the things I love about the Peppermint Kiss Cookies Recipe is how easy it is to tweak based on your flavor preferences or occasion. Whether you’re feeling more classic or want to switch things up, there’s room to make this recipe your own.
- Less peppermint, more vanilla: If you prefer subtle mint, just cut the peppermint extract in half or leave it out entirely and bump up the vanilla instead—either way, they still taste amazing.
- Almond extract swap: I sometimes swap peppermint for almond extract when I want a more classic sugar cookie vibe with a nutty twist.
- Chocolate lovers, try this: Roll the dough balls in sparkling sugar instead of sprinkles and swap the candy cane kisses for chocolate ones—so delicious.
- Dietary modifications: You can substitute gluten-free all-purpose flour blend if needed; I’ve done it with great results using my favorite brand.
Step-by-Step: How I Make Peppermint Kiss Cookies Recipe
Step 1: Whisk and Prep Your Dry Ingredients
Start by whisking together the flour, baking powder, and salt in a medium bowl. This step is easy but important—it ensures the rising agent and salt are evenly distributed, so every cookie rises perfectly and tastes balanced. Set this bowl aside while you move on to the wet ingredients. I like to get this done first because flour dusting can get a bit messy!
Step 2: Cream Butter and Sugar Until Fluffy
Using a hand or stand mixer fitted with the paddle attachment, beat softened butter and sugar on high speed for about 3 minutes. This is where patience pays off—the longer you cream (without melting the butter), the fluffier and lighter your cookies will be. Don’t rush this part. If you’re unsure about creaming technique, check out a quick tutorial online; it really makes a difference!
Step 3: Add Egg, Vanilla, and Peppermint Extract
Once the butter and sugar are light and fluffy, add the egg along with both extracts. Beat until everything is well combined, scraping the sides and bottom of the bowl once or twice to make sure nothing’s missed. Here, the peppermint extract starts to give that festive aroma, so your kitchen will smell incredible!
Step 4: Mix in Dry Ingredients Slowly
Turn your mixer to low and add the flour mixture gradually. Since this dough is on the thicker side, mixing gently helps keep your cookies tender instead of tough. Once all the dry ingredients are incorporated, you’ll have a dense, firm dough ready to roll.
Step 5: Shape and Sprinkle
Roll the dough into 1 scant tablespoon-sized balls—try to keep them about 20 grams each. The dough might feel a bit dry at first, but don’t worry: the warmth from your hands helps them come together nicely. Then roll each ball generously in your nonpareil sprinkles. I like to pour sprinkles onto a plate and press the dough balls gently into them—that way, the colorful coating sticks evenly. If your dough resists sticking, add a teaspoon of water to soften it up.
Step 6: Chill the Dough Balls
Pop the sprinkle-coated dough balls into the fridge for 20 minutes or up to a day. If chilling longer, cover them lightly. Chilling helps the cookies keep their shape during baking and makes the sprinkles stay put, so don’t skip this step.
Step 7: Bake and Add the Candy Cane Kisses
Heat your oven to 350°F (177°C). Arrange the chilled dough balls about 2 inches apart on a lined baking sheet and bake for 12 minutes. The edges will look set, but the centers might seem slightly underdone—that’s perfect for a soft cookie! As soon as they come out of the oven, gently press a candy cane Hershey’s Kiss into the center of each cookie. Then transfer the cookies carefully to a plate and freeze for 10 minutes to set the candy fast.
Step 8: Serve and Enjoy
After the freeze, the Peppermint Kiss Cookies are ready to serve! They stay fresh covered at room temp for up to a week—but honestly, they tend to disappear much faster in my house.
Pro Tips for Making Peppermint Kiss Cookies Recipe
- Perfect Butter Temperature: Let your butter soften at room temp for at least an hour—it cream better and gives a lighter cookie texture.
- Don’t Overbake: The secret to soft cookies is pulling them out just as edges set; they’ll finish baking as they cool.
- Sprinkle Adhesion Trick: Rolling dough balls in sprinkles right after shaping helps them stick better; if your kitchen is cold, warm your hands slightly for best results.
- Use a Thin Spatula: When transferring cookies before freezing the kisses, a thin spatula prevents them from breaking since the centers are extra soft.
How to Serve Peppermint Kiss Cookies Recipe

Garnishes
I like to keep garnishes simple since the sprinkles and candy kisses are festive enough on their own. But around the holidays, a light dusting of powdered sugar or a drizzle of melted white chocolate adds a lovely touch without overpowering. Fresh peppermint leaves can be a cute, natural garnish if you want to get fancy for a party.
Side Dishes
These cookies pair beautifully with a warm cup of hot cocoa, eggnog, or even a simple glass of cold milk. I’ve served them alongside gingerbread or a fruit platter during holiday gatherings, and the contrast in flavors is always a hit.
Creative Ways to Present
For special occasions, I’ve arranged Peppermint Kiss Cookies on tiered dessert trays with sprigs of evergreen and cranberries for a festive look. Another fun idea: create mini cookie gift bags tied with red and white twine for party favors—people love receiving these cute, edible treats!
Make Ahead and Storage
Storing Leftovers
I keep leftover cookies in an airtight container at room temperature, and they usually stay soft and delicious for up to a week. If your kitchen is warm, pop them in the fridge, but bring them back to room temp before serving to enjoy the best texture.
Freezing
One of the best things about this recipe is that the unbaked, sprinkle-coated dough balls freeze brilliantly for up to 3 months. I like to freeze them on a tray first, then transfer to a zip-top bag. When you want fresh cookies, just bake them straight from frozen—add an extra minute or two to the baking time, and you’re set!
Reheating
Got leftover baked cookies to enjoy later? Warm them in a 300°F oven for about 5 minutes. This revives their soft texture and brings out that peppermint aroma like they’re freshly baked. Microwaving is quicker but can make them slightly chewy, so the oven’s my go-to.
FAQs
-
Can I use regular chocolate Hershey’s Kisses instead of candy cane flavor?
Absolutely! While the candy cane flavor adds a peppermint punch, regular chocolate Hershey’s Kisses work perfectly and create a classic chocolate-vanilla bite. You could also experiment with other flavors like caramel or mint chocolate if you like.
-
How do I make sure the sprinkles stick to the dough?
Roll the dough balls immediately after shaping so the moisture on the surface helps the sprinkles adhere. If they’re too dry, warming your hands or adding a teaspoon of water to the dough can help. Also, pressing dough balls firmly into the sprinkles on a plate improves coverage.
-
Can I make this Peppermint Kiss Cookies Recipe without peppermint extract?
Yes! If you’re not a fan of peppermint or don’t have any on hand, simply omit it or replace it with almond extract for a delightful twist. The cookies will still be tasty and festive thanks to the sprinkles and Hershey’s Kisses.
-
What’s the best way to avoid overbaking these cookies?
Keep a close eye on the baking time and look for edges that are just set and lightly golden. The centers might look slightly underdone—that’s exactly how you want them for a soft, tender cookie. Pull them out promptly and let them finish cooling on the baking sheet.
Final Thoughts
This Peppermint Kiss Cookies Recipe holds a special place in my heart because it always brings family and friends together around the kitchen counter, chatting and smiling as the sweet peppermint scent fills the air. It’s simple enough for beginners but special enough to impress guests, which makes it my go-to holiday cookie every year. I can’t wait for you to try it out and see how these little cookies pack such a big festive punch. Let me know how your batch turns out—I’m sure you’ll love them as much as I do!
Print
Peppermint Kiss Cookies Recipe
- Prep Time: 45 minutes
- Cook Time: 12 minutes
- Total Time: 1 hour 10 minutes
- Yield: 36 cookies
- Category: Dessert
- Method: Baking
- Cuisine: American
- Diet: Vegetarian
Description
Candy Cane Kiss Cookies are festive, peppermint-flavored sugar cookies rolled in colorful sprinkles and topped with iconic candy cane Hershey’s Kisses. These holiday treats feature a soft, creamy texture with a hint of peppermint, perfect for celebrating the season or gifting to friends and family.
Ingredients
Dry Ingredients
- 2 cups + 1 Tablespoon (260g) all-purpose flour (spooned & leveled)
- 1 and 1/2 teaspoons baking powder
- 1/4 teaspoon salt
Wet Ingredients
- 10 Tablespoons (142g) unsalted butter, softened to room temperature
- 1 cup (200g) granulated sugar
- 1 large egg, at room temperature
- 1 teaspoon vanilla extract
- 1/4 teaspoon peppermint extract
Coating and Topping
- 1/2 cup (about 90g) nonpareil sprinkles
- 32–36 candy cane flavor Hershey’s Kisses, unwrapped
Instructions
- Prepare Dry Ingredients: Whisk together the all-purpose flour, baking powder, and salt in a medium bowl until fully combined. Set this mixture aside for later use.
- Cream Butter and Sugar: In a large bowl, use a hand-held or stand mixer with a paddle attachment to beat the softened butter and granulated sugar on high speed until the mixture is creamy and combined, about 3 minutes.
- Add Egg and Extracts: Add the large egg, vanilla extract, and peppermint extract to the creamed butter and sugar. Beat on medium speed until everything is incorporated, about 1 minute. Scrape down the bowl’s sides and bottom to ensure even mixing.
- Incorporate Dry Ingredients: Gradually add the flour mixture to the wet ingredients and mix on low speed until a thick dough forms and everything is fully combined. The dough will be very thick and slightly dry.
- Form Dough Balls and Roll in Sprinkles: Roll the dough into balls using about 1 scant Tablespoon each (roughly 20g). The warmth of your hands will help the dough come together. Roll each ball generously in the nonpareil sprinkles, ensuring they stick well. If sprinkles don’t adhere, press dough balls firmly into sprinkles on a plate or add 1 teaspoon of water to the dough to help with stickiness.
- Chill Dough Balls: Place the sprinkle-coated dough balls on a baking sheet or plate that fits in your refrigerator. Chill for 20 minutes up to 1 day. If chilling longer than 1 hour, cover them to prevent drying out.
- Preheat Oven: While chilling, preheat your oven to 350°F (177°C).
- Bake Cookies: Arrange the chilled dough balls about 2 inches apart on parchment-lined baking sheets. Bake in the preheated oven for 12 minutes or until the edges appear set. The centers may look slightly under-baked, which is ideal. Remove from the oven and let cookies cool on the sheet for 5 minutes.
- Press Hershey’s Kisses: Immediately press an unwrapped candy cane-flavored Hershey’s Kiss into the center of each cookie. Using a thin spatula, carefully transfer the cookies to a plate or multiple plates without breaking them, as they’re soft.
- Set Candies in Freezer: Place the plates of cookies in the freezer for 10 minutes to quickly set the candy into the cookies.
- Serve and Store: Remove cookies from the freezer and serve as desired. Keep cookies covered at room temperature to stay fresh for up to 1 week.
Notes
- Make Ahead & Freezing: Cookie dough balls can be prepared, coated in sprinkles, and chilled up to 1 day in advance. For longer storage, freeze unbaked dough balls for up to 3 months and bake from frozen, adding 1 minute to baking time. Baked cookies also freeze well for up to 3 months.
- Extract Alternatives: Peppermint extract can be omitted or substituted with almond extract for classic sugar cookie flavor.
- Sprinkle Options: Use nonpareils, sanding sugar, or jimmies-style sprinkles as desired for coating.
- Chocolate Variation: Try rolling dough balls in granulated sugar or confectioners’ sugar and bake them as usual for a chocolate peppermint thumbprint style cookie. Press candy kisses after baking and cooling as described.
- Prevent Sprinkles from Falling Off: If sprinkles don’t stick, roll dough balls repeatedly to warm them or add a teaspoon of water to the dough to increase stickiness.
- Soft Texture Reminder: Cookies are soft when removed from oven; do not overbake to maintain desired texture.
- Use Parchment or Silicone Mats: For easiest transfer and cleanup, line baking sheets with parchment paper or silicone baking mats.
Nutrition
- Serving Size: 1 cookie
- Calories: 130 kcal
- Sugar: 14 g
- Sodium: 65 mg
- Fat: 6 g
- Saturated Fat: 4 g
- Unsaturated Fat: 2 g
- Trans Fat: 0 g
- Carbohydrates: 18 g
- Fiber: 0 g
- Protein: 1 g
- Cholesterol: 20 mg

