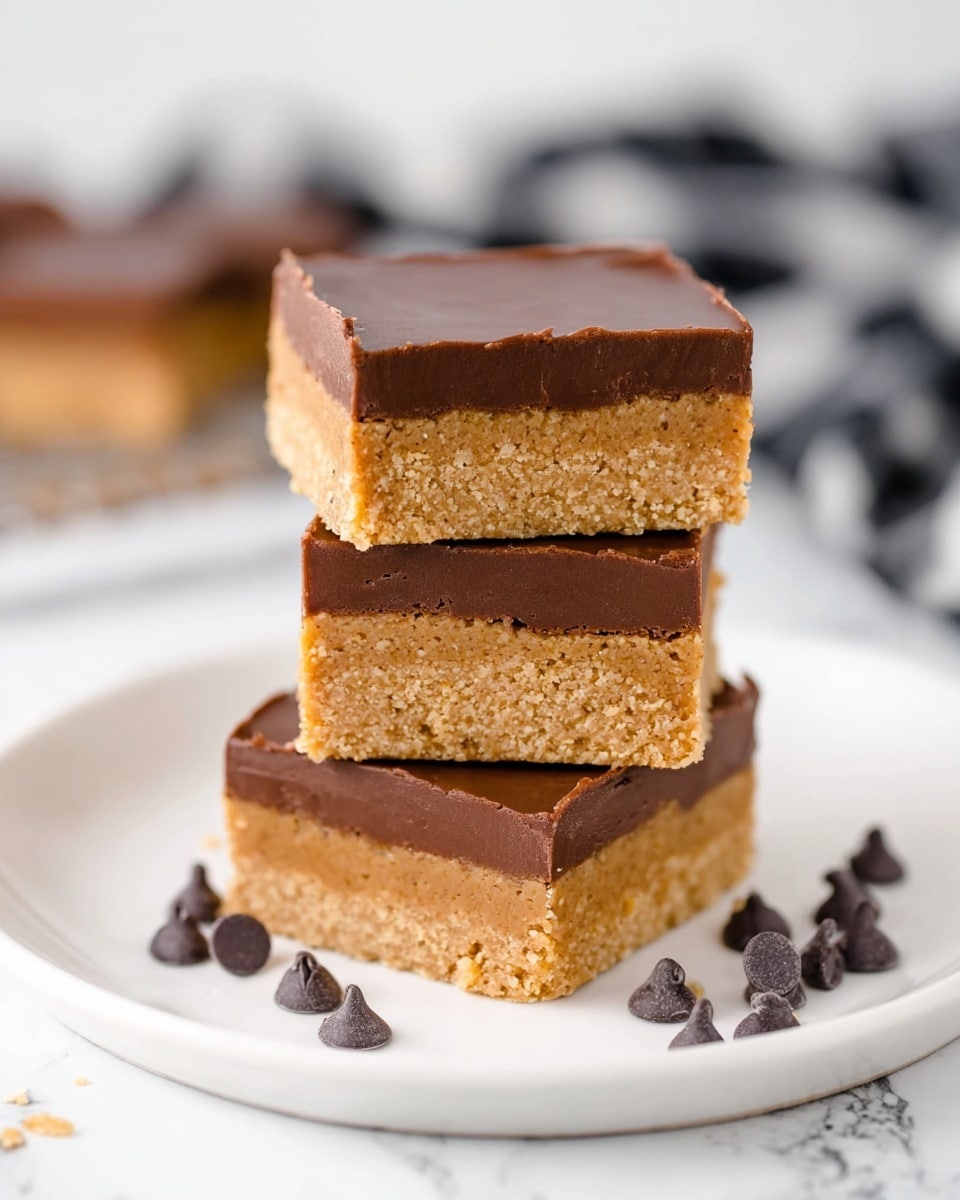
Peanut Butter Bars Recipe
I’m so excited to share this Peanut Butter Bars Recipe with you because it’s hands-down one of my favorite no-bake treats to whip up when I want something sweet and a little nostalgic. These bars come together quickly, yet deliver that perfect combo of creamy peanut butter and rich chocolate that just hits the spot every time. Seriously, whether you’re serving them at a casual get-together or just craving a cozy snack while binge-watching your favorite show, they make the whole experience better.
What makes this Peanut Butter Bars Recipe really special is how simple it is without sacrificing flavor or texture. You don’t need any fancy equipment, and the ingredients probably are already sitting in your pantry. Plus, it’s a great recipe to get kids involved with or to make ahead for potlucks. I’ve made these so many times and each batch disappears fast—trust me, you’ll want to keep this one handy too!
Why This Recipe Works
- No-Bake Delight: You simply melt and mix — no oven needed, making it super kid-friendly and quick.
- Perfect Texture: The graham crackers add a subtle crunch while the peanut butter layer is creamy and indulgent.
- Chocolate-Peanut Butter Harmony: Melting chocolate and peanut butter together creates a luscious topping that seals the deal.
- Easy Ingredient Swap: Using common pantry staples means you can make this anytime without special shopping runs.

Ingredients & Why They Work
The ingredients in this Peanut Butter Bars Recipe are simple, but each one plays a key role in balancing textures and flavors — from buttery, sweet to nutty and smooth. I always recommend using creamy peanut butter here for that perfect spreadability, and crushed graham crackers add just the right crunch without overwhelming the bars.
- Butter: Using melted butter binds the graham crackers and adds richness to the base layer.
- Graham Crackers: These bring a light, honey-kissed crunch that plays well with smooth peanut butter.
- Powdered Sugar: Provides sweetness and helps hold the base together without any grittiness.
- Creamy Peanut Butter: Essential for creaminess and that classic peanut butter flavor we’re all here for.
- Semi-Sweet Chocolate Chips: They melt smoothly and combine with peanut butter for a gooey topping that hardens nicely.
Tweak to Your Taste
I love how versatile this Peanut Butter Bars Recipe is—you can make it more chocolatey, nuttier, or adjust the sweetness to suit your cravings. Don’t hesitate to experiment a little and make these bars truly your own. For example, adding a sprinkle of flaky sea salt on top really kicks the flavor up a notch!
- Nut Variations: Try swapping peanut butter for almond or cashew butter for a different twist I enjoyed recently.
- Chocolate Choices: Dark chocolate chips add a richer depth, while milk chocolate makes it sweeter and creamier.
- Crunchy Texture: Toss in some chopped peanuts or even miniature pretzels for an added crunch that I sometimes do for game nights.
- Sweetness Level: Reduce powdered sugar slightly if you prefer a less sweet bar—perfect for those watching their sugar intake.
Step-by-Step: How I Make Peanut Butter Bars Recipe
Step 1: Mix the Base Layer
First off, line a 9×9-inch baking dish with parchment paper to make the bars a breeze to lift out later. Then, melt the butter and combine it with the crushed graham crackers and powdered sugar using a hand mixer or stand mixer. Make sure everything blends well, then stir in 1 ¼ cups of creamy peanut butter until the mixture is smooth and uniform. A tip from me: use fresh graham crackers that aren’t stale for the best texture. Spread this mixture evenly into the prepared baking dish using a spatula or the back of a spoon—don’t skimp on smoothing it out!
Step 2: Prepare the Chocolate Peanut Butter Topping
Grab a heat-safe bowl and add the semi-sweet chocolate chips along with the remaining 3 tablespoons of creamy peanut butter. Microwave in 30-second bursts, stirring well after each round until the chocolate is silky smooth and fully combined with the peanut butter. This double-whammy of chocolate and peanut butter seals the bars perfectly. Make sure not to overheat the chocolate to avoid seizing—it should be melted but still smooth and glossy.
Step 3: Assemble and Chill
Pour the melted chocolate layer over the peanut butter base and gently spread it out till it’s fully covered. Pop the dish into the fridge for at least one hour to firm up. When it’s set, I like to let the bars sit out for about 10 to 15 minutes before slicing—it softens the chocolate just enough, making them easier to cut and even yummier to eat.
Pro Tips for Making Peanut Butter Bars Recipe
- Crush Graham Crackers Evenly: Use a food processor or place crackers in a zip-top bag and crush with a rolling pin for uniform texture.
- Don’t Skip the Chill: Chilling for at least an hour is key to letting the bars set properly, so be patient!
- Gently Spread Chocolate: Wait a minute after melting so the topping isn’t scorching hot, which helps prevent mixing into the base layer.
- Measure Ingredients Exactly: Too much butter or peanut butter can make the bars too soft or greasy; trust me, I’ve been there!
How to Serve Peanut Butter Bars Recipe
Garnishes
I love topping my peanut butter bars with a sprinkle of sea salt flakes—it really brings out the sweetness and adds a gourmet touch. Sometimes I add a few chopped roasted peanuts or a light drizzle of caramel sauce when serving guests. These little extras take the bars from everyday snack to something a bit more special, especially for celebrations.
Side Dishes
Peanut Butter Bars make a great pairing with a cold glass of milk or a cup of black coffee to balance their richness. I also like serving them alongside fresh fruit like sliced apples or strawberries for a bit of freshness. They shine at afternoon tea or dessert buffets with an array of other sweet bites.
Creative Ways to Present
For parties, I’ve cut these bars into bite-sized squares and arranged them in neat rows on a pretty platter with little paper doilies underneath. Adding a garnish of mini peanut butter cups or sprinkles in coordinating colors makes them perfect for birthdays or holidays. You can also layer them in clear jars for cute, portable treats that are easy to gift.
Make Ahead and Storage
Storing Leftovers
These bars keep best when stored in an airtight container in the fridge. I usually cut them into squares, then layer sheets of parchment or wax paper between them to prevent sticking. They stay wonderfully fresh for up to a week, but honestly, they rarely last that long in my house!
Freezing
Freezing is a breeze—wrap individual bars tightly in plastic wrap and pop them into a freezer-safe bag. When I freeze them, I usually let them thaw in the fridge overnight before eating, which helps keep their texture intact. They’re perfect for making ahead if you want stashable treats for later.
Reheating
Since they’re no-bake bars, reheating isn’t really necessary. But if you like them a tad softer, I gently microwave a single bar for about 10 seconds—just enough to warm the chocolate slightly without melting it completely. It’s a cozy way I enjoy them on chilly days.
FAQs
-
Can I use crunchy peanut butter instead of creamy?
Absolutely! Using crunchy peanut butter will give your bars a little more texture and an extra nutty crunch. Just be aware it may make the base a bit less smooth but still delicious.
-
How do I prevent the chocolate topping from mixing into the base?
Let the melted chocolate and peanut butter mixture cool for about a minute before spreading it on the base. This prevents the two layers from blending and keeps your bars visually appealing.
-
Can I make these bars gluten-free?
Yes! Just swap out the graham crackers for a gluten-free version or crushed gluten-free cookies. The rest of the recipe stays the same and they’ll still turn out amazing.
-
How long do Peanut Butter Bars last?
Stored properly in an airtight container in the fridge, these bars last up to one week, though they’re usually eaten much faster in my experience!
Final Thoughts
This Peanut Butter Bars Recipe is a go-to comfort treat I always come back to when I want something simple yet decadent. It’s one of those recipes that impresses without any fuss, and honestly, it’s fun to make with friends or family. I hope you enjoy making and sharing these bars as much as I do—it’s definitely a recipe worth keeping in your back pocket for those moments when you need a little sweet pick-me-up or a crowd-pleasing treat.
Print
Peanut Butter Bars Recipe
- Prep Time: 10 minutes
- Cook Time: 0 minutes
- Total Time: 1 hour 10 minutes
- Yield: 16 servings
- Category: Dessert
- Method: No-Cook
- Cuisine: American
- Diet: Vegetarian
Description
Delicious and easy-to-make Peanut Butter Bars with a crunchy graham cracker base, creamy peanut butter, and a rich chocolate topping, perfect for a sweet snack or dessert.
Ingredients
Base
- 3/4 cup butter melted
- 2 cups graham crackers crushed
- 2 cups powdered sugar
- 1 1/4 cup creamy peanut butter
Topping
- 2 1/2 cups semi sweet chocolate chips
- 3 tablespoons creamy peanut butter
Instructions
- Prepare baking dish: Line a 9×9 baking dish with parchment paper and set aside to prevent sticking and ease removal of bars.
- Mix base ingredients: Using a stand mixer or hand held mixer, combine the melted butter, powdered sugar, and crushed graham crackers until well mixed.
- Add peanut butter: Mix in 1 ¼ cup creamy peanut butter just until incorporated evenly into the cracker mixture.
- Press base: Evenly spread the peanut butter mixture into the bottom of the prepared baking dish to form the base layer.
- Melt chocolate topping: In a heat-safe bowl, combine semi sweet chocolate chips and remaining 3 tablespoons peanut butter. Heat in 30 second intervals, stirring well after each, until smooth and fully melted.
- Spread topping: Pour and spread the chocolate-peanut butter mixture evenly over the base layer.
- Chill: Refrigerate the bars for 1 hour to set the chocolate topping and firm up the bars.
- Serve: Let the bars sit at room temperature for 10 to 15 minutes before slicing and serving for the best texture and flavor.
Notes
- For a crunchier texture, use chopped peanuts in the base mixture.
- Substitute semi sweet chocolate chips with milk or dark chocolate according to preference.
- Ensure the chocolate mixture is smooth before spreading to avoid lumps.
- Store leftover bars in an airtight container in the refrigerator to maintain freshness.
- Use parchment paper generously to easily lift bars from the pan.
Nutrition
- Serving Size: 1 bar
- Calories: 250 kcal
- Sugar: 18 g
- Sodium: 120 mg
- Fat: 16 g
- Saturated Fat: 6 g
- Unsaturated Fat: 8 g
- Trans Fat: 0 g
- Carbohydrates: 22 g
- Fiber: 2 g
- Protein: 6 g
- Cholesterol: 20 mg

