Pan Fried Chicken Strips Recipe
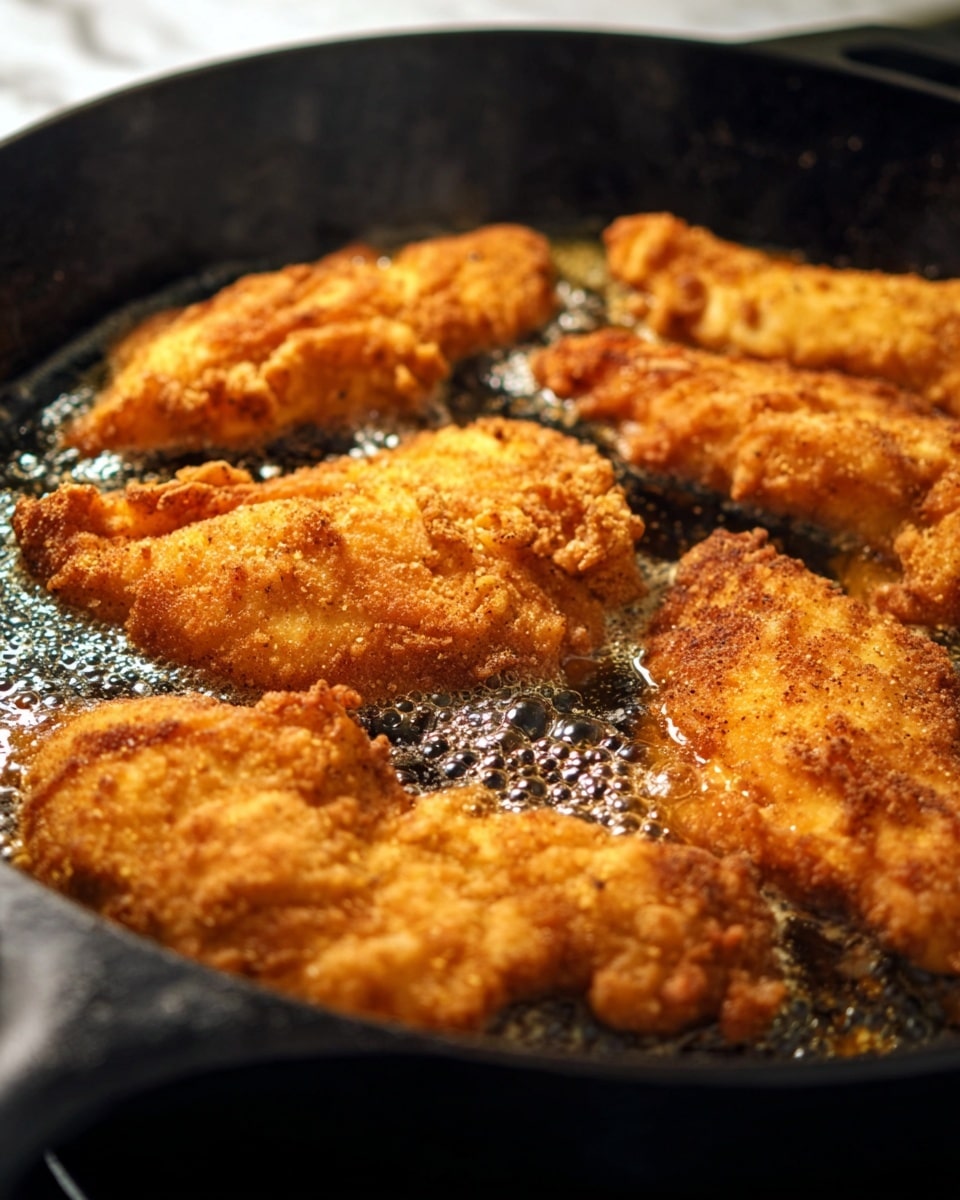
If you’re craving something crispy on the outside and juicy on the inside, my pan fried chicken strips recipe is just what you need. It’s quick, satisfying, and gives you that incredible golden crust that’s better than what you get from takeout. Personally, I love making this any time I want a comforting meal that feels just a little special without a lot of fuss.
This recipe works wonderfully for weeknight dinners or casual weekend lunches, and it’s always a hit with family and friends. Plus, you don’t need a deep fryer—just a trusty cast iron skillet and some simple pantry staples. Once you try this pan fried chicken strips recipe, you’ll see why I keep coming back to it!
Why This Recipe Works
- Perfect Crispy Coating: The double dredging with seasoned flour and egg creates a satisfyingly crunchy yet tender crust.
- Simple Yet Flavorful Spices: Garlic, onion powder, paprika, and kosher salt add depth without overwhelming the chicken’s natural flavor.
- Quick Cooking Time: Ready in about 25 minutes, it’s a fuss-free option that doesn’t skimp on taste or texture.
- Easy for Any Skill Level: Whether it’s your first time frying chicken or you’re a pro, these steps are straightforward and foolproof.
Ingredients & Why They Work
Each ingredient in this pan fried chicken strips recipe plays its part in building that crave-worthy bite. From the flour base to the seasoning mix, here’s what makes them essential—and some tips on picking the best versions.
- Flour: All-purpose flour creates the foundation for that crispy crust, and it’s perfect for holding the seasoning and egg on the chicken.
- Kosher Salt: Coarse enough to enhance flavor but not overpower, it seasons the breading evenly.
- Garlic Powder: Adds a warm, savory note without the sharpness of fresh garlic—perfect for frying.
- Onion Powder: Brings subtle sweetness and depth, complementing the garlic and paprika exquisitely.
- Freshly Ground Pepper: Gives a little kick and brightness when combined with the other spices.
- Paprika: Adds color and a smoky, mild warmth that makes the crust visually and flavorfully appealing.
- Egg: Acts as a glue to keep the flour coating attached to the chicken strips for that perfect double-breading effect.
- Chicken Breasts: Lean, tender, and easy to slice into strips—choose fresh or thawed, high-quality chicken breasts for the best results.
- Cooking Oil (Non-GMO Canola Oil): Neutral in flavor with a high smoke point, it’s great for frying and yields a clean, crispy finish.
Tweak to Your Taste
I like to mix things up based on what mood I’m in or what I have on hand – and you should too! This pan fried chicken strips recipe is super adaptable, so don’t be shy about making it your own.
- Spicy Kick: I once tossed in a teaspoon of cayenne pepper to the seasoned flour mix—my family loved the extra warmth without it being too hot.
- Herb Infusion: Adding dried thyme or oregano gives it a nice herby twist that pairs well with a side of roasted veggies.
- Gluten-Free: Swap the flour for a gluten-free alternative like rice flour or almond flour; just remember cooking time might be a little different.
- Lemon Zest: For a fresh zing, sprinkle some lemon zest into the flour mixture before coating the chicken strips.
Step-by-Step: How I Make Pan Fried Chicken Strips Recipe
Step 1: Get Your Oil Hot and Ready
Heat about a cup of canola oil in a 12-inch cast iron skillet over medium heat until it hits around 350°F. I use a candy or deep-fry thermometer here—not only does it help nail the perfect temperature, it prevents the oil from getting too hot and burning the coating. If you don’t have a thermometer, wait for the oil to shimmer but not smoke.
Step 2: Mix the Seasoned Flour and Egg
Whisk together the flour, kosher salt, garlic powder, onion powder, pepper, and paprika in a shallow dish. In a separate bowl, beat the egg lightly with a fork. This combo ensures each strip gets seasoned evenly and holds on to the breading layers beautifully.
Step 3: Prep Your Chicken Strips
Slice your chicken breasts into even strips—about 1-inch wide works well for quick cooking and crispiness. Then, coat each strip lightly with the flour mixture, dip it in the egg, and go back for a second roll in the flour. For the crispiest crust, I always give the strips a final roll in the flour before frying. It adds that extra protective layer that turns golden and crunchy.
Step 4: Fry the Strips
Carefully place the strips into the hot oil, making sure you don’t overcrowd the pan; crowded strips steam instead of fry. Cook for about 4 minutes on one side, then flip with tongs or a fork and cook another 3-4 minutes. I always check the internal temperature aiming for 160°F to ensure the chicken is perfectly cooked but still juicy.
Step 5: Drain and Serve
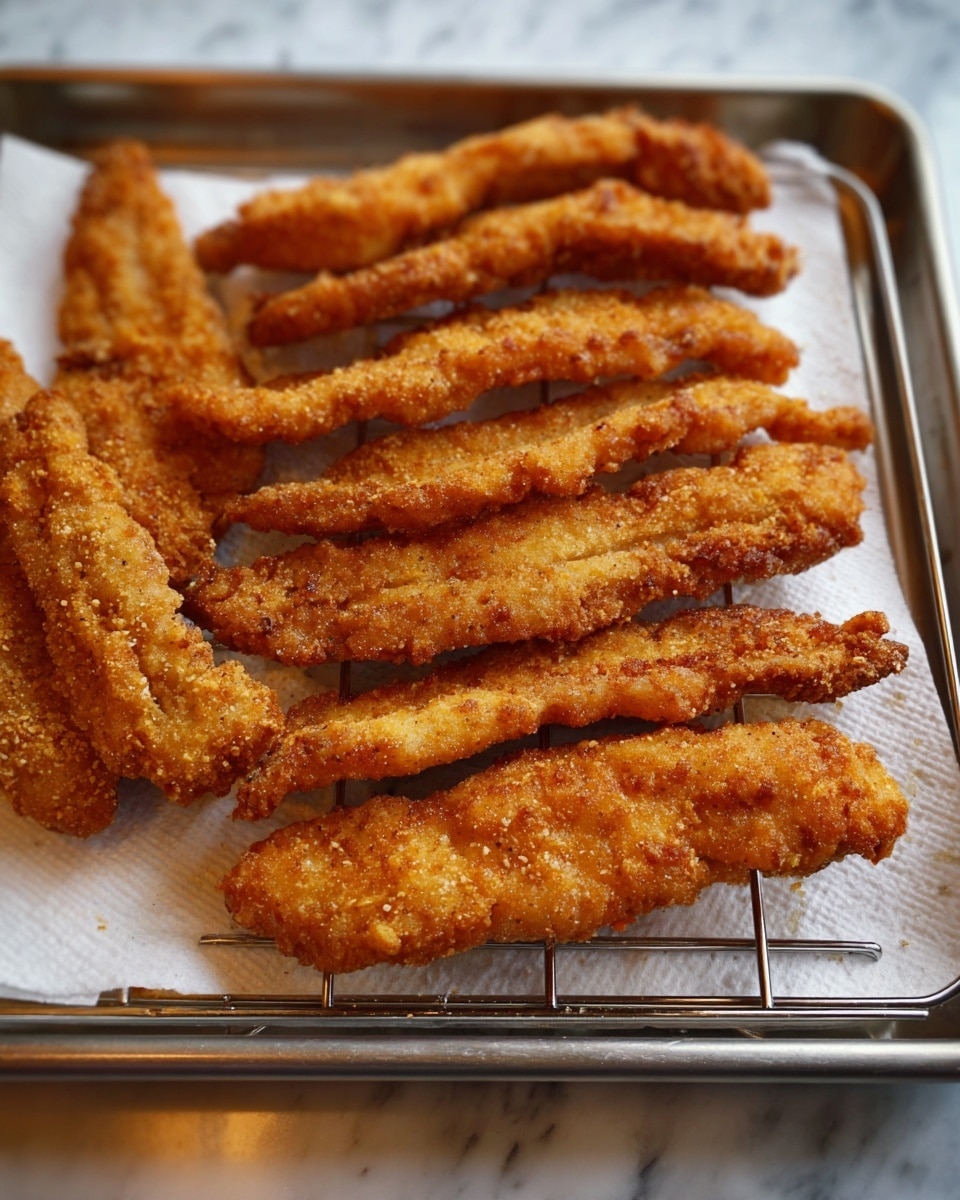
Set a cooling rack over a baking sheet lined with paper towels and transfer the cooked strips onto it to drain excess oil. This simple step keeps them from getting soggy. Serve immediately for that fresh, crunchy experience or keep warm in a low oven if you’re serving family in batches.
Pro Tips for Making Pan Fried Chicken Strips Recipe
- Control Your Oil Temperature: Keeping the oil around 350°F prevents greasy strips and gives that perfect crunch.
- Double-Dip for Extra Crunch: That final roll in seasoned flour right before frying locks in flavor and texture every time.
- Use a Cooling Rack for Draining: It stops strips from sitting in oil and keeps them crispy on all sides.
- Don’t Overcrowd the Pan: Fry in batches to avoid dropping the oil temperature and steaming the chicken strips.
How to Serve Pan Fried Chicken Strips Recipe
Garnishes
I love topping my chicken strips with a sprinkle of chopped fresh parsley or a squeeze of lemon juice for a bright, fresh contrast to the savory crust. You can also try a light dusting of Parmesan cheese right after frying for a cheesy twist that’s irresistible.
Side Dishes
For sides, I usually go with crispy fries or a simple mixed green salad dressed with vinaigrette. Coleslaw also pairs beautifully, adding that cool crunch and tangy bite that balances the richness. On cozy nights, mashed potatoes or roasted vegetables work beautifully too.
Creative Ways to Present
One fun way I’ve served these is in sliders with a smear of honey mustard or spicy mayo, topped with pickles. For a party, try stacking the chicken strips on skewers with fresh veggies or serve as part of a dipping platter with a variety of sauces—including ranch, BBQ, and sriracha mayo.
Make Ahead and Storage
Storing Leftovers
I store leftover chicken strips in an airtight container in the fridge for up to 3 days. Laying them flat without stacking too heavily preserves the coating’s crunch. Just reheat when you’re ready and enjoy!
Freezing
Freezing works great too. I flash freeze the chicken strips on a baking sheet before transferring them to a freezer-safe bag. This way, they don’t stick together, and you can grab exactly how many you want later. They keep well for about 2 months.
Reheating
To reheat, I preheat the oven to 375°F and spread the strips on a wire rack over a baking sheet to crisp up evenly. Bake for 8-10 minutes until hot and crispy again—this avoids the soggy microwave problem every time.
FAQs
-
Can I use chicken thighs instead of breasts for this pan fried chicken strips recipe?
Absolutely! Chicken thighs have a bit more fat and tend to stay juicier. Just adjust cooking time slightly as thighs can cook a bit faster and may need less time in the hot oil. Make sure to slice the thighs into even strips for consistent cooking.
-
How do I avoid the chicken strips being greasy after frying?
The key is maintaining the oil temperature around 350°F and not overcrowding the pan. Also, draining the strips on a cooling rack instead of paper towels helps keep them crispy without sitting in leftover oil. Using oils with high smoke points, like canola, is also beneficial.
-
What’s the best way to test if my chicken strips are cooked through?
A meat thermometer is your best friend—aim for an internal temperature of 160°F for juicy, safe-to-eat chicken. If you don’t have one, cut into the thickest strip and make sure the juices run clear and the meat is opaque all the way through.
-
Can I make these chicken strips ahead of time for a party?
Yes! You can fry them ahead and keep them warm in a low oven before serving. If prepping much earlier, refrigerate or freeze and reheat in the oven just before your guests arrive for freshest texture and flavor.
Final Thoughts
This pan fried chicken strips recipe has become one of my go-tos whenever I want something comforting, quick, and downright tasty. The combination of crisp seasoning and juicy chicken just feels like a little love on a plate. I hope you’ll enjoy making it just as much as I do—it’s one of those recipes that feels like a hug from the inside out. Give it a try next time you want dinner that’s simple yet something special!
Print
Pan Fried Chicken Strips Recipe
- Prep Time: 15 minutes
- Cook Time: 10 minutes
- Total Time: 25 minutes
- Yield: 4 servings
- Category: Main Course
- Method: Frying
- Cuisine: American
Description
Crispy and flavorful pan-fried chicken strips coated in a seasoned flour mixture and cooked to juicy perfection in a cast iron skillet. Perfect for a quick dinner or snack, these chicken strips are easy to prepare and deliver a satisfying crunch with every bite.
Ingredients
Breaded Coating
- 2/3 cup flour
- 2 tsp kosher salt
- 1 1/2 tsp garlic powder
- 1 1/2 tsp onion powder
- 3/4 tsp freshly ground pepper
- 3/4 tsp paprika
Chicken and Egg
- 1 egg
- 2 chicken breasts
Cooking Oil
- 1 cup cooking oil (non-GMO canola oil recommended)
Instructions
- Heat the oil: Heat 1 cup of cooking oil in a 12-inch cast iron skillet over medium heat until it reaches 350°F using a candy thermometer for accuracy.
- Prepare the coating: In a shallow dish, whisk together flour, kosher salt, garlic powder, onion powder, freshly ground pepper, and paprika to blend thoroughly. In a small bowl, beat the egg with a fork.
- Coat the chicken: Cut the chicken breasts into strips. Roll each strip in the seasoned flour until lightly coated, then dip in beaten egg, and roll again in the flour mixture. For extra breading, roll the strips a third time in the seasoned flour and place them on a plate or cutting board.
- Fry the chicken strips: Gently place the coated chicken strips into the hot oil. Fry for 4 minutes, then flip using tongs or a fork and cook for another 3 to 4 minutes until the internal temperature reads 160°F.
- Drain and serve: Transfer the cooked chicken strips onto a cooling rack set over a baking sheet lined with paper towels to drain excess oil. Serve immediately or keep warm in the oven until ready to eat.
Notes
- Use a candy thermometer to maintain the oil temperature at 350°F for optimal crispiness.
- Canola oil is recommended for its high smoke point and neutral flavor, but other oils like vegetable oil can be used as a substitute.
- Ensure chicken reaches an internal temperature of 160°F for safe consumption.
- Double the flour and add an extra egg if making more than 8 strips.
- Resting the cooked strips on a cooling rack instead of paper towels helps retain crispiness.
Nutrition
- Serving Size: 1 serving (about 2-3 strips)
- Calories: 350 kcal
- Sugar: 1 g
- Sodium: 600 mg
- Fat: 20 g
- Saturated Fat: 3 g
- Unsaturated Fat: 15 g
- Trans Fat: 0 g
- Carbohydrates: 18 g
- Fiber: 1 g
- Protein: 30 g
- Cholesterol: 85 mg

