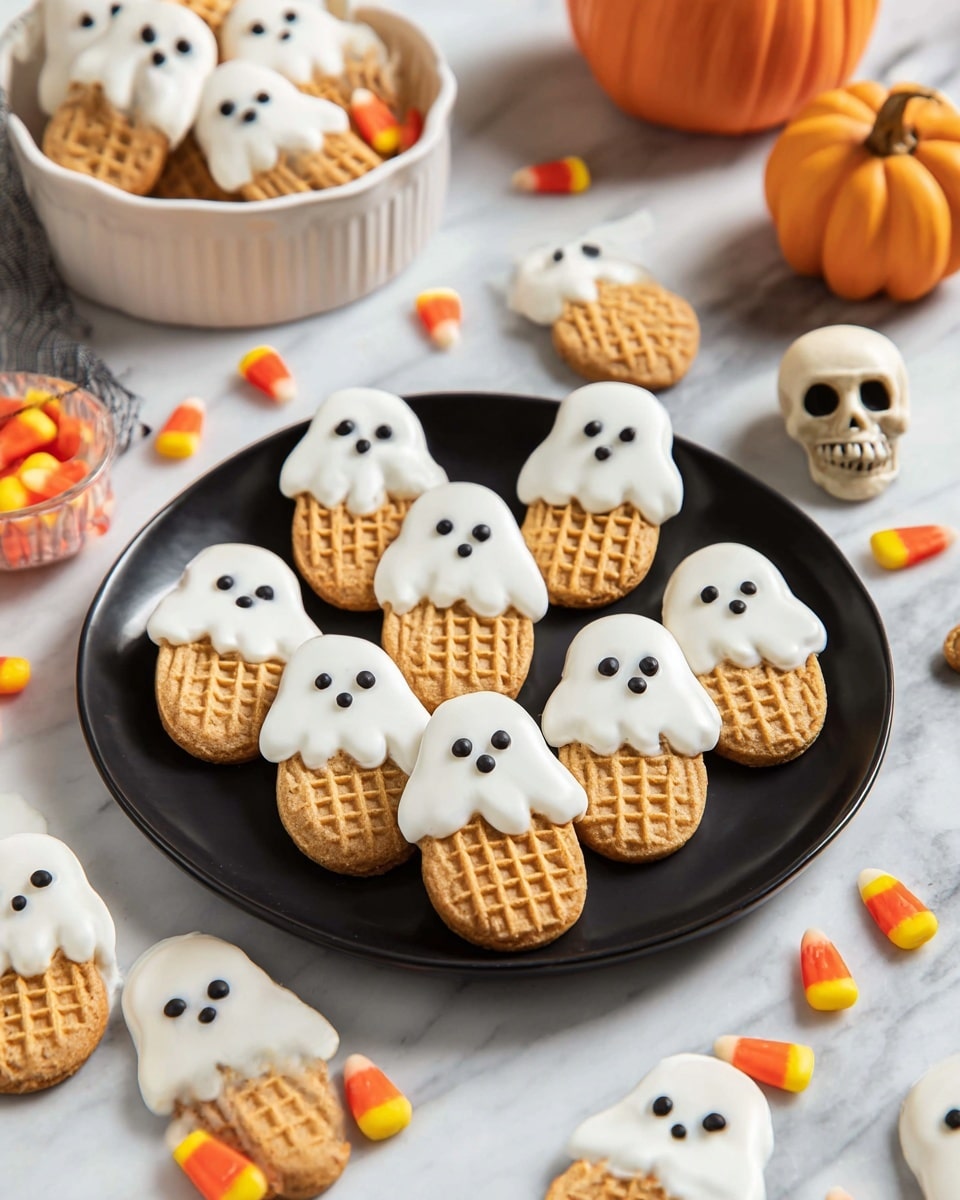
Nutter Butter Ghosts Recipe
If you’re looking for a Halloween treat that’s both adorable and delicious, you’ve got to try this Nutter Butter Ghosts Recipe. These little spooky cookies are fun to make, perfect for parties, and right up there on my list of crowd-pleasers. Plus, they’re ridiculously easy—no baking, no complicated steps—just a little dipping, decorating, and you’re done. Stick with me, and I’ll walk you through every bit so your Nutter Butter ghosts turn out totally charming (and not a melting mess)!
Why This Recipe Works
- No-Bake Simplicity: This recipe skips the oven and uses melting chocolates, making it beginner-friendly and quick.
- Perfectly Adorable: The natural shape of Nutter Butter cookies lends itself beautifully to ghostly figures with minimal effort.
- Customizable Fun: You get to play around with expressions, making each ghost unique and full of personality.
- Kid-Friendly Activity: Great for including little helpers, turning baking time into bonding time.

Ingredients & Why They Work
The magic of this Nutter Butter Ghosts Recipe lies in its simplicity and the harmony between the ingredients. The classic peanut butter cookie forms the ghostly base, while the smooth white chocolate coating creates that perfect spooky ghost blanket. Then, just a touch of dark chocolate brings those cute faces to life!
- Nutter Butter Cookies: Their oval shape and ridged edges mimic a ghost’s silhouette perfectly—no carving required.
- White Melting Chocolate: This coats the cookies smoothly and hardens quickly, giving a bright, ghostly shine.
- Melting Chocolate (Dark or Semi-Sweet): Perfect for piping eyes and mouths with a nice contrast that really pops.
Tweak to Your Taste
One of the reasons I keep making this Nutter Butter Ghosts Recipe is because it’s super flexible. Want to make them extra spooky, or maybe add a fun twist? Go for it! I’ve played around with different expressions and chocolate colors, and honestly, every batch feels fresh and fun.
- Chocolate Variations: Try colored candy melts—orange or pastel purple—to mix up the ghostly vibe. I once used a drop of food coloring in white chocolate for a lavender ghost batch, and it was such a hit!
- Add Sprinkles: For a festive touch, sprinkle edible glitter or mini candy stars on the wet coating before it sets.
- Peanut Allergy Friendly: Substitute Nutter Butters for vanilla sandwich cookies and check allergen-free coatings.
- Expression Variety: Don’t stick to one ghost face—some silly, some surprised, some shy. It’s my favorite part and kids love it too.
Step-by-Step: How I Make Nutter Butter Ghosts Recipe
Step 1: Prep Your Workspace and Cookies
Start by lining a cookie sheet with wax or parchment paper—that’s where your little ghosts will chill while they set up. I like to get all my Nutter Butter cookies out and laid flat so the process flows smoothly. Having everything ready upfront makes dipping way easier and faster.
Step 2: Melt the White Chocolate
Use a microwave-safe bowl for melting the white chocolate or almond bark. Heat in 30-second bursts, stirring in between. This helps avoid burning the chocolate, which can be super frustrating. You want silky smooth, pourable coating—take your time with this step!
Step 3: Dip or Spoon the Coat
Now, here’s where the fun begins. You can dip each cookie halfway into the white coating for a dripping-ghost effect, or spoon the coating over the tops to fully cover and create a rounded ghost shape. After dipping, a gentle shake helps remove any excess chocolate—too much coating makes it messy and hard to decorate.
Step 4: Add the Ghostly Faces
Before your coating sets, quickly pipe small dots of the dark melting chocolate for eyes and mouths. I use a small piping bag or zip-lock with a tiny corner snipped off. It’s easiest to do the faces while the coating is still wet. Trust me, this step adds so much charm—don’t rush it!
Step 5: Let Them Set Completely
Once decorated, leave the cookies on the parchment-lined tray or a wire rack until the chocolate hardens fully. I usually pop mine in the fridge for about 10-15 minutes to speed this up, but letting them sit at room temperature works if you have time.
Pro Tips for Making Nutter Butter Ghosts Recipe
- Avoid Overheating the Chocolate: Melt in short bursts, stirring often to keep white chocolate from seizing or burning.
- Practice Piping Faces First: Test on parchment before decorating cookies to get comfortable with your piping pressure and design.
- Use a Light Hand Dipping: Too much coating makes your ghosts look bulky and takes ages to dry.
- Store in Layers: Prevent smudging by layering cookies with parchment paper when storing.
How to Serve Nutter Butter Ghosts Recipe
Garnishes
I usually keep it simple—just those sweet little piped faces steal the show! But once, for a festive touch, I sprinkled edible pearl dust lightly over the white coating before setting, which gave the ghosts a magical shimmer. If you want to get extra, tiny candy eyes or Halloween-themed sprinkles make great garnish options, too.
Side Dishes
These ghosts pair wonderfully with a warm mug of hot chocolate or spiced pumpkin latte during chilly fall evenings. For parties, I love setting them on a platter alongside a tray of caramel apples or a bowl of autumn-colored popcorn for a fun, thematic spread.
Creative Ways to Present
Once, I arranged these ghosts on a black platter lined with fake spider webs and used dry ice beneath for a smoky, eerie effect that wowed the kids and adults alike. You could also pop them individually into small clear cellophane bags tied with orange ribbons—perfect for party favors or classroom treats!
Make Ahead and Storage
Storing Leftovers
I store my leftover Nutter Butter ghosts in an airtight container, layering wax paper between them to avoid smudging. Kept this way at room temperature, they stay perfectly crisp and delicious for up to 5 days.
Freezing
If you want to make these ahead of time, they freeze beautifully. Just wrap each ghost individually in cling wrap and place them in a freezer-safe container. When you’re ready, thaw them at room temperature for about 30 minutes before serving.
Reheating
Since these are dipped cookies, you really don’t want to heat them directly—it can melt the coating and ruin the design. If you prefer a slightly softer cookie, let them sit at room temperature out of the fridge for a bit, but avoid ovens or microwaves for reheating.
FAQs
-
Can I use regular white chocolate instead of melting chocolate?
You can, but regular white chocolate can be trickier to melt smoothly and may not harden as crisply as candy melts or white almond bark. If you do use regular white chocolate, temper it gently and monitor closely to avoid clumping or seizing.
-
How long do Nutter Butter ghosts last?
Stored in an airtight container at room temperature, they’re best eaten within 5 days. After that, the cookie may start to lose its crunch, but they’re generally still safe and tasty a bit longer.
-
Can kids help make this recipe?
Definitely! This recipe is kid-friendly and a great way to get little ones involved in the kitchen. Just be sure to supervise the melting chocolate step and help with piping the faces if needed.
-
Any allergy-friendly alternatives?
If peanut allergies are a concern, using vanilla sandwich cookies like Oreos or a similar brand as the base can work. Just swap out Nutter Butters, and ensure your chocolates and coatings are allergen-free.
Final Thoughts
I can’t tell you how many times these cheerful Nutter Butter Ghosts have made an appearance at our Halloween gatherings. They’re so quick to whip up and just plain joyful to eat and share. If you’re dreaming of a treat that’s cute, festive, and fuss-free, this recipe’s your new best friend. Give it a go—I promise you’ll be smiling as much as your ghosts!
Print
Nutter Butter Ghosts Recipe
- Prep Time: 15 minutes
- Cook Time: 5 minutes
- Total Time: 20 minutes
- Yield: 32 cookies
- Category: Dessert
- Method: No-Cook
- Cuisine: American
Description
Nutter Butter Ghosts are a fun and festive treat perfect for Halloween or any spooky celebration. These peanut butter cookies are dipped in smooth white chocolate to create ghostly shapes and decorated with melted chocolate eyes and mouths, making them adorable and delicious.
Ingredients
Cookies
- 32 Nutter Butter cookies
Chocolate Coating
- 12 ounces melting white chocolate
- 1 ounce melting chocolate
Instructions
- Prepare Cookies: Line a cookie sheet with wax paper or parchment paper and arrange the Nutter Butter cookies on it.
- Melt White Chocolate: In a microwave-safe bowl, melt the white candy coating or white chocolate in 30 second intervals, stirring until smooth and fully melted.
- Dip Cookies: Dip each Nutter Butter cookie halfway into the melted white chocolate or spoon the coating over the tops to create a ghostly shape. Gently shake off excess chocolate before placing the cookies back onto the prepared cookie sheet.
- Add Faces: Before the white chocolate sets, use a piping bag to pipe small dots of melted chocolate for the ghosts’ eyes and mouths to give each ghost personality.
- Set Coating: Allow the coated cookies to set completely on a rack or on the wax paper-lined cookie sheet until the chocolate is firm.
Notes
- Use a 16 oz package of Nutter Butters that contains about 32 cookies for this recipe.
- White almond bark or white candy coating melts smoothly and hardens quickly, making it ideal for dipping.
- Tap each cookie gently to remove excess coating before drying to prevent a mess and uneven coating.
- Make your ghost cookies fun by varying their facial expressions—scared, surprised, or silly.
- Store dipped cookies in an airtight container between layers of wax paper for up to 5 days to maintain freshness.
Nutrition
- Serving Size: 1 cookie
- Calories: 140 kcal
- Sugar: 10 g
- Sodium: 110 mg
- Fat: 8 g
- Saturated Fat: 4 g
- Unsaturated Fat: 3 g
- Trans Fat: 0 g
- Carbohydrates: 15 g
- Fiber: 1 g
- Protein: 2 g
- Cholesterol: 5 mg
