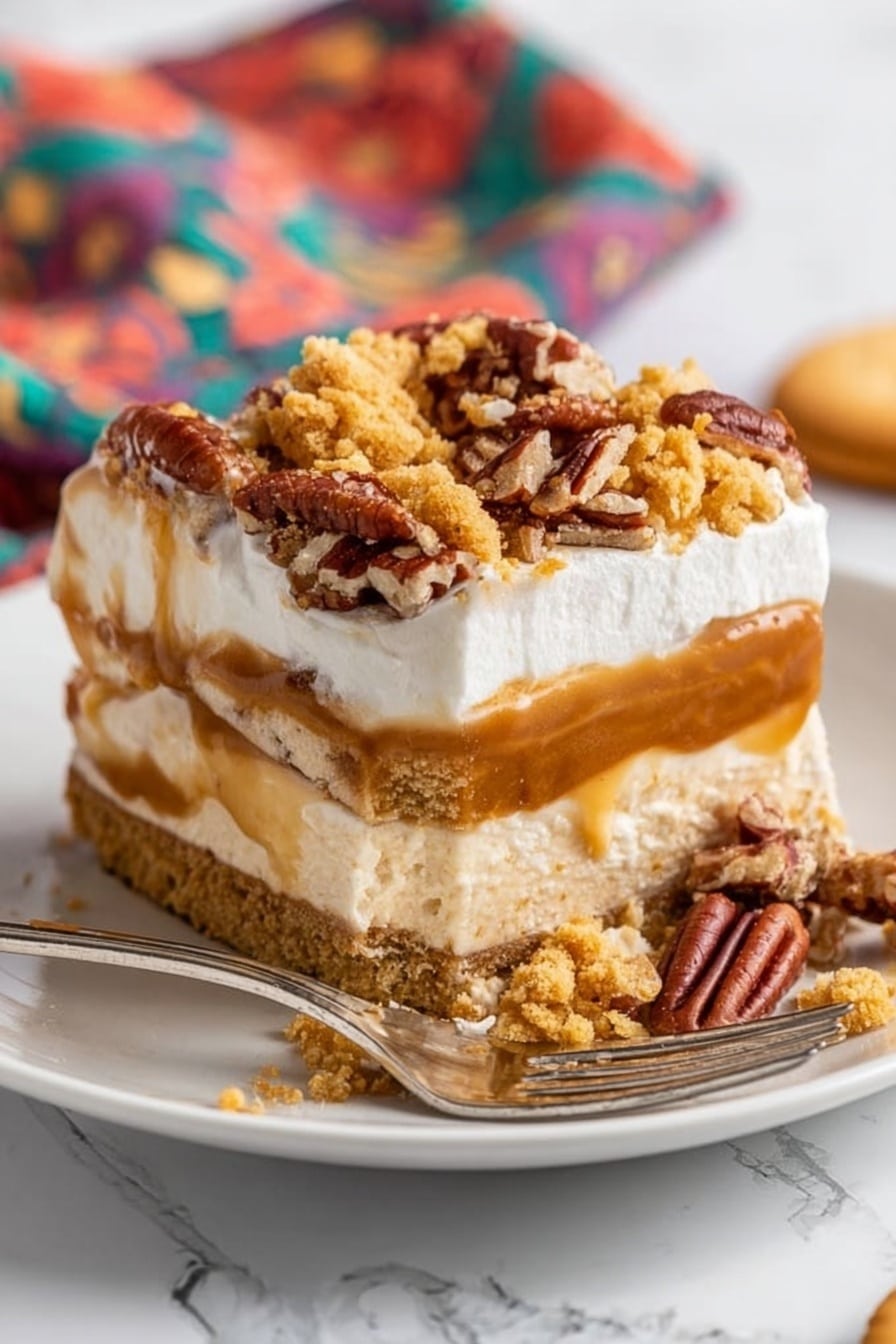
No Bake Pumpkin Lush Recipe
If you’re anything like me, fall flavors get you all kinds of excited, and this No Bake Pumpkin Lush Recipe is just the perfect way to satisfy that craving without heating up your kitchen. Trust me, once you dive into this luscious, creamy dessert layered with pumpkin goodness and a crunchy gingersnap base, you’ll keep coming back for more. It’s incredibly easy to make, doesn’t require an oven, and looks fancy enough to impress unexpected guests. So, stick around—I’ll walk you through all the tips and tricks to nail this recipe every time!
Why This Recipe Works
- No-Bake Convenience: You won’t need to turn on the oven, keeping your kitchen cool and your hands mess-free.
- Layered Textures: The crunchy gingersnap crust contrasts beautifully with the creamy pumpkin and pudding layers for a delightful bite.
- Seasonal Flavors: Pumpkin spice and real pumpkin puree give this dessert that authentic autumn vibe you crave.
- Flexible Ingredients: You can easily swap pudding flavors or add your favorite toppings to make it your own.

Ingredients & Why They Work
This No Bake Pumpkin Lush Recipe calls for ingredients that blend seamlessly without fuss. The gingersnap crust adds warmth and spice, while the pumpkin cream cheese and pudding layers bring silky richness that’s balanced by the airy Cool Whip topping. Each ingredient plays its part, creating layers that complement one another perfectly.

- Gingersnap cookie crumbs: These add a slightly spicy, crunchy base that holds together well after chilling.
- Unsalted butter: Helps bind the cookie crumbs creating that compact crust you want without overpowering flavors.
- Pumpkin Spice Pudding Mix: This instant puddy mix takes the pumpkin flavor up a notch and gives the middle layer that creamy structure.
- Milk: Needed to prepare the pudding—use the amount suggested for the right thickness.
- Cream cheese: Adds tang and creaminess to the pumpkin layer, balancing the sweetness.
- Confectioners’ sugar: Sweetens the cream cheese layer smoothly without graininess.
- Pure pumpkin puree: Real pumpkin flavor and moisture that keeps the dessert from being fake-tasting.
- Vanilla extract & pumpkin spice: Bring out those warm fall spices and deepen all the flavors.
- Cool Whip: Light and fluffy, this makes the layers airy and soft—divided to mix and top off the dessert.
- Chopped pecans & extra gingersnap crumbs (optional): Great for crunch and a lovely finishing touch when serving.
Tweak to Your Taste
I’ve made this No Bake Pumpkin Lush Recipe a bunch of times, and one thing I love is how forgiving it is for personal tweaks. Whether you want more spice, a lighter texture, or a different crust base, it adapts beautifully. It’s your dessert playground, so play around!
- Variation: I once swapped pumpkin spice pudding with butterscotch pudding—it gave a mellow sweetness that worked surprisingly well when paired with extra pumpkin spice.
- Dietary Modification: For a dairy-free version, try using coconut cream instead of cream cheese and a dairy-free whipped topping.
- Seasonal Change: Swap pumpkin puree for sweet potato puree if you’re out of stock; the flavor is unique but still delicious.
- More Crunch: Adding a layer of chopped pecans within the crust gives a nice nutty texture.
Step-by-Step: How I Make No Bake Pumpkin Lush Recipe
Step 1: Crafting the Perfect Gingersnap Crust
Start by lining an 8×8-inch pan with parchment paper—this little trick makes lifting the bars out so much easier without any mess. Melt the butter in a small bowl, then add in the crushed gingersnap crumbs. Stir until the crumbs are evenly coated. Press this crumb mixture firmly into the bottom of your pan, smoothing it to the edges for an even crust. Pop it into the freezer for at least 30 minutes so it sets nicely—don’t skip this step or your layers might get soggy later.
Step 2: Whipping Up the Pudding Layer
While your crust chills, whisk together the pumpkin spice pudding mix and milk in a medium bowl. I always use a whisk to make sure there are no lumps. Once combined, pop it in the fridge for at least 10 minutes so it thickens up nicely. This waiting time is perfect for prepping your next layer!
Step 3: Mixing the Pumpkin Cream Cheese Layer
Beat the cream cheese in a mixing bowl until silky smooth—no lumps, please! Then add the confectioners’ sugar, pumpkin puree, vanilla extract, and pumpkin spice. Mix this to combine thoroughly. Using a rubber spatula, fold in 1 cup of Cool Whip gently so the mixture stays light and fluffy. This creamy pumpkin layer is the heart of this recipe—get ready for a treat.
Step 4: Assembling Your Pumpkin Lush
Retrieve your set crust from the freezer and dollop the pumpkin cream cheese mixture on top. Spread it carefully and evenly. Next, spoon the chilled pudding layer atop the pumpkin cream cheese, smoothing to the edges. Finally, cover everything with the remaining Cool Whip, spreading it out like a soft cloud. Pop the pan into the refrigerator and let it chill for at least 4 hours—overnight is even better—to get those layers firm and melded with flavor. If you’re short on time, an hour and a half in the freezer also works.
Step 5: Add That Finishing Crunch
Right before serving, sprinkle chopped pecans and some extra crushed gingersnap crumbs over the top for an added festive crunch and visual pop. It’s like the cherry on top of this pumpkin lusciousness!
Pro Tips for Making No Bake Pumpkin Lush Recipe
- Chill the Crust Properly: Don’t rush the freezing step, or the crust might crumble when slicing later.
- Use Room Temperature Cream Cheese: This helps you get a silky smooth pumpkin layer without lumps.
- Gently Fold the Whipped Topping: To keep your pumpkin cream cheese layer airy, fold instead of mixing vigorously.
- Serve Chilled but Not Frozen: Let bars sit a few minutes after fridge removal—they’re easier to cut and melt in your mouth better.
How to Serve No Bake Pumpkin Lush Recipe
Garnishes
I usually garnish with chopped pecans and a light sprinkle of crushed gingersnap crumbs, but sometimes I add a dash of ground cinnamon or drizzle a little caramel sauce on top for extra indulgence. If you want to get fancy for guests, add a few candied pecans or a dollop of freshly whipped cream on each serving.
Side Dishes
This dessert pairs wonderfully with a hot cup of chai tea or a smooth latte. If you want something more substantial, it’s also beautiful alongside a simple green salad with crisp apples and walnuts—perfect balance of sweet and fresh!
Creative Ways to Present
For special occasions, I’ve served this No Bake Pumpkin Lush in individual clear glasses to show off the distinct layers. It’s such a crowd-pleaser and takes minimal effort. I also like to press the crust mixture into mini muffin tins for bite-sized pumpkin lush cups—perfect for parties.
Make Ahead and Storage
Storing Leftovers
I always keep leftovers covered tightly with plastic wrap or stored in an airtight container in the fridge. The flavors actually improve after a day, and it stays fresh for up to 4 days. Just give it a gentle stir on the top if the whipped cream layer settles slightly.
Freezing
Freezing works but changes the texture a bit—the whipped topping can separate slightly. If you freeze, I recommend wrapping the pan well and thawing overnight in the fridge before serving. The crust holds up surprisingly well!
Reheating
Since this is a no-bake chilled dessert, reheating isn’t really necessary. If you want it softer, just let it come to room temperature for 15 minutes before serving—it’ll melt in your mouth all the same.
FAQs
-
Can I substitute the gingersnap crust with graham crackers?
Yes! Using crushed graham crackers is a popular alternative if you prefer a milder crust. Just keep in mind it will change the flavor profile slightly, making the crust less spicy but still delicious.
-
Where can I find pumpkin spice pudding mix?
I usually find pumpkin spice pudding mix at Walmart or online on Amazon. If it’s tricky to source, butterscotch pudding mix is a great stand-in and complements the pumpkin spices nicely.
-
Can I make this dessert ahead of time?
Absolutely! In fact, this No Bake Pumpkin Lush Recipe actually tastes better when it has time to chill overnight, allowing the flavors to meld beautifully. Just store it covered in the fridge.
-
Is it possible to make this recipe gluten-free?
Yes, switch the gingersnap cookies for a gluten-free gingersnap brand. Make sure your pudding mix and other ingredients are also gluten-free to keep the entire dessert safe for gluten-sensitive folks.
-
Can I use fresh pumpkin instead of canned pumpkin puree?
You can, but it takes more prep. Fresh pumpkin needs to be roasted and pureed and might have a bit more water content. If you go this route, drain excess moisture to maintain the recipe’s texture.
Final Thoughts
This No Bake Pumpkin Lush Recipe has become my go-to for fall gatherings and when I want a fuss-free but impressive dessert. It’s perfect for sharing with family on a chilly afternoon or for last-minute guests who deserve a seasonal treat. I hope you give it a try—it’s really one of those recipes that hits all the right notes: easy, flavorful, and pure comfort in every bite. You’re going to love how it turns out!
Print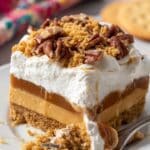
No Bake Pumpkin Lush Recipe
- Prep Time: 45 minutes
- Cook Time: 0 minutes
- Total Time: 4 hours 45 minutes
- Yield: 9 servings
- Category: Dessert
- Method: No-Cook
- Cuisine: American
- Diet: Vegetarian
Description
No Bake Pumpkin Lush is a rich, creamy dessert featuring layers of spiced gingersnap crust, pumpkin spice pudding, and a smooth pumpkin cream cheese mixture topped with whipped topping and crunchy pecans. Perfect for fall gatherings or a festive treat without any baking.
Ingredients
Crust
- 1 ⅓ cups crushed Gingersnap cookie crumbs (about 25 cookies depending on their size)
- 5 tablespoons unsalted butter
Pudding Layer
- 3.4 ounce package Pumpkin Spice Pudding Mix (can use butterscotch pudding if you can’t find pumpkin spice pudding)
- 1 ½ cups milk
Pumpkin Cream Cheese Layer
- 6 ounces cream cheese, room temperature
- ½ cup confectioners’ sugar
- ¼ cup pure pumpkin puree
- ½ teaspoon pure vanilla extract
- ¾ teaspoon pumpkin spice
- 1 cup Cool Whip from container below
Topping
- 8 ounces Cool Whip, divided
- Chopped pecans for topping, if desired
- Additional crushed Gingersnap cookies for topping, if desired
Instructions
- Prepare the crust: Line an 8×8-inch baking pan with parchment paper to allow easy removal and slicing. Melt the butter in a small mixing bowl, then add the crushed gingersnap cookie crumbs and mix until well combined. Press this crumb mixture evenly into the bottom of the pan. Place in the freezer for at least 30 minutes to harden.
- Make the pudding layer: In a medium mixing bowl, whisk together the pumpkin spice pudding mix and 1 ½ cups milk until smooth and combined. Refrigerate the pudding for at least 10 minutes to set.
- Prepare the pumpkin cream cheese layer: In a mixing bowl, beat the room temperature cream cheese until smooth. Add the confectioners’ sugar, pumpkin puree, vanilla extract, and pumpkin spice and mix until fully combined. Fold in 1 cup of Cool Whip using a rubber spatula, mixing gently until smooth.
- Assemble the dessert: Remove the crust from the freezer. Spoon dollops of the pumpkin cream cheese layer on top of the frozen crust and spread evenly to cover. Next, spread the prepared pudding layer over the cream cheese layer. Cover the entire dessert with the remaining 8 ounces of Cool Whip, spreading it evenly on top.
- Chill the dessert: Place the assembled dessert in the refrigerator for a minimum of four hours, or preferably overnight, to allow it to set. Alternatively, you may place it in the freezer for 1 hour and 30 minutes for a quicker set.
- Add toppings and serve: Before serving, sprinkle chopped pecans and additional crushed gingersnap cookies over the top, if desired. Cut into bars and serve chilled.
Notes
- Pumpkin Spice Pudding Mix can be found at Walmart or online through Amazon in case local stores don’t stock it.
- Using parchment paper makes removal and slicing easier without the bars sticking to the pan.
- If pumpkin spice pudding is unavailable, butterscotch pudding mix is a good substitute for a different but complementary flavor.
- For a firmer texture, allow the dessert to chill overnight rather than just four hours.
- Chopped pecans and extra gingersnap cookie crumbs add texture and flavor but can be omitted if preferred.
Nutrition
- Serving Size: 1 bar
- Calories: 300 kcal
- Sugar: 20 g
- Sodium: 150 mg
- Fat: 18 g
- Saturated Fat: 8 g
- Unsaturated Fat: 7 g
- Trans Fat: 0 g
- Carbohydrates: 32 g
- Fiber: 2 g
- Protein: 3 g
- Cholesterol: 35 mg
