No Bake Oreo Cheesecake Parfait Recipe
If you’re craving something creamy, decadent, and easy to whip up, you’re going to love this No Bake Oreo Cheesecake Parfait Recipe. It’s that perfect treat that combines the crunch of Oreos with luscious, dreamy cheesecake layers—without turning on your oven. Seriously, I make this for just about every celebration or even a casual weekend treat because it’s quick, crowd-pleasing, and absolutely fan-freaking-tastic. Stick around, and I’ll share everything you need to make this parfait shine in your kitchen!
Why This Recipe Works
- No Oven Needed: Perfect for hot days or when you want a fuss-free dessert without heating up the kitchen.
- Layered Textures: Crunchy Oreo crumbs paired with velvety cream cheese layers make every spoonful exciting.
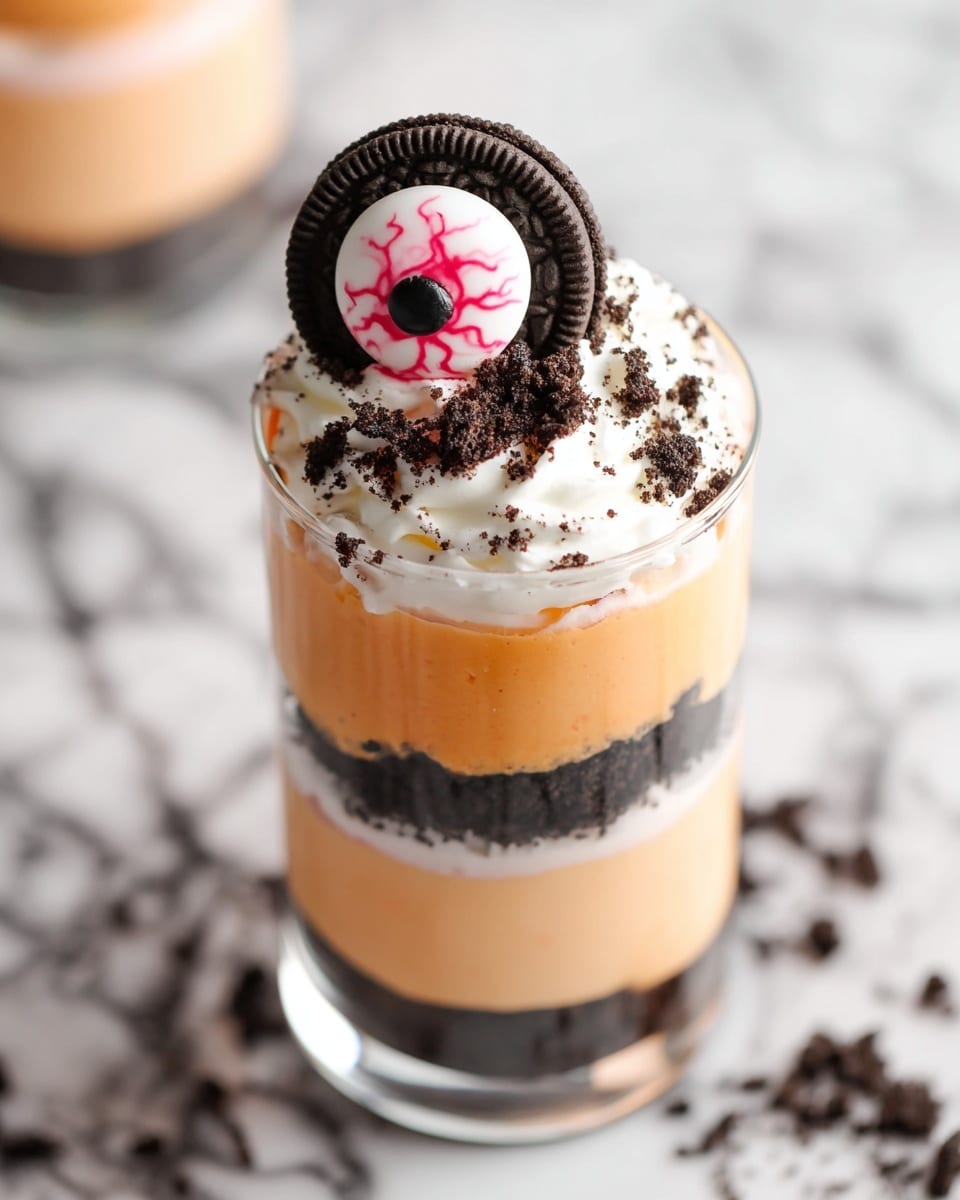
- Fun & Festive: The orange and white cheesecake layers plus spooky Oreo eyes really make this dessert pop for special occasions.
- Customizable: You can tweak the flavors, colors, or even the presentation to fit your mood or event.

Ingredients & Why They Work
The magic of this No Bake Oreo Cheesecake Parfait Recipe lies in simple, trusty ingredients that come together for maximum flavor and creaminess. I always keep my cream cheese at room temperature for the smoothest batter, and the Oreos add just the right balance of sweet crunch. A splash of Fanta orange is my little secret twist—it adds brightness and a pop of color, making this dessert irresistible.
- Cream Cheese: Make sure it’s softened to room temp for a silky, lump-free cheesecake base.
- Granulated Sugar: Balances the tang of the cream cheese without overpowering the flavors.
- Heavy Cream: Whipping this up fresh gives you that light, airy texture essential for folding into the batter.
- Oreos: The star of this parfait—crumbled for crust layers and whole for fun “spooky eyes.”
- Unsalted Butter: Helps bind the Oreo crumbs into a sturdy crust layer to support the parfait.
- Fanta Orange: Adds a citrusy zing and a beautiful orange hue; you can swap it for any orange soda if you want.
- Vanilla Extract: I use clear vanilla to keep the white cheesecake layer bright and fresh looking.
- Optional Food Coloring & Candy Eyeballs: Great for that festive, spooky vibe especially if you’re making this around Halloween.
Tweak to Your Taste
One of the best things about this No Bake Oreo Cheesecake Parfait Recipe is how easily you can make it your own. I’ve experimented with different soda flavors and even swapped in gluten-free cookies to cater to friends with allergies—it all works wonderfully. Feel free to get creative and make this recipe truly yours!
- Flavor Swap: I once tried using grape soda instead of Fanta, and the purple color was gorgeous—and my guests went wild!
- Dairy-Free Version: Use a plant-based cream cheese and coconut cream to keep it creamy but vegan-friendly.
- Extra Crunch: Add chopped nuts or different cookie crumbs between layers to mix up the texture.
- Mini Parfaits: I love making these in smaller glasses for parties—it makes serving so easy and looks adorable.
Step-by-Step: How I Make No Bake Oreo Cheesecake Parfait Recipe
Step 1: Whip Up a Silky Cheesecake Batter
Start by beating your room-temp cream cheese until it’s super smooth—no lumps, promise. I use a stand mixer with the paddle attachment, but a hand mixer works fine too. Next, add the granulated sugar and clear vanilla extract, and blend until everything’s silky. Pro tip: clear vanilla keeps your white cheesecake layer nice and bright! Divide this batter in half—one part stays white, while the other gets a splash of Fanta orange (and a drop of orange food coloring if you want it extra vibrant). Finally, whip your chilled heavy cream until soft peaks form, then fold it gently into each bowl to get that fluffy, luscious texture. Pop these back in the fridge while you prep the Oreo crust.
Step 2: Craft That Perfect Oreo Crust
Next, crush about 10 Oreo cookies in your food processor until they become fine crumbs, then stir in melted unsalted butter to bind them all together. Spoon half of this Oreo crust mixture evenly into your serving glasses and press down lightly to compact. Pop these into the freezer for 15-20 minutes to set up firm—that way, they don’t crumble when you add your cheesecake layers later. I like using clear glasses so you can admire all those layers. If you’re making mini parfaits, this chilling step is a must for neat servings.
Step 3: Make Spooky Oreo Eyes (or Skip for Daily Treats!)
This is the fun part that turns this parfait into a showstopper! Twist open Oreo cookies and stick candy eyeballs onto the creamy side using a dab of caramel sauce or frosting. Use a red food color marker to draw bloodshot veins around the eyeballs—instantly spooky and so extra (especially if you’re serving this at a party). I usually make 3-4 eyes to garnish the parfait. If you’re just making this for a weeknight dessert, no worries—skip this step, and it’s delicious either way.
Step 4: Layer It All Up
Grab your chilled glasses with the Oreo crust base and pipe or spoon a layer of the orange cheesecake batter on top. Then add a layer of the white cheesecake batter. Sprinkle a bit of the remaining Oreo crumbs on top to add a little crunch, then repeat these layers as desired—ending with the white cheesecake layer on top. Finish by garnishing with more Oreo crumbs and those spooky eyes if you made them. It’s a colorful, tempting dessert that practically begs you to dig in!
Step 5: Chill Before Serving
Pop your parfaits in the fridge for at least 3-4 hours to let everything set properly and the flavors meld together. I usually make them the night before—it makes serving a breeze and actually improves the taste. Just remember to cover them so they don’t absorb fridge odors.
Pro Tips for Making No Bake Oreo Cheesecake Parfait Recipe
- Chill Your Tools: I always chill my bowl and whisk before whipping cream—it whips faster and fluffs up better.
- Fold Gently: To keep that light texture, gently fold the whipped cream into the cheesecake batter instead of stirring vigorously.
- Freeze Crust First: Freezing the Oreo crust prevents it from mixing into the creamy layers and keeps each bite distinct.
- Avoid Over-Mixing Colors: When adding the orange batter, mix just to combine to keep vibrant, defined layers.
How to Serve No Bake Oreo Cheesecake Parfait Recipe
Garnishes
I love topping these parfaits with crushed Oreos and the playful spooky eyes for seasonal vibes. Sometimes, I add a little whipped cream swirl or even a drizzle of chocolate sauce to ramp up the indulgence. Fresh orange zest sprinkled on top adds a lovely aromatic zing that balances the sweetness.
Side Dishes
Since this dessert is rich and sweet, I usually serve it alongside fresh fruit or a light salad for balance. A simple berry salad or slices of crisp apple create a refreshing counterpoint to the creamy parfait.
Creative Ways to Present
For birthday parties or holidays, I’ve experimented with serving this parfait in mason jars or clear mini trifle bowls for a rustic, elegant look. You can also layer the parfaits in clear plastic cups with lids for easy grab-and-go individual desserts at picnics or potlucks.
Make Ahead and Storage
Storing Leftovers
I find these parfaits store beautifully in the fridge for up to 3 days. Just cover them tightly with plastic wrap or a lid to keep everything fresh and prevent the Oreo crumbs from getting soggy. They’re actually even better the next day once the flavors have melded.
Freezing
While I haven’t frozen the parfaits themselves (the texture isn’t quite the same after thawing), you can freeze the Oreo crust mixture ahead of time if you want to prep in stages. Wrap it tightly and keep it frozen for up to a month.
Reheating
Since this is a cold dessert, no reheating needed! Just grab a spoon and dive in straight from the fridge. If it’s too firm, let it sit at room temperature for 5-10 minutes to soften slightly—it’ll be irresistible.
FAQs
-
Can I use different cookies instead of Oreos for this parfait?
Absolutely! While Oreos bring that classic chocolate and cream combo, you can substitute any sandwich cookies or even crushed chocolate chip cookies. Just make sure to adjust the sweetness accordingly.
-
Is it necessary to use Fanta orange soda in the cheesecake batter?
Not at all! The Fanta orange soda adds a lovely citrusy aroma and a bit of tang, but you can skip it or replace it with any orange-flavored soda or even orange juice. Keep in mind that substituting might slightly alter the taste and color.
-
How long can I keep the parfaits refrigerated before serving?
They’re best enjoyed within 3-4 days when stored properly covered in the fridge. After that, the Oreo crumbs might soften too much, and the texture could change.
-
Can I prepare these parfaits in advance for a party?
Definitely! I often make them a day or two ahead, which helps all the flavors meld beautifully. Just garnish the parfaits last minute if you want your spooky eyes or toppings to look extra fresh.
Final Thoughts
This No Bake Oreo Cheesecake Parfait Recipe holds a special place in my heart because it’s the perfect blend of ease, flavor, and fun presentation—ideal when you want to impress without stress. Whether you’re making it for the family, a party, or just because, trust me, you’re going to get rave reviews. So grab those Oreos, cream cheese, and that secret Fanta splash, and try it out soon—you’ll thank me later!
Print
No Bake Oreo Cheesecake Parfait Recipe
- Prep Time: 45 minutes
- Cook Time: 0 minutes
- Total Time: 4 hours 45 minutes
- Yield: 4 servings
- Category: Dessert
- Method: No-Cook
- Cuisine: American
Description
Delight in this spooky No Bake Oreo Cheesecake Parfait featuring layers of creamy orange and white cheesecake batter, Oreo crumb crusts, and fun Halloween-themed Oreo eyes. Perfect for an easy, no-bake dessert that combines rich flavors and festive presentation.
Ingredients
Cheesecake Batter
- 8 oz cream cheese at room temperature
- ½ teaspoon clear vanilla extract
- ½ cup granulated white sugar
- 1 cup heavy cream
- 2-3 tablespoons Fanta orange soda
- Drop of orange food color (optional)
Oreo Crust/Base
- ¾ cup Oreo crumbs (from about 10 Oreo sandwich cookies)
- 1.5 tablespoons unsalted butter, melted
Spooky Eyes
- 4 Oreos
- Candy eyeballs
- Red food color marker
Instructions
- Make the cheesecake batter: Beat cream cheese using a stand mixer with paddle attachment or a hand mixer until smooth. Add sugar and vanilla extract and continue beating until well combined. Divide mixture into two bowls. Add Fanta orange soda to one bowl and mix well, adding orange food color if desired. Whip heavy cream in a chilled bowl using a whisk attachment or hand mixer until stiff peaks form. Divide whipped cream equally between the two bowls and fold gently into the cream cheese mixtures. Refrigerate the batter bowls.
- Prepare the Oreo crust: Crush Oreo cookies into fine crumbs using a food processor. Combine crumbs with melted butter. Divide half of the mixture equally between two serving glasses, pressing gently to form a crust layer. Reserve remaining crumbs for topping. Place glasses in the freezer for 15-20 minutes.
- Create the spooky Oreo eyes: Carefully separate Oreo cookies. On the cream side, attach candy eyeballs using a small amount of caramel sauce as adhesive. Use a red food color marker to draw veins around the eyeball for a spooky effect. Prepare 3-4 eyes and set aside.
- Assemble the parfait: Transfer the orange and white cheesecake mixtures into separate piping bags. Remove glasses from freezer. Pipe an orange cheesecake layer over the Oreo crust, then pipe the white cheesecake layer on top. Sprinkle some reserved Oreo crumbs over the white layer. Repeat the layering process, finishing with a white cheesecake layer on top.
- Garnish and chill: Top the parfaits with additional crushed Oreo crumbs and the spooky Oreo eyes. Refrigerate the parfaits for 3-4 hours before serving to allow the cheesecake to set properly.
Notes
- Ensure cream cheese is softened to room temperature for smooth mixing.
- Chill the bowl and whisk attachment before whipping heavy cream to achieve better volume.
- Clear vanilla extract helps keep the cheesecake batter white instead of yellowish.
- The orange food coloring is optional and used only to enhance the orange color of the Fanta-infused batter.
- Use piping bags for neat and clean layering of the cheesecake batter.
- Freezing the glasses briefly helps set the base layer firmly before adding more layers.
- Use store-bought caramel sauce or any sticky edible glue to attach candy eyes securely.
- The parfaits can be assembled a day ahead and stored covered in the refrigerator for convenience.
Nutrition
- Serving Size: 1 parfait (approx. 150 g)
- Calories: 420 kcal
- Sugar: 28 g
- Sodium: 180 mg
- Fat: 32 g
- Saturated Fat: 18 g
- Unsaturated Fat: 12 g
- Trans Fat: 0 g
- Carbohydrates: 30 g
- Fiber: 1 g
- Protein: 6 g
- Cholesterol: 110 mg


