No-Bake Cookie Butter Icebox Cake Recipe
If you’re looking for a dessert that’s impressively delicious yet incredibly easy to whip up, you’re going to love this No-Bake Cookie Butter Icebox Cake Recipe. Trust me, it’s one of those treats that feels fancy but comes together with almost zero stress—perfect for busy days or when you want to wow friends without turning on the oven. Plus, the cookie butter flavor is straight-up addictive, making every bite a little slice of dreamy comfort.
Why This Recipe Works
- No-Bake Convenience: You get a rich layered dessert without ever needing to heat up that oven, which is a game-changer on warm days.
- Classic Cookie Butter Flavor: Using Lotus Biscoff spread and cookies gives a unique spicy-sweet flavor that’s impossible to resist.
- Creamy Texture Combo: The mascarpone and whipped cream blend creates a luscious filling that balances the crunchy cookie layers perfectly.
- Make-Ahead Friendly: This recipe requires 24 hours chilling, so it’s ideal for preparing a day in advance and stress-free entertaining.

Ingredients & Why They Work
The magic of this No-Bake Cookie Butter Icebox Cake Recipe really starts with simple, comforting ingredients that play off each other beautifully. It’s worth picking quality cookie butter and fresh heavy cream to get those rich, smooth textures and deep flavors to shine through.
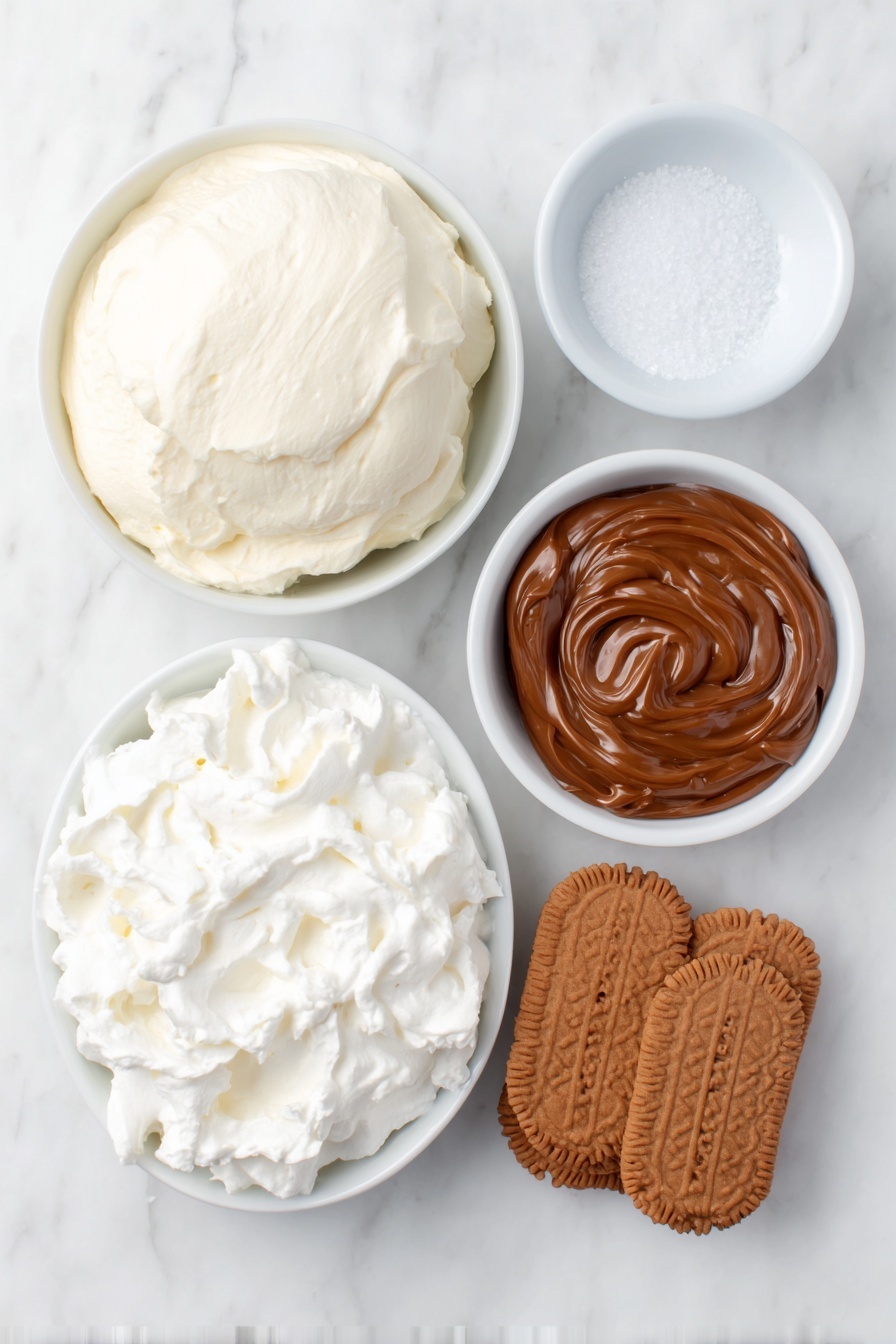
- Heavy cream: Whipped to medium peaks, it gives the filling a light, airy texture that holds its shape nicely.
- Lotus Biscoff spread (cookie butter): This is the star flavor—sweet with a hint of cinnamon and caramelized spice that’s utterly addictive.
- Mascarpone cheese: Adds richness and silkiness to the cream mixture, balancing the sweetness perfectly.
- Vanilla extract: Boosts the overall flavor profile, making each bite taste more complex and warm.
- Kosher salt: Just a pinch to enhance and brighten the flavors.
- Confectioner’s sugar: Sweetens the whipped cream gently without adding graininess.
- Lotus Biscoff cookies: These crunchy, spiced cookies layer between the creamy filling creating that classic icebox cake structure.
Tweak to Your Taste
One of the things I love about this No-Bake Cookie Butter Icebox Cake Recipe is how easily it adapts to whatever you have in your kitchen or your personal cravings. Feel free to play around with mix-ins or toppings to make it truly your own.
- Variation: Sometimes, I like folding in chopped toasted pecans or walnuts into the cream for an extra crunch and nutty hint—trust me, it’s delightful.
- Dietary modification: If you want a dairy-free version, coconut whipped cream and dairy-free cookie butter spread work in a pinch, though mascarpone is definitely the dream texture.
- Seasonal twist: Adding a drizzle of salted caramel sauce instead of plain cookie butter on top gives it a festive vibe in winter.
Step-by-Step: How I Make No-Bake Cookie Butter Icebox Cake Recipe
Step 1: Whip the Cream to Perfection
Start by pouring your cold heavy cream into the bowl of a stand mixer fitted with the whisk attachment (or grab a hand mixer if that’s what you’ve got). Whip on medium-high speed until you see soft to medium peaks form—this means when you lift the whisk, the cream holds gentle peaks but still moves slightly. Be careful not to overwhip or you’ll get butter (been there, done that!). This whipped cream is going to make your filling light and fluffy.
Step 2: Mix in the Cookie Butter and Mascarpone
In a separate bowl, gently stir together the Lotus Biscoff spread, mascarpone cheese, vanilla extract, a pinch of kosher salt, and confectioner’s sugar until smooth and creamy. Then fold this into the whipped cream carefully—using a spatula so you don’t deflate that perfect airiness. The mascarpone adds richness while the cookie butter packs the recipe’s signature sweet-spicy punch.
Step 3: Assemble the Layers Like a Pro
Line a loaf pan with plastic wrap for easy removal later. Start by placing a single layer of Biscoff cookies at the bottom—it’s okay if they’re touching or overlapped slightly. Spread an even layer of your cookie butter cream on top, roughly the same thickness as the cookie layer. Repeat this until you reach the top, making sure the top final layer is cookies. This layering is where the magic happens, and I always press the cream down gently so layers stick and don’t slide apart.
Step 4: Chill Overnight for the Best Texture
Cover the assembled cake loosely with plastic wrap and pop it into your fridge for at least 24 hours. This chilling time lets the cookies soften as they soak up the flavorful cream, turning into a blissfully tender yet structured dessert. The patience here seriously rewards you with incredible melt-in-your-mouth layers.
Pro Tips for Making No-Bake Cookie Butter Icebox Cake Recipe
- Use Cold Ingredients: Keep your cream and mascarpone chilled until prep to ensure the best volume when whipping and mixing.
- Warm Your Cookie Butter: I like to microwave a bit in short bursts and stir to reach a drizzle-able consistency when serving—it makes the final touch luxe.
- Loaf Pan Choice Matters: A straight-sided loaf pan works best for neat layers; if yours tapers, expect some adjustments in cookie count.
- Don’t Skip the Chill Time: Rushing the fridge time means firmer cookies and less melding of flavors—24 hours is key for that signature icebox cake texture.
How to Serve No-Bake Cookie Butter Icebox Cake Recipe
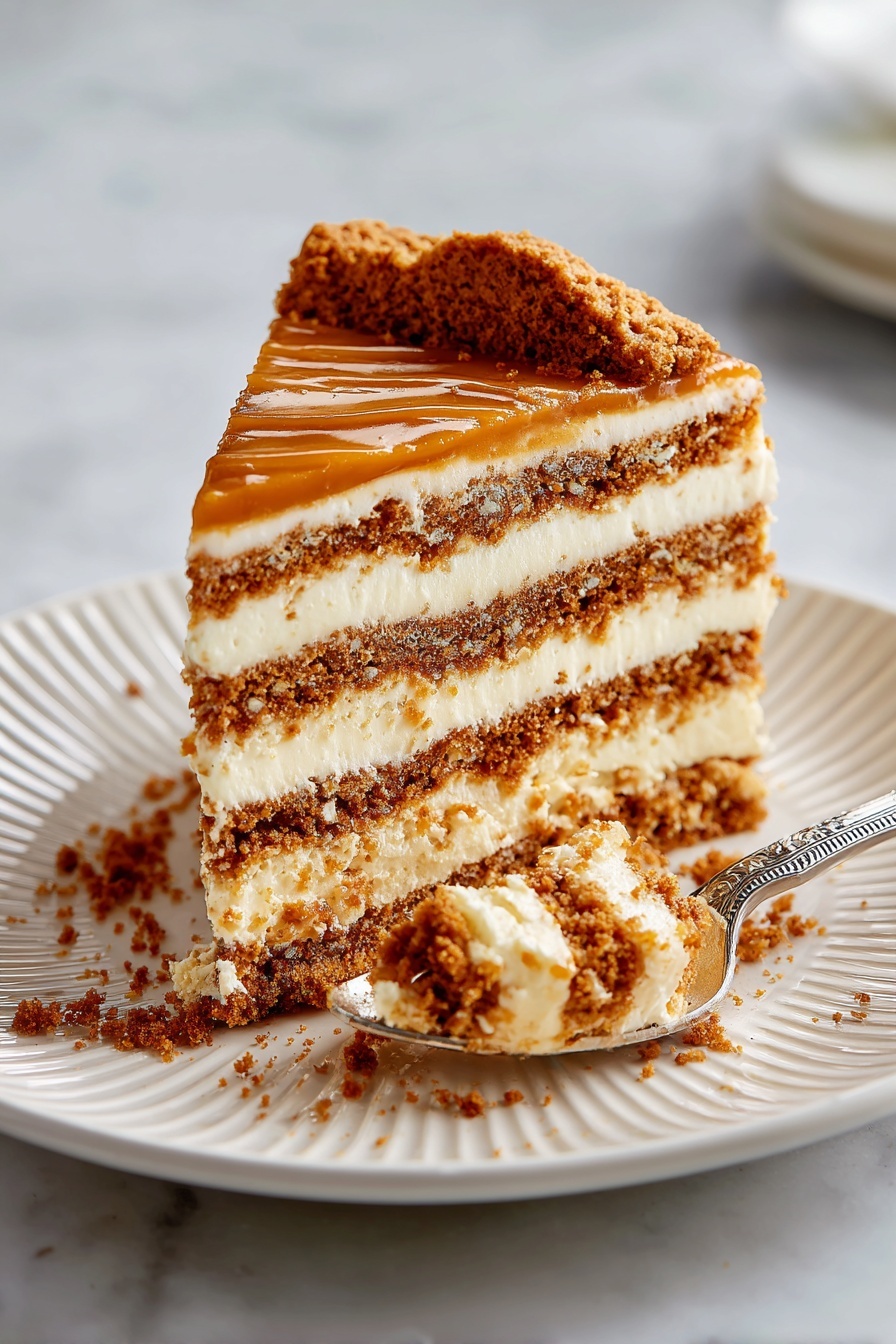
Garnishes
For serving, I usually drizzle warmed cookie butter over the top for extra richness, then sprinkle crushed Biscoff cookies for a little crunch and gorgeous texture contrast. If I want to get fancy, a few toasted pecans or a dusting of powdered sugar finish it off beautifully.
Side Dishes
This icebox cake stands well on its own, but I love serving it with a simple cup of strong coffee or spiced chai tea. The spice notes in the cookie butter pair beautifully with warm, aromatic drinks and make the experience full and cozy.
Creative Ways to Present
For parties, I sometimes slice the cake into individual rectangular portions and serve on pretty dessert plates with a drizzle of dark chocolate sauce and a tiny fresh mint leaf on top—it’s such an unexpected little touch that always impresses guests without extra fuss.
Make Ahead and Storage
Storing Leftovers
Keep any leftovers covered tightly in the refrigerator—either wrapped in plastic wrap inside the loaf pan or placed in an airtight container. I’ve found it stays delicious and maintains texture up to 3 days, making it great for meal prep or weekend treats.
Freezing
If you want to freeze this icebox cake, I recommend wrapping it very well in plastic wrap and then placing it in a freezer-safe container. When ready to enjoy again, thaw it overnight in the fridge. The texture holds up surprisingly well, though the cookies soften even more.
Reheating
Because this is a chilled dessert, reheating isn’t necessary or recommended. Instead, just let any frozen leftovers thaw fully in the fridge for that perfect creamy, layered finish.
FAQs
-
Can I use a different brand of cookie butter or cookies?
Absolutely! While Lotus Biscoff is the classic choice because of its distinct flavor and spice notes, you can substitute with any speculoos or ginger snap cookies and a matching cookie butter spread. Just keep in mind the flavor may vary slightly, but it’ll still be delicious.
-
How long can I store the icebox cake before serving?
This cake is best after at least 24 hours of chilling up to about 3 days. After that, the cookies might get too soft and the texture won’t be as enjoyable.
-
Can I make this recipe gluten-free?
You’ll need to find gluten-free speculoos-style cookies and a compatible cookie butter spread, which are available at some specialty stores or online. Just verify all ingredients to keep it truly gluten-free.
-
What’s the best way to unmold the cake from the loaf pan?
Because you line the pan with plastic wrap, simply lift the cake out by the wrap’s edges. Let it sit for a few minutes at room temperature if it feels too firm, then slice with a sharp knife for clean servings.
-
Can I use a different cheese instead of mascarpone?
Mascarpone is ideal for its creamy texture and mild flavor, but if you don’t have it, cream cheese can work in a pinch—just beat it very well to soften and replace some of the sugar to balance its tang.
Final Thoughts
This No-Bake Cookie Butter Icebox Cake Recipe holds a special place in my heart because it’s brought me so much joy during last-minute get-togethers and cozy nights at home. Really, once you taste that layered harmony of creamy, crunchy, spiced sweetness, there’s no turning back. I can’t wait for you to make it your own, sharing a slice with friends or simply savoring it solo with a good cup of tea. Give it a try—you’ll soon see why it’s become my go-to no-fuss dessert that looks and tastes way more complicated than it is!
Print
No-Bake Cookie Butter Icebox Cake Recipe
- Prep Time: 15 minutes
- Cook Time: 0 minutes
- Total Time: 1 day 15 minutes
- Yield: 8 servings
- Category: Dessert
- Method: No-Cook
- Cuisine: American
- Diet: Vegetarian
Description
A decadent no-bake icebox cake layered with creamy Biscoff cookie butter and mascarpone mixture, perfectly chilled for 24 hours. This easy dessert features crispy Lotus Biscoff cookies combined with a luscious whipped cream filling, offering a delightful balance of crunch and smoothness, finished with a drizzle of warm Biscoff spread and crushed cookies for extra indulgence.
Ingredients
Cream Mixture
- 2 cups heavy cream
- ½ cup (150g) Lotus Biscoff spread
- ⅓ cup (80g) mascarpone cheese
- 1 tsp pure vanilla extract
- Pinch of Kosher salt
- 2 Tbsp confectioner’s sugar
Assembly
- 2 packages Lotus Biscoff cookies (32 cookies per package)
- ⅓ cup warmed Lotus Biscoff spread for serving
Instructions
- Whip the cream: Pour 2 cups of heavy cream into a stand mixer bowl fitted with a whisk attachment. Whisk on medium-high speed until medium peaks form, indicating the cream holds shape but is still smooth.
- Combine cookie butter mixture: Add ½ cup (150g) Lotus Biscoff spread, ⅓ cup (80g) mascarpone cheese, 1 tsp pure vanilla extract, a pinch of Kosher salt, and 2 Tbsp confectioner’s sugar to the whipped cream. Mix gently until everything is thoroughly combined and smooth.
- Assemble the icebox cake: Line a loaf pan with plastic wrap. Place a single layer of Lotus Biscoff cookies along the bottom of the pan. Spread a layer of the Biscoff cream mixture evenly over the cookies, matching the thickness of the cookie layer. Repeat layering cookies and cream until reaching the top of the pan, finishing with a cookie layer.
- Refrigerate: Loosely wrap the loaf pan with plastic wrap and refrigerate for 24 hours to allow the cookies to soften and flavors to meld.
- Serve: When ready, unmold the cake onto a plate or tray. Drizzle with ⅓ cup of warmed Biscoff spread and sprinkle crushed Biscoff cookies on top for garnish. Slice and enjoy chilled.
Notes
- Nutrition facts are estimates based on using 45 cookies.
- Loaf pan sizes vary; a straight-sided pan uses about 9 cookies per layer, and 1½ packages of cookies suffice. For tapered pans, fewer cookies may be needed on the bottom layer.
- To warm cookie butter, heat ⅓ cup in a microwave-safe bowl in 30-second increments, stirring between intervals until smooth and warm.
- Icebox cakes can be made up to 3 days in advance and kept refrigerated.
- Store leftovers airtight in the loaf pan or container for up to 3 days.
- To freeze, wrap tightly in plastic, place in a freezer-safe container, and thaw overnight in the fridge before serving.
Nutrition
- Serving Size: 1 slice
- Calories: 350 kcal
- Sugar: 25 g
- Sodium: 120 mg
- Fat: 25 g
- Saturated Fat: 15 g
- Unsaturated Fat: 8 g
- Trans Fat: 0 g
- Carbohydrates: 28 g
- Fiber: 1 g
- Protein: 4 g
- Cholesterol: 90 mg


