No Bake Boston Cream Halloween Pie Recipe
If you’re looking for a show-stopping dessert that’s as fun to make as it is to eat, you’ve got to try my No Bake Boston Cream Halloween Pie Recipe. It’s this luscious chocolate and vanilla treat with a spooky twist—perfect for Halloween parties or just a cozy night in. What I love most is how easy it is to whip up without turning on the oven, which is a total win when you want something impressive but simple. Stick around, and I’ll walk you through every step so you nail it on your first go!
Why This Recipe Works
- No-Bake Ease: Skip the oven without sacrificing rich, indulgent flavor and texture.
- Perfect Layers: The crumbly chocolate crust, creamy pudding filling, and fluffy whipped cream create an irresistible combo.
- Festive Flair: The Halloween-themed chocolate bats add a whimsical and fun touch that guests love.
- Flexible Portions: Easily scale the recipe for one large pie or two smaller ones depending on your needs.

Ingredients & Why They Work
The magic of this No Bake Boston Cream Halloween Pie Recipe really lies in the way simple store-bought ingredients come together to feel homemade and special. Each plays a role to build the creamy, crunchy, and chocolatey layers perfect for Halloween fun. When shopping, pick quality chocolate bars and fresh whipping cream for the best results.
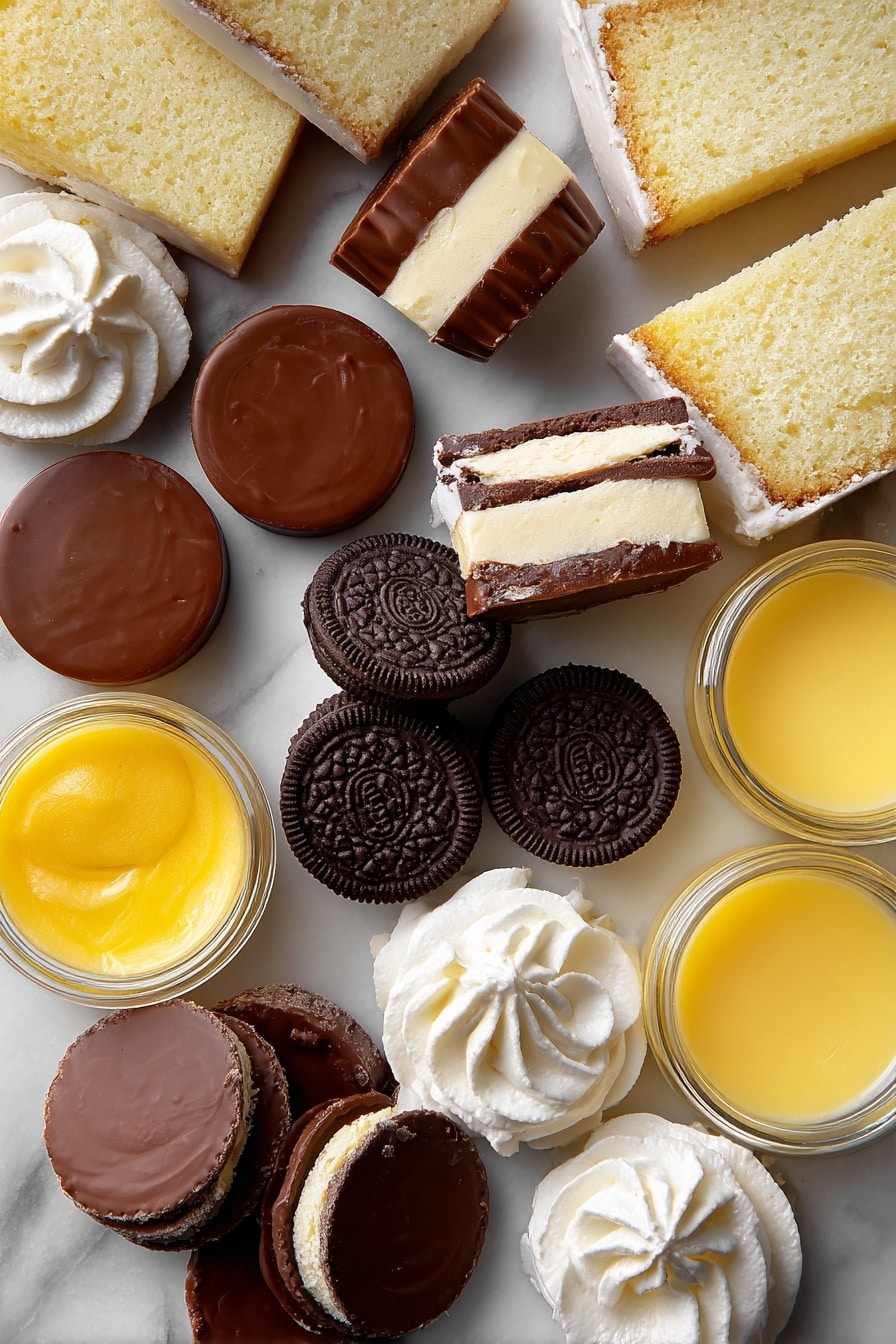
- Oreo chocolate baking crumbs: The base of the crust; I use finely crushed crumbs so they bind well with butter.
- Unsalted butter: Melts into the crumbs to create a sturdy yet tender crust.
- White granulated sugar: Just a touch to balance the bitter notes of the cookie crumbs.
- Semi-sweet chocolate: Melts into a glossy glaze that coats the crust, locking in flavor and texture.
- Corn syrup: Adds shine and smoothness to the chocolate glaze; a little secret for perfect texture.
- Yellow gel paste food/icing coloring: To get that perfect pumpkin-esque golden hue in the pudding — avoid grocery store liquid coloring, which can water down the mixture.
- Whipped cream: Lightens the filling; fresh homemade or popular frozen toppings like Cool Whip both work well.
- Instant vanilla pudding: The creamy heart of the pie; the yellow coloring gives it that iconic Boston cream look.
- White pound, angel food, or loaf cake: Provides soft texture contrast; slice or crumble it for easier layering.
- Mini Reese’s peanut butter cups and Oreo thins: For the whimsical Halloween chocolate bats topping the pie—trust me, they steal the show!
- Frosting/royal icing and edible eyes: To assemble the bats and add that fun spooky vibe.
Tweak to Your Taste
I love making this pie my own depending on the mood or occasion, and honestly, you should too! You can switch up the cake type or play around with the toppings to match your personal taste or dietary needs. There’s a lot of room for creativity here, so don’t hesitate to experiment.
- Variation: I sometimes swap out the vanilla pudding for chocolate pudding just to keep things chocolaty through and through — my chocoholic friends especially appreciate this twist.
- Diet-friendly tweak: For a lighter take, try using reduced-fat whipped topping and sugar-free pudding mixes with no compromise on flavor.
- Seasonal spin: Add a pinch of cinnamon or pumpkin spice to the pudding for an extra fall vibe that warms everyone’s heart.
Step-by-Step: How I Make No Bake Boston Cream Halloween Pie Recipe
Step 1: Prepping Your Pie Dish and Crust
Start by spraying your 10.5-inch round dessert dish or two smaller 9-inch pie plates with non-stick cooking spray — trust me, this makes removing the pie so much easier! Then, mix the Oreo crumbs with the melted butter and granulated sugar in a big bowl until everything clings together nicely. Press this firmly and evenly into the bottom of your pie dish. Chill the crust for about 10 minutes to set it hard — this is the foundation for your whole pie, so take your time getting it even!
Step 2: Making the Silky Chocolate Glaze
While the crust chills, melt your semi-sweet chocolate carefully. I prefer using the microwave at 50% power so it melts slowly — heat in 30-second bursts and stir in between to avoid scorching. Adding the butter and corn syrup right after melting gives you a beautifully glossy chocolate glaze. Be sure not to overheat or let any water near the chocolate or it’ll seize up into a gritty mess, which I learned the hard way once! Pour this glaze gently over the chilled crust and spread it out with a spatula, trying to keep everything smooth without breaking the crust. Pop it back in the fridge for 15 minutes to firm up.
Step 3: Layering the Creamy Filling
Now, spread your whipped cream evenly over the set chocolate crust—this adds that light fluffy layer we all crave. Then arrange slices or broken pieces of your white cake over the cream. For the pudding, mix your instant vanilla pudding and add yellow gel food coloring bit by bit until your mixture looks just right—a nice golden yellow that screams Boston cream. Spread the pudding over the cake layer, smoothing it into an even layer with a butter knife. You’ll want it as flush with the pie edges as possible to give a polished finish.
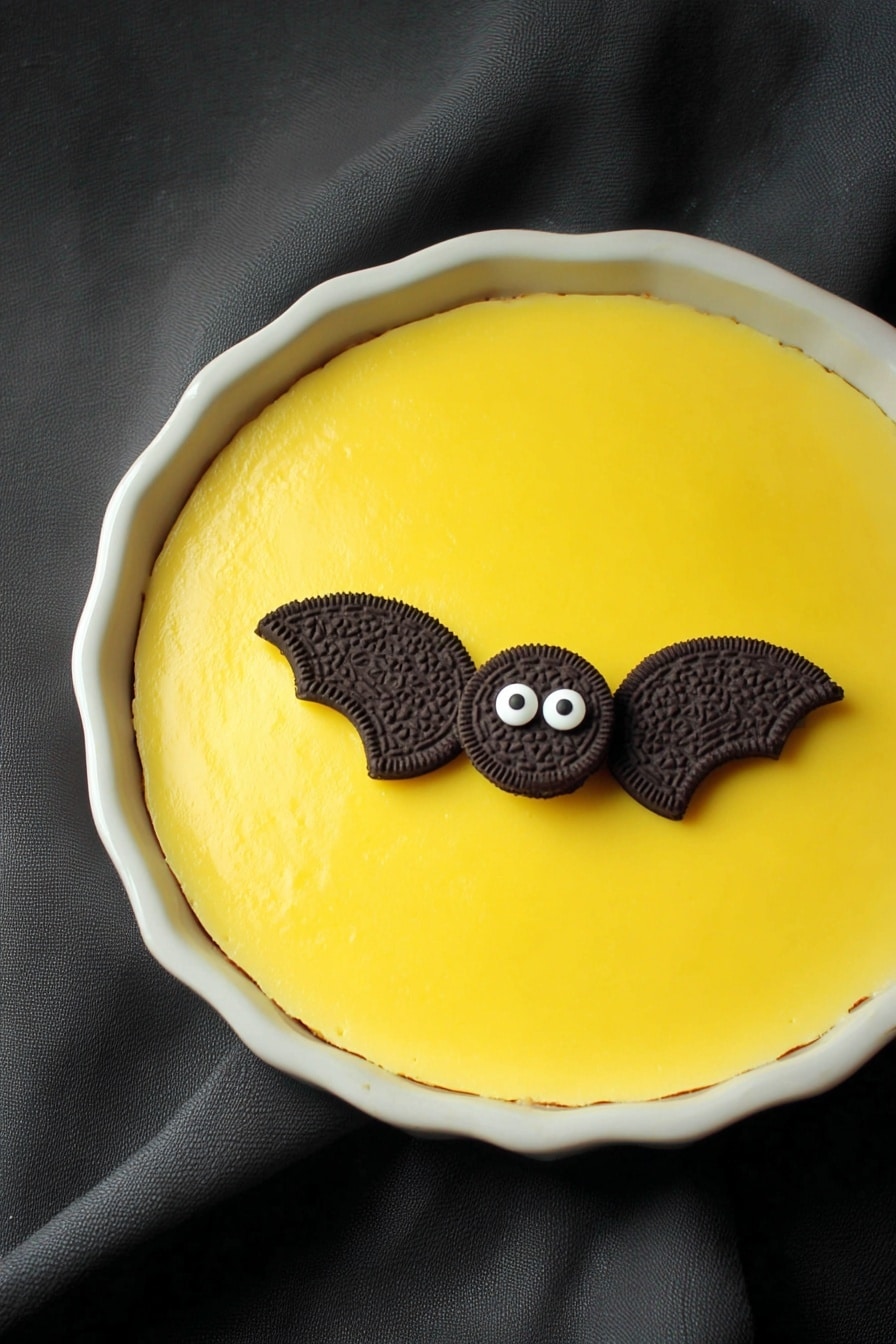
Step 4: Crafting the Chocolate Bats for the Finish
This is the fun part—your edible Halloween decor! Remove wrappers from mini Reese’s cups, then carefully break Oreo Thins in half and pull apart each half so you have “bat wings.” Scrape off excess frosting to keep the wings crisp. Attach one wing on each side of the Reese’s cup with a dab of frosting or royal icing, and use more frosting as glue to stick edible eyes right on top. Place your chocolate bats carefully on the top of the pie just before serving—trust me, don’t put them on early or they’ll get soggy and the eyes will slide off. I learned this the hard way after a disappointing lesson in bat mushiness!
Pro Tips for Making No Bake Boston Cream Halloween Pie Recipe
- Take Your Time Melting Chocolate: Heating chocolate slowly prevents it from burning or seizing, which can ruin the glaze.
- Chill in Between Steps: Let each layer set well in the fridge to keep the pie firm and prevent mixing.
- Use Gel Food Coloring: It’s concentrated and won’t thin out your pudding like liquid coloring does.
- Assemble Bats Last Minute: Adding the bats just before serving keeps them crisp and visually perfect—don’t skip this!
How to Serve No Bake Boston Cream Halloween Pie Recipe
Garnishes
I love a simple dusting of cocoa powder around the edges or a few extra edible eyes lurking near the pie to amp up the spooky vibes. Sometimes, I add a drizzle of caramel or extra melted chocolate if I’m feeling fancy, but the bats really steal the spotlight here.
Side Dishes
Since the pie is rich and creamy, I usually keep sides light—maybe some fresh berries or a crisp apple cider to wash it down. For a crowd, I like offering salted nuts or popcorn for that salty crunch contrast.
Creative Ways to Present
One Halloween, I served this pie on a rustic wooden slab surrounded by mini pumpkins and candles—people couldn’t stop taking pictures! For parties, placing it on a decorative cake stand with some spider webbing and plastic spiders really sets the spooky mood.
Make Ahead and Storage
Storing Leftovers
I cover leftover pie tightly with plastic wrap and keep it refrigerated. It stays fresh and indulgent for up to 3 days. Just remember to add the chocolate bats fresh before serving again for that perfect look and texture.
Freezing
You can freeze the pie without the bats wrapped well in foil and airtight containers for up to a month. When ready, thaw it overnight in the fridge. The texture remains great, though I don’t recommend freezing the bats themselves—they don’t hold up well.
Reheating
Since this is a chilled dessert, reheating isn’t necessary — in fact, it’s best enjoyed cold straight from the fridge once it’s set. Just let it sit out a few minutes before serving if it’s too chilly.
FAQs
-
Can I make the No Bake Boston Cream Halloween Pie Recipe ahead of time?
Absolutely! You can prepare the pie up to a day in advance. Just keep it refrigerated and wait to assemble the chocolate bats until just before serving to maintain their crispness.
-
What if I don’t have Oreo crumbs for the crust?
If you can’t find Oreo baking crumbs, just crush regular Oreo cookies finely and use them instead. Just make sure the crumbs are very fine so the crust holds together well once mixed with butter.
-
Can I use homemade pudding instead of instant?
You can, though instant pudding provides the firm texture this pie needs. If using homemade pudding, try adding a stabilizer like gelatin to help it set properly.
-
Is there a gluten-free version of this pie?
Yes! Use gluten-free chocolate cookie crumbs or a gluten-free crust base and gluten-free cakes. Most other ingredients, like pudding and chocolate, are naturally gluten-free but always double-check packages.
Final Thoughts
This No Bake Boston Cream Halloween Pie Recipe has become my go-to for fall dessert celebrations—it’s playful, delicious, and honestly, simple enough for a weeknight treat if you’re feeling fancy. I hope you enjoy making it as much as I do, and don’t be afraid to put your own spin on it! Just remember the little tips about chilling and assembling the bats last to keep everything looking perfect. Now, grab your mixing bowls and get ready to impress your family or friends with this spooky-yet-classic pie that’s sure to become a Halloween favorite.
Print
No Bake Boston Cream Halloween Pie Recipe
- Prep Time: 45 minutes
- Cook Time: 0 minutes
- Total Time: 1 hour 10 minutes
- Yield: 8 servings
- Category: Dessert
- Method: No-Cook
- Cuisine: American
Description
A festive No Bake Boston Cream Halloween Pie featuring a crunchy Oreo crust, a rich chocolate glaze, creamy whipped filling with vanilla pudding, and spooky chocolate bats decoration. Perfect for Halloween celebrations.
Ingredients
Pie Crust
- ½ 400g box Oreo chocolate baking crumbs
- ½ cup unsalted butter melted
- 2 tablespoon white granulated sugar
Pie Glaze
- 6 oz melted semi-sweet chocolate
- 1 tablespoon corn syrup
- ¼ cup melted butter
- ½ teaspoon yellow gel paste food/icing colouring (avoid grocery store food coloring)
Pie Filling
- 2 cups whipped cream (homemade or frozen dessert topping, e.g., Cool Whip)
- 12 99g containers snack size instant vanilla pudding (3 packages of 4 pudding)
- 1 270g – 370g white pound, angel food or loaf cake, sliced or broken up
Chocolate Bats
- 4 miniature Reese’s peanut butter cups
- 4 Oreo Chocolate (thins) Sandwich Cookies
- dabs frosting/icing (royal icing recommended)
- 8 edible eyes
Instructions
- Prepare the Pie Dish: Spray the inside of a 10.5 inch round (2.5 inches deep) dessert dish or two shallow (1.5 inch) 9 inch pie plates with non-stick cooking spray.
- Make the Crust: In a large bowl, mix Oreo cookie baking crumbs, melted unsalted butter, and white granulated sugar until the mixture clings together. Press this mixture evenly into the bottom of the pie plate. Chill for 10 minutes.
- Prepare the Glaze: Melt the semi-sweet chocolate in the microwave on 50% power for about 2 ½ to 3 minutes until melted. Stir in the melted butter and corn syrup until smooth. Pour glaze evenly over the cookie crust, spreading gently with a spatula to cover the entire surface without breaking up the crumbs. Refrigerate until firm, about 15 minutes.
- Assemble the Filling: Spread whipped cream evenly over the chilled chocolate cookie crust. Then layer sliced or broken up white cake pieces over the whipped cream.
- Color and Add Pudding: Add yellow gel food coloring to the vanilla pudding until desired yellow color is achieved. Spoon the pudding on top of the cake layer and use a butter knife to smooth the surface flush with the pie edge, adjusting the amount as needed.
- Create Chocolate Bats: Remove wrappers from Reese’s peanut butter cups. Break Oreo Chocolate Thin Sandwich Cookies in half and separate into individual pieces (8 bat wings). Scrape off frosting from cookie pieces. Press one cookie piece on each side of a Reese’s cup to form bat wings. Use royal icing to pipe frosting on the back of the edible eyes and secure them to the center of each Reese’s cup. Repeat for all four bats.
- Decorate and Serve: Place chocolate bats on top of the pie immediately before serving. If not serving immediately, refrigerate the pie without bats and add bats just before serving to prevent them from becoming mushy.
Notes
- For one 9 inch pie plate, halve the recipe and servings (8 servings).
- Use gel paste food coloring for the yellow pudding for best color results; grocery store food coloring may not achieve the correct hue.
- You can melt chocolate using a double boiler instead of microwave for better control.
- Avoid moisture when melting chocolate to prevent it from seizing.
- Refrigerate pie until firm before adding filling and glaze.
- Do not assemble chocolate bats too early to keep eyes from running and bats from becoming mushy.
Nutrition
- Serving Size: 1 slice
- Calories: 380 kcal
- Sugar: 28 g
- Sodium: 160 mg
- Fat: 25 g
- Saturated Fat: 12 g
- Unsaturated Fat: 10 g
- Trans Fat: 0 g
- Carbohydrates: 35 g
- Fiber: 2 g
- Protein: 5 g
- Cholesterol: 35 mg
