Mummy Dogs Recipe
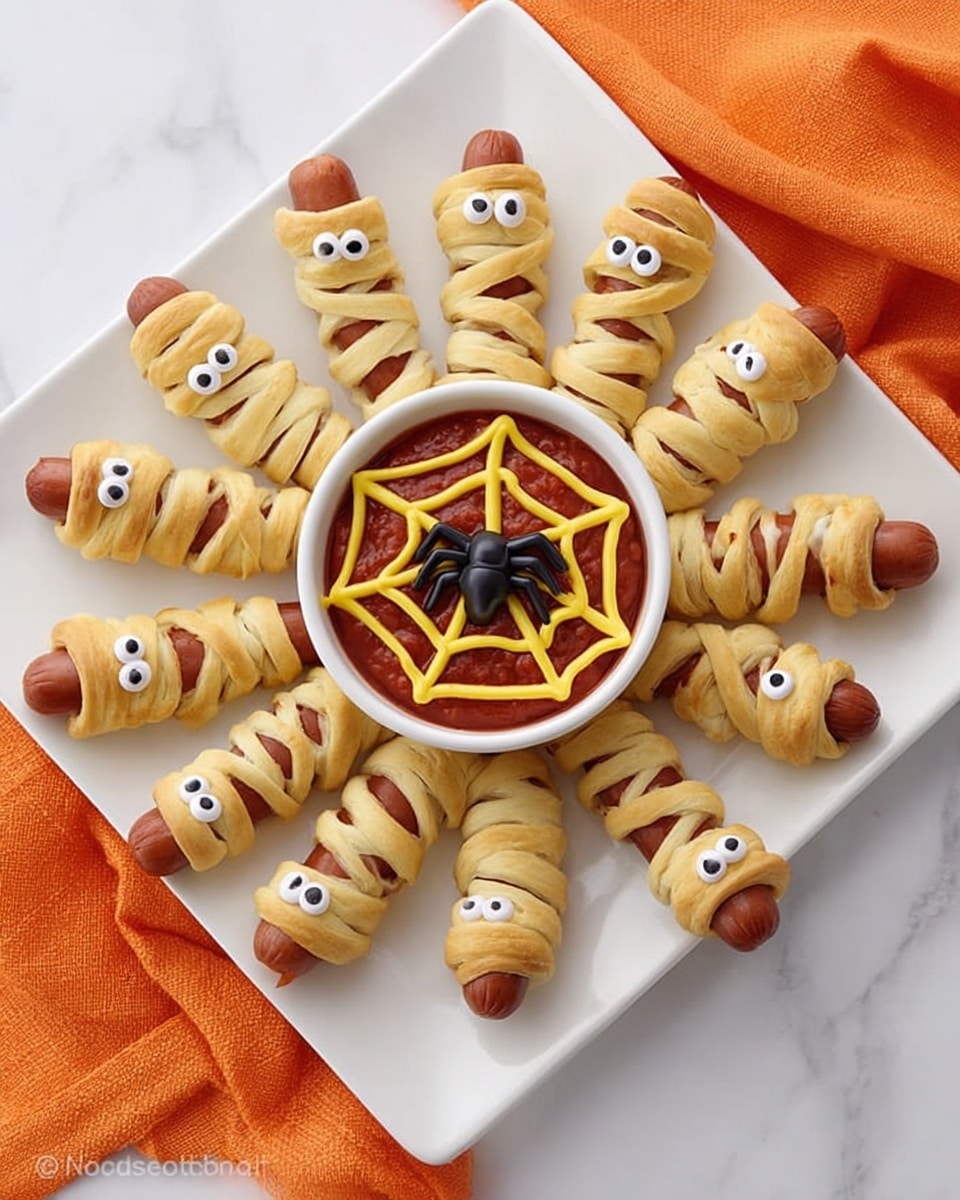
If you’re looking for a fun, spooky snack that’s as tasty as it is adorable, you’re going to love this Mummy Dogs Recipe. It’s quick, kid-friendly, and perfect for Halloween parties or anytime you want to make mealtime a little more magical. Trust me, once you try this, it’ll become a favorite go-to that brings everyone running to the kitchen for seconds!
Why This Recipe Works
- Simple Ingredients: Minimal pantry staples make it easy to whip up anytime.
- Kid-Approved Fun: The “mummy” look is irresistible for little ones and great for parties.
- Quick Prep & Bake: You’ll be amazed at how fast they come together and hit the table.
- Perfect Balance: Gooey cheese inside and flaky dough outside for the best flavor combo.

Ingredients & Why They Work
The beauty of this Mummy Dogs Recipe is the way simple ingredients team up to create something far more exciting than the sum of their parts. Each one lends a little magic, and I’ll share some tips so you get the best results.
- Hot Dogs: Go for your favorite brand, but I like ones with a good snap to hold the cheese and dough together well.
- Crescent Roll Dough: The buttery, flaky dough is what makes these mummies come alive. I always buy canned dough for ease – it’s foolproof!
- American Cheese: These slices melt perfectly and add that creamy, nostalgic flavor kids adore inside.
- Decorative Eyes or White Cheese & Olives: Eyes bring the mummy to life. I often improvise with cheese and bits of olive for a homemade touch.
Tweak to Your Taste
This Mummy Dogs Recipe is super versatile, so I encourage you to make it your own. Whether you want to spice up the filling or swap out ingredients for dietary preferences, there are lots of fun twists.
- Variation: One time, I swapped the American cheese for pepper jack for a little heat – it was a hit with the grown-ups!
- Diet-Friendly: Try turkey dogs or plant-based hot dogs for a leaner or vegetarian option without losing any of the fun.
- Seasonal Flavors: I’ve added a brush of garlic butter on top before baking to amp up the flavor during cozy fall nights.
- Extra Crispy: For crunch lovers, adding a sprinkle of Parmesan over the dough before baking really elevates the texture.
Step-by-Step: How I Make Mummy Dogs Recipe
Step 1: Prep Like a Pro
First things first: preheat your oven to 375°F (190°C). While it warms up, dry your hot dogs thoroughly with paper towels—this keeps the dough from slipping around and helps it stick better. Then, gently pinch the crescent roll dough to seal those perforations; you want smooth strips for wrapping. Slice the dough into thin strips, around 1/2 inch wide, because those thin “bandages” really give the authentic mummy look.
Step 2: Cheese In, Dough On
Cut your American cheese into long strips, about twice as long as the dough strips. Using a small knife, cut a slit along each hot dog to create a little pocket—you’re basically tucking cheese inside the mummy’s body. Slide one cheese strip inside each hot dog, then wrap it snugly but not too tight with the dough strips. The idea is to leave gaps so you can see the “bandages,” but make sure the dough overlaps enough to hold everything together.
Step 3: Bake to Golden Perfection
Place your mummies on a baking sheet lined with parchment or a silicone mat for easy cleanup. Pop them in the oven for about 15 minutes. You’ll know they’re ready when the dough is golden brown and puffed just right. The hot dogs should be heated through, and the cheese melted and gooey inside. It smells amazing at this point—warning: it’s hard to wait!
Step 4: Add Those Spooky Eyes
While still warm, it’s time to get creative with the eyes. I like to use a straw to punch out tiny circles of white cheese, then place a small slice of olive for the pupil—this gives a cute, slightly creepy stare. Gently press the eyes onto the warm dough so they stick but don’t melt completely. If you’re using store-bought decorative eyes, just place them on now!
Pro Tips for Making Mummy Dogs Recipe
- No-Perforation Dough: Pinching out the crescent roll perforations stops tearing and helps the dough stay intact during baking.
- Cheese Pocket Trick: Making a slit pocket in the hot dog keeps the cheese firmly inside and prevents it from oozing out too much.
- Thin Dough Strips: Wrapping with thin strips rather than large pieces helps the mummy’s look and ensures the dough bakes evenly.
- Eye Placement: Add eyes while the dough is warm but not hot – too hot and the cheese melts away; too cool and the eyes won’t stick.
How to Serve Mummy Dogs Recipe
Garnishes
I like to keep garnishes simple but festive. A little squiggle of mustard or ketchup outside the mummy for “bloody veins” amps up the spooky vibe without overpowering the flavor. Sometimes, I add thinly sliced green onions for a pop of color and fresh bite.
Side Dishes
Pair these mummy dogs with a crisp side salad or homemade sweet potato fries for something a little healthier. For parties, popcorn or veggie sticks with a fun dip like ranch or BBQ are always winners alongside this playful snack.
Creative Ways to Present
Once, I served my mummy dogs standing upright in a jar filled with celery sticks to create a creepy “mummy graveyard” centerpiece for a Halloween party — so much fun! You could also use a dark platter lined with lettuce “grass” and scatter plastic spiders around for effect.
Make Ahead and Storage
Storing Leftovers
I store any leftover mummy dogs in an airtight container in the refrigerator for up to three days. When you want a snack, they reheat beautifully without losing their texture.
Freezing
You can freeze these before baking by wrapping them on a baking sheet, then transferring to a freezer bag. When ready, bake from frozen, adding a few extra minutes to the cooking time. I’ve done this a few times for quick party prep, and it works like a charm.
Reheating
To reheat, pop mummy dogs in a 350°F oven for about 10 minutes until warmed through and crisp again. Microwave works in a pinch but can make the dough a bit soggy, so I save that for emergencies.
FAQs
-
Can I use different types of cheese in the Mummy Dogs Recipe?
Absolutely! While American cheese melts perfectly and is classic, you can experiment with mozzarella, cheddar, or pepper jack for different flavors and textures. Just cut into strips that fit well inside the hot dog.
-
How do I make sure the dough doesn’t tear while wrapping?
Be sure to pinch the crescent roll dough’s perforations before slicing it into strips. Using gentle pressure to wrap rather than stretching the dough helps prevent tearing. Thin, even strips also make wrapping easier and less likely to break.
-
Can I prepare Mummy Dogs ahead of time?
Yes! You can assemble them and store in the fridge for a few hours before baking. For longer storage, freeze assembled mummies before baking and cook from frozen when needed, adding a few minutes to bake time.
-
What kinds of hot dogs work best for this recipe?
I recommend regular or beef hot dogs with some firmness (a good snap). Turkey or veggie dogs work too, but pick ones that hold their shape well when heated to avoid soggy results.
Final Thoughts
This Mummy Dogs Recipe is one of those charming little meals that brings everyone together with smiles and delight. I’ve lost count of how many times it’s saved the day when I needed a quick, fun dinner or a party treat that leaves a lasting impression. Give it a try—you’ll have a blast making these spooky, cheesy mummies and eating every delicious bite. Trust me, the smiles and compliments are guaranteed!
Print
Mummy Dogs Recipe
- Prep Time: 10 minutes
- Cook Time: 15 minutes
- Total Time: 25 minutes
- Yield: 8 servings
- Category: Appetizer
- Method: Baking
- Cuisine: American
Description
Mummy Dogs are a fun and spooky twist on classic hot dogs, perfect for Halloween or any festive occasion. Wrapped in crescent roll dough with melted cheese inside and decorated with edible eyes, these savory treats are both delicious and visually entertaining.
Ingredients
Main Ingredients
- 8 hot dogs
- 1 can crescent roll dough
- 4 slices American cheese
- 16 decorative eyes (or white cheese and an olive for homemade eyes)
Instructions
- Preheat Oven: Preheat your oven to 375 degrees Fahrenheit to prepare for baking the mummy dogs.
- Prepare Cheese Strips: Cut the 4 slices of American cheese into about 16 long strips and set them aside for filling.
- Prepare Dough Strips: Pinch the crescent roll dough to eliminate perforations, then cut the dough into thin strips suitable for wrapping.
- Dry Hot Dogs: Pat dry the hot dogs with paper towels to remove moisture before filling and wrapping.
- Create Cheese Pocket: Make a slit in each hot dog lengthwise to create a pocket to insert a cheese strip inside.
- Stuff and Wrap: Place a cheese strip inside each hot dog slit, then wrap the hot dogs with the crescent dough strips, leaving gaps to resemble a mummy’s bandages.
- Bake: Arrange the wrapped hot dogs on a baking sheet and bake in the preheated oven for about 15 minutes or until the hot dogs are hot and the dough is golden brown and cooked through.
- Make Eyes: Use a straw to punch out small circles from a slice of white cheese and gently blow them out. Slice olives into tiny pupils.
- Decorate: While the mummy dogs are still warm, press the cheese eyes onto them and add the olive pupils to complete the mummy look.
Notes
- Use a paper towel to thoroughly dry the hot dogs to help the dough stick better.
- If you don’t have decorative eyes, homemade eyes from white cheese and olive slices work perfectly.
- Pinching crescent dough perforations prevents dough from tearing while wrapping.
- Leave small gaps between dough strips for a spooky mummy bandage effect.
- You can substitute American cheese with any melting cheese you prefer.
- For extra flavor, sprinkle some garlic powder or Italian seasoning on the dough before baking.
- Serve warm for best taste and texture.
Nutrition
- Serving Size: 1 mummy dog
- Calories: 250 kcal
- Sugar: 2 g
- Sodium: 700 mg
- Fat: 15 g
- Saturated Fat: 6 g
- Unsaturated Fat: 7 g
- Trans Fat: 0.5 g
- Carbohydrates: 18 g
- Fiber: 1 g
- Protein: 9 g
- Cholesterol: 30 mg


