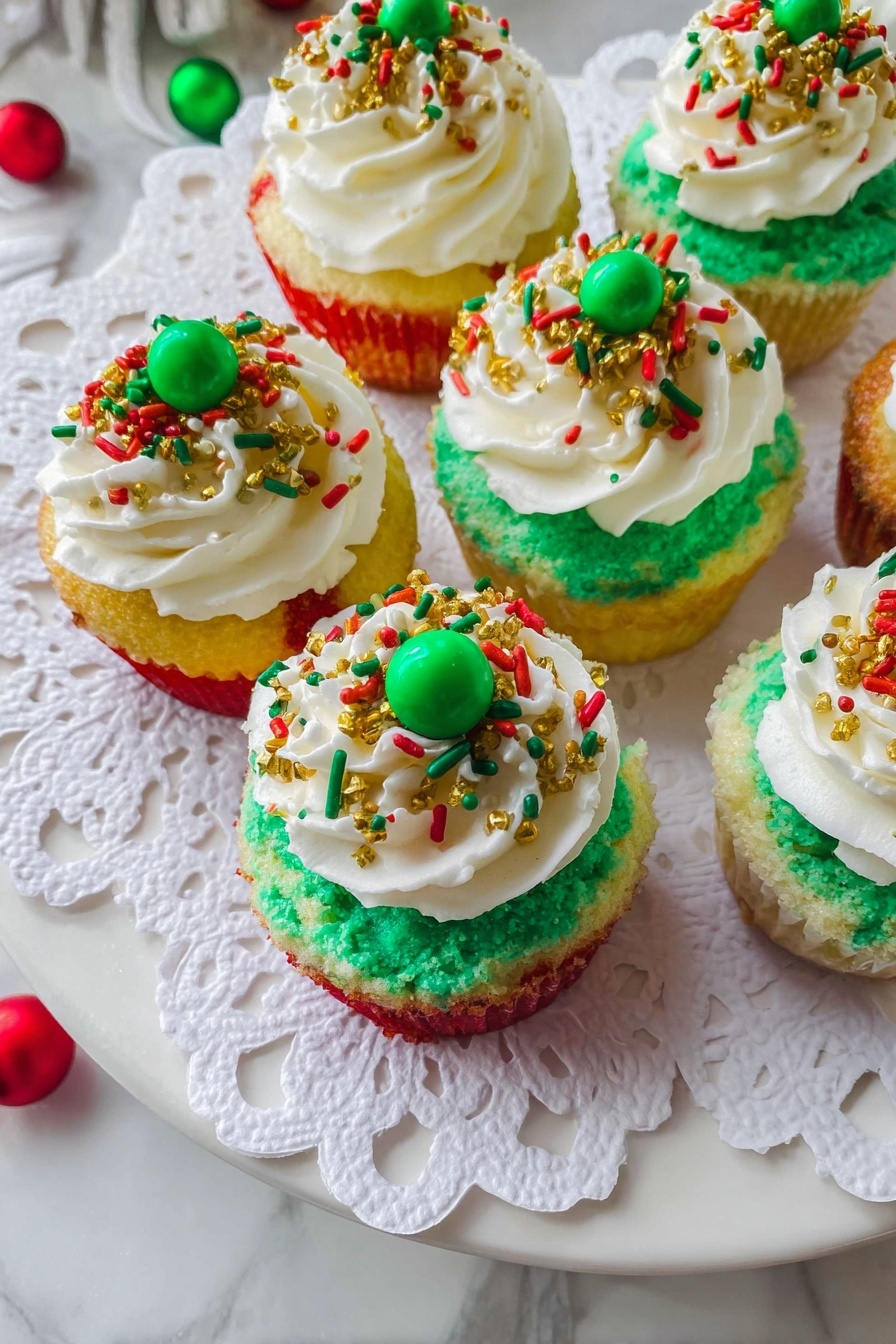
Mini Christmas Oreo Cheesecakes Recipe
Hey friend! If you’re looking for a festive dessert that’s both adorable and absolutely delicious, I have just the thing for you. This Mini Christmas Oreo Cheesecakes Recipe is seriously one of my favorite holiday treats to make and share. Picture creamy cheesecake swirled with Christmas colors, all nestled on a crunchy Oreo crust—mini bites of joy that are perfect for parties, gifts, or just treating yourself to something special this winter. Trust me, once you try these, they’ll be a staple in your holiday baking lineup.
Why This Recipe Works
- Perfect Bite-Sized Portions: These mini cheesecakes are easy to serve and enjoy without any messy cutting.
- Oreo Base Adds Crunch and Flavor: The cookie crust with Oreo filling gives each bite a deep chocolate flavor that complements the creamy cheesecake perfectly.
- Festive Swirl Colors: Red and green marbled cheesecake batter make these mini treats pop on your holiday dessert table.
- Easy Prep & Baking: Minimal fuss, no complicated steps, and the water bath trick keeps these cheesecakes silky smooth.

Ingredients & Why They Work
Each ingredient here plays a key role in making these mini Christmas Oreo cheesecakes creamy, flavorful, and festive. Let me share some tips to help you pick the best stuff and know why it works.
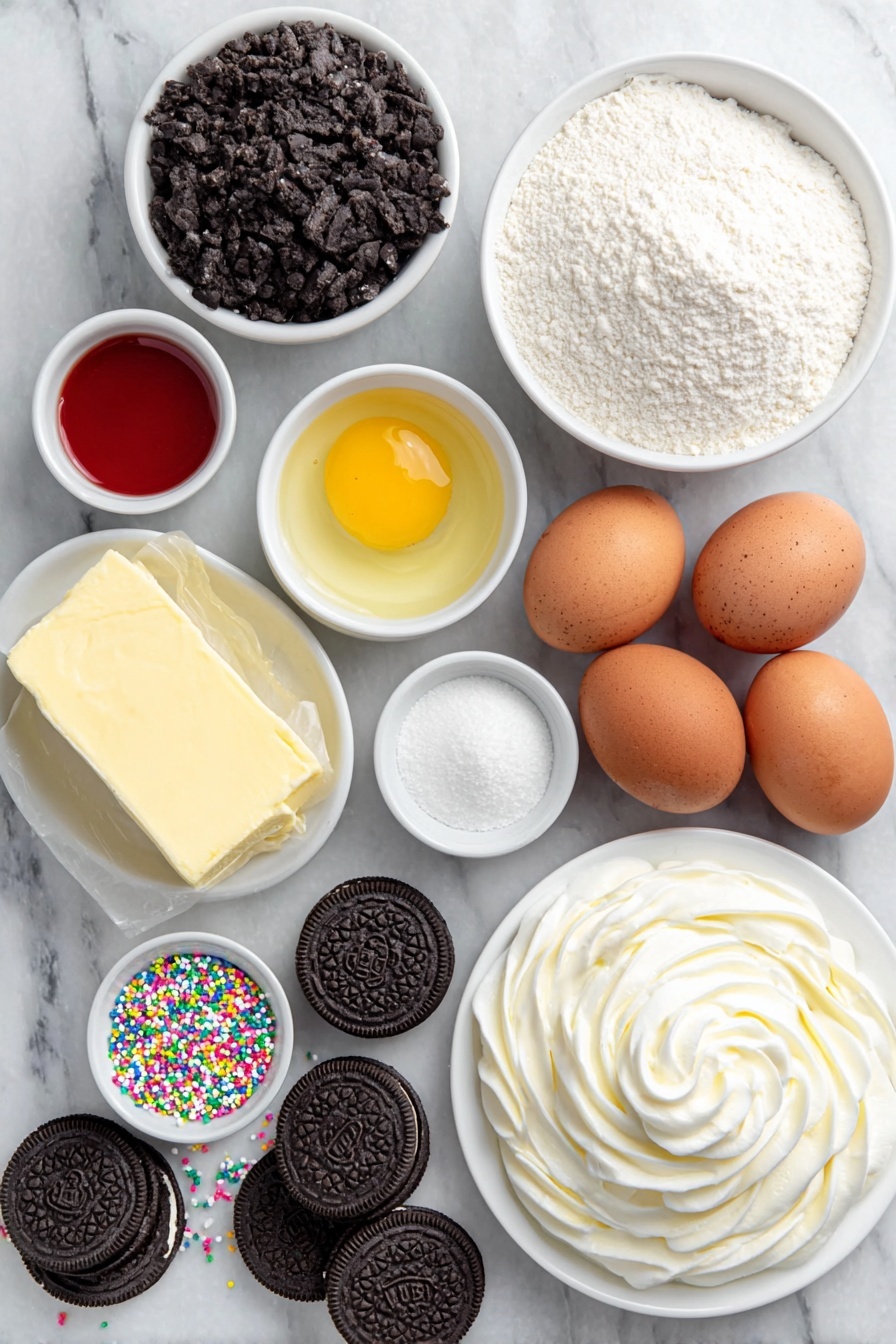
- Oreo Cookies: Using the whole cookie with filling crushed gives a rich chocolatey base; no need to separate the cream—it keeps the crust moist and flavorful.
- Butter: Melted butter binds those Oreo crumbs into a sturdy crust—don’t skip melting it first for even mixing.
- Cream Cheese: The star of the show—make sure it’s softened to room temp to get that silky texture without lumps.
- Granulated Sugar: Sweetens nicely without overshadowing the tangy cream cheese.
- All Purpose Flour: Just a touch adds structure so the cheesecake holds up well without cracking.
- Vanilla Extract: Adds warmth and depth to the flavor; pure vanilla works best.
- Lemon Zest: A little zing to brighten the cheesecake and balance richness.
- Heavy Cream: Makes the batter luscious and creamy—fold gently to keep the texture smooth.
- Eggs: The binding agents that help set the cheesecake as it bakes.
- Red & Green Food Coloring: For that festive twinkle—use gel colors for vibrant hues without affecting texture.
- Whipped Cream & Sprinkles: Optional toppings that add whimsy and extra festive flair just before serving.
Tweak to Your Taste
I love how versatile this Mini Christmas Oreo Cheesecakes Recipe is—it’s so easy to personalize! Whether you want a more intense chocolate flavor, gluten-free options, or a different holiday theme, you can tweak this recipe with confidence.
- Flavor Twist: I once added a swirl of peppermint extract into the batter for an extra holiday kick; it was a big hit at my family gathering.
- Crust Change: Swap Oreo for gluten-free chocolate cookies if you want to make these gluten-free-friendly.
- Color Variations: Try pastel colors for an Easter theme—just replace the red and green with soft pink and light blue food coloring.
- Non-Dairy Alternative: Use vegan cream cheese and coconut cream—just note the texture will be slightly different but still tasty!
Step-by-Step: How I Make Mini Christmas Oreo Cheesecakes Recipe
Step 1: Prepare the Oreo Crust
I start by crushing the Oreo cookies—I like using my food processor because it’s quick and gets the crumbs fine but not powdery. Remember, keep the filling in the cookies; it’s what makes the crust extra moist and flavorful. Then, mix the crumbs with melted butter until every crumb is coated. When I press the mixture into cupcake liners, I use a small rolling pin or the bottom of a small glass to firmly pack the base down. This helps make sure the crust won’t crumble when you eat these mini cheesecakes!
Step 2: Whip Up the Creamy Batter
Next up is the cheesecake batter. I beat the softened cream cheese until smooth first—that’s key for a lump-free batter. Then, add sugar, flour, and lemon zest and mix briefly. The eggs go in next, added all at once, and I beat just until combined—overbeating can trap air and cause cracks later. Finally, gently fold in the heavy cream; this step adds the creamy richness without deflating the batter.
Step 3: Add Festive Swirls of Color
I divide about a third of the batter into two smaller bowls, adding red food coloring to one and green to the other. Mixing these colors well gives those lovely Christmas hues. When it’s time to fill the cupcake liners, I alternate spooning plain, green, and red batter in layers, then swirl with a skewer in circular motions to get a beautiful marbled effect. Just be careful not to let the skewer touch the Oreo crust — it keeps that distinct crust flavor intact.
Step 4: Bake with a Water Bath for Silky Texture
Baking these mini cheesecakes at 150°C with a pan of water inside the oven works wonders—a simple water bath keeps the environment moist and prevents cracking or drying out. I bake them for about 20 minutes and then let them sit in the oven for 5 minutes more with the heat off. Then, I let them cool at room temperature for 15 minutes before refrigerating to chill thoroughly.
Step 5: Chill, Unmold, and Garnish
Patience is key here! After at least 4 hours in the fridge (overnight is even better), I carefully peel off the cupcake liners so I don’t damage the delicate edges. A dollop of whipped cream and some festive sprinkles on top add that final joyful touch—because what’s Christmas without a little sparkle?
Pro Tips for Making Mini Christmas Oreo Cheesecakes Recipe
- Room Temperature Ingredients: I always make sure the cream cheese is softened to avoid lumps in the batter—this simple step makes a huge difference!
- Don’t Overmix: Too much beating traps air bubbles which can cause cracks or uneven baking; mixing until just combined keeps the cheesecake smooth.
- Water Bath Magic: Placing a baking pan filled with water in the oven creates steam that keeps the cake moist and prevents cracking.
- Peel Casings Gently: After chilling, carefully peeling off cupcake liners prevents breaking the edges; sometimes running a small knife around the rim helps.
How to Serve Mini Christmas Oreo Cheesecakes Recipe
Garnishes
I love topping these mini cheesecakes with a generous swirl of whipped cream—that creaminess balances the denser cheesecake so nicely. Then, sprinkles in red, green, or gold add a festive pop of color and crunch. Sometimes, I’ll add a tiny fresh mint leaf or a dusting of cocoa powder for an extra touch. These little finishing touches really elevate the presentation.
Side Dishes
Since these are bite-sized and rich, I usually serve them alongside something light like a crisp fruit salad or a warm cup of spiced tea or coffee. They also pair beautifully with holiday cocktails or even a glass of sweet dessert wine if you’re entertaining adults.
Creative Ways to Present
One year, I placed these mini cheesecakes in a tiered dessert stand decorated with holly and fairy lights for our Christmas party—it was an instant conversation piece! You can also place each cheesecake in mini clear plastic boxes tied with festive ribbons for edible gifts. Another fun idea is to serve them on a wooden board sprinkled with crushed candy canes for a colorful display.
Make Ahead and Storage
Storing Leftovers
I always keep leftover mini cheesecakes in an airtight container in the refrigerator. They stay fresh and creamy for up to 3-4 days. Bringing them out for a quick snack during the hectic holiday season never gets old!
Freezing
Freezing works surprisingly well for this recipe. I freeze mine on a tray first so they don’t stick together, then transfer to a freezer bag or container. When you want one, thaw in the fridge overnight. The texture is still creamy and lovely, which is great if you want to prep ahead of time.
Reheating
I don’t recommend reheating cheesecake since it’s best served chilled, but if you prefer it a bit softer, just let it sit out at room temperature for 10-15 minutes before serving. That brings out the flavors without compromising texture.
FAQs
-
Can I use a different cookie for the crust besides Oreos?
Absolutely! While Oreos add a classic chocolate flavor and creaminess, you can substitute with any chocolate sandwich cookie or even graham crackers, chocolate wafers, or ginger snaps for a different twist. Just crush them fine and mix with melted butter the same way.
-
How can I make these mini cheesecakes gluten-free?
Use gluten-free chocolate sandwich cookies or gluten-free graham crackers for the crust. Be sure to check that all other ingredients like sprinkles or flavorings are also gluten-free. The cheesecake batter itself is naturally gluten-free aside from a small amount of flour, which you can replace with gluten-free flour blends.
-
Why do you use a water bath when baking?
The water bath helps keep the oven humid, which prevents the cheesecakes from cracking and drying out. It creates a gentle, even heat so you get that smooth, silky texture that we all love in a cheesecake.
-
Can I make a large cheesecake instead of minis?
Definitely! You can pour this same batter into a 7-inch or 9-inch round cake pan and bake for longer (about 55-70 minutes depending on size) until the edges are set and the center still jiggles slightly. Just adjust the baking time and keep an eye to avoid overbaking.
Final Thoughts
Honestly, I think these Mini Christmas Oreo Cheesecakes Recipe are the perfect blend of festive fun and crowd-pleasing deliciousness. I’ve made them for years now, and every time they wow my guests with their creamy texture and chocolaty crust. Plus, their cute size means you can sneak a few without anyone noticing! I hope you have as much fun making and enjoying them as I do—so grab those Oreos, get your mixer ready, and let the holiday magic begin!
Print
Mini Christmas Oreo Cheesecakes Recipe
- Prep Time: 30 minutes
- Cook Time: 20 minutes
- Total Time: 4 hours 50 minutes
- Yield: 12 servings
- Category: Dessert
- Method: Baking
- Cuisine: American
Description
Delight in these festive Mini Christmas Cheesecakes featuring a crunchy Oreo cookie crust, creamy batter with colorful marbled red and green hues, topped with whipped cream and sprinkles. Perfect for holiday gatherings and easy to make ahead with a chilling time that ensures rich, smooth texture.
Ingredients
Cheesecake Crust
- 100 g Oreo Cookies crushed with the filling
- 30 g butter melted
Cheesecake Batter
- 450 g cream cheese
- 150 g granulated sugar
- 20 g all purpose flour
- ½ teaspoon vanilla extract
- 1 tablespoon lemon zest
- 60 g heavy cream
- 2 eggs
- red & green food coloring (as needed)
Topping & Garnish
- Whipped cream (to taste)
- Sprinkles (to taste)
Instructions
- Preheat Oven and Prepare Pan: Preheat oven to 150°C. Place cupcake casings into a cupcake tray, ready for filling.
- Make the Crust: Crush Oreo cookies including the filling into fine crumbs using a food processor or rolling pin in a zip lock bag. Mix crumbs with melted butter until fully moistened.
- Form the Crust Base: Spoon one tablespoon of crumb mixture into each cupcake casing. Press down firmly using the side of a small rolling pin to form a solid base. Set aside.
- Beat Cream Cheese: In a bowl, beat cream cheese until smooth for 30 to 60 seconds, scraping the bowl often to ensure even texture.
- Add Dry Ingredients and Flavor: Add sugar, flour, and lemon zest; beat for 20 seconds until combined well.
- Incorporate Eggs and Vanilla: Add both eggs and vanilla extract at once; beat for 10 seconds, scrape bowl, then beat another 10 seconds until smooth and creamy. Avoid overbeating to prevent excess air.
- Fold in Heavy Cream: Gently fold the heavy cream into the batter for richness without deflating.
- Color the Batter: Divide about one third of the batter into two small bowls. Add green food coloring to one and red to the other, mixing thoroughly.
- Assemble the Batter: Alternate spooning plain, green, and red batters into the crust-lined casings. Use a skewer to swirl and create a marbled effect without touching the crust.
- Bake With Moisture: Bake at 150°C for 20 minutes. Place a water-filled baking dish in the oven to maintain moist baking conditions.
- Rest in Oven: Leave cheesecakes in the oven after baking for an additional 5 minutes for gentle cooling.
- Cool Completely: Remove from oven; cool at room temperature for 15 minutes before refrigerating.
- Chill Thoroughly: Refrigerate for at least 4 hours or overnight to set perfectly.
- Remove Wrappers and Garnish: Carefully peel off cupcake casings. Top cheesecakes with whipped cream and sprinkles before serving.
- Store Leftovers: Keep any leftover cheesecakes refrigerated to maintain freshness.
Notes
- To make a full large cheesecake, use the same batter and pour into a 7-inch round cake tin; bake for 55 to 60 minutes.
- For a 9-inch round cheesecake, double the recipe and bake for 65 to 70 minutes until the edges are firm and the center remains slightly wobbly.
- A water bath or moist baking environment helps prevent cracking and results in a creamier texture.
- Do not overbeat the batter to avoid incorporating too much air, which can cause cracks during baking.
- Use fresh cream cheese and eggs at room temperature for best results.
- Refrigerate fully before removing cupcake liners to avoid breaking.
Nutrition
- Serving Size: 1 mini cheesecake
- Calories: 320 kcal
- Sugar: 22 g
- Sodium: 180 mg
- Fat: 24 g
- Saturated Fat: 14 g
- Unsaturated Fat: 8 g
- Trans Fat: 0 g
- Carbohydrates: 18 g
- Fiber: 1 g
- Protein: 5 g
- Cholesterol: 90 mg

