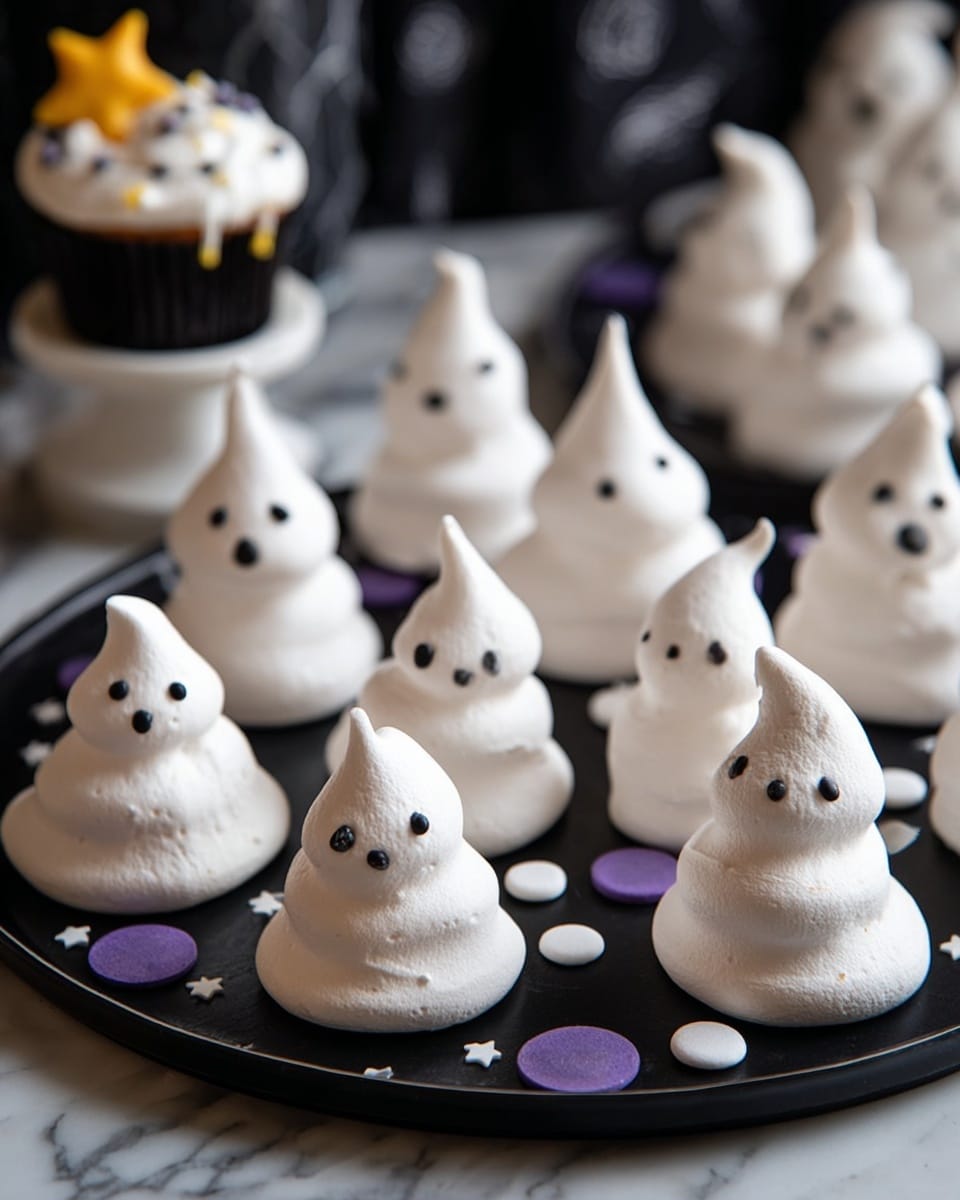
Meringue Ghosts Recipe
If you’re looking to add a fun, spooky twist to your next dessert table, I’ve got just the thing for you — a seriously charming and surprisingly simple Meringue Ghosts Recipe. These little ghosts are light, crisp, and absolutely perfect for Halloween or any time you want to bring a smile to your friends’ faces. Trust me, once you see how easy and delightful these are, you’ll want to make them again and again!
Why This Recipe Works
- Simple Ingredients: Uses just a few pantry staples, making it easy and budget-friendly.
- Perfect Texture: The low-and-slow baking method creates crisp, delicate meringues that melt in your mouth.
- Fun Decoration: Customizable black food coloring details let you get creative with your ghostly faces.
- Room Temperature Eggs: Ensures your egg whites whip up to stiff peaks without a hitch.

Ingredients & Why They Work
These simple ingredients come together to create the lightest, crispest meringue ghosts you’ll ever make. I always recommend using room temperature egg whites and super fine sugar for the best whipping action and smooth texture.
- Caster (Super Fine) Sugar: Dissolves easily into the egg whites, ensuring a glossy, stiff meringue without grit.
- Egg Whites: Giving them time to warm up to room temperature helps you get more volume and stability.
- Black Food Colouring Gel or Paste: Perfect for drawing cute, spooky eyes and mouths that stand out sharply on the white meringues.
Tweak to Your Taste
One of the things I love about this Meringue Ghosts Recipe is how easy it is to personalize. Whether you want to experiment with flavors or try decorations beyond the traditional black, there’s plenty of room to make it your own.
- Variation: I sometimes add a drop of peppermint extract for a seasonal twist that tastes like a cool breeze on a chilly October night.
- Dietary swap: Naturally gluten-free and egg-white based, these meringues fit most allergen-free diets with no extra fuss.
- Colorful faces: Try adding food coloring in soft pastel shades to create cute monsters or friendly ghosts for a kids’ party.
Step-by-Step: How I Make Meringue Ghosts Recipe
Step 1: Prep with Cleanliness
First things first — make sure your mixing bowl and utensils are squeaky clean and completely grease-free. This is one spot where I learned the hard way. Even a little grease can stop the egg whites from whipping properly, so give everything a quick wipe down with lemon juice or vinegar if you want to be sure.
Step 2: Whisk the Egg Whites to Soft Peaks
Using a hand mixer or stand mixer, whisk your room-temperature egg whites at medium speed. Watch carefully as they start to foam and then turn soft and billowy — soft peaks are when the whites hold a peak that droops slightly. This is your green light to start adding sugar slowly.
Step 3: Gradually Add Sugar & Whip to Stiff Peaks
Spoon in the caster sugar a little at a time, whisking continuously so it dissolves fully and helps build structure. When you lift your whisk, the meringue should form stiff, shiny peaks that stand tall without flopping over. This step can take a bit, but patience here leads to perfect texture.
Step 4: Pipe Your Ghosts
Fit a piping bag with a 1cm round nozzle and fill with the meringue. On a baking sheet lined with non-stick parchment, pipe out your adorable little ghost shapes. It’s fun to experiment with shapes — I like a rounded head with a slightly wavy base to give that floating ghost vibe. The size is up to you, but piping uniform ghosts will bake evenly.
Step 5: Bake Low & Slow
Pop your tray in the oven preheated to 100°C (212°F) and let the ghosts bake for about 1 hour. The key here is patience — slow baking dries them out perfectly without browning. To test readiness, your meringues should lift off the paper easily and feel dry and crisp.
Step 6: Cool and Decorate
Turn off the oven and leave your meringue ghosts inside for a few hours or overnight. This extra drying time prevents them from becoming sticky. Once completely cool, grab your black food colouring pen or edible paint and add little eyes and mouths. It’s the best part — watching these cute ghosts come to life!
Pro Tips for Making Meringue Ghosts Recipe
- Room Temperature Egg Whites: Taking this extra step really helps your meringue reach maximum volume and stiffness.
- Slow Sugar Addition: Adding sugar gradually while whisking avoids grainy texture in your meringues.
- Leave Meringues to Cool in Oven: This prevents cracks and keeps them beautifully crisp.
- Use a Clean Bowl: Even tiny grease traces can stop the egg whites from whipping up — trust me, I’ve learned this the hard way!
How to Serve Meringue Ghosts Recipe
Garnishes
I love pairing these meringue ghosts with a sprinkle of edible glitter or a dusting of cocoa powder for a bit of contrast and whimsy. Sometimes, I pop a few fresh mint leaves on the side for a splash of green — it’s a simple way to make the plate pop visually and add freshness.
Side Dishes
These ghosts are delightful alongside a rich hot chocolate or a spiced pumpkin latte — perfect for chilly nights. If you want to get fancy, serve them on top of dark chocolate mousse or a berry compote for contrasting textures and flavors.
Creative Ways to Present
For a fun Halloween party, I’ve piped the meringue ghosts directly onto cupcake tops or nestled them around a spooky parfait. Another favorite? Arranging them in a small “graveyard” scene with crushed Oreo “dirt” and candy tombstones—kids (and adults!) go wild for that one every time.
Make Ahead and Storage
Storing Leftovers
I store leftover meringue ghosts in an airtight container at room temperature to keep them crispy. If they start to lose their crunch, the container likely wasn’t fully airtight or they absorbed moisture from the air, so double-check your seal next time.
Freezing
Freezing meringue ghosts isn’t my go-to because they can become a bit chewy when thawed. However, if you do freeze them, wrap each one lightly in parchment paper and place in a sealed container. They should keep for a couple of weeks but always test texture before serving.
Reheating
If your meringue ghosts have softened, you can crisp them back up by baking at 100°C (212°F) for 10-15 minutes. Keep an eye on them to avoid browning – patience is key!
FAQs
-
Can I use regular granulated sugar instead of caster sugar for this Meringue Ghosts Recipe?
Technically yes, but caster sugar dissolves faster and leads to a smoother, silkier meringue. Using regular granulated sugar might result in a slightly grainy texture, so if you don’t have caster sugar, try pulsing granulated sugar briefly in a food processor to make it finer.
-
Why do my meringue ghosts hollow out or crack?
Hollow or cracked meringues usually mean the oven temperature is too high or they baked too quickly. Stick with a low temperature (100°C/212°F) and bake slowly, allowing the meringues to dry out but not brown. Also, leaving the meringues in the turned-off oven to cool helps prevent cracks.
-
Can I make meringue ghosts without a piping bag?
Absolutely! You can spoon the meringue onto the baking sheet and shape with the back of a spoon or a small spatula, but piping gives a neater ghost shape that’s easier to decorate. If you want neat shapes, a piping bag is definitely worth having around.
-
How long do meringue ghosts keep crisp?
Stored correctly in an airtight container at room temperature, they’ll stay crisp for up to a week. Moisture is the enemy here, so avoid storing them in humid areas or refrigerators.
Final Thoughts
This Meringue Ghosts Recipe holds a special place in my heart because it’s a sweet, simple way to bring a little whimsy and joy into the kitchen. It’s fun to make, looks enchanting, and tastes like a delicate cloud of sweetness. Next time you want to impress without stressing, give this a try — you’ll have everyone asking for these adorable little ghosts again and again!
Print
Meringue Ghosts Recipe
- Prep Time: 30 minutes
- Cook Time: 1 hour
- Total Time: 1 hour 30 minutes
- Yield: 20 ghosts
- Category: Dessert
- Method: Baking
- Cuisine: Western
- Diet: Vegetarian
Description
Delight in these whimsical Meringue Ghosts, a perfect light and airy treat for Halloween or any festive occasion. Crisp on the outside and melt-in-your-mouth soft inside, these ghost-shaped meringues are beautifully decorated with black food coloring to create playful eyes and mouths. Simple ingredients and straightforward steps make this recipe an enjoyable activity and a stunning dessert centerpiece.
Ingredients
Meringue
- 120 g caster (super fine) sugar
- 2 medium egg whites, at room temperature
Decoration
- Black food colouring gel or paste for the eyes and mouth
Instructions
- Preheat the Oven: Preheat your oven to 100 degrees Celsius (212 degrees Fahrenheit), Gas Mark 1/2. Line a large baking sheet with non-stick baking parchment to prepare for baking the meringues.
- Whisk Egg Whites: In a completely spotless bowl, whisk the egg whites at medium speed until soft peaks form. Gradually add the caster sugar one spoonful at a time, continuing to whisk until the meringue is shiny and stiff.
- Pipe the Ghosts: Transfer the meringue mixture into a piping bag fitted with a 1cm round nozzle. Pipe ghost shapes onto the lined baking sheet until all the meringue is used.
- Bake the Meringues: Place the baking sheet in the oven and bake for about 1 hour or until the meringues are crisp and easily lift off the baking sheet. After baking, turn off the oven and leave the meringue ghosts inside for several hours or overnight to dry completely.
- Decorate the Ghosts: Once completely cool, use a black food colouring pen or a fine paintbrush with food colouring paste to draw eyes and mouths on the ghosts. Allow the decorations to set before serving.
Notes
- Ensure the bowl and whisk are completely clean and free from grease to achieve perfect stiff peaks when whisking egg whites.
- You can decorate the ghosts using either a black icing pen or a small paintbrush dipped in black food colouring paste for detailed designs.
- For best results, leave the meringues to dry overnight in the turned-off oven after baking to ensure they are crisp.
Nutrition
- Serving Size: 1 ghost
- Calories: 25 kcal
- Sugar: 6 g
- Sodium: 0 mg
- Fat: 0 g
- Saturated Fat: 0 g
- Unsaturated Fat: 0 g
- Trans Fat: 0 g
- Carbohydrates: 6 g
- Fiber: 0 g
- Protein: 1 g
- Cholesterol: 0 mg

