Marshmallow Swirl Chocolate Fudge Recipe
If you’ve ever dreamed of the perfect chocolate fudge that’s velvety, rich, and just a little bit whimsical, you’re going to love this Marshmallow Swirl Chocolate Fudge Recipe. I love how the marshmallow swirls add a fun texture and a subtle sweetness that makes each square irresistibly special. Stick with me, and I’ll walk you through every step to ensure your fudge turns out beautifully smooth, sliceable, and utterly delicious.
Why This Recipe Works
- Perfect Texture Balance: Sweetened condensed milk keeps the fudge soft yet firm enough to cut cleanly.
- Flavor Harmony: Semi-sweet chocolate melts into a luscious base, while vanilla brings depth and warmth.
- Marshmallow Swirls: Gently folding in marshmallows creates delightful pockets of chewy sweetness without melting away.
- Easy Prep & Cleanup: Lining your pan with parchment paper makes slicing and serving a breeze.

Ingredients & Why They Work
This Marshmallow Swirl Chocolate Fudge Recipe’s magic comes straight from a handful of simple ingredients that play off each other beautifully. Each component is carefully chosen to contribute creamy texture, rich chocolate flavor, or that signature marshmallow pop. I always recommend quality ingredients for best results—your fudge will taste that much better!

- Semi-sweet chocolate chips: The foundation of the fudge’s chocolate flavor and silky texture. I prefer good quality chips because they melt smoothly without graininess.
- Sweetened condensed milk: This thick, sugary milk is what makes the fudge creamy and chewy, without needing to temper chocolate or watch a candy thermometer.
- Unsalted butter: Adds richness and smoothness, helping everything combine nicely.
- Vanilla extract: Just a touch to brighten and balance the chocolate’s richness.
- Salt: Enhances the sweetness and deepens the chocolate flavor, so don’t skip it!
- Mini marshmallows: The star of the show—folded in just right so you get gooey swirls instead of fully melted marshmallows.
Tweak to Your Taste
One of the reasons I adore this Marshmallow Swirl Chocolate Fudge Recipe is how easy it is to make it your own. Feel free to mix up the chocolate type or add fun mix-ins to customize it exactly how you like. You’ll find it’s forgiving enough to handle small changes without losing that perfect fudgy texture.
- Variation: When I want a richer fudge, I swap semi-sweet chips for dark chocolate—total game changer if you love intense chocolate flavor.
- Dairy-free: Using vegan condensed milk and dairy-free chocolate chips works beautifully for a plant-based twist.
- Mix-ins: I sometimes toss in chopped nuts or crushed peppermint candies for crunch and festive flair.
- Marshmallow remix: If mini marshmallows aren’t handy, marshmallow fluff folded in gently works too—though the texture shifts slightly.
Step-by-Step: How I Make Marshmallow Swirl Chocolate Fudge Recipe
Step 1: Prep Your Pan
Start by lining an 8×8-inch baking pan with parchment paper, leaving some overhang on the edges. This little trick makes it so much easier to lift the entire block of fudge out once it’s set — trust me, trying to pry it out without parchment can be a sticky nightmare!
Step 2: Melt Chocolate, Milk, Butter, and Salt
Over low heat, combine your semi-sweet chocolate chips, sweetened condensed milk, unsalted butter, and salt in a medium saucepan. Stir constantly with a silicone spatula to avoid scorching. The mixture should become glossy and smooth in about 8-10 minutes. Patience here pays off — too hot, and your chocolate might seize or grain, so keep it gentle!
Step 3: Add Vanilla
Once off the heat, stir in the vanilla extract to brighten up the flavors. It’s a small addition that really makes a big difference in the background taste of the fudge.
Step 4: Fold in Marshmallows
Quickly but gently fold in the mini marshmallows with your spatula. The goal is to swirl them throughout without melting them completely, so stop folding as soon as they’re evenly distributed and still somewhat whole. This step is where your fudge gets its signature look and delightful, chewy texture bubbles.
Step 5: Transfer to Pan and Swirl
Pour the chocolate mixture into the prepared pan and use your spatula to create gentle swirls on top, letting little marshmallow peaks peek through. This not only looks beautiful but promises gooey bites in every square.
Step 6: Chill and Set
After letting it cool on the counter for about 10 minutes, pop the pan into your fridge for at least 2 hours. This chilling time is essential — rushing it will make cutting a messier experience.
Step 7: Slice and Serve
When your fudge is completely firm, use the parchment paper to lift it out from the pan. For the cleanest cuts, I like to butter my knife lightly so the slices glide through smoothly without sticking or crumbling.
Pro Tips for Making Marshmallow Swirl Chocolate Fudge Recipe
- Low Heat Melting: I learned the hard way that rushing with high heat burns the chocolate—go slow, stir often, and be patient.
- Marshmallow Magic: Adding marshmallows off the heat keeps them from melting into the fudge, preserving those lovely swirls.
- Parchment Paper Benefits: Always line your pan; it’s a lifesaver for easy removal and neater slices.
- Cutting Cleanly: Warm your butter knife under hot water, dry it, then slice—this simple trick keeps edges tidy and smooth.
How to Serve Marshmallow Swirl Chocolate Fudge Recipe

Garnishes
When I serve this fudge, I love sprinkling crushed peppermint crystals or flaky sea salt on top of some pieces for a flavor contrast. A few toasted coconut flakes also add a lovely visual and textural surprise. It’s these little touches that make sharing fudge feel extra special.
Side Dishes
Any warm drink like coffee, chai, or hot cocoa pairs beautifully with the rich chocolate and marshmallow sweetness. For an indulgent spread, I like to serve this fudge alongside fresh berries or a scoop of vanilla ice cream.
Creative Ways to Present
For parties, I arrange fudge squares on a pretty platter lined with parchment and drizzle a thin caramel sauce over the top. You can also layer fudge squares between wax paper sheets inside a decorative tin for gifting. Wrapping individual squares in colorful parchment ribbons makes for a charming presentation that guests enjoy unwrapping.
Make Ahead and Storage
Storing Leftovers
I store leftover fudge in an airtight container in the fridge for up to a week, separating layers with parchment to prevent sticking. It holds up beautifully and stays soft and chewy, making it perfect for nibbling over several days.
Freezing
I’ve had great success freezing this fudge, especially when I want to prep for later occasions. Cut the fudge into squares, place parchment paper between the layers, and keep it in an airtight container or freezer bag. It lasts up to three months and defrosts overnight in the fridge without losing texture or flavor.
Reheating
If you want softer fudge bites after refrigerated storage, I gently warm individual squares for a few seconds in the microwave (about 5-7 seconds) just until slightly softened—be careful not to melt completely. This brings back that freshly-made feel and melts the marshmallow swirls perfectly.
FAQs
-
Can I use a different type of chocolate for the fudge?
Absolutely! While the recipe calls for semi-sweet chocolate chips, you can substitute with milk chocolate for a sweeter fudge or dark chocolate for a richer taste. Just make sure the chocolate chips are good quality and melt smoothly to keep the texture perfect.
-
What’s the best way to store leftover fudge?
Store leftover fudge in an airtight container in the fridge, layering with parchment paper to prevent sticking. It keeps well for up to 7 days and can also be frozen for up to 3 months.
-
Why didn’t my marshmallows swirl properly?
Marshmallows melt quickly with heat, so you want to fold them in gently and off the heat to keep their shape. If you stir too long or over heat, the marshmallows will dissolve instead of forming swirls.
-
Can this fudge be made vegan or dairy-free?
Yes! Use vegan condensed milk alternatives and dairy-free chocolate chips, making sure all other ingredients like butter are plant-based. Just note texture and flavor might vary slightly but still delicious.
Final Thoughts
Honestly, this Marshmallow Swirl Chocolate Fudge Recipe has become one of my absolute favorites for gift-giving and cozy nights in. It’s simple enough to whip up without stress, yet feels like a gourmet treat every single time. I can’t wait for you to try it out and enjoy those gooey marshmallow pockets alongside rich chocolate bliss. Once you nail this, you’ll see why it’s a recipe I come back to again and again—trust me, your kitchen (and anyone you share it with) will thank you!
Print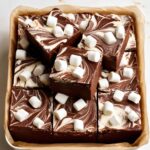
Marshmallow Swirl Chocolate Fudge Recipe
- Prep Time: 10 minutes
- Cook Time: 10 minutes
- Total Time: 2 hours 20 minutes
- Yield: 16 servings
- Category: Dessert
- Method: Stovetop
- Cuisine: American
Description
Marshmallow Swirl Fudge is a rich and creamy treat featuring a smooth blend of semi-sweet chocolate, sweetened condensed milk, and swirls of mini marshmallows. This easy no-bake fudge sets firm in the fridge, delivering a perfect balance of sweetness and texture with each bite.
Ingredients
Fudge Base
- 3 cups semi-sweet chocolate chips
- 1 (14 oz) can sweetened condensed milk
- 2 tbsp unsalted butter
- 1/8 tsp salt
- 1 tsp vanilla extract
Marshmallow Swirl
- 1 1/4 cups mini marshmallows
Instructions
- Prep Your Pan: Line an 8×8-inch square baking pan with parchment paper, leaving a slight overhang on the sides for easy removal of the fudge once set.
- Melt Chocolate, Milk, Butter, and Salt: In a medium saucepan over low heat, combine the chocolate chips, sweetened condensed milk, unsalted butter, and salt. Stir constantly to melt everything smoothly without overheating or burning.
- Add Vanilla: Remove the pan from heat and stir in the vanilla extract until fully combined and smooth.
- Fold in Marshmallows: Quickly add the mini marshmallows and fold them in gently with a spatula just enough to create lovely swirls without melting them completely.
- Transfer to Pan and Swirl: Pour the mixture into the prepared baking pan. Use a spatula to gently swirl the top so some marshmallows peek through the surface decoratively.
- Chill and Set: Let the fudge cool at room temperature for about 10 minutes, then refrigerate for at least 2 hours until fully set and firm to touch.
- Slice and Serve: Once set, lift the fudge out of the pan using the parchment paper overhang. Using a buttered knife, slice it into 16 evenly sized squares and serve.
Notes
- Don’t overheat the chocolate or it’ll seize; stir constantly on low heat for smooth melting.
- Add marshmallows last so they retain their shape and create beautiful swirls inside the fudge.
- Use parchment paper in the pan for easy lifting and cleaner slicing.
- A buttered knife helps to make neater cuts through the fudge.
- Store fudge in an airtight container to prevent drying out.
- You can swap semi-sweet chocolate chips with dark or milk chocolate for variation.
- Use marshmallow fluff as a substitute if mini marshmallows are unavailable.
- For extra texture, add crushed peppermint or chopped nuts.
- Vegan versions can be made using vegan condensed milk and chocolate.
- Fudge can be made up to 5 days in advance and refrigerated or frozen for up to 3 months.
Nutrition
- Serving Size: 1 square
- Calories: 165 kcal
- Sugar: 21 g
- Sodium: 45 mg
- Fat: 7 g
- Saturated Fat: 4 g
- Unsaturated Fat: 3 g
- Trans Fat: 0 g
- Carbohydrates: 25 g
- Fiber: 1 g
- Protein: 1 g
- Cholesterol: 10 mg
