Maple Glazed Donuts Recipe
If you’re craving that perfect balance of fluffy dough and sweet, sticky glaze, you’re in the right place. This Maple Glazed Donuts Recipe is honestly one of my all-time favorites to make at home. The rich maple flavor in the glaze perfectly complements the tender, slightly chewy texture of the doughnuts, making each bite a little moment of joy. Whether you’re an experienced baker or giving donuts a whirl for the first time, I’ll walk you through it so you can nail these delights effortlessly.
Why This Recipe Works
- Perfect Dough Texture: The dough is delightfully tender yet slightly chewy because of the balance between bread flour and a little baking powder.
- Maple Flavor That Pops: Using maple extract combined with light corn syrup in the glaze gives you a maple punch without overpowering the donut’s taste.
- Double Rise for Fluffiness: The two-step rise in a warm, humid oven environment delivers that beautiful puffy donut that fries up light and airy.
- Simple Ingredients: No weird stuff here—just pantry basics that magically come together for an indulgent treat.

Ingredients & Why They Work
Every ingredient in this Maple Glazed Donuts Recipe plays a vital role. From the yeast’s bubbly activation to the powdered sugar’s smooth sweetness in the glaze, these items combine to give you that classic donut experience at home. Here are a few tips to help you pick and prep your ingredients before you get started.

- Active Dry Yeast: Make sure your yeast is fresh so it bubbles up nicely; that’s how you know your dough will rise perfectly.
- Bread Flour: I love bread flour here for some chewiness, but all-purpose works if that’s what you’ve got. It’s all about texture preference.
- Butter-flavored Shortening: This adds richness and tenderness; regular shortening will do too if you want a more neutral flavor.
- Egg Yolks: Using just yolks keeps the dough soft and rich without getting too heavy.
- Maple Extract: A little goes a long way; taste your glaze and adjust to your liking for an authentic maple note.
- Powdered Sugar: Make sure it’s sifted or lump-free to get your glaze perfectly smooth.
- Peanut Oil: Ideal for frying at home thanks to its high smoke point and neutral flavor.
Tweak to Your Taste
I love experimenting with this Maple Glazed Donuts Recipe by adding little personal tweaks here and there. Honestly, the basic recipe is a winner, but feel free to make it your own! You can adjust the maple extract for a more subtle or bold taste, or swap peanut oil for vegetable oil if you prefer.
- Extra Maple Kick: I sometimes double the maple extract in the glaze because I adore that rich maple flavor, and it makes the donuts taste just a bit more luxurious.
- Gluten-Free Variation: I haven’t tried it personally with gluten-free flour, but subbing a blend designed for yeast breads might work—just expect slightly different texture.
- Healthy Swap: You can use honey instead of corn syrup in the glaze, but it will alter the shine and sweetness level, so test and adjust accordingly.
Step-by-Step: How I Make Maple Glazed Donuts Recipe
Step 1: Wake Up Your Yeast
Start by mixing the warm water, active dry yeast, and a tablespoon of sugar in a large bowl or your stand mixer. Let it hang out for 5 minutes until it’s frothy and bubbly—this means the yeast is alive and ready. If nothing happens here, don’t be shy about starting fresh. It’s such a bummer to miss this step and have the dough not rise.
Step 2: Mix and Beat the Dough
Once your yeast is lively, add half a cup of sugar, shortening, egg yolks, and vanilla. Beat it with the mixer’s paddle attachment until the shortening is broken up but not fully mixed in—this little texture quirk actually helps make the dough tender. Next, gradually add flour, salt, and baking powder while continuing to mix. When the dough starts coming together, switch to your dough hook or knead by hand on a floured surface.
Step 3: Knead and Create Your Dough Ball
Knead the dough for about 5 minutes. It might seem sticky at first, and that’s okay! The dough should pull away from the bowl edges and form a slightly tacky but manageable ball. This stickiness is your friend for soft donuts—just add the flour slowly if it’s overly wet.
Step 4: First Rise in a Warm Humid Oven
Shape the dough into a 6×6 inch square on a lightly floured baking sheet. Sprinkle a bit more flour on top, then cover with a clean cloth. To get that perfect first rise, warm your oven for 30 seconds at 350°F, turn it off, and place the dough inside along with a pan filled with boiling water on the rack below. The steam creates the ideal humid environment, and after about an hour, your dough will double in size and be all puffy and dreamy.
Step 5: Shape and Second Rise
Carefully turn the risen dough onto a floured surface (I like a pastry cloth for a smooth release). Gently roll it out to about 11×12 inches without smashing out all the air. Cut into twelve 5×2-inch rectangles using a pizza cutter. Transfer them to floured baking sheets spaced out well. Repeat the warm oven rise trick with steaming water for 45 minutes until doubled again.
Step 6: Frying Time
Heat about 2 inches of peanut oil to 350°F in a heavy pot. This can take around 15 minutes, so be patient and keep that temperature steady. Fry donuts in batches, slipping them gently into the hot oil with a spatula. They cook fast—about 30-40 seconds on the first side, then flip for 20 more seconds until golden. Drain on paper towels and let them cool fully before glazing.
Step 7: The Magical Maple Glaze
Whisk together powdered sugar, corn syrup, salt, vanilla, maple extract, and hot water until smooth. The glaze should be pourable but not too runny—I usually test it with a spoon to make sure it coats nicely. Dip each donut on the round side into the glaze and let the excess drip off. Place glazed donuts on a wire rack to set for 15-20 minutes. Resist the urge to eat them immediately (although that’s tough) because the glaze needs time to firm up.
Pro Tips for Making Maple Glazed Donuts Recipe
- Humidity is Your Friend: Don’t skip the boiling water pan in the oven for rising – it creates essential steam that keeps the dough soft and moist.
- Oil Temperature Matters: Keep your frying oil steady at 350°F; too hot and the donuts burn outside while staying raw inside, too cool and they soak up oil.
- Don’t Rush the Cooling: Let your donuts cool fully before glazing, or the glaze won’t stick properly and will just slide off.
- Glaze Consistency: Add hot water by teaspoon increments to get the perfect dipping consistency for your maple glaze.
How to Serve Maple Glazed Donuts Recipe

Garnishes
While the maple glaze is the star, I love sprinkling a little crushed toasted pecans or even a pinch of coarse sea salt on top for extra texture and flavor contrast. It’s optional, but I think it adds a lovely rustic touch and a subtle crunch that makes the donuts even more irresistible.
Side Dishes
Maple glazed donuts are perfect paired with a hot cup of coffee or a rich latte first thing in the morning. I also like serving them alongside fresh berries or a dollop of whipped cream when it’s brunch time. If you want to go classic, some crispy bacon works surprisingly well for that sweet-savory combo.
Creative Ways to Present
For special occasions, try stacking your donut rectangles on a pretty platter with small maple syrup pitchers on the side for dipping. You can also drizzle some white chocolate over the maple glaze or add colorful sprinkles for a fun twist kids love. Believe me, these donuts make any breakfast table feel festive.
Make Ahead and Storage
Storing Leftovers
I usually keep leftover donuts in an airtight container on the counter. They stay fresh for about 2-3 days, but honestly, they rarely last that long around here because they’re just that good!
Freezing
If you want to freeze them, I recommend freezing the donuts plain, without glaze. Wrap each donut individually in plastic wrap and place them in a freezer-safe bag. They keep well for up to 1 month. When you’re ready to enjoy, thaw them at room temperature and then glaze fresh for the best texture.
Reheating
To warm up leftovers, pop them in a 300°F oven for about 5-7 minutes to bring back that fresh-from-the-fryer softness. Avoid the microwave if you want to maintain a nice texture, as it can make donuts a bit rubbery.
FAQs
-
Can I use all-purpose flour instead of bread flour in this Maple Glazed Donuts Recipe?
Absolutely! Using all-purpose flour will still give you delicious donuts, although the texture will be a bit less chewy and more tender. It’s a great option if bread flour isn’t on hand, and the donuts still turn out fantastic.
-
How do I know if my yeast is still good for the recipe?
If your yeast is fresh, it will foam and bubble within 5 minutes when mixed with warm water and sugar. No foam means it’s time to get new yeast, or your dough won’t rise properly. This step is crucial for the success of this Maple Glazed Donuts Recipe.
-
Can I make the donuts without a stand mixer?
Sure! You can mix by hand with a large bowl and wooden spoon, then knead on a floured surface for 8-10 minutes until smooth. It just takes a little more elbow grease, but it’s totally doable and yields the same wonderful results.
-
Why do the donuts need two rises?
The first rise develops the dough’s flavor and lets the yeast work its magic, while the second rise after shaping ensures your donuts are puffy and light before frying. Skipping the second rise often results in dense, heavy donuts.
-
What if my glaze is too thick or too thin?
Adjust the glaze by adding hot water a teaspoon at a time if it’s too thick, or add a bit more powdered sugar if too thin. The glaze should be pourable enough for dipping but thick enough to stick and set nicely on the donuts.
Final Thoughts
This Maple Glazed Donuts Recipe has a special place in my kitchen rotations because it strikes the perfect balance between indulgence and achievable homemade magic. Whenever I make these, the smell alone brings my family running—so you know it’s good. I can’t recommend giving it a try enough; the reward of biting into a soft, perfectly glazed maple donut right at home is unbeatable. You’ve got this—happy baking!
Print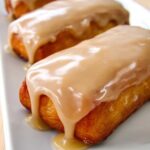
Maple Glazed Donuts Recipe
- Prep Time: 30 minutes
- Cook Time: 2 minutes
- Total Time: 2 hours 32 minutes
- Yield: 12 servings
- Category: Breakfast
- Method: Frying
- Cuisine: American
Description
This Maple Bar Donut recipe delivers fluffy, golden-fried rectangles of dough topped with a smooth, sweet maple glaze. The dough is enriched with egg yolks and shortening, fried to perfection in peanut oil, then dipped in a flavorful maple icing for a classic donut experience perfect for breakfast or dessert.
Ingredients
Dough
- 1 cup warm water, about 105 degrees F
- 3 tablespoons active dry yeast
- 1 tablespoon granulated sugar
- 1/2 cup granulated sugar
- 1/4 cup butter-flavored shortening or regular shortening
- 3 large egg yolks
- 1 teaspoon vanilla extract
- 3 1/2 cups bread flour, spooned and leveled (up to 4 cups if needed)
- 2 1/2 teaspoons kosher salt
- 1/2 teaspoon baking powder
- Peanut oil for frying (about two 24-ounce bottles)
Maple Icing
- 4 cups powdered sugar, plus an extra 1/2 cup (1 pound total)
- 2 teaspoons light corn syrup
- 1/4 teaspoon kosher salt
- 1/2 teaspoon vanilla extract
- 1 teaspoon maple extract (or more to taste)
- 1/3 cup hot water, plus more if needed
Instructions
- Activate Yeast: In a large bowl or stand mixer, combine 1 cup warm water (105-110 degrees F), 3 tablespoons active dry yeast, and 1 tablespoon sugar. Let sit for 5 minutes until bubbly and frothy. If no bubbles form, the yeast is dead and you need to start over.
- Mix Wet Ingredients: Add 1/2 cup granulated sugar, 1/4 cup shortening, 3 egg yolks, and 1 teaspoon vanilla to the yeast mixture. Beat with a paddle attachment until the shortening breaks up but isn’t completely blended.
- Add Initial Flour and Seasoning: Stir in 1 cup bread flour without mixing. Sprinkle 2 1/2 teaspoons kosher salt and 1/2 teaspoon baking powder over the flour, lightly stir into the flour, then beat into the dough for 1 minute until combined.
- Add Remaining Flour and Knead: Add remaining bread flour 1 cup at a time, switching to dough hook or kneading by hand once dough firms. Use 3 1/2 cups total, up to 4 cups if dough is very sticky. Knead for 5 minutes until smooth and pulling from bowl sides.
- Prepare Proofing Setup: Boil at least 2 quarts of water. Lightly flour a baking sheet (not silicone). Shape dough into a 6×6 inch square on baking sheet; cover with a clean floured cloth.
- Create Warm Proofing Environment: Preheat oven to 350 degrees F for 30 seconds, then turn off. Place dough pan on top rack and a 9×13 inch pan of boiling water on a lower rack. Close the door to create a warm, humid proofing box.
- First Rise: Let dough rise in oven setup for 1 hour or until doubled in size.
- Prepare for Frying: Carefully transfer risen dough onto a floured surface without deflating. Dust two baking sheets with flour.
- Shape Donuts: Roll dough gently into an 11×12 inch rectangle. Cut into 12 rectangles approximately 5×2 inches by first slicing into quarters, then each quarter into three strips. Trim edges for neat rectangles if desired.
- Second Rise: Transfer dough rectangles to floured baking sheets spaced 2 inches apart. Place back in the warmed, turned-off oven with boiling water below, and let rise 45 minutes until doubled.
- Heat Oil: About 15 minutes before the second rise finishes, heat 2 inches of peanut oil in a large pot to 350 degrees F using a candy thermometer. Maintain medium heat and monitor temperature closely for even frying.
- Fry Donuts: Working in batches of 2-3, carefully lower dough rectangles into hot oil using a rubber scraper or spatula. Fry 30-40 seconds on the first side, then flip and fry 20 seconds more until golden brown. Remove with slotted spoon and drain on paper towels. Let cool completely before glazing.
- Make Maple Icing: Whisk together 4 cups powdered sugar, 2 teaspoons light corn syrup, 1/4 teaspoon kosher salt, 1/2 teaspoon vanilla, 1 teaspoon maple extract, and 1/3 cup hot water in a bowl or stand mixer. Adjust consistency with more hot water or powdered sugar so that the glaze is liquid enough to dip donuts.
- Glaze Donuts: Dip the roundest side of each cooled donut into the maple icing. Let excess drip off, then place on a wire rack to set for 15-20 minutes until glaze hardens.
- Store and Serve: Store donuts at room temperature in a sealed container for up to 2-3 days for best freshness.
Notes
- All-purpose flour can be used instead of bread flour, but the donuts will be less chewy and tender.
- Save the used peanut oil by straining and funneling it back into bottles for reuse in future frying to save waste.
- A stickier dough results in a more tender donut, so add flour gradually and do not overdo it.
- Use a candy thermometer to maintain the oil temperature at exactly 350 degrees F for perfect frying and color.
- Let donuts cool completely before glazing, as warm donuts won’t hold the icing well.
- Add more maple extract to the icing if you prefer a stronger maple flavor.
- Discard or save the trimmed edges to make an extra smaller donut if desired.
Nutrition
- Serving Size: 1 donut
- Calories: 350 kcal
- Sugar: 25 g
- Sodium: 250 mg
- Fat: 18 g
- Saturated Fat: 6 g
- Unsaturated Fat: 10 g
- Trans Fat: 0 g
- Carbohydrates: 42 g
- Fiber: 1 g
- Protein: 5 g
- Cholesterol: 70 mg

