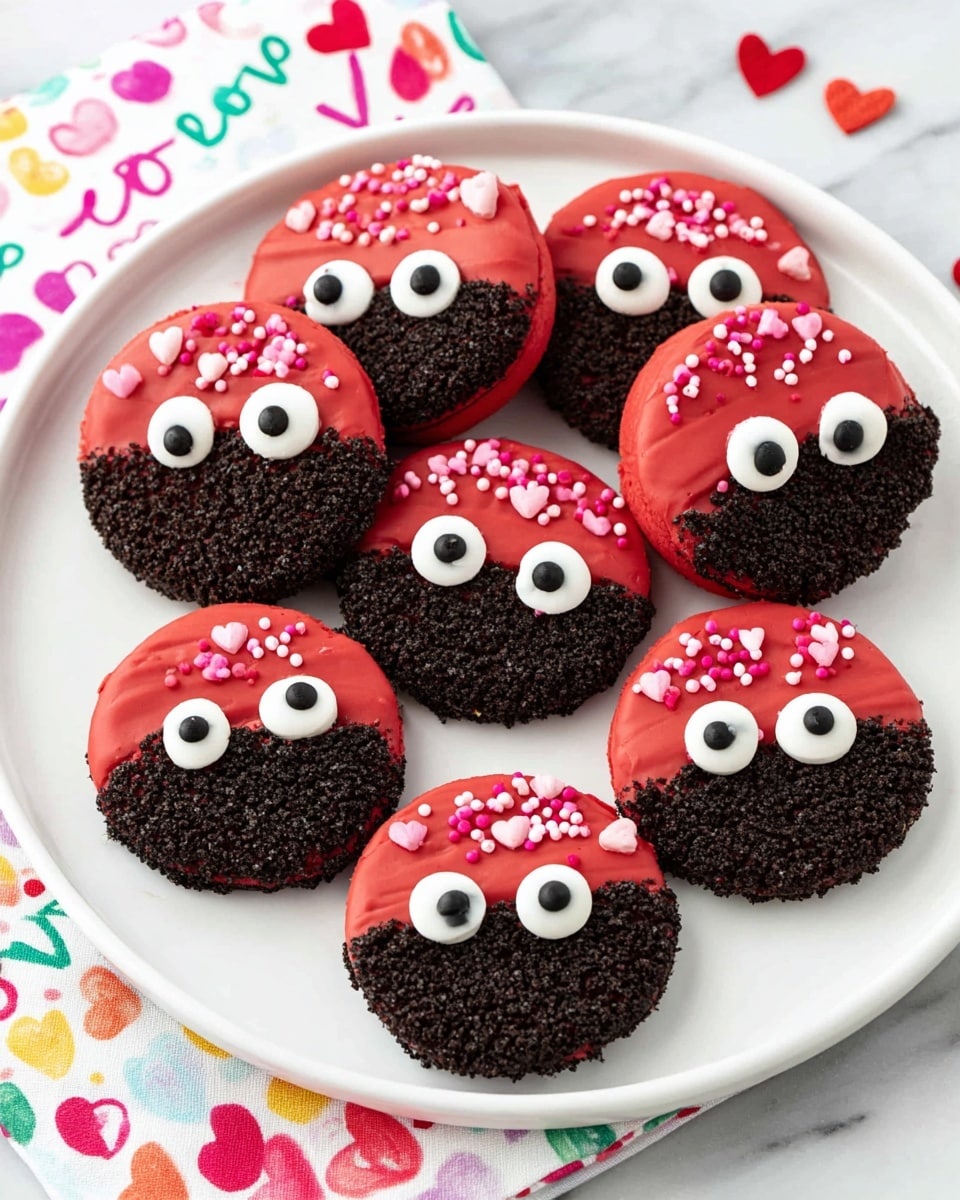
Love Bug Oreo Cookies Recipe
If you’re looking for an adorable and downright delicious treat to wow your friends and family, you’ve got to try my Love Bug Oreo Cookies Recipe. These charming cookies are not just cute—they’re ridiculously easy to make and pack that perfect sweet crunch with a festive touch that’s perfect for Valentine’s Day or any time you want to spread a little love. Stick around, and I’ll walk you through every step so you can whip up a batch that’s as fun to make as it is to eat.
Why This Recipe Works
- Simplicity: You only need a few ingredients and minimal prep, so it’s perfect for any skill level.
- Visual Appeal: The red chocolate coating and cute sprinkles transform plain Oreos into festive love bugs.
- Customization: Easily switch up sprinkles or candy colors for different occasions.
- Quick Set Time: Melted chocolate sets fast, so you won’t be waiting long to enjoy a sweet, charming treat.

Ingredients & Why They Work
The magic of my Love Bug Oreo Cookies Recipe lies in its straightforward ingredients that play nicely together. The classic Oreo cookies provide the perfect crunchy base, while the red chocolate wafers melt smoothly for a shiny, eye-catching coating. The royal icing eyes and micro heart sprinkles add just the right whimsical, lovey-dovey flair, making these cookies unforgettable—and surprisingly easy.
- Oreo Cookies: The classic sandwich cookie offers a sturdy base and that timeless chocolate-and-cream combo everyone loves.
- Red Chocolate Melting Wafers: These melt beautifully and coat the Oreos evenly, plus their vibrant color fits the love bug theme perfectly.
- Royal Icing Eyes: Tiny but essential, these eyes turn your cookies into adorable critters that actually look back at you.
- Micro Heart Sprinkles: A sweet finishing touch that adds texture, sparkle, and a pop of festive color.
Tweak to Your Taste
One of my favorite things about the Love Bug Oreo Cookies Recipe is how easy it is to personalize. Whether you’re making these with kids or just want to experiment, feel free to mix up colors or swap sprinkles based on what you have on hand or the occasion you’re celebrating.
- Chocolate Colors: I’ve tried pink, white, and even pastel blue wafers, and each gives a different vibe—go wild with whatever suits your mood!
- Sprinkle Combinations: Sometimes I add edible glitter or tiny candy pearls to make them extra special and festive.
- Dietary Swaps: If you want to keep things dairy-free, check ingredient labels on wafers and sprinkles or try vegan-friendly versions.
Step-by-Step: How I Make Love Bug Oreo Cookies Recipe
Step 1: Get Everything Ready
I always start by lining a baking sheet with parchment paper or a Silpat mat. This makes cleanup a breeze and gives your dipped Oreos a non-stick landing spot. Having all your ingredients and tools within reach also helps because melted chocolate waits for no one! I like to keep a toothpick handy for placing the eyes precisely.
Step 2: Melt the Red Chocolate Wafers Slowly
Place the red chocolate wafers in a microwave-safe bowl. Microwave them on medium heat for about 30 seconds, then stir gently but thoroughly. This keeps the chocolate smooth and prevents burning. Continue microwaving in 15-second bursts, stirring between each, until fully melted and glossy. Patience here pays off with a velvety coating that’s easy to dip into.
Step 3: Dip and Decorate
Dip each Oreo about three-fourths of the way into the melted red chocolate. A little tip from me: tap the cookie gently against the side of the bowl to shake off the excess chocolate—this keeps your coating neat and even. Then, place it on your prepared sheet and quickly add those darling micro heart sprinkles before the chocolate sets. They stick better that way and add instant charm.
Step 4: Add Eyes and Let Set
Using a toothpick, dab a tiny drop of melted chocolate onto the back of each royal icing eye and press it gently onto the red chocolate area of the Oreo. These eyes bring your love bugs alive! Once all eyes are on, give your cookies a bit of time—usually about 20 minutes should do—to let the chocolate harden completely before handling or serving.
Pro Tips for Making Love Bug Oreo Cookies Recipe
- Avoid Overheating Chocolate: Melt the wafers gently at medium power to prevent graininess and preserve smooth texture.
- Work Quickly When Decorating: Add sprinkles immediately after dipping before the chocolate hardens for good adhesion.
- Use a Toothpick for Precision: It’s perfect for placing eyes and small details without messy fingers.
- Store Properly: Keep cookies in an airtight container at room temperature to maintain crispness and flavor.
How to Serve Love Bug Oreo Cookies Recipe
Garnishes
When I serve these Love Bug Oreo Cookies, I often line the platter with fresh mint leaves or delicate edible flowers to add a natural, fresh contrast. You could also sprinkle a little powdered sugar for a subtle “frosted” effect. The goal is to keep it simple so the cupcakes’ whimsical charm stays front and center.
Side Dishes
I love pairing these cookies with a creamy hot chocolate or a cup of freshly brewed coffee. For parties, a fruit platter or light finger sandwiches balance the sweetness and keep things feeling fresh. They’re a perfect no-mess treat alongside your favorite beverages!
Creative Ways to Present
At a recent Valentine’s Day party, I arranged my Love Bug Oreo Cookies in a circle on a heart-shaped platter and surrounded them with little red and pink rose petals. For kid’s birthdays, I’ve stuck toothpicks into the cookies to create cute “bug on a stick” party favors. You can get really creative with presentation to match any theme!
Make Ahead and Storage
Storing Leftovers
Once your Love Bug Oreo Cookies are completely set, store them in an airtight container at room temperature. I usually stack them in layers separated by parchment paper to keep the sprinkles and eyes intact. They’ll stay fresh and crunchy for a solid week or more if kept away from humidity.
Freezing
If you want to freeze them, place cookies in a single layer on a baking sheet first, freeze until solid, then transfer to a freezer-safe bag or container. When thawing, do it slowly at room temperature to keep the chocolate from sweating or cracking. From my experience, freezing works well if you want to prepare these ahead of a celebration.
Reheating
Since these are best enjoyed chilled or at room temperature, I don’t recommend reheating. But if you want the chocolate to soften slightly, a quick 5-7 second zap in the microwave can help—just watch closely! Otherwise, I find they’re perfect right out of the container.
FAQs
-
Can I use other types of cookies for the Love Bug Oreo Cookies Recipe?
Absolutely! While Oreos are classic, you can experiment with other sandwich cookies that have a sturdy filling. Just make sure the cookie holds up well when dipped in melted chocolate.
-
What can I substitute if I can’t find royal icing eyes?
If royal icing eyes are hard to find, mini black or white candy melts can be used to pipe tiny dots for eyes. Alternatively, small edible pearls or even colored sprinkles can do the trick with a little creativity.
-
How long does it take for the chocolate to set?
Typically, the melted chocolate sets firm within 15-20 minutes at room temperature. To speed things up, you can pop the cookies in the fridge for about 10 minutes, but watch that condensation doesn’t form.
-
Is it okay to make these a day in advance?
Definitely! These cookies keep really well and can be made a day or two before your event. Just store them properly in an airtight container to keep that fresh crunch and glossy finish.
Final Thoughts
Honestly, whenever I make the Love Bug Oreo Cookies Recipe, it feels like sharing a little bit of joy in cookie form. They’re simple, fun, and always a hit whether for a party, gift, or just an everyday treat to brighten your day. I hope you’ll try making these—you won’t believe how much fun it is to create something so cute and tasty with just a few ingredients. Trust me, once you do, these little love bugs will become a regular in your baking routine!
Print
Love Bug Oreo Cookies Recipe
- Prep Time: 5 minutes
- Cook Time: 20 minutes
- Total Time: 25 minutes
- Yield: 20 cookies
- Category: Dessert
- Method: No-Cook
- Cuisine: American
Description
Delight in these adorable Love Bug Oreo Cookies, perfect for Valentine’s Day or any occasion that calls for a sweet treat with a festive twist. Oreo cookies are dipped in melted red chocolate, decorated with royal icing eyes, and topped with micro heart sprinkles to create charming edible bugs that are easy to make and sure to impress.
Ingredients
Chocolate Coating
- 1 and ½ cups red chocolate melting wafers
Cookies and Decorations
- 20 Oreo cookies
- Royal icing eyes (about 40 eyes for two per cookie)
- Micro heart sprinkles (Valentine’s Day themed)
Instructions
- Prepare the baking surface: Line a baking sheet with parchment paper or a silpat mat and set it aside to ensure the cookies don’t stick while the chocolate sets.
- Melt the chocolate wafers: Place the red chocolate melting wafers in a microwave-safe bowl. Microwave on medium heat for 30 seconds, then remove and stir gently. Continue microwaving in 15-second increments, stirring after each, until the wafers are fully melted and smooth.
- Dip the Oreos: Dip each Oreo cookie about three-fourths of the way into the melted red chocolate. Lightly tap the cookie to remove excess chocolate and transfer it to the prepared baking sheet.
- Add sprinkles: Immediately sprinkle the dipped portion with Valentine’s Day micro heart sprinkles so they stick to the chocolate before it sets.
- Attach eyes: Using a toothpick, place a small drop of melted chocolate on the back of each royal icing eye and carefully attach two eyes to the chocolate-coated part of each Oreo to create the love bug look.
- Set the cookies: Allow the cookies to sit at room temperature until the chocolate hardens completely, approximately 20 minutes. Once set, the Love Bug Oreo Cookies are ready to be enjoyed.
Notes
- Store the Love Bug Oreo Cookies in an airtight container to maintain freshness for up to 7 days.
- If you don’t have royal icing eyes, you can substitute with small edible candy eyes or create eyes with white and black icing.
- Use a silpat mat if you have one for easier removal and cleaner setup.
- Be careful not to overheat the chocolate wafers to prevent them from seizing.
Nutrition
- Serving Size: 1 cookie
- Calories: 150 kcal
- Sugar: 18 g
- Sodium: 105 mg
- Fat: 7 g
- Saturated Fat: 4 g
- Unsaturated Fat: 2 g
- Trans Fat: 0 g
- Carbohydrates: 22 g
- Fiber: 1 g
- Protein: 1 g
- Cholesterol: 5 mg


