Loaf Pan Basque Cheesecake Recipe
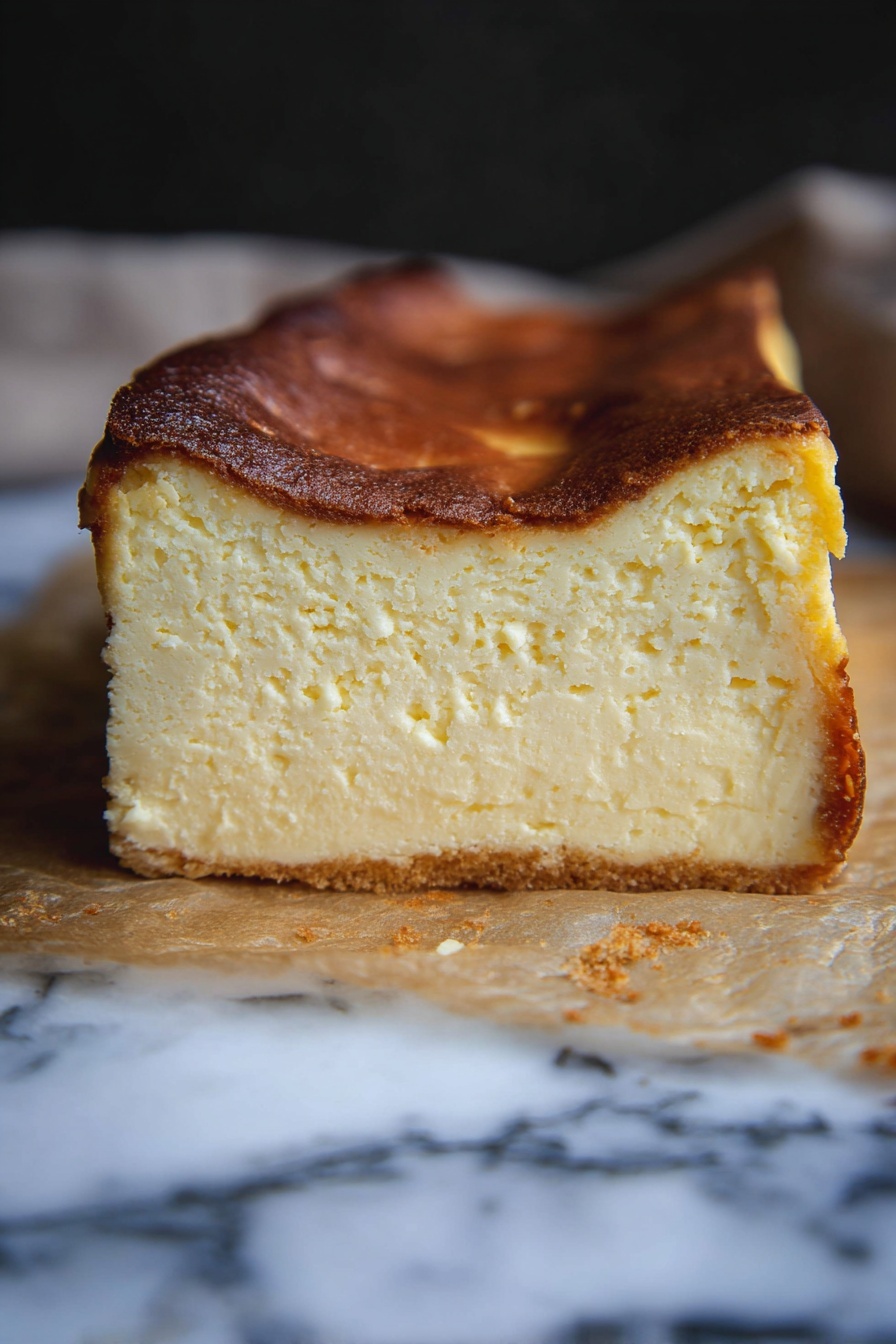
If you’ve been curious about trying your hand at a Basque cheesecake but want to avoid the hassle of a springform pan, I’ve got you covered. This Loaf Pan Basque Cheesecake Recipe is an absolute game-changer. It’s creamy, deeply caramelized on top, and just a little wobbly in the center—the texture everyone raves about. Plus, it bakes beautifully in a simple loaf pan, which makes it a quick and fuss-free dessert for any occasion. Stick with me here because I’m sharing all my best tips so you nail it the first time!
Why This Recipe Works
- Simple Equipment: Using a loaf pan means no hunting for a springform, and cleanup is minimal.
- Classic Basque Texture: That beautiful burnt top and creamy, slightly wiggly center comes through perfectly every time.
- Minimal Ingredients: Just cream cheese, sugar, eggs, cream, and a touch of flour—nothing complicated but everything rich and decadent.
- Beginner Friendly: The method is straightforward, and I share my tried-and-true tricks to avoid cracks, overflow, and undercooking.

Ingredients & Why They Work
The beauty of this Loaf Pan Basque Cheesecake Recipe lies in the simplicity of its ingredients all coming together to create that luscious, silky texture and iconic caramelized top. Let me highlight what each ingredient brings to the party and what to look for when you’re shopping.
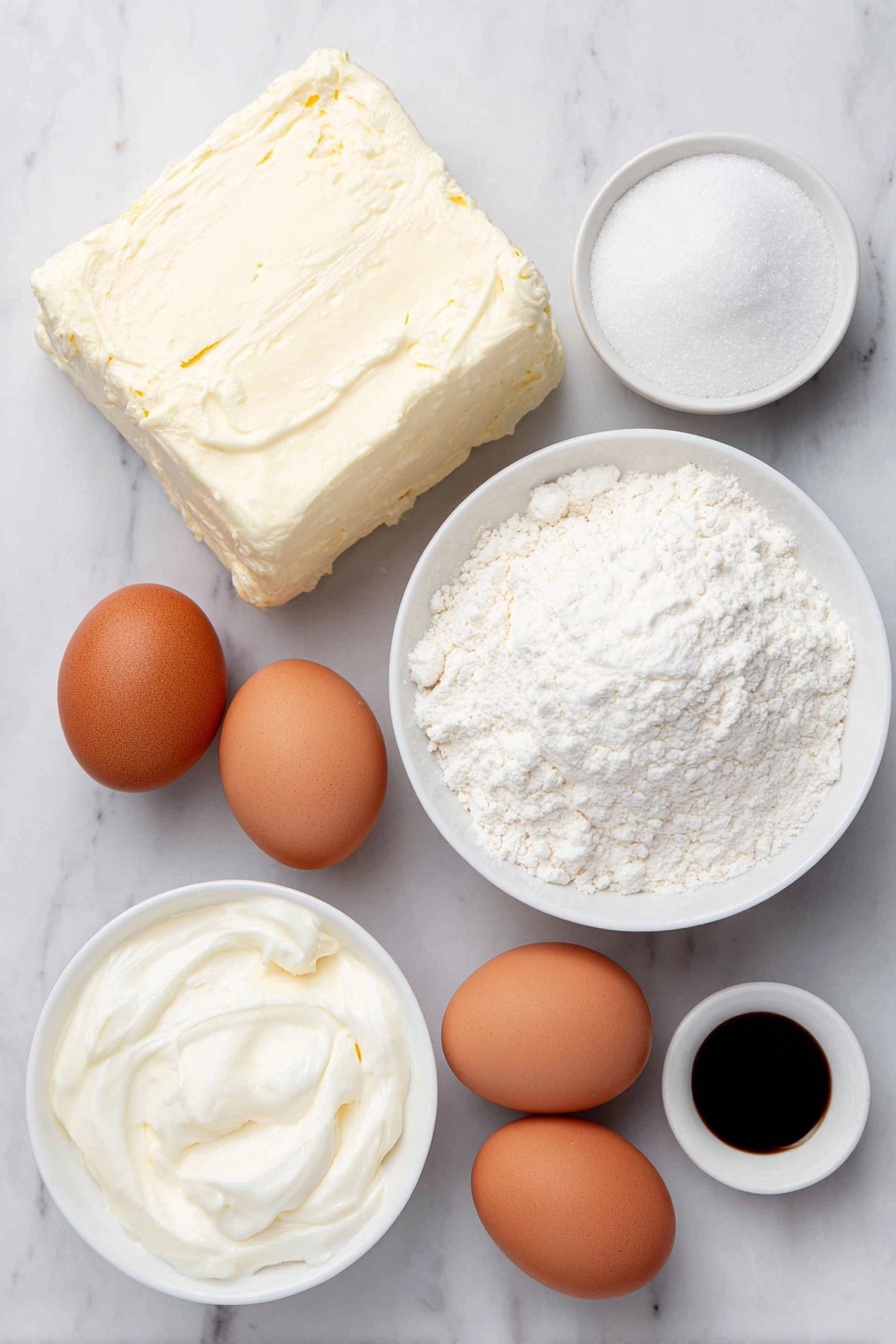
- Full Fat Cream Cheese: The foundation—make sure it’s softened (but not melted!) for easy mixing and the best creamy consistency.
- Granulated Sugar: Sweetness plus helps with that golden, caramelized surface.
- Large Eggs: They add structure without making the cheesecake too dense and help it set during baking.
- Heavy Cream: Adds richness and the silky mouthfeel that everyone loves in Basque cheesecake.
- Vanilla Extract (Optional): If you have it, go ahead and add it for a subtle warmth—otherwise, no stress!
- Salt: A pinch balances the sweetness and enhances all those creamy flavors.
- All-Purpose Flour: Just a little helps keep the cheesecake from being too loose, but sift it in carefully for smooth batter.
Tweak to Your Taste
I like to keep the Loaf Pan Basque Cheesecake Recipe pretty classic, but you can definitely tailor it to your liking. Maybe you’re feeling adventurous or need a variation for dietary reasons—here are some ideas I’ve tried or thought about that might inspire you to make it your own.
- Added Citrus Zest: A pinch of lemon or orange zest brightens the flavor; I tried lemon zest once and it gave a lovely fresh twist without overpowering the cheesecake.
- Gluten-Free Version: Swap the all-purpose flour for a gluten-free blend; just sift carefully the same way.
- Lower Sugar: You can reduce sugar slightly if you prefer less sweet, but I wouldn’t cut too much—sugar influences the caramelization, too.
- Vanilla-Free: Skipping vanilla extract is totally fine—trust me, the cheesecake still shines!
Step-by-Step: How I Make Loaf Pan Basque Cheesecake Recipe
Step 1: Prep Your Loaf Pan Like a Pro
First things first, preheat your oven to 400°F. Then grab your 9×5-inch loaf pan—this pan is key because it gives you that perfect shape and caramelized edges. Lightly butter the inside to help the parchment paper stick. When you lay down your parchment, make sure it covers all corners and leaves at least a 2-inch overhang around the edges. This overhang is so useful for lifting out the cheesecake later without any mess. Don’t go for wax paper here; it melts, and trust me, I’ve seen it happen!
Step 2: Beat That Cream Cheese and Sugar Until Dreamy
Take your softened cream cheese and sugar and toss them into a large bowl. I like to use my handheld mixer for this part and keep it on low to medium speed, beating for about 5 minutes. You want the mixture smooth and creamy—no lumps. If you don’t have a handheld mixer, a stand mixer works great, too. Just remember, patience here pays off in texture.
Step 3: Eggs, One at a Time
Add the eggs one by one, mixing well after each addition so everything combines evenly. This keeps the batter stable and silky. Avoid rushing this step or you might end up with a batter that’s not as smooth.
Step 4: Cream, Vanilla & Salt Join the Party
Once your eggs are incorporated, pour in the heavy cream, add the optional vanilla extract if you have it on hand, and sprinkle in the salt. Use a whisk here to gently combine everything until just mixed through. The cream brings that luxurious texture we all crave.
Step 5: Sift and Stir in the Flour Gently
This is a little technique I swear by. Rather than dumping the flour directly in, sift it in gradually. Tap your fine mesh strainer over the bowl and gently whisk in each dusting before adding more. This prevents lumps and helps achieve that perfectly smooth batter.
Step 6: Bake with Confidence
Pour the batter into your parchment-lined loaf pan and pop it in the oven for about 40-45 minutes. Here’s the fun part: the top should turn a beautiful dark brown around the edges while the center stays lighter and slightly jiggly—you want this! Don’t worry if the top seems very dark; that caramelized crust is exactly what makes Basque cheesecake so irresistible. If your loaf pan is very full, I recommend placing it on a baking sheet just in case of overflow.
Step 7: Cool and Chill
Once baked, let the cheesecake cool fully on the counter—a few hours works great. Then cover it and refrigerate for 2-4 hours or overnight. This chilling step is essential as it allows the cheesecake to firm up and flavors to meld beautifully. Trust me, the wait is worth it!
Pro Tips for Making Loaf Pan Basque Cheesecake Recipe
- Don’t Skip Buttering the Pan: It helps the parchment stick, making it easier to lift the cheesecake out cleanly after baking.
- Patience with Mixing: Beat the cream cheese and sugar long enough so your batter is silky smooth, no lumps allowed!
- Watch Your Oven Color: A deeply browned top is perfect—not burnt. This is what gives Basque cheesecake its signature flavor.
- Use the Right Parchment Paper: Never wax paper! The wrong paper could melt or stick, ruining your cheesecake’s perfect crust.
How to Serve Loaf Pan Basque Cheesecake Recipe
Garnishes
I usually keep the garnish simple so the cheesecake’s rich flavor shines through. A light dusting of powdered sugar adds a hint of elegance without overpowering. Sometimes, I like to scatter fresh berries like raspberries or blackberries on top; their tartness cuts nicely through the creaminess. A drizzle of honey or a smear of berry compote alongside makes for a lovely pairing if you want a little extra sweetness and color.
Side Dishes
Since this cheesecake is quite rich, a fresh side like a citrus salad or a simple arugula and orange segment salad really balances things out. If you’re serving it after dinner, a cup of strong espresso or black coffee complements the caramelized top beautifully.
Creative Ways to Present
For a special occasion, I’ve sliced this loaf pan cheesecake and served individual portions on slate boards with edible flowers and a sprinkle of flaky sea salt for that unexpected something. It looks rustic but elegant, just like the cheesecake itself. You can also slice it and layer pieces between sheets of parchment paper for gifting—it’s always a crowd-pleaser in that format!
Make Ahead and Storage
Storing Leftovers
After enjoying a slice (or three!), wrap the leftover cheesecake tightly in plastic wrap or store it in an airtight container. I find it keeps well in the fridge for up to 4 days. It’s key to keep it chilled—room temperature for more than a couple hours can change that perfect texture.
Freezing
If you want to freeze it, no problem! Wrap the whole loaf tightly in plastic wrap and then foil to prevent freezer burn. When you’re ready to enjoy, thaw it overnight in the fridge. The texture holds up surprisingly well—just keep in mind more delicate garnishes like berries are better added fresh.
Reheating
I actually prefer this cheesecake chilled, but if you want it a little softer, just let the slice come to room temperature for 15-20 minutes before serving. Avoid microwaving—it changes the texture and flavor. The whole point is that luscious creaminess and caramelized crust, so handle gently!
FAQs
-
Can I use regular cream cheese instead of the full-fat cream cheese bars?
For the best texture, I highly recommend using full-fat cream cheese bars—like those wrapped in foil. Regular cream cheese can work but often has a higher moisture content which might affect the structure and richness of your Basque cheesecake. Using the bars ensures a denser, creamier finish.
-
Why does the Basque cheesecake have a burnt top?
The burnt or deeply browned top is actually the hallmark of Basque cheesecake. It forms because it’s baked at a high temperature, caramelizing the sugars and fats on the surface. This contrast gives the cheesecake its signature smoky sweetness paired with a creamy interior.
-
Is it okay if the cheesecake cracks?
Absolutely! Cracks are quite normal for Basque cheesecake and add to its rustic charm. The cheesecake settles as it cools, making the cracks less noticeable. So don’t stress if yours aren’t perfectly smooth on top.
-
What if my loaf pan isn’t exactly 9×5 inches?
Not all loaf pans are identical, so if your batter doesn’t fit with room to spare, fill your pan about half an inch from the top and watch the baking time closely. The cheesecake is done when the edges are very dark brown and the center is still a bit wobbly but slightly lighter. Adjust baking time as needed.
-
Can I make this cheesecake without vanilla extract?
Definitely! Vanilla extract is optional here. It adds a nice subtle flavor, but the rich cream cheese and caramelized topping are the stars, so don’t feel like you have to hunt down vanilla just for this.
Final Thoughts
I have to say, this Loaf Pan Basque Cheesecake Recipe quickly became one of my go-to desserts—whether it’s for a casual family dinner or a spontaneous treat. I love that it feels fancy but isn’t complicated or intimidating at all. Using a loaf pan makes it so approachable, and getting that caramelized crust with minimal fuss just feels like a small victory. If you love cheesecake and want to switch it up with something with a deeper flavor and a gorgeous rustic look, I highly recommend you try this recipe out. You won’t be disappointed!
Print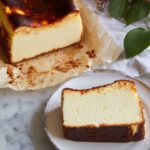
Loaf Pan Basque Cheesecake Recipe
- Prep Time: 15 minutes
- Cook Time: 45 minutes
- Total Time: 1 hour
- Yield: 12 servings
- Category: Dessert
- Method: Baking
- Cuisine: Basque
Description
This Loaf Pan Basque Cheesecake offers a rich and creamy texture with a beautifully caramelized top, baked in a loaf pan for an easy and rustic presentation. Perfect for dessert lovers seeking a unique twist on classic cheesecake.
Ingredients
Cheesecake Batter
- 1¾ lb full fat cream cheese bars (or 1 lb 12 oz), softened
- 1 cup granulated sugar
- 4 large eggs
- 1⅔ cup heavy cream
- 1 teaspoon vanilla extract (optional)
- ¼ teaspoon salt
- ¼ cup all-purpose flour
Instructions
- Preheat Oven: Preheat your oven to 400°F to prepare for baking the cheesecake.
- Prepare Loaf Pan: Lightly butter the inside of a 9×5-inch loaf pan. Line it with a long strip of parchment paper, pressing it firmly into the corners and ensuring at least 2 inches of overhang. Trim any excess beyond the overhang.
- Mix Cream Cheese and Sugar: In a large mixing bowl, blend the softened cream cheese and granulated sugar using a hand-held or stand mixer on low-medium speed for 5 minutes until smooth and creamy.
- Add Eggs: Incorporate the eggs one at a time, mixing after each addition until fully combined.
- Add Cream and Flavoring: Whisk in the heavy cream, optional vanilla extract, and salt until evenly mixed.
- Sift and Fold in Flour: Sift the all-purpose flour gradually over the mixture and gently fold it in to avoid lumps and maintain smooth texture.
- Pour Batter and Bake: Pour the batter into the prepared loaf pan and bake for 45 minutes. The top should be dark brown around the edges with a slightly lighter center that remains soft and wobbly.
- Cool and Chill: Let the cheesecake cool fully at room temperature. Cover and refrigerate it for 2-4 hours or overnight before serving to allow it to set properly.
Notes
- The vanilla extract is optional but adds a subtle creamy vanilla flavor if used.
- Consider buying vanilla extract in bulk to save costs if you bake often.
- Only use parchment paper, not wax paper, as wax paper can melt in the oven.
- Butter the loaf pan to help parchment paper stick securely for easier batter pouring.
- Sift the flour gradually to ensure even incorporation and prevent lumps.
- Darkening of the top is expected; it should be caramelized but not burnt.
- If your loaf pan fills to the top, place it on a baking sheet to catch any possible overflow.
- Cracks on the surface are normal and add to the rustic appeal of the cheesecake.
- If your pan is smaller or batter is too much, leave ½ inch of space and watch baking time carefully.
Nutrition
- Serving Size: 1 slice
- Calories: 380 kcal
- Sugar: 20 g
- Sodium: 210 mg
- Fat: 30 g
- Saturated Fat: 18 g
- Unsaturated Fat: 10 g
- Trans Fat: 0.5 g
- Carbohydrates: 25 g
- Fiber: 0 g
- Protein: 7 g
- Cholesterol: 145 mg


