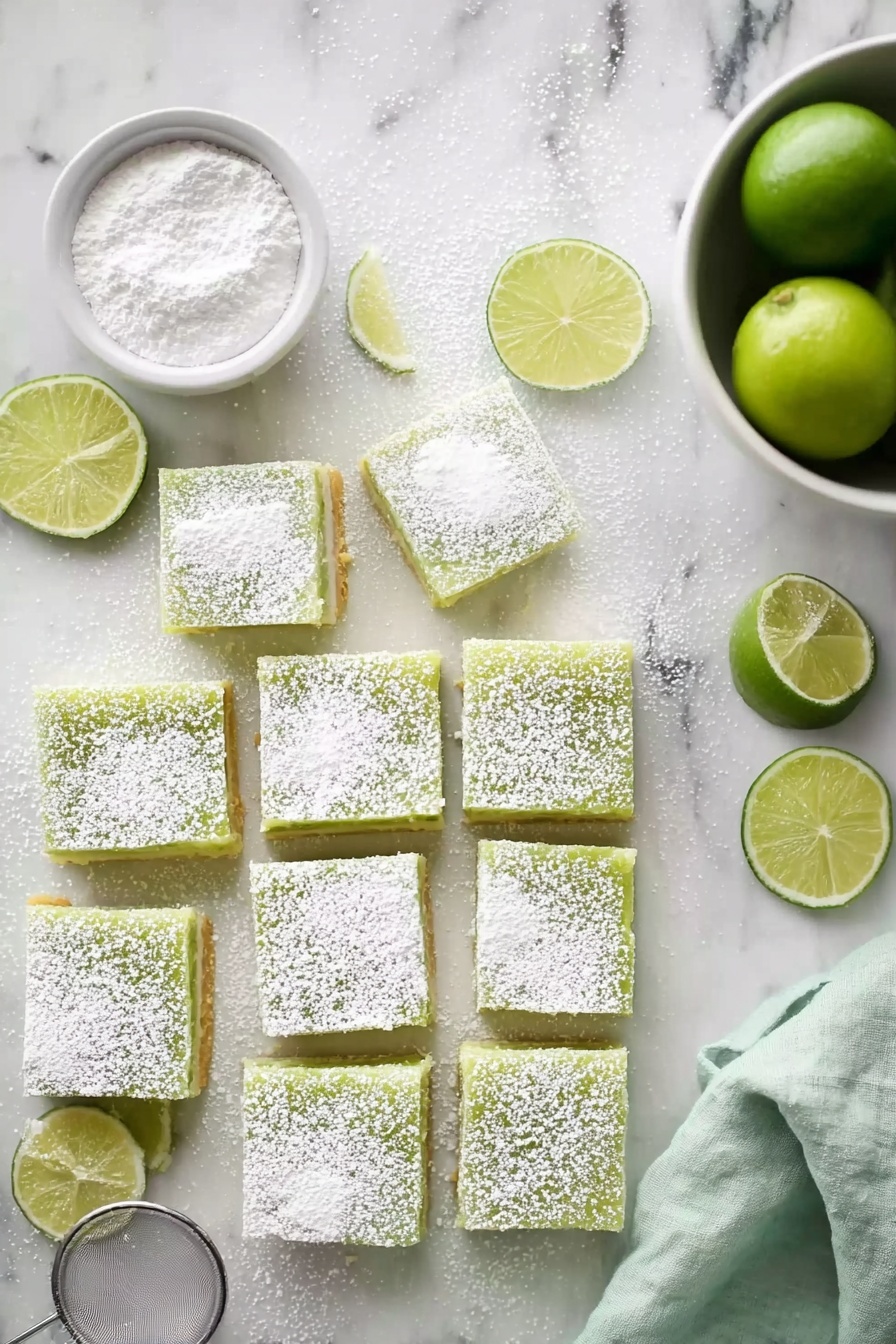
Lime Bars Recipe
If you’re looking for a bright, tangy treat that’s surprisingly simple to whip up, you’re going to love this Lime Bars Recipe. I remember the first time I made these—they were a hit at a summer barbecue and suddenly I was getting asked for the recipe over and over. The balance of zesty lime with a buttery crust is just irresistible, and the best part is how easy they are to make. Keep reading, and I’ll share all my tips for making these bars perfectly every time!
Why This Recipe Works
- Bright, Fresh Flavor: The fresh lime juice and zest bring a tangy punch that’s balanced perfectly by the sweet filling.
- Buttery Crust: The crust is crisp and golden, giving a solid base that complements the creamy lime layer.
- Simple Ingredients: You probably have everything in your pantry already, which makes this recipe easy to whip up on a whim.
- Versatile Presentation: Whether you want a casual snack or a polished dessert, these bars fit right in.
Ingredients & Why They Work
Every ingredient in this Lime Bars Recipe plays a crucial role in the final texture and flavor. From my experience, choosing fresh limes and high-quality butter really makes a difference, so here’s a quick rundown of what to look for while you shop.

- All-purpose flour: Provides structure for both crust and filling; make sure to measure it properly—too much can make bars dry.
- Powdered sugar: Keeps the crust delicate and tender, melting smoothly into the buttery base.
- Salt: A pinch enhances all the flavors without overpowering the lime tang.
- Butter: Using cold, unsalted butter cut into small pieces ensures a perfectly crumbly crust.
- Granulated sugar: Sweetens the tart lime filling and helps it set just right.
- Eggs: They give the filling that classic custard-like texture and help it firm up when baked.
- Lime zest and juice: Freshly grated zest and fresh lime juice bring the brightest, most natural flavor.
- Food coloring (optional): Just a drop makes those bars pop with a fun green hue, but it’s totally optional.
Tweak to Your Taste
One of the best things about this Lime Bars Recipe is how easy it is to customize. I enjoy playing around with it depending on the season or who’s coming over. You should feel free to make it your own and find your perfect twist.
- Variation: I sometimes swap part of the lime juice with lemon juice for a slightly different citrus hit—adds a fun zing, especially in springtime.
- Dietary modification: If you want to make it gluten-free, I’ve used a 1-to-1 gluten-free flour blend in the crust with good results.
- Extra flair: Add a sprinkle of toasted coconut or chopped pistachios on top after baking for texture and a tropical vibe.
- Less sweet: You can reduce sugar by about 10-15% if you prefer your bars more tart.
Step-by-Step: How I Make Lime Bars Recipe
Step 1: Prepare Your Pan and Preheat the Oven
First things first—preheat your oven to 350°F. I like to lightly grease my 11×7-inch baking dish, then line it with parchment paper that overhangs on two sides. This overhang is a game-changer because it helps you lift the bars out once they’ve cooled, making cutting a breeze without crumbling. Trust me, it’s worth the extra minute!
Step 2: Make the Crust: Butter, Sugar & Flour Magic
Throw the flour, powdered sugar, salt, and butter into your food processor and pulse until it looks like fine crumbs. I’ve done it by hand before, but the food processor just makes everything so much easier and faster. Press that crumbly mixture evenly into your pan—it helps to use a flat-bottomed glass or measuring cup. Then bake it for about 18-20 minutes until golden brown around the edges. This step sets the stage for the lush filling.
Step 3: Whisk Together the Filling
While the crust bakes, mix your filling. Whisk granulated sugar and flour together first. Then add the eggs—one at a time, whisking well after each addition to keep the mixture smooth and to prevent clumps. Add in your fresh lime zest and juice. If you’re feeling playful, add a drop of green (and optionally yellow) food coloring—it really brightens things up visually. I love this part because the zingy aroma fills my kitchen and makes me even more excited to dig in.
Step 4: Bake the Filling on the Hot Crust
Pour the lime filling over the freshly baked, hot crust and pop it back into the oven for another 18 to 20 minutes. Keep an eye on it; you want the filling to be set and not jiggle when you gently shake the pan. This signals the perfect custard texture.
Step 5: Cool and Chill Before Serving
Once baked, let the whole dish cool at room temperature for about an hour. Then, pop it in the refrigerator for another 1-2 hours. Chilling is key—it helps the bars set firmly and makes slicing cleaner and neater. When ready, lift the bars out using those parchment paper handles and slice into squares. Store any leftovers in the fridge for freshness.
Pro Tips for Making Lime Bars Recipe
- Room Temperature Eggs: Using eggs straight from the fridge can cause your filling to curdle; let them sit out for 15 minutes before mixing.
- Press Crust Firmly: Firmly pressing the crust into the pan prevents it from crumbling when you cut the bars.
- Don’t Skip Chilling: Chilling not only sets the bars but also helps develop flavors, so be patient with this step.
- Watch Baking Time: Overbaking dries out the filling, so start checking at 18 minutes for that perfect gentle jiggle.
How to Serve Lime Bars Recipe
Garnishes
I like to sprinkle a little powdered sugar on top for a simple finish. Sometimes, I add a few thin lime slices or a pinch of lime zest to make it pop visually. A tiny dollop of whipped cream works wonders if you want a bit of richness to balance the citrus. These garnishes make it look extra-special without much effort.
Side Dishes
These lime bars pair beautifully with a cup of hot tea or a cold glass of sparkling water with mint. If serving at brunch, I love them alongside fresh fruit or a light salad to keep things refreshing. They’re also a nice contrast to savory dishes like grilled chicken or tacos if you want a zesty dessert.
Creative Ways to Present
For parties, I cut the bars into mini squares and serve them on a pretty platter with tiny forks. Another fun idea is layering them in small mason jars as portable treats. If you’re feeling festive, a dusting of edible flowers adds a whimsical touch that guests love. Presentation really amps up the joy of these bars!
Make Ahead and Storage
Storing Leftovers
After enjoying your lime bars, wrap any leftovers tightly with plastic wrap or store them in an airtight container in the fridge. I’ve found they keep their fresh flavor and texture for up to 4 days. Just make sure they’re chilled properly to avoid any sogginess.
Freezing
If you want to freeze them, I recommend cutting the bars into individual squares first, then wrapping each piece tightly in plastic before placing them in a freezer-safe bag. From my experience, they freeze well for up to 2 months. When you’re ready, thaw overnight in the refrigerator.
Reheating
I generally enjoy lime bars chilled, but if you prefer them slightly warmer, just take them out of the fridge 15 minutes before serving. Avoid microwaving, as it can make the filling too soft and watery. Room temperature is the sweet spot!
FAQs
-
Can I use bottled lime juice instead of fresh?
While bottled lime juice can be used in a pinch, I highly recommend fresh lime juice for this recipe because it offers a brighter, more natural flavor that really shines in lime bars. The zest and fresh juice together elevate the taste significantly.
-
How do I know when the lime bars are fully baked?
You’ll want to look for the filling to be set and not jiggle when you gently shake the pan. It should be firm to the touch but still soft, similar to a custard or cheesecake texture. Overbaking can dry it out, so start checking around 18 minutes.
-
Can I make the crust without a food processor?
Absolutely! If you don’t have a food processor, you can cut the cold butter into the flour mixture using a pastry cutter or two forks until it resembles coarse crumbs. It just takes a little more elbow grease but works just as well.
-
What’s the best way to cut lime bars cleanly?
Be sure the bars are well chilled before slicing. Use a sharp knife, warming it briefly under hot water and wiping it dry between cuts to get clean edges without crumbling.
Final Thoughts
This Lime Bars Recipe has become a personal favorite because it’s the perfect balance of tangy, sweet, and buttery, with a texture that’s just dreamy. I always find myself going back for seconds—and hearing “Wow, can you make these again?” never gets old. Give it a try; I promise these lime bars will become your go-to dessert for summer gatherings or any time you want a refreshing pick-me-up. Happy baking, friend!
Print
Lime Bars Recipe
- Prep Time: 10 minutes
- Cook Time: 40 minutes
- Total Time: 2 hours 50 minutes
- Yield: 12 servings
- Category: Dessert
- Method: Baking
- Cuisine: American
Description
Lime Bars are a tangy and sweet dessert featuring a buttery, tender crust topped with a smooth lime filling. Perfectly balanced with zesty lime juice and zest, these bars are baked until set and chilled to achieve a refreshing, citrusy treat ideal for any occasion.
Ingredients
Crust:
- 1 cup (120 g) all-purpose flour
- ¼ cup (30 g) powdered sugar
- ¼ tsp salt
- ½ cup (113 g) butter, cut into 8 pieces
Filling:
- 1 ¼ cup (250 g) granulated sugar
- ¼ cup (30 g) all-purpose flour
- 4 large eggs
- 2 tsp lime zest
- ⅔ cup (159 ml) fresh lime juice
- drop of green (+ yellow) food coloring, optional
Instructions
- Preheat Oven: Preheat oven to 350 degrees Fahrenheit. Lightly grease or line an 11×7-inch baking dish with parchment paper that overhangs 2 inches on both sides.
- Make Crust: Combine the flour, powdered sugar, salt, and butter in a food processor. Pulse until the mixture resembles fine crumbs. Press mixture evenly into the prepared pan and bake for 20 minutes or until golden brown.
- Prepare Filling: While crust bakes, whisk together granulated sugar and flour in a bowl. Add eggs one at a time, whisking well after each addition. Stir in lime zest, lime juice, and a drop of green (plus yellow) food coloring if using, mixing until smooth and fully combined.
- Bake Filling: Pour the lime filling over the hot crust and return the pan to the oven. Bake for 20 minutes or until the filling is set and no longer jiggles.
- Cool and Chill: Allow the lime bars to cool completely in the pan for about 1 hour. Then refrigerate for 2 hours to fully set before serving.
- Serve: Lift the bars out of the pan using the parchment paper overhang. Cut into squares and serve chilled. Store leftovers in the refrigerator.
Notes
- Use fresh lime juice and zest for the best flavor intensity.
- For easier cutting, chill the bars thoroughly before slicing.
- Parchment paper with an overhang helps lift the bars out cleanly.
- Food coloring is optional and purely for visual appeal.
- Butter should be cold when pulsed into the crust for a tender texture.
Nutrition
- Serving Size: 1 bar (approximately 45 g)
- Calories: 220 kcal
- Sugar: 25 g
- Sodium: 70 mg
- Fat: 11 g
- Saturated Fat: 7 g
- Unsaturated Fat: 4 g
- Trans Fat: 0 g
- Carbohydrates: 30 g
- Fiber: 0.5 g
- Protein: 3 g
- Cholesterol: 75 mg
