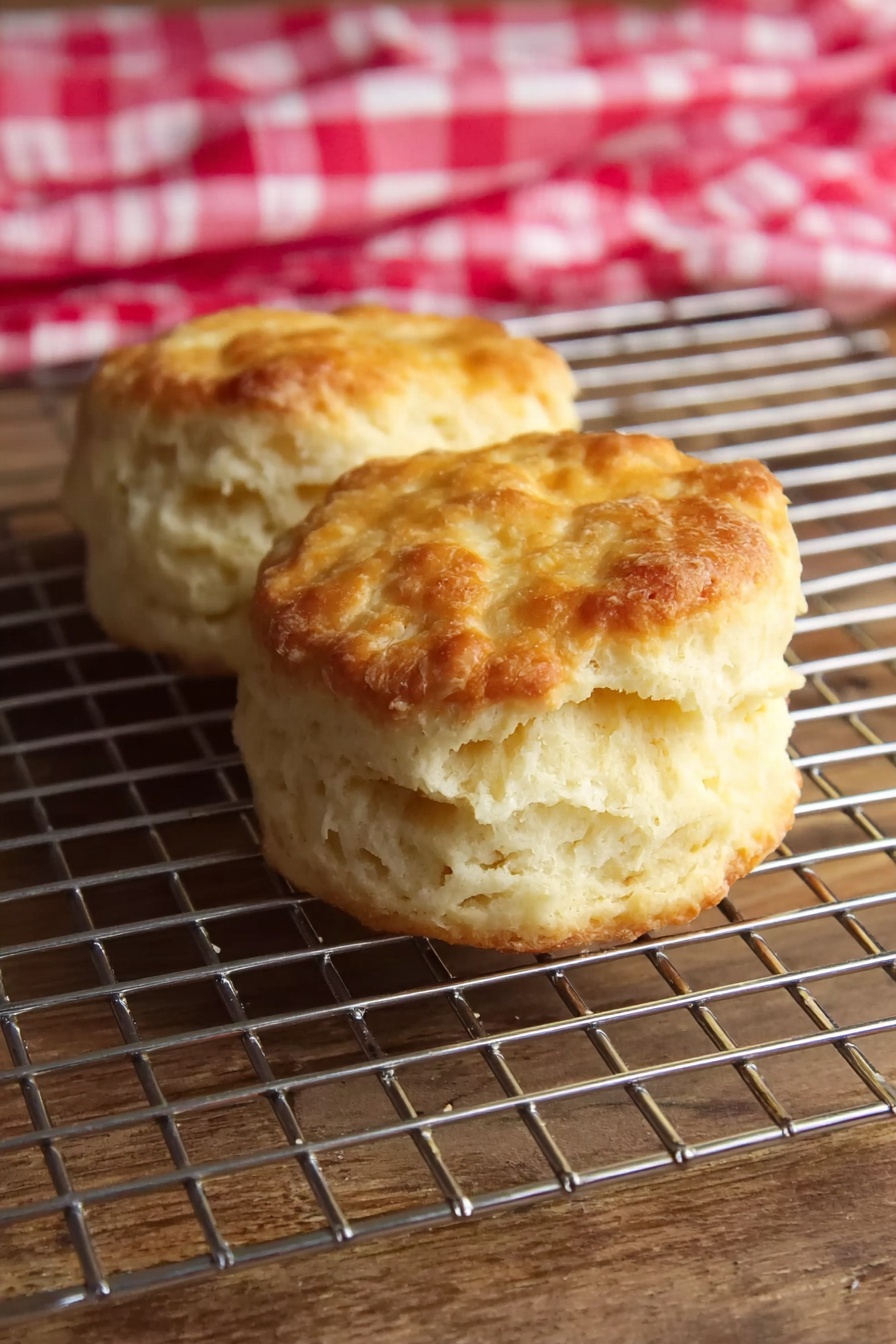
Homemade Angel Biscuits Recipe
If you’ve ever wanted to master the art of fluffy, melt-in-your-mouth biscuits, then you’re in the right place. This Homemade Angel Biscuits Recipe is an absolute game changer—soft, buttery, with layers that practically sing when you tear into them. Trust me, once you try this recipe, it’ll become your go-to for breakfast, dinner, or whenever you just need a little comfort on a plate. Stick around because I’m sharing all my secrets to make sure your biscuits come out perfect every time.
Why This Recipe Works
- Yeast Magic: The rapid rise yeast adds a subtle tang and incredible fluffiness without the long wait.
- Layered Goodness: The folding technique creates delicate layers that give each biscuit an angelic texture.
- Butter-Shortening Blend: Using both butter and shortening ensures tenderness with a beautiful flaky crumb.
- Finishing Touch: Brushing with cream before baking and melted butter after creates a gorgeous golden crust and rich flavor.

Ingredients & Why They Work
The beauty of this Homemade Angel Biscuits Recipe lies in how the ingredients work together to make something light yet rich. Grab the right staples and a few special touches for best results—like White Lily flour if you can get it, or a good quality buttermilk for that tang.
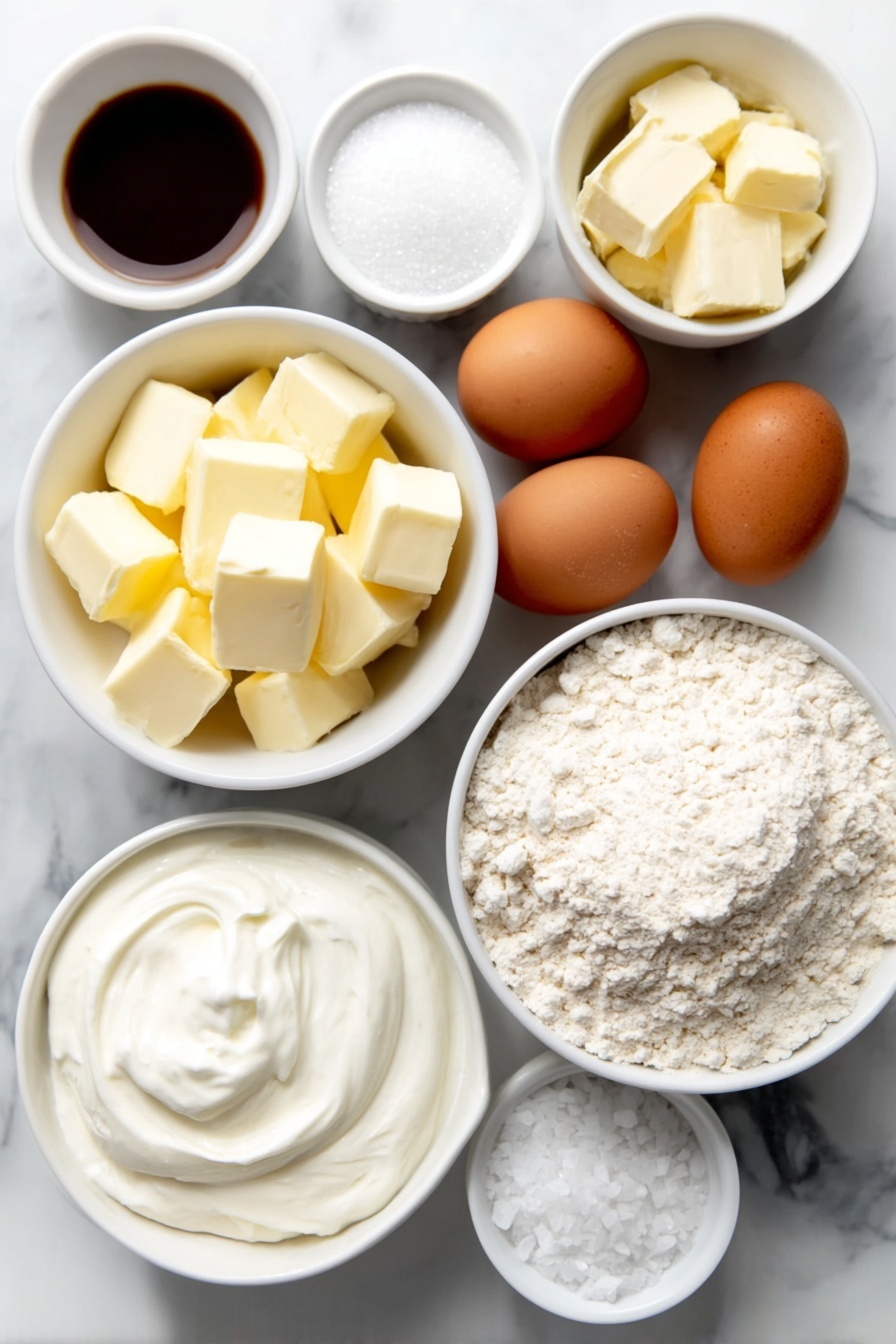
- Warm Water: Activates the yeast gently; make sure it’s not too hot or it will kill the yeast.
- Sugar: Feeds the yeast and adds slight sweetness to balance the tang of buttermilk.
- Rapid Rise Instant Yeast: Shortens rising time dramatically, making these biscuits doable on a busy schedule.
- All-Purpose Flour: Provides structure; lighter flours like White Lily produce softer biscuits, but any all-purpose works.
- Baking Powder & Baking Soda: Together, they boost rise and tenderize crumb with layered leavening action.
- Salt: Enhances all the other flavors.
- Unsalted Butter: Adds rich flavor and flaky texture; keep it cold and cut in well.
- Butter-Flavored Shortening: Keeps biscuits moist and tender; shortening has a higher melting point, which helps with layers.
- Buttermilk: Reacts with baking soda to lighten and adds just the right tang.
- Heavy Whipping Cream: Brushed on top before baking to get that perfect golden-brown crust and afterwards for extra buttery shine.
Tweak to Your Taste
One of the things I love about this Homemade Angel Biscuits Recipe is how easy it is to adjust to your preference. Want them a little sweeter, or maybe add a cheesy twist? Go for it! These biscuits are super versatile, so you can really make them your own.
- Cheesy Variation: When I’m craving something savory, I stir in a half cup of shredded sharp cheddar cheese right after adding the buttermilk—it’s pure comfort food heaven.
- Herb-Infused: Try folding fresh chopped chives or thyme into the dough for a fresh garden flavor that changes everything up.
- Gluten-Free Adaptation: While not tested with a direct substitute, you can experiment with a gluten-free flour blend that includes xanthan gum for structure.
- Dairy-Free Version: Swap buttermilk for a mix of almond milk and a teaspoon of lemon juice, and use dairy-free margarine instead of butter and shortening.
Step-by-Step: How I Make Homemade Angel Biscuits Recipe
Step 1: Proof the Yeast—The Foundation
Start by warming your water to about 125°F, just warm enough to feel cozy but not hot. Stir in the sugar, then sprinkle your rapid rise yeast on top. Let it sit for about 5 minutes until bubbly and foamy—that’s how you know the yeast is lively and ready to work its magic. This little step is key because a sluggish yeast will yield dense biscuits, and we definitely want fluffiness!
Step 2: Mix & Cut the Fats for Flaky Texture
In your large bowl, sift or whisk the flour, sugar, baking powder, baking soda, and salt. Now, grab your chilled butter and shortening—cut them into small chunks and use a pastry cutter or your fingertips to blend them into the dry ingredients until the mixture looks like tiny pea-sized crumbs. This is the flaky factor in your biscuits, so don’t rush it but also don’t overwork those fats.
Step 3: Combine the Wet and Dry—Gentle Does It
Create a little well in the center of your flour mixture. Pour in your proofed yeast mixture along with the buttermilk, and start stirring gently from the center outward. Gradually fold the flour into the wet mix until it just comes together — resist the urge to overmix or your biscuits will get tough. The dough will be a bit sticky but soft and pliable.
Step 4: Knead and Fold for Layers
Turn your dough onto a lightly floured surface. Give it a few gentle kneads—not too aggressive, just enough to incorporate any loose crumbs. Then fold the dough several times—this trick is what creates those signature layers. I tend to fold and pat it into a 1-inch thick rectangle because that shape is perfect for cutting out my biscuits.
Step 5: Cut and Prepare for Rising
Using a floured 2.5-inch biscuit cutter, carefully press straight down into the dough—don’t twist, or you’ll seal the edges and the biscuits won’t rise properly. I usually get 8-10 biscuits from this batch. Arrange them on a greased pan, spaced about half an inch apart to let them grow. Cover loosely with plastic wrap.
Step 6: The Crucial Rise
Pop your covered pan in a warm, draft-free spot for about an hour. I love putting mine in the oven with just the pilot light on—it’s the perfect environment. The dough should puff up noticeably but not double. This stage sets the fluffy, airy texture we’re after.
Step 7: Bake to Golden Perfection
Remove the plastic wrap and lightly brush the tops with heavy whipping cream—it helps them brown beautifully and adds a hint of richness. Bake at 400°F for 10-12 minutes, but start checking around 8 minutes to prevent burning. For that perfect golden crown, switch your oven to low broil for the last minute—just keep a close eye to avoid charring. As soon as they come out, brush with melted butter to lock in flavor and shine.
Pro Tips for Making Homemade Angel Biscuits Recipe
- Perfect Water Temp: Use a kitchen thermometer to check your water temp—it makes all the difference for a lively yeast rise.
- No Twisting the Cutter: I learned the hard way that twisting seals the edge and kills the biscuit rise, so straight down and up only!
- Layer Folding Trick: Folding the dough multiple times really changed my biscuit game—those layers give you that melt-in-your-mouth feeling.
- Watch the Broil: The last-minute broil is magic, but stay right in front of the oven or you might end up with burnt tops.
How to Serve Homemade Angel Biscuits Recipe
Garnishes
I love topping my warm angel biscuits with a pat of honey butter or a spoonful of homemade jam—especially peach or strawberry. Sometimes I even sprinkle a tiny pinch of flaky sea salt on top to balance out the sweetness. It’s those little finishing touches that make every bite feel extra special.
Side Dishes
These biscuits are perfect alongside a hearty breakfast of scrambled eggs and sausage, or as a cozy addition to a bowl of chicken and vegetable soup. I’ve also served them with southern-style greens and fried chicken for weekend dinners. Honestly, they pair beautifully with just about everything savory or sweet.
Creative Ways to Present
For special occasions, I’ve arranged angel biscuits in a braided circular pattern on a large platter and brushed with herb-infused butter for a show-stopping centerpiece. You can also serve mini biscuit sliders with little fillings inside—think ham and cheese or a dollop of pimento cheese—for an elegant yet cozy party appetizer.
Make Ahead and Storage
Storing Leftovers
I usually keep leftover biscuits in an airtight container at room temperature for up to two days. If you want them to stay soft, wrapping them in a clean kitchen towel inside the container helps maintain moisture beautifully.
Freezing
Freezing these biscuits works great! I flash-freeze the cut biscuits on a baking sheet, then transfer them to a freezer bag. When you’re ready, just pop them straight into the oven from frozen—adding an extra few minutes to the baking time—and they come out almost as fresh as when first made.
Reheating
To reheat, I wrap the biscuit in a damp paper towel and warm it in the microwave for about 15 seconds to get softness back, then finish in a 350°F oven for 5 minutes to crisp up the outside. This combo gives you that just-baked texture and flavor every time.
FAQs
-
Can I substitute the rapid rise yeast with regular active dry yeast?
Yes! Just be aware that regular active dry yeast takes longer to proof and rise—usually double the time. You might want to let the dough rise in a warmer spot and for closer to two hours rather than one.
-
Why should I avoid twisting the biscuit cutter?
Twisting seals the dough edges which prevents the biscuits from rising fully and getting those perfect fluffy layers. Instead, press the cutter straight down and pull straight up to keep the edges open and ready to puff up.
-
Can I make these biscuits vegan?
You can! Swap buttermilk for plant-based milk plus lemon juice, use vegan butter or margarine in place of butter and shortening, and choose a suitable egg replacement if your recipe calls for eggs in other versions. The texture will be slightly different but still delicious.
-
How do I know when the biscuits are done baking?
Look for a golden-brown top and lightly browned edges. When you tap the top, it should feel firm but with a slight spring. The broil step in the last minute helps ensure a beautiful crust, but keep a close watch so they don’t burn.
Final Thoughts
This Homemade Angel Biscuits Recipe has become one of those treasured recipes I often pull out when I want to impress without stress. They’re simple enough for a weekday treat but elegant enough for holiday brunches. I hope you find as much joy in making and sharing these biscuits as I do—it’s like a little homemade hug on a plate. Go ahead, give it a try and see how these angelic biscuits can brighten your table and your day.
Print
Homemade Angel Biscuits Recipe
- Prep Time: 20 minutes
- Cook Time: 12 minutes
- Total Time: 1 hour 32 minutes
- Yield: 8 servings
- Category: Breakfast
- Method: Baking
- Cuisine: American
- Diet: Vegetarian
Description
These homemade Angel Biscuits are tender, flaky, and layered, made with a yeast and buttermilk base for a light and fluffy texture. Perfect for breakfast or as a side with your favorite meal, these biscuits are brushed with heavy cream before baking for a golden finish and brushed with butter afterward for extra richness.
Ingredients
Yeast Mixture
- 1/4 cup warm water (125 F)
- 1 teaspoon granulated sugar
- 1 package Rapid Rise Instant yeast (1/4 oz) (2¼ teaspoons)
Biscuits
- 2½ cups all-purpose flour (preferably White Lily flour)
- 1/4 cup granulated sugar
- 1 teaspoon baking powder
- 1/2 teaspoon baking soda
- 1 teaspoon salt
- 1/4 cup unsalted butter, chopped + more for brushing finished biscuits
- 1/4 cup butter-flavored shortening
- 1 cup buttermilk
- 1 tablespoon heavy whipping cream
Instructions
- Proof the Yeast: In a glass measuring cup or bowl, combine warm water (125 F) and granulated sugar. Stir in the rapid rise instant yeast and let it proof while preparing the dry ingredients.
- Mix Dry Ingredients: In a large bowl, sift or whisk together the flour, sugar, baking powder, baking soda, and salt to ensure even distribution.
- Cut in Fats: Using a pastry cutter, cut the unsalted butter and butter-flavored shortening into the flour mixture until it resembles small crumbs.
- Add Wet Ingredients: Make a well in the center of the flour mixture, pour in the yeast mixture and buttermilk. Stir to combine just the yeast mixture and buttermilk.
- Form the Dough: Gradually push the flour mixture into the well, mixing gently until a dough forms.
- Knead the Dough: Lightly flour a work surface and turn the dough out. Gently knead to incorporate all crumbs until forming a soft, pliable mound.
- Create Layers: Fold the dough several times to develop layers that will make the biscuits flaky.
- Shape the Biscuits: Pat the dough into a 1-inch thick rectangle. Using a floured 2.5-inch round biscuit cutter, cut out 8-10 biscuits without twisting the cutter.
- Prepare for Rising: Place biscuits on a lightly greased 9-inch pan about 1/2 inch apart. Cover loosely with plastic wrap and place in a warm, draft-free area (like an oven with the pilot light on) to rise for 1 hour.
- Preheat and Brush: Preheat the oven to 400 F. Remove the plastic wrap and gently brush the tops with a light coating of heavy whipping cream to aid browning.
- Bake and Broil: Bake for 12 minutes, checking at 8 minutes. In the last minute, turn the oven to low broil to create golden tops, watching carefully to avoid burning.
- Finish: Remove from the oven and immediately brush the biscuits with melted butter for a rich finish.
Notes
- Do not twist the biscuit cutter when cutting biscuits, press straight down and lift to maintain layers and rise.
- Using White Lily flour or a soft all-purpose flour helps produce tender biscuits.
- Proofing the yeast properly ensures the biscuits rise well and develop light texture.
- Folding the dough several times before cutting creates flaky layers similar to puff pastry.
- Brushing biscuits with heavy cream before baking promotes a nicely browned, glossy top.
- Watch the biscuits closely when broiling at the end to prevent burning.
- Serving them warm with butter enhances flavor and texture.
Nutrition
- Serving Size: 1 biscuit
- Calories: 180 kcal
- Sugar: 4 g
- Sodium: 320 mg
- Fat: 9 g
- Saturated Fat: 4 g
- Unsaturated Fat: 4 g
- Trans Fat: 0 g
- Carbohydrates: 22 g
- Fiber: 1 g
- Protein: 3 g
- Cholesterol: 25 mg


