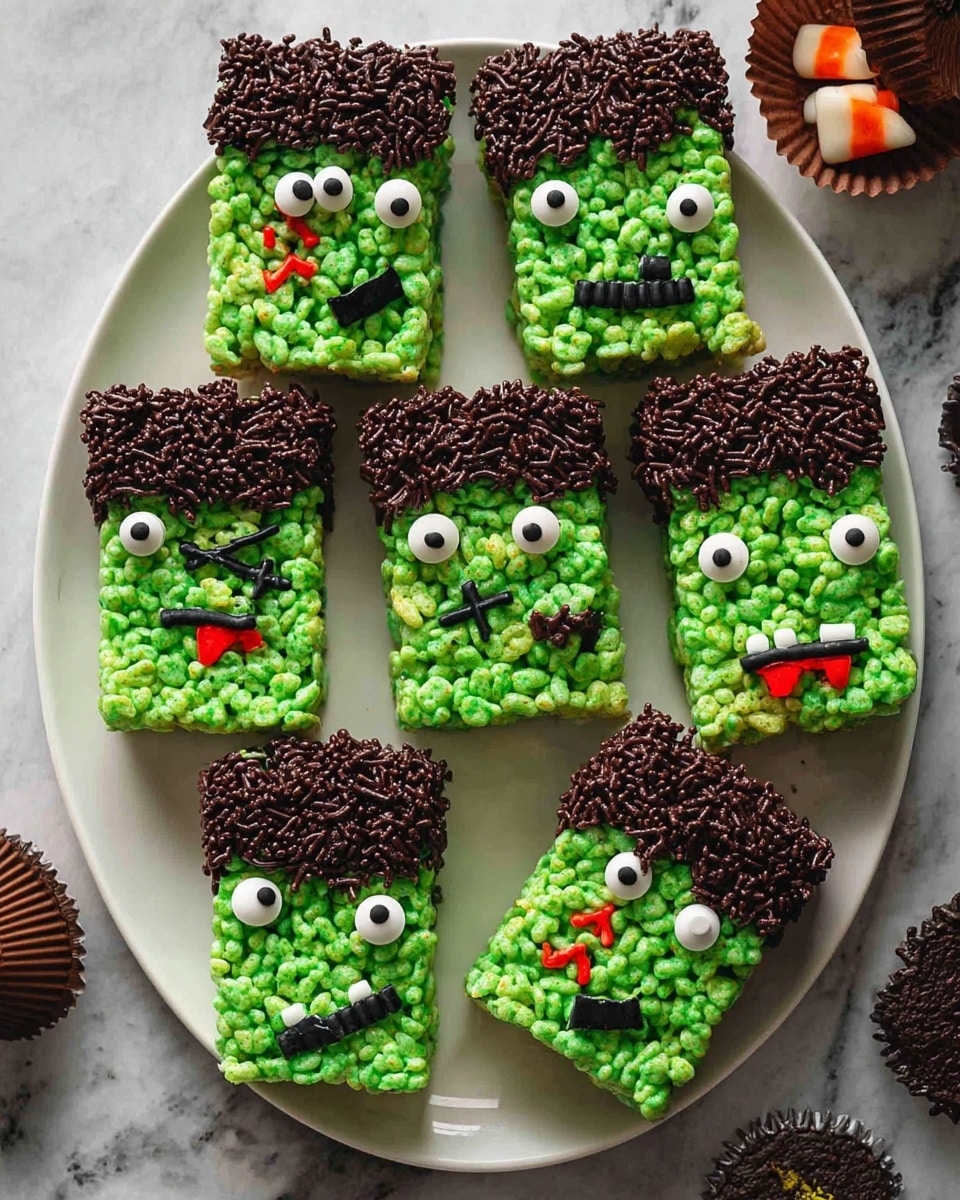
Halloween Rice Krispies Treats (Frankenstein’s Monster!) Recipe
If you’re looking for a fun, spooky, and downright delicious treat to serve this season, you’ve got to try my Halloween Rice Krispies Treats (Frankenstein’s Monster!) Recipe. These marshmallowy, crispy, and adorably creepy treats bring the nostalgia of classic Rice Krispies with a Halloween twist that’s easy to make and sure to impress your little monsters (and the big ones too!). Stick around because I’m sharing all my best tips to make these green Frankenstein monsters perfectly gooey, vibrant, and fun to decorate!
Why This Recipe Works
- Perfect Texture: The balance of buttery marshmallows and crispy cereal creates that iconic chewy but crunchy bite we all love.
- Festive Look: The bright green marshmallow base and creative chocolate decorations bring Frankenstein’s monster to life in a cute way.
- Simple Ingredients: You don’t need anything fancy, just pantry staples and a few fun additions like candy eyeballs to wow everyone.
- Kid-Friendly Fun: Easy enough for little helpers to join in the fun of assembling and decorating the treats.

Ingredients & Why They Work
This Halloween Rice Krispies Treats (Frankenstein’s Monster!) Recipe relies on simple ingredients that come together effortlessly, producing that perfect soft yet crispy texture. Choosing the right marshmallows and quality cereal will make all the difference in both flavor and consistency.
- Unsalted butter: Melts smoothly to help bind the cereal and marshmallows; unsalted lets you control the saltiness perfectly.
- Mini marshmallows: Smaller size means quicker melting and a smoother marshmallow coating.
- Kosher salt: Just a pinch enhances the sweetness and balances the flavor.
- Green food coloring: Gives that perfect Frankenstein green without altering taste.
- Rice Krispies cereal: Classic choice for the perfect crunch and iconic texture.
- Semisweet chocolate chips: For dipping and decorating, adds a rich contrast to the sweetness.
- Chocolate sprinkles: Adds texture and a spooky touch to decorating.
- Candy eyeballs: Essential for bringing Frankenstein’s monster to life—fun, freaky, and a bit silly!
- Reese’s Minis Unwrapped: Used as the monster’s “neck bolts” for a peanut butter twist.
- Black writing gel: To draw creepy stitches and mouths.
- Red writing gel (optional): Adds a little “yikes” with some fake blood details.
Tweak to Your Taste
I love making this recipe my own by playing around with decorations and slightly adjusting sweetness. You can easily customize the look or flavor to fit your family’s preferences or party themes.
- Variation: Sometimes I swap Reese’s Minis with small rectangular cookies or jelly beans for alternative “neck bolts” that add different textures or flavors.
- Dietary tweaks: Use gluten-free Rice Krispies if needed, or swap marshmallows for vegan versions to accommodate dietary restrictions.
- More colors: I’ve experimented with blue or purple food coloring for different monster looks, and my kids loved helping pick colors!
- Darker chocolate: Using dark chocolate chips instead of semisweet adds a lovely depth that cuts the sweetness a bit.
Step-by-Step: How I Make Halloween Rice Krispies Treats (Frankenstein’s Monster!) Recipe
Step 1: Prep and Melt With Care
First, lightly spray your 13 x 9-inch pan with nonstick baking spray — this is key for easy removal later without the hassle of sticky stuck-on treats. Next, melt four tablespoons of unsalted butter in a large pot over medium-low heat. I always keep an eye on the butter, making sure it melts gently so it doesn’t brown or burn, which would alter the flavor.
Step 2: Add Marshmallows and Color
Add your 10 ounces (that’s about 5-1/2 cups) of mini marshmallows along with a pinch of kosher salt to the melted butter. Stir them slowly as they melt to a smooth, gooey mixture. Now here’s the fun part: stir in green food coloring a little at a time until you get that perfect bright Frankenstein green. I usually add a few drops, stir, then add more — it’s easier to add than to fix a color that’s too dark.
Step 3: Combine with Cereal
Remove the marshmallow mixture from the heat and pour in 5 cups of Rice Krispies cereal. Fold everything together using a spatula until every crunchy bit is coated in the vibrant green marshmallow goo. This step needs just a gentle touch — don’t overmix or you’ll squash the cereal and lose that great texture.
Step 4: Press Into the Pan and Cool
Transfer your monster mixture into the prepared pan. I like to use a piece of parchment paper or lightly greased hands to press it evenly into the corners and smooth the surface. Let it sit at room temperature for about 15 minutes to firm up — this helps with easier cutting and decorating later.
Step 5: Cut Into Frankenstein’s Monster Shapes
Once set, flip the slab onto a cutting board. Cut the rectangle in half lengthwise, then cut each half into five equal pieces crosswise, giving you 10 Frankenstein monsters to decorate — perfect for a party or classroom treat!
Step 6: Melt Chocolate and Dip
Place your 8 ounces of semisweet chocolate chips into a microwave-safe bowl or glass measuring cup — I find glass containers best for dipping because you can dip the Rice Krispies treats easily. Microwave in 30-second intervals, stirring between each, until smooth and melt-ready. Dip one end of each treat in the melted chocolate and immediately sprinkle with chocolate sprinkles for that spooky texture.
Step 7: Add Eyes and Neck Bolts
While the chocolate is still wet, use the remaining melted chocolate as glue to attach candy eyeballs and Reese’s Minis as Frankenstein’s signature “neck bolts.” This is the part my kids love most because they get to get creative and make each monster unique.
Step 8: Detail with Writing Gel
Finally, use black writing gel to draw on creepy mouths and stitches. If you want to get extra spooky, add some red writing gel to suggest a bit of ghoulish “blood.” Let your monster treats sit until the chocolate hardens, and you’re ready to enjoy!
Pro Tips for Making Halloween Rice Krispies Treats (Frankenstein’s Monster!) Recipe
- Gentle Heat: Keep the heat low when melting butter and marshmallows to avoid scorching and tough treats.
- Use Parchment Paper for Pressing: Pressing the mixture with parchment works wonders for even thickness and prevents sticking.
- Work Quickly: Once the marshmallows melt, combine with cereal and press immediately before the mixture cools and hardens.
- Dip and Decorate Fast: Dip one treat at a time and decorate immediately so sprinkles and candy stick before chocolate sets.
How to Serve Halloween Rice Krispies Treats (Frankenstein’s Monster!) Recipe
Garnishes
For garnish, I love using extra candy eyeballs and sprinkles to scatter on the serving platter for more spooky fun. Sometimes I add little green or black sugar crystals for extra shimmer — it makes the treats look like they popped straight out of a mad scientist’s lab!
Side Dishes
Pair these treats with classic Halloween drinks like spiced apple cider or a bubbly punch with gummy worms floating on top. If it’s a party, add bowls of mini pretzels or popcorn for salty snacks that balance the sweet.
Creative Ways to Present
For Halloween gatherings, I like serving these treats on a black platter lined with orange tissue paper or faux cobweb decorations. You can also skewer the treats with popsicle sticks for “Frankenstein pops” that are easy for kids to hold. Wrapping individually with clear treat bags tied with a green ribbon makes for adorable party favors!
Make Ahead and Storage
Storing Leftovers
These treats keep beautifully in an airtight container at room temperature for up to 3 days. I recommend separating layers with parchment paper to avoid sticking. The texture stays just right — chewy with a crisp snap.
Freezing
I’ve frozen Halloween Rice Krispies Treats (Frankenstein’s Monster!) Recipe before by wrapping each treat tightly in plastic wrap and storing them in a freezer-safe bag. When thawed, they’re almost as fresh as the day I made them, perfect for prepping ahead of spooky celebrations.
Reheating
No reheating needed for these little monsters, but if you want to soften slightly, pop them in the microwave for 5-10 seconds wrapped in a paper towel — just don’t overdo it or they’ll get sticky and lose their crunch.
FAQs
-
Can I use regular-sized marshmallows instead of mini marshmallows?
Yes! Regular-sized marshmallows will work, but they’ll take a bit longer to melt. Just be patient and stir frequently on low heat to avoid scorching the mixture. Your treats might be slightly less smooth but still delicious.
-
What if I don’t have candy eyeballs for decorating?
No worries! You can create eyes using small white chocolate chips with a dot of black writing gel, or use mini marshmallows with chocolate chip or icing pupils. Feel free to get creative with whatever candies you have on hand.
-
How do I keep the treats from sticking to my hands when pressing?
I always lightly grease my hands with butter or use a piece of parchment paper to press the mixture into the pan. This prevents sticky fingers and helps get a smooth surface!
-
Can I make this recipe vegan?
Absolutely! Use vegan marshmallows and a dairy-free butter alternative. Just double-check that your Rice Krispies cereal is vegan-friendly (some versions contain vitamin D3 from animal sources).
-
What’s the best way to store these treats for a Halloween party?
Store your Frankenstein Rice Krispies treats in an airtight container layered with parchment paper at room temp. If you’re prepping in advance, individually wrap each treat to keep them fresh and prevent decorations from smudging.
Final Thoughts
Honestly, the Halloween Rice Krispies Treats (Frankenstein’s Monster!) Recipe holds a special spot in my kitchen during the spooky season. It’s one of those simple, joyful recipes that brings everyone—from the youngest ghost to the oldest ghoul—together for a hands-on, sweet triumph. These treats are easy to whip up, endlessly customizable, and delightfully nostalgic. I hope you’ll make them this Halloween and make some fun memories while you’re at it. Trust me, your Frankenstein crew will thank you!
Print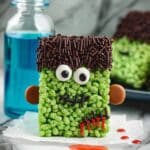
Halloween Rice Krispies Treats (Frankenstein’s Monster!) Recipe
- Prep Time: 30 minutes
- Cook Time: 5 minutes
- Total Time: 50 minutes
- Yield: 10 servings
- Category: Dessert
- Method: Stovetop
- Cuisine: American
Description
These Halloween Rice Krispies Treats are fun, festive, and perfect for a spooky celebration. Shaped like Frankenstein’s Monster, these bright green, chewy treats are coated with melted chocolate, decorated with candy eyeballs, and finished with playful icing details for a creepy-cute effect.
Ingredients
Main Ingredients
- 4 tablespoons unsalted butter
- 10 ounces mini marshmallows (5-1/2 cups)
- Pinch kosher salt
- Green food coloring (enough to achieve bright green color)
- 5 cups Rice Krispies cereal
Decoration
- 8 ounces semisweet chocolate chips
- 1/4 cup chocolate sprinkles
- 20 candy eyeballs
- 20 Reese’s Minis unwrapped
- Black writing gel
- Red writing gel (optional)
- Nonstick baking spray (for pan)
Instructions
- Prepare the pan: Spray the bottom and sides of a 13 x 9-inch pan with nonstick baking spray to prevent sticking.
- Melt butter and marshmallows: In a large pot over medium-low heat, melt the butter. Add the mini marshmallows, a pinch of kosher salt, and green food coloring. Stir continuously until the mixture is fully combined, smooth, and a bright green color, adding more food coloring if needed.
- Mix with cereal: Remove the pot from heat. Add the Rice Krispies cereal and stir gently until all the cereal is evenly coated with the green marshmallow mixture.
- Press mixture into pan: Transfer the mixture into the prepared pan. Use a piece of parchment paper or greased hands to firmly press the mixture evenly into the pan’s bottom. Let it stand at room temperature for 15 minutes to set.
- Cut the treats: Turn the set mixture out onto a cutting board. Cut the rectangle in half lengthwise, then cut each half into 5 pieces crosswise, making 10 pieces total.
- Melt chocolate: Place semisweet chocolate chips in a microwave-safe glass measuring cup or bowl. Microwave in 30-second intervals, stirring between each, until the chocolate is smooth and fully melted.
- Dip and decorate: Dip one end of each treat into the melted chocolate, then place on parchment paper. Immediately sprinkle chocolate with chocolate sprinkles.
- Attach features: Use the remaining melted chocolate to attach candy eyeballs and Reese’s Minis as neck bolts onto each treat.
- Add finishing details: Use black writing gel to draw mouths and stitches on the treats. Optionally, add a touch of red writing gel to simulate blood for extra spooky effect.
Notes
- Use greased hands or parchment paper to press the mixture to prevent sticking.
- Adjust green food coloring to your preferred shade for the marshmallow mixture.
- If melted chocolate becomes too thick, microwave for a few seconds more to thin it out.
- Store treats in an airtight container at room temperature for up to 3 days.
- Red writing gel is optional but adds a fun blood-like detail to the Frankenstein treats.
Nutrition
- Serving Size: 1 treat
- Calories: 210 kcal
- Sugar: 16 g
- Sodium: 90 mg
- Fat: 9 g
- Saturated Fat: 5 g
- Unsaturated Fat: 3 g
- Trans Fat: 0 g
- Carbohydrates: 30 g
- Fiber: 1 g
- Protein: 2 g
- Cholesterol: 15 mg


