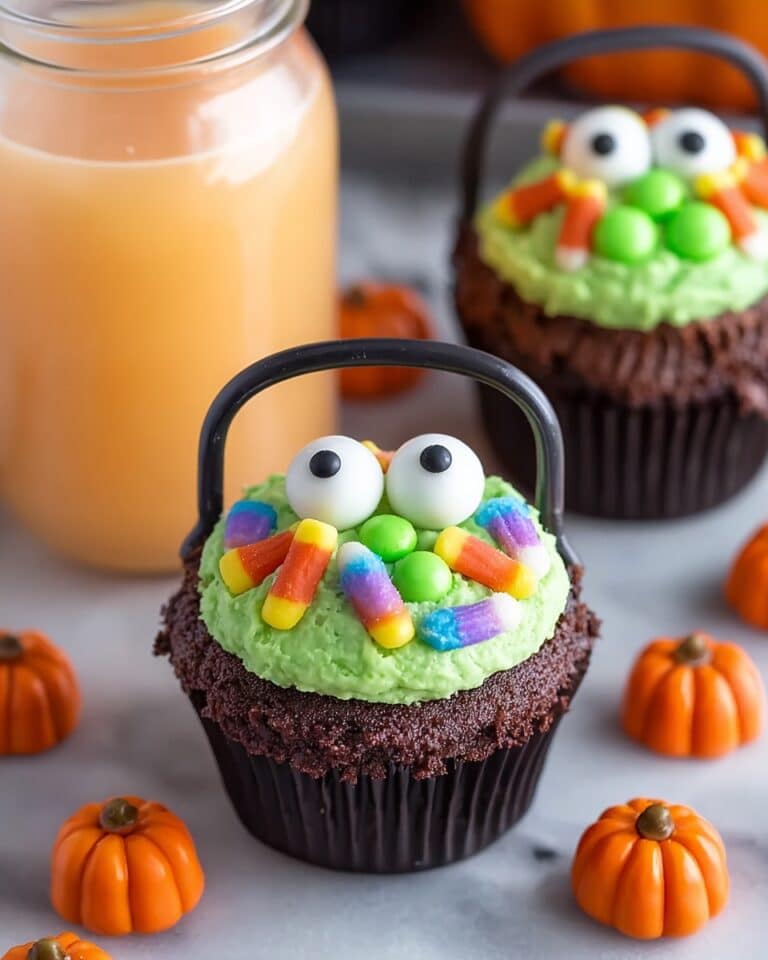
Halloween Oreo Candy Molded Treats Recipe
If you’re on the lookout for a show-stopping Halloween treat that’s both fun to make and absolutely delicious, you’ve got to try this Halloween Oreo Candy Molded Treats Recipe. Seriously, these little beauties are a hit every time I bring them out, whether it’s for a spooky party or a cozy night with the family. They’re colorful, creamy, and festive with that magical mix of Oreo crunch inside candy shell goodness. Trust me, once you whip these up, they’ll be a go-to for your Halloween celebrations!
Why This Recipe Works
- Perfect Combo of Texture: The crisp Oreo nestled inside smooth, sweet candy melts creates an irresistible crunch and creamy bite every time.
- Customizable Decorating: You can get as creative as you want with sprinkles, candy eyes, and piping designs, making this recipe super fun for kids and adults alike.
- Easy to Make: With just melting, molding, and chilling, you don’t need fancy baking skills or equipment.
- Great for Make-Ahead: Once they’re set, these treats hold up really well, perfect for prepping in advance of your Halloween party.

Ingredients & Why They Work
The magic behind this Halloween Oreo Candy Molded Treats Recipe is in the simplicity and quality of ingredients. Each item plays its part, creating layers of flavor and texture that make each bite heavenly. Plus, they’re easy to find at your local grocery or craft store!

- Oreos: Classic, reliably tasty, and the perfect size to fit snugly inside most candy molds.
- Candy Melts: These colorful melts provide silky coverage and vibrant hues; plus, they harden beautifully for that perfect molded shape.
- Sprinkles and Decorations: These add your personal Halloween flair—from spooky candy eyes to sparkling orange and black sprinkles.
Tweak to Your Taste
I love mixing up the colors and decorations to match whatever vibe I’m going for — sometimes spooky, sometimes cute, and sometimes downright glittery and wild! Feel free to experiment by swapping in your favorite candy melts colors, or adding nuts or small candies for an extra crunch. It’s your treat, so make it fun.
- Halloween Variations: I once made a batch using dark chocolate candy melts and piped on little ghost faces with white icing — so adorable and perfect for spooking out the kids!
- Dietary Swaps: If you want to go dairy-free, just grab vegan candy melts and double-check Oreos (they’re usually dairy-free) — it worked perfectly when I made them for a friend with allergies.
- Seasonal Flavors: For a fun twist, add a sprinkle of cinnamon or pumpkin spice to the candy melts before melting for a subtle seasonal kick.
Step-by-Step: How I Make Halloween Oreo Candy Molded Treats Recipe
Step 1: Melt Your Candy Melts Carefully
I use paper Dixie cups to melt my candy melts in the microwave — it’s super convenient and cleanup is a breeze! Heat them in 30-second bursts, stirring in between, until silky smooth. If the candy melts get too thick or start to seize, stir in a tiny splash of vegetable oil (about half a teaspoon) to loosen the texture without sacrificing flavor.
Step 2: Fill the Mold with Candy Melts & Add Oreos
Spoon about a tablespoon of melted candy into each mold cavity and spread it evenly to cover the bottom. Gently press an Oreo cookie on top, then cover it with another tablespoon of melted candy melts, making sure to seal the cookie inside. This step is fun because you get to peek at the Oreo peeking through the colorful candy.
Step 3: Chill Until Set
Pop your filled molds into the fridge for at least an hour. I usually give them the full hour to make sure the chocolate hardens perfectly, but if you’re in a rush, 45 minutes might work — just don’t skip this or your candies will be messy to unmold.
Step 4: Decorate Your Treats Like a Pro
Once the candies are set, carefully pop them out from the mold. Melt extra candy melts of different colors for decorating. For classic jack-o’-lantern faces, I like using black candy melts in a small piping bag with the tiniest cut tip. If you’re not feeling steady-handed, a black food-safe marker pen does the trick too!
If you want to keep it simple, drizzle colored candy melts over the tops and sprinkle your favorite Halloween-themed decorations before the drizzle hardens. Chill again briefly to lock in your designs.
Pro Tips for Making Halloween Oreo Candy Molded Treats Recipe
- Use High-Quality Candy Melts: I swear by Ghirardelli chocolate candy melts—they melt silky smooth, spread evenly, and taste rich, making your treats taste next-level.
- Don’t Skip the Chill Time: Giving the candies enough time in the fridge is what keeps the shape clean and helps them release from the mold easily.
- Avoid Overheating Candy Melts: Heat in short bursts and stir often—that little patience saves you from grainy or burned chocolate.
- Decorate After Unmolding: Decorating candies while still in the mold? Trust me, it’s a sticky mess—best to wait until they’re solid and popped out.
How to Serve Halloween Oreo Candy Molded Treats Recipe

Garnishes
I like topping mine with cute candy eyeballs, a sprinkle of edible glitter, or even tiny bits of crushed candy corn. It adds that festive pop and makes them instantly photo-worthy. Bonus: kids go wild over personalized candy eyes!
Side Dishes
These molded treats pair nicely with a simple glass of cold milk or a warm cup of pumpkin spice latte — the ultimate sweet-and-creamy combo I swear by every Halloween season. They also work great alongside bowls of popcorn or caramel apples for a balanced treat table.
Creative Ways to Present
Try arranging them on a black or orange platter lined with tissue paper or do a little “trick or treat” themed gift bag with a few individually wrapped for friends or neighbors. One year, I wrapped them in clear cellophane with mini pumpkin tags — adorable and so easy to personalize!
Make Ahead and Storage
Storing Leftovers
I keep leftovers in an airtight container in the fridge; they last about a week without losing their crunch or flavor. Just make sure to layer with parchment paper to prevent sticking.
Freezing
If you want to plan ahead, freezing works like a charm! Wrap each treat individually in plastic wrap, then store in a ziplock bag. When you thaw them at room temperature, they keep their texture almost perfectly—great for prepping early for Halloween.
Reheating
These treats are best enjoyed cold or at room temperature. If they’ve gotten a bit chilly from the fridge, letting them sit out for 10–15 minutes brings back their creamy softness without melting the outer shell.
FAQs
-
Can I use regular chocolate instead of candy melts for this recipe?
You can, but candy melts are designed to harden with a smooth finish and come in festive colors, making them easier to work with and perfect for decorating. Regular chocolate tends to require tempering and might not hold up as well in the mold.
-
How do I prevent the candy melts from getting lumpy or thick when melting?
Heat the candy melts in short bursts (about 20-30 seconds) and stir thoroughly in between. If they start to thicken, stir in a tiny bit of vegetable oil to smooth the texture right out.
-
What’s the best way to remove the treats from the molds without breaking them?
Make sure your treats are fully chilled and hardened before trying to pop them out. Gently flex the mold and press from the bottom if possible. If the candy sticks, give it a bit more time in the fridge.
-
Can I use different types of cookies instead of Oreos?
Absolutely! Just make sure the cookie fits well inside your mold cavities and works well with the candy melts. Thin sandwich cookies or sturdy biscuit cookies are great alternatives.
Final Thoughts
Honestly, this Halloween Oreo Candy Molded Treats Recipe has become a favorite in my house because it’s simple, fun, and always brings smiles — from little kids decorating to grown-ups who love their nostalgia. It’s the kind of recipe you’ll return to every fall, and I hope you enjoy making (and eating!) it as much as I do. Give it a try at your next Halloween hangout; you’ll impress everyone, guaranteed.
Print
Halloween Oreo Candy Molded Treats Recipe
- Prep Time: 45 minutes
- Cook Time: 0 minutes
- Total Time: 1 hour 45 minutes
- Yield: 8 servings
- Category: Dessert
- Method: No-Cook
- Cuisine: American
Description
This Halloween Oreos recipe transforms classic Oreos into festive, decorated treats perfect for spooky celebrations. Covered in colorful melted candy melts and adorned with sprinkles, candy eyes, and piped designs, these Halloween Oreos are both fun and delicious, ideal for party snacks or themed desserts.
Ingredients
Oreos
- 12 Oreos
Candy Coating
- 1 cup candy melts in different colors
Decorations
- Sprinkles
- Gel coloring
- Candy eyes
- Black candy melts or dark chocolate for piping
Instructions
- Melt candy melts: Melt the candy melts according to package directions using a microwave-safe container like paper dixie bowls for easy cleanup and to prevent burning.
- Assemble Oreos: Fill the bottom of each mold cavity with about 1 tablespoon of melted candy melts. Place one Oreo on top, then cover with more melted candy melts to seal the Oreo inside.
- Chill to set: Place the mold in the refrigerator and chill until the candy melts have fully hardened, about 1 hour.
- Remove and decorate: Carefully remove the set Oreos from the molds. Melt additional candy melts in desired colors for decorating.
- Decorate jack o’ lantern faces: Use black candy melts or dark chocolate in a small piping bag with the tip cut off to pipe eyes and mouth shapes on the Oreos, or use a black food writer pen for precision.
- Sprinkle decoration: Drizzle melted candy melts over the Oreo tops and add desired sprinkles or candy eyes. Chill again to harden the decorations.
Notes
- Using high-quality chocolate candy melts like Ghirardelli improves flavor and texture.
- Candy melts from craft stores tend to be thicker; add about 1/2 teaspoon vegetable oil to thin the mixture if needed.
- Refer to tips on melting candy easily in related posts for smoother decorating.
- Use paper dixie bowls for melting candy to avoid mess and prevent burning in the microwave.
Nutrition
- Serving Size: 1 cookie
- Calories: 150 kcal
- Sugar: 20 g
- Sodium: 90 mg
- Fat: 7 g
- Saturated Fat: 4 g
- Unsaturated Fat: 2 g
- Trans Fat: 0 g
- Carbohydrates: 22 g
- Fiber: 1 g
- Protein: 1 g
- Cholesterol: 5 mg


