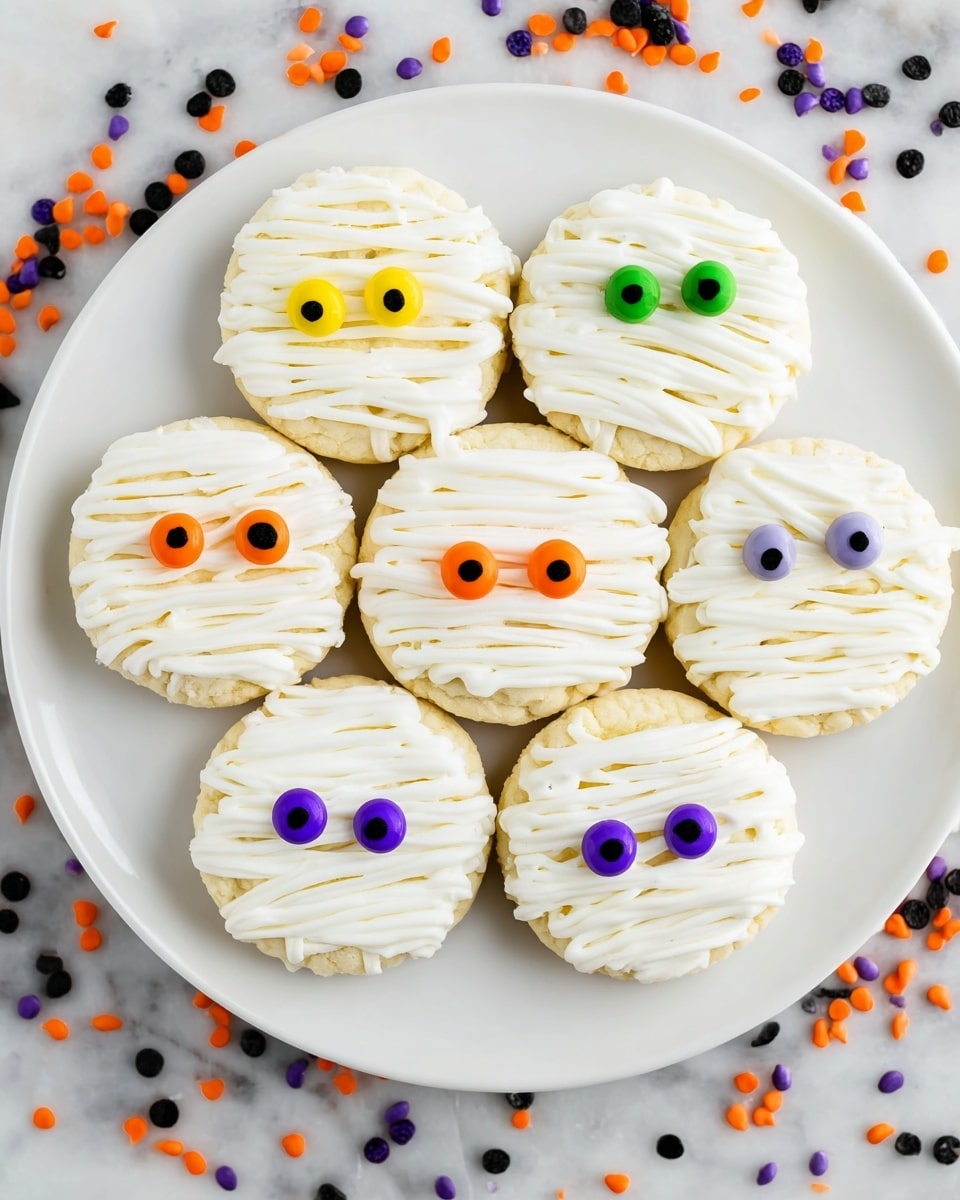
Halloween Mummy Oreo Cookies Recipe
If you’re hunting for a Halloween treat that’s as fun to make as it is to eat, you’re going to adore this Halloween Mummy Oreo Cookies Recipe. These little mummies are spooky, sweet, and surprisingly simple—perfect for last-minute parties or a fun kitchen project with the kids. Plus, I’ve got all the tips you need to make yours look utterly creepy-cute (without freaking out the chocolate!). Let’s dive in so you can wow your friends with these delightfully wrapped Oreo mummies.
Why This Recipe Works
- Simple Ingredients: You only need a few pantry staples like Oreos and white chocolate, making this recipe super accessible anytime.
- Instant Festive Appeal: The mummy design is charming and perfect for Halloween without being scary, suitable for all ages.
- No Baking Required: This treat comes together quickly with minimal effort—no oven needed, just some melting and decorating.
- Customizable Fun: You can easily switch up flavors or colors to fit your party vibe or dietary preferences.

Ingredients & Why They Work
This Halloween Mummy Oreo Cookies Recipe keeps things straightforward, using classic Oreos as a base and creamy white chocolate to create that iconic mummy wrap effect. The royal icing eyes add personality and a touch of spookiness that really bring them to life. If you grab quality melting wafers and optional paramount crystals, your mummies will not only look perfect but also have that smooth, shiny finish everyone loves.
- Oreo Sandwich Cookies: Pick your favorite flavor, but classic Oreos work best—they’re sturdy and have that perfect chocolate-vanilla combo.
- White Chocolate Melting Wafers: These melt smoothly and set quickly, ideal for dipping and piping your mummy wraps.
- Paramount Crystals: Optional, but I recommend them to keep your white chocolate shiny and prevent that dull, chalky “bloom” effect.
- Royal Icing Eyes: These little edible eyes add instant personality and spooky charm—plus, they’re easy to find in craft or baking stores around Halloween.
Tweak to Your Taste
I’ve found that adding my own little twist keeps this recipe fresh every year. Maybe you like a splash of orange or green candy melts for other creepy critters, or want to swap in some peppermint Oreos for a cool twist. Feel free to get creative — it’s half the fun!
- Variation: Once, I replaced white chocolate with orange candy melts for a vibrant “pumpkin mummy” effect. It was a hit at our Halloween party and super easy to do.
- Dietary Modifications: For a dairy-free version, try coconut-based white chocolate melts—they work well and keep things yummy.
- Difficulty Level: If you want to make it quicker, skip the piping step and just dip then add eyes—you’ll still get great results!
Step-by-Step: How I Make Halloween Mummy Oreo Cookies Recipe
Step 1: Get Your Dipping Station Ready
Line a baking sheet with parchment paper or a Silpat mat—this will keep your cookies from sticking when the white chocolate sets. Set it somewhere cool and accessible so you can transfer dipped Oreos right away. Trust me, this little step saves you a lot of sticky mess later on.
Step 2: Melt the White Chocolate with Care
Pop your white chocolate melting wafers and optional paramount crystals into a microwave-safe bowl. Microwave at medium power for 30 seconds, then take it out and stir slowly to distribute heat and prevent seizing. Repeat heating in 15-second bursts, stirring each time until completely smooth and glossy. This careful melting is key to smooth dips and clean piping lines.
Step 3: Dip & Add Those Eyes
Using a fork or dipping tool, dip an Oreo cookie fully into the melted white chocolate. Gently tap off the excess chocolate to avoid drips. Place on the lined sheet and immediately press two royal icing eyes onto the cookie before the chocolate firms up. This quick action makes sure the eyes stick perfectly in place—no awkward sliding later.
Step 4: Pipe the Mummy Wraps
Pour some of the melted chocolate into a decorating or sandwich bag, and snip off a tiny corner—just enough for thin, ribbon-like lines. Pipe back and forth across the Oreos to create “bandages,” being careful not to cover the eyes. It’s like giving your mummy its signature wrap look. Let them sit until the chocolate hardens completely. Then brace yourself for the first bite—it’s that good!
Pro Tips for Making Halloween Mummy Oreo Cookies Recipe
- Use Room Temperature Cookies: Cold Oreos can cause the chocolate to harden too fast, making dipping tricky, so let them sit out for a bit first.
- Slow and Steady Melting: Stirring between small microwave bursts prevents burning, ensuring silky chocolate perfect for dipping and piping.
- Keep the Eyes Close By: Have those royal icing eyes ready next to your dipping station so you can place them on immediately.
- Don’t Overload Chocolate: Tapping off excess chocolate avoids drips and messy pooling, which can cover the eyes or ruin your mummy lines.
How to Serve Halloween Mummy Oreo Cookies Recipe
Garnishes
I typically keep these cute mummies simple—those royal icing eyes pack enough charm! But if you want to dress them up, sprinkle a tiny pinch of edible glitter or orange and black sanding sugar around for festive sparkle. It’s a fun way to add a little magic without overpowering the mummy design.
Side Dishes
Pair your Halloween Mummy Oreo Cookies with a big mug of spiced hot chocolate or pumpkin spice latte for an indulgent seasonal treat. They also work wonderfully alongside a bowl of fresh fruit or some crunchy pretzels—offering a balance between sweet and salty snacks at your party table.
Creative Ways to Present
For my Halloween get-togethers, I like to arrange a spooky “mummy graveyard” on a black tray, using green-tinted coconut flakes for “grass” and little tombstone picks. Another cute idea? Wrap them in mini cupcake liners and stack them like a mummy tower for a playful centerpiece that invites guests to grab one (or three!).
Make Ahead and Storage
Storing Leftovers
I always store leftover Halloween Mummy Oreo Cookies in an airtight container at room temperature. They keep perfectly for at least a week, staying fresh and crunchy without the chocolate spotting or melting. Just make sure to keep them away from direct heat.
Freezing
If you want to make these ahead of time, freezing works great. I wrap them gently in parchment paper, place them in a freezer-safe container, and pull them out a day before serving to thaw slowly in the fridge. This helps retain their crispness and chocolate shine.
Reheating
Since these are cookies dipped in chocolate—not baked—you don’t really need to reheat them. If the chocolate loses some of its luster, just allow them to come to room temperature, and they’ll taste as good as fresh. Avoid warming them too much or you’ll risk melting the chocolate again.
FAQs
-
Can I use other types of cookies in this Halloween Mummy Oreo Cookies Recipe?
Absolutely! While Oreos offer a classic look and sturdy texture perfect for dipping, you can experiment with similar sandwich cookies or even homemade cookies as long as they hold together well when dipped in chocolate.
-
What are paramount crystals, and do I really need them?
Paramount crystals are powdered oil that helps keep melted chocolate smooth and shiny while reducing sugar and fat bloom. They’re optional but highly recommended if you want your white chocolate to look glossy and last longer at room temperature.
-
Can I make these mummies vegan or dairy-free?
Yes! Use vegan or dairy-free white chocolate melting wafers and find vegan-friendly sandwich cookies. Just double-check that your royal icing eyes are vegan or substitute with small candy eyes made from natural ingredients.
-
How do I prevent the white chocolate from hardening too quickly when dipping?
Work quickly and melt the chocolate just enough for dipping (don’t overheat). You can also warm your bowl gently between batches or dip fewer cookies at a time to prevent the chocolate from setting before use.
-
How long does it take for the chocolate to harden on these cookies?
Usually, white chocolate sets within 15-20 minutes at room temperature. If you want to speed things up, placing the baking sheet in the fridge for 10-15 minutes helps the chocolate firm up faster without condensation issues.
Final Thoughts
Honestly, this Halloween Mummy Oreo Cookies Recipe has become my go-to for festive fun that’s totally stress-free. The smile on everyone’s face when they see those wide, shimmery eyes wrapped in white chocolate “bandages” is priceless. If you love quick, adorable, and delicious Halloween treats, give these a whirl—I promise they’ll be a huge hit at your next spooky gathering. Grab your Oreos, melt that white chocolate, and let’s get wrapping!