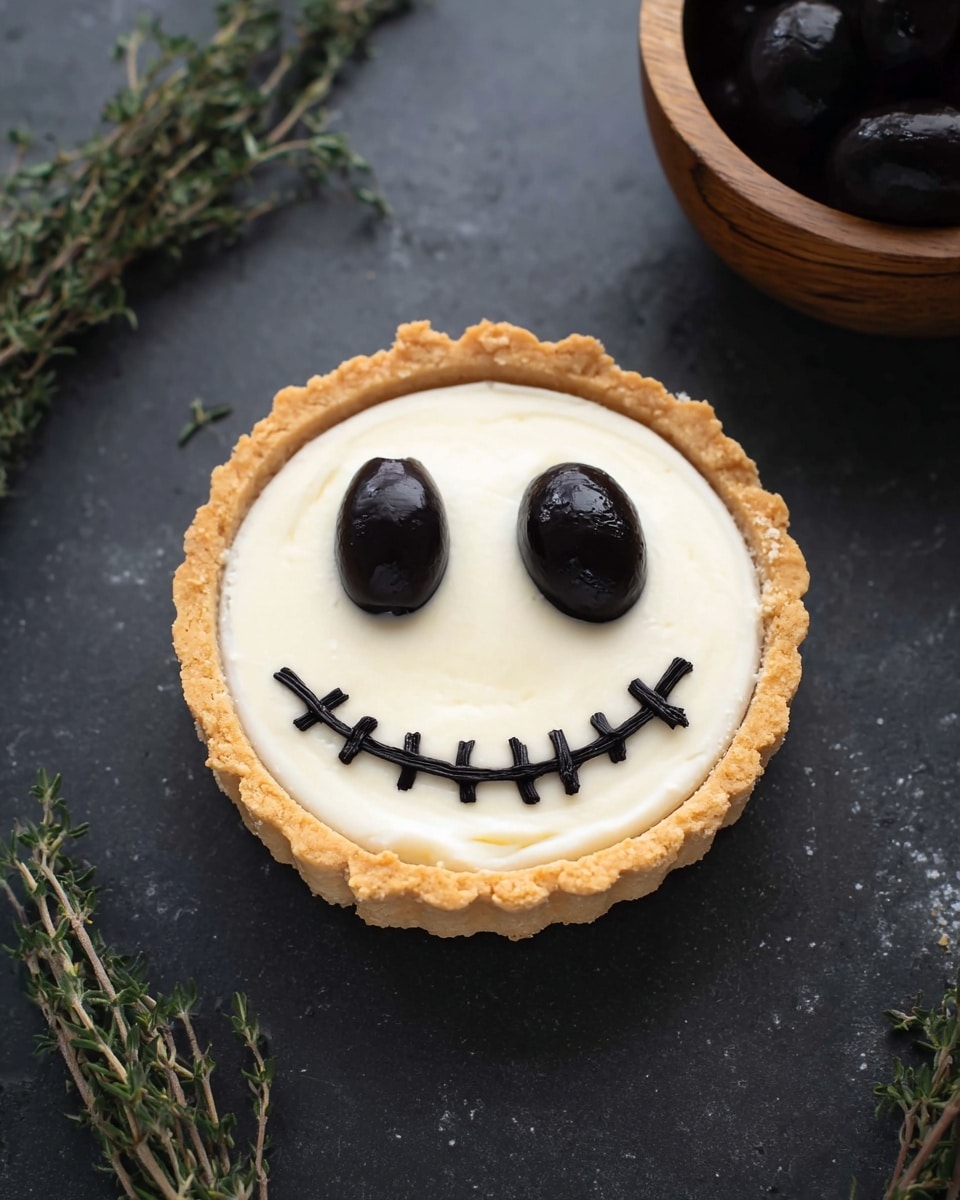
Halloween Jack Skellington Ricotta Olive Tarts Recipe
If you’re looking to wow your friends at your next Halloween gathering with something truly unique, look no further than my Halloween Jack Skellington Ricotta Olive Tarts Recipe. These adorable little tarts capture that spooky spirit in every bite, combining creamy ricotta, salty olives, and a gluten-free crust that’s buttery and perfect for fall. Trust me, once you make them, they’ll quickly become a seasonal favorite – plus, they’re fun to decorate! Keep reading, and I’ll walk you through every step so you can nail this recipe — even if you’re new to tart-making.
Why This Recipe Works
- Gluten-Free Crust Magic: Using a blend of sweet rice, millet, and oat flours creates a tender, flaky crust that holds up beautifully without gluten.
- Savory-Sweet Balance: The tangy ricotta and Greek yogurt mix with salty olives and sun-dried tomatoes to give a perfect harmony of flavors.
- Halloween Charm: The careful placement of olives transforms these tarts into charming Jack Skellington faces that are sure to delight both kids and adults.
- Make-Ahead Friendly: You can prep the dough ahead and freeze assembled tarts for easy entertaining later on.

Ingredients & Why They Work
The ingredients in this Halloween Jack Skellington Ricotta Olive Tarts Recipe are thoughtfully chosen to marry texture and flavor while keeping things approachable. Each component plays a role, so using quality products will make a noticeable difference, especially with ricotta and olives.
- Sweet rice flour: Adds tender crispness and a slight chew to the crust.
- Millet flour: Gives earthiness and a bit of nutty flavor to balance the other flours.
- Oat flour: Homemade oat flour keeps the crust gluten-free and adds a subtle sweetness.
- Tapioca flour: Helps bind the crust and gives it a nice springiness.
- Kosher salt: Essential to enhance all the flavors.
- Cold unsalted butter: Creates that flaky, buttery texture we all love.
- Ice water: Keeps the dough together without melting the butter.
- Black olives: Both chopped for filling and sliced for decoration — they contribute saltiness and the iconic Jack Skellington features.
- Sun-dried tomatoes: Their concentrated sweetness contrasts beautifully with savory elements.
- Fresh thyme leaves: Add an herbal brightness that lifts the tart beyond just creamy and salty.
- Parmesan cheese: Provides a savory umami punch.
- Ricotta cheese: The creamy base for the filling, mild and versatile.
- Greek yogurt: Adds tang and richness to the filling, making it lovely and smooth.
- Egg whites: Lighten and bind the filling without heaviness.
- Minced garlic: Just a hint to deepen flavor without overpowering.
Tweak to Your Taste
One of the things I love about the Halloween Jack Skellington Ricotta Olive Tarts Recipe is how easy it is to make your own. I’ve played around with it a bit, and you might want to, too! Whether you like things a touch spicier, or want to suit dietary needs, feel free to experiment.
- Variation: I’ve swapped sun-dried tomatoes with roasted red peppers for a milder but still sweet component — it’s delicious and changes the flavor profile just enough.
- Dairy-free option: Try using your favorite dairy-free ricotta and yogurt alternatives — just be mindful of moisture content to keep the filling set.
- Herb swaps: Rosemary or oregano can easily stand in for thyme if you prefer a different herbal note.
- Gluten-full crust: If gluten isn’t a concern, swapping the gluten-free flours for all-purpose will give a classic, sturdier tart shell.
Step-by-Step: How I Make Halloween Jack Skellington Ricotta Olive Tarts Recipe
Step 1: Mix and Chill the Gluten-Free Crust Dough
The crust is the foundation here, so you want to take your time making it right. Start by whisking together your sweet rice, millet, oat flours, tapioca flour, and kosher salt in a large bowl. When you add in the cold butter, I like to use my hands and gently work it in until the largest butter pieces are about the size of peas — this helps create that flaky texture we want. Adding ice water slowly and mixing after each tablespoon is key; stop when the dough just holds together with a pinch. Don’t overdo the water or the dough gets sticky. Once mixed, divide into about 6–8 pieces depending on your tart pan size, shape into discs, wrap tightly in plastic, and chill for at least 30 minutes. Trust me, chilling is non-negotiable — it makes rolling out a breeze!
Step 2: Roll Out and Press Into Tart Pans
Here’s a trick I picked up after trial and error — roll your dough pieces between two sheets of parchment paper or wax paper that are lightly dusted with millet flour. It stops the dough from sticking, and you get a perfectly round circle a bit bigger than your tart pan. Then, carefully flip the dough into the pan with the parchment on top, peel off the top layer, and gently press the dough to shape. Repeat with your remaining circles, working in batches if your tart pans only hold a few at a time like mine. This technique saves you frustration and keeps the crust intact while maintaining a clean shape.
Step 3: Prepare the Filling and Bake the Crusts Partially
While the crusts are preheating in the oven at 400°F, start preparing the filling elements. Slice 6 black olives into paper-thin strips for the mischievous mouths, and carve 12-14 small ovals for noses — a tiny paring knife works great here. Then, chop the remaining olives for mixing into the tarts, followed by layering in julienned sun-dried tomatoes and a sprinkle of fresh thyme leaves and parmesan cheese on top of each crust. Bake these tartlets for about 12 minutes, just until the crust is lightly cooked but not golden yet. This partial bake prevents sogginess once you add the wet ricotta filling.
Step 4: Mix the Ricotta Filling and Assemble the Faces
While the crusts bake, whisk together ricotta, Greek yogurt, egg whites, minced garlic, and salt until smooth. When the crusts come out from their initial bake, divide the ricotta filling evenly among the tarts, mounding it to the top. Now here’s where the fun begins — place two whole black olives for eyes and two small olive ovals for noses. For the mouths, delicately create that iconic Jack Skellington smile with the thin olive strips arranged in a criss-cross pattern. I found using chopsticks made this delicate olive placement so much easier — give it a try!
Step 5: Bake Until Filling Sets and Serve Warm
Place the tarts back in the oven at 400°F for 20–25 minutes. Depending on your tart pan size, start checking around 15 minutes — you want the ricotta filling to be set but not browned. When finished, let them cool slightly and serve warm. These tarts are irresistible fresh from the oven but taste just as great after cooling. I usually make a batch for a Halloween party and watch them disappear fast!
Pro Tips for Making Halloween Jack Skellington Ricotta Olive Tarts Recipe
- Keep Butter Cold: Cold butter chunks create that perfect flaky crust—if it warms up, pop the dough back in the fridge before rolling.
- Rolling Technique: Rolling between parchment paper prevents sticking and keeps dough from tearing—a game changer in gluten-free baking.
- Olive Placement: Use chopsticks or tweezers to position thin olive slices carefully to get that flawless Jack Skellington grin.
- Baking Time: Start checking tarts early as oven temps can vary; you want the filling set but still creamy, not dry.
How to Serve Halloween Jack Skellington Ricotta Olive Tarts Recipe
Garnishes
I like to sprinkle a little more fresh thyme or finely chopped parsley over the tarts just before serving — it adds an inviting green freshness that brightens the savory filling. A few cracked black peppercorns on top also wake the flavors up nicely. If you’re feeling festive, a tiny drizzle of balsamic glaze can give a sweet contrast and deep color.
Side Dishes
These tarts pair wonderfully with a simple arugula salad dressed in lemon vinaigrette — the peppery greens refresh the palate after the rich filling. For parties, I often serve alongside roasted seasonal vegetables or even a bowl of spicy pumpkin soup for a full-on Halloween theme.
Creative Ways to Present
For a Halloween party, I arrange the tarts on a black slate serving board dusted lightly with smoked paprika for extra color. Adding edible flowers or microgreens around each tart elevates the presentation to a more elegant level. You can even place baby carrots and celery sticks nearby as “witch fingers” to keep the spooky fun going!
Make Ahead and Storage
Storing Leftovers
I usually store any leftover tarts covered tightly in the fridge for up to 2 days. They keep their creamy texture surprisingly well, though the olive faces may wilt a little. Just make sure to cover them so the crust doesn’t get soggy from fridge humidity.
Freezing
Freezing fully assembled tarts works super well for me. I place them on a baking sheet first to freeze individually, then transfer to an airtight container or freezer bags. When you want to enjoy them, thaw overnight in the fridge and reheat in the oven. The crust and filling both hold up nicely.
Reheating
Reheat leftovers directly in the oven at 400°F for about 7 minutes. This crisps up the crust again and warms the filling perfectly without drying it out – skipping the microwave is key here!
FAQs
-
Can I make the crust ahead of time?
Absolutely! I recommend making the dough, dividing it into discs, wrapping tightly, and refrigerating for up to 2 days before rolling and assembling. You can also freeze the dough discs for longer storage; just thaw overnight in the fridge before use.
-
What if I don’t have gluten-free flours?
You can substitute all-purpose flour for the gluten-free blends if you’re not gluten-sensitive. Use the same quantity, and your crust will be easier to work with and more traditional in texture.
-
Can I prepare these as mini appetizers for a party?
Yes! Using mini tart pans makes these perfect bite-sized treats that guests will adore. Just adjust baking times slightly, checking early so the fillings don’t overcook.
-
How do I prevent the crust from getting soggy?
Baking the crust partially before adding the ricotta filling really helps seal it. Also, avoid adding too much wet filling and bake the tarts immediately after assembling to minimize sogginess.
-
What are good substitutions for black olives?
If you want a milder olive flavor, Kalamata or green olives can work. Just adjust quantity to taste, and keep in mind the visual impact for Jack Skellington’s face when arranging the slices.
Final Thoughts
I personally adore this Halloween Jack Skellington Ricotta Olive Tarts Recipe because it brings together festive fun and genuinely delicious flavor. They’re a hit whenever I serve them — sometimes I even make a double batch because they practically disappear. Whether you’re hosting a spooky party, looking for a creative appetizer, or just want to sneak some holiday spirit into your kitchen, these tarts won’t disappoint. Grab your tart pans, get those olives sliced, and dive in — you’ll love how impressive and tasty these turn out!
Print
Halloween Jack Skellington Ricotta Olive Tarts Recipe
- Prep Time: 30 minutes
- Cook Time: 37 minutes
- Total Time: 1 hour 7 minutes
- Yield: 8 tarts
- Category: Appetizer
- Method: Baking
- Cuisine: American
- Diet: Gluten Free
Description
These Halloween Jack Skellington Ricotta Olive Tarts are a spooky and delicious gluten-free treat perfect for the season. Featuring a crisp, gluten-free tart crust filled with a creamy ricotta and yogurt mixture, and decorated with olives, sun-dried tomatoes, and parmesan cheese to create Jack Skellington’s iconic face, these tarts are both festive and flavorful. Perfect for a Halloween party appetizer or a fun snack.
Ingredients
Gluten-Free Tart Crust
- ½ cup sweet rice flour
- ¼ cup millet flour
- ⅓ cup gluten-free oat flour
- 3 tablespoons tapioca flour
- ¼ teaspoon kosher salt
- 8 tablespoons cold unsalted butter, cut into tablespoon-sized pieces
- 5-7 tablespoons ice water
Filling and Toppings
- 1 can black olives
- 3-4 tablespoons julienned sun-dried tomatoes packed in oil
- 2-3 teaspoons fresh thyme leaves
- 3 tablespoons freshly grated parmesan cheese
- 1½ cups ricotta cheese
- ¼ cup + 2 tablespoons Greek yogurt
- 3 egg whites
- 3 cloves garlic, minced
- ½ teaspoon kosher salt
Instructions
- Make the crust dough: Whisk together sweet rice flour, millet flour, oat flour, tapioca starch, and salt in a large bowl. Add the cold butter and use your hands to break it up until pieces are about pea-sized. Gradually add ice water one tablespoon at a time, mixing until the dough holds together when pinched.
- Chill the dough: Divide dough into 6 to 8 pieces, roll each into a ball, flatten into discs, wrap in plastic, and refrigerate for 30 minutes.
- Preheat the oven: Set your oven to 400ºF (200ºC).
- Roll out the crust: Roll each dough disc between two sheets of parchment or wax paper sprinkled with millet flour into circles 1 inch larger than the tart pans.
- Fit dough into tart pans: Peel off one parchment sheet and flip the crust into the tart pan with parchment side up. Remove the second piece of parchment paper and press the dough into the pan evenly. Repeat for each tart shell. Work in batches if necessary.
- Prepare olives for decoration: Thinly slice 6 black olives lengthwise into paper-thin strips for the mouth, then cut 12-14 small ovals for the nose. Set aside.
- Assemble base tart toppings and pre-bake: Chop 3-4 tablespoons of black olives and distribute among the tarts. Top each with 3-5 strips of julienned sun-dried tomatoes, sprinkle about ¼ teaspoon thyme leaves, and divide grated parmesan evenly. Bake tarts for 12 minutes until crust is lightly cooked.
- Mix the ricotta filling: While tarts bake, whisk ricotta, Greek yogurt, egg whites, minced garlic, and salt together until smooth.
- Add filling and decorate: Remove pre-baked tart shells from oven and fill each to the top with the ricotta mixture. Place two whole black olives for eyes and two small olive ovals for the nose on each tart. Create a criss-cross mouth with thin olive strips, using chopsticks or a tool for precision.
- Bake the filled tarts: Bake for 20-25 minutes until the ricotta filling is set. Check starting at 15 minutes depending on tart size. Serve warm.
- Reheating: To reheat, place tarts in a 400ºF oven for 7 minutes until warm.
Notes
- Use chilled butter and ice water to ensure a flaky crust.
- Gluten-free oat flour can be made by grinding rolled oats in a food processor.
- Decorative olive placement can be done using chopsticks for better control.
- Check the ricotta filling at 15 minutes to avoid overbaking as tart size varies.
- Sun-dried tomatoes packed in oil add flavor and moisture; drain if necessary to avoid soggy crust.
- Leftover tarts can be refrigerated and reheated as instructed.
Nutrition
- Serving Size: 1 tart
- Calories: 210 kcal
- Sugar: 2 g
- Sodium: 320 mg
- Fat: 14 g
- Saturated Fat: 7 g
- Unsaturated Fat: 5 g
- Trans Fat: 0 g
- Carbohydrates: 15 g
- Fiber: 2 g
- Protein: 7 g
- Cholesterol: 30 mg


