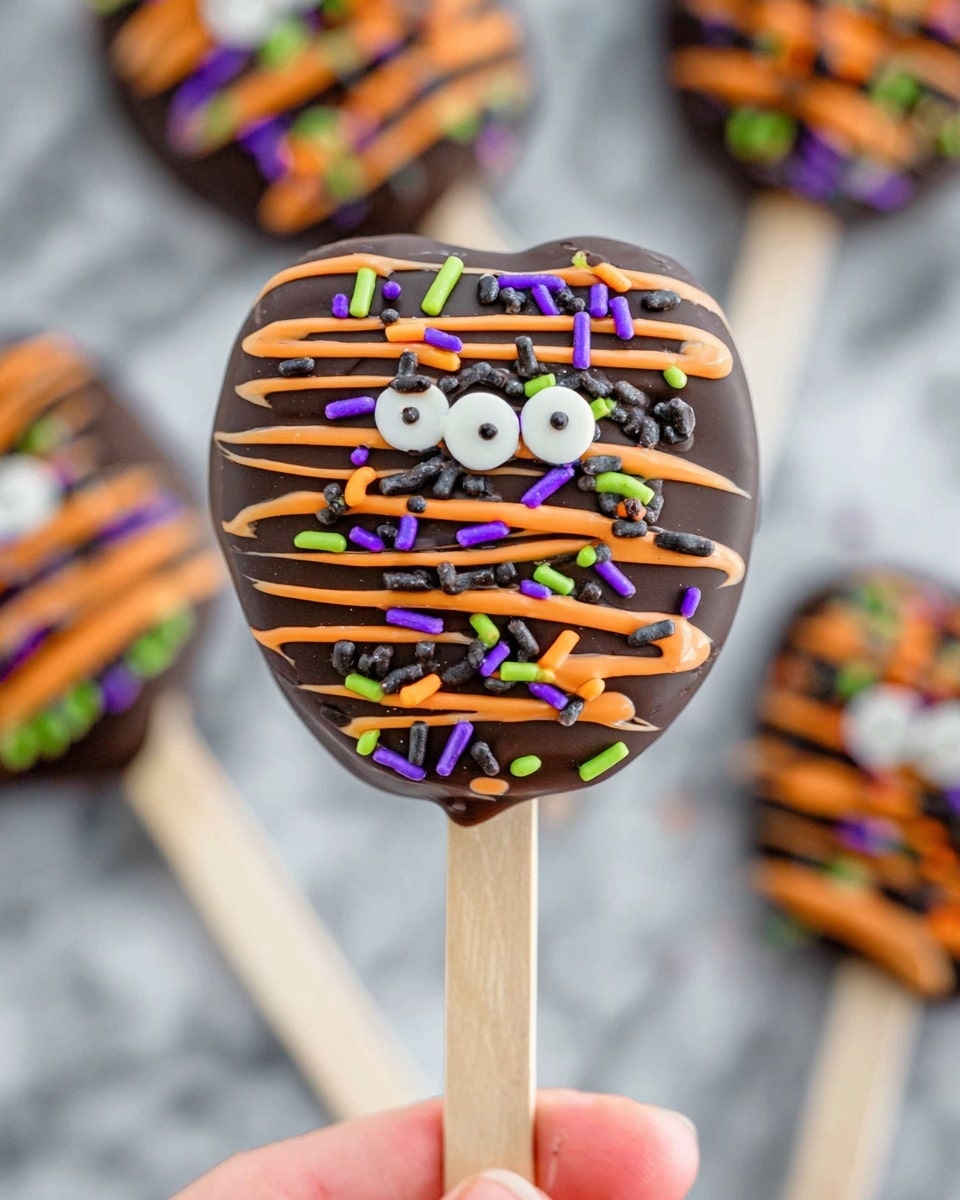
Halloween Chocolate Covered Apple Pops Recipe
If you’re looking for a fun and festive treat to wow your friends and family this spooky season, you’ve got to try this Halloween Chocolate Covered Apple Pops Recipe. Imagine crisp, tangy granny smith apples dipped in rich dark chocolate and bright orange candy melts, all decorated with whimsical Halloween sprinkles — it’s a total crowd-pleaser that’s super easy to make. Trust me, once you whip these up, they’ll be your go-to fall party snack!
Why This Recipe Works
- Perfect Texture Contrast: Crisp apple slices balance the smooth, creamy chocolate coating perfectly for a satisfying bite every time.
- Easy to Customize: You can dress these pops up with any decorations or chocolate colors you like, making them fun for all ages.
- Simple Prep Steps: With just a few ingredients and no baking required, this recipe fits into hectic fall schedules easily.
- Kid-Friendly and Messy-Fun: These pops are great for kids to help decorate — just prep the apples yourself to avoid any frustration with the sticking process!

Ingredients & Why They Work
The magic of this Halloween Chocolate Covered Apple Pops Recipe lies in the way the flavors and textures come together — tart granny smith apples provide a tangy crunch, while the melty chocolates add indulgent sweetness and make the pops irresistibly festive.
- Granny Smith apples: Their tartness cuts through the sweetness perfectly and the firm flesh holds up great on pops.
- Dark cocoa melting wafers: These melt smoothly and give you that rich, deep chocolate flavor that pairs wonderfully with apples.
- Orange melting wafers: The bright color screams Halloween, plus their sweet, mellow flavor contrasts nicely with the dark chocolate.
- Halloween sprinkles: This is your chance to get creative! Sprinkles add fun colors and textures, making each pop unique.
Tweak to Your Taste
I love that this recipe is super flexible — once you get the hang of dipping those apple slices, you can go wild with flavors and decorations. I sometimes swap out orange wafers for white chocolate tinted green with food coloring, which makes “witchy” apple pops my kids adore.
- Variation: If you want a little extra crunch, try rolling the chocolate-covered apples in crushed nuts or cookie crumbs before they set — it adds so much texture!
- Dietary Adjustment: Use dairy-free or vegan melting wafers if you’re catering to dietary needs; make sure to check that the sprinkles are allergen-friendly too.
- Seasonal Twist: Around Thanksgiving, swap Halloween-themed sprinkles for autumn leaves or gold glitter for a classy fall treat.
Step-by-Step: How I Make Halloween Chocolate Covered Apple Pops Recipe
Step 1: Prepare Your Apple Slices and Popsicle Sticks
Start by washing your granny smith apples and slicing them into slightly less than ½-inch thick wedges, carefully avoiding the core since it won’t hold the stick well. Then, gently push a popsicle stick into the center of each slice to create your ‘apple pop.’ If your slices are too thin, the sticks will bend or make the slice floppy, so keep that thickness just right. Pro tip: if the stick won’t go in easily, dab a little melted chocolate where you want the stick and press it on — let it set to secure the stick!
Step 2: Melt Your Chocolates Separately
Place your orange and dark cocoa melting wafers in separate microwave-safe bowls. Microwave each for 2 minutes, then stir. If they aren’t fully melted, continue microwaving in 30-second bursts, stirring in between, until smooth. The key here is to avoid overheating – if your chocolate looks thick or grainy, add a tablespoon of shortening (like Crisco) to soften it up for that silky finish.
Step 3: Dip and Decorate Your Apple Pops
Take an apple pop and dip each side into the dark cocoa melted chocolate. Then, using a spoon, drizzle orange melted chocolate over it to create a beautiful contrast. Top it off with Halloween sprinkles while the chocolate is still wet so they stick well. Place your dipped pops on parchment paper or a wire rack to set. Repeat with half the apples dipped in dark chocolate first.
For the remaining apple pops, flip the chocolate colors: dunk these in orange chocolate first, drizzle cocoa chocolate on top, then sprinkle with decorations. This creates a fun variety and makes your platter pop with color.
Pro Tips for Making Halloween Chocolate Covered Apple Pops Recipe
Pro Tips for Making Halloween Chocolate Covered Apple Pops Recipe
- Prevent Browning: Brush your apple slices lightly with lemon or lime juice right after slicing to keep that fresh green color while you prep the chocolate.
- Dry Your Apples: Make sure the apple surfaces are dry before dipping — excess moisture can cause the chocolate to slide off or seize up.
- Use Parchment or Wire Racks: Let the pops set on parchment paper or a wire rack to avoid sticky messes and ensure evenly set chocolate coatings.
- Work Quickly: Chocolate can harden fast, so have your toppings and sticks ready before you start dipping for a smooth process.
How to Serve Halloween Chocolate Covered Apple Pops Recipe
Garnishes
I always keep a variety of Halloween-themed sprinkles on hand — from tiny candy eyeballs to orange and black nonpareils. Sometimes I sprinkle crushed Oreos or shredded coconut on top for an extra texture pop. My kids love adding mini marshmallows for a “fuzzy spider” effect! The key is to let your creativity run wild and use what you have or find.
Side Dishes
When I serve these apple pops, I like pairing them with warm apple cider or a rich hot chocolate to keep the cozy fall vibe going. They’re also perfect alongside a pumpkin spice cupcakes or a plate of soft gingerbread cookies if you want to go all out with fall flavors.
Creative Ways to Present
For a party, I love standing these apple pops upright in a foam block covered with black fabric or festive shredded paper. You can even stick them in mini pumpkins or place them on a branch centerpiece for a spooky forest effect. It’s such a fun way to make your Halloween treat table look extra special and festive.
Make Ahead and Storage
Storing Leftovers
These apple pops are best devoured the same day while the apples are fresh and crunchy. But if you need to save some for later, keep them in an airtight container in the fridge for up to one day. Just note that the apples may start to soften and lose some crispness overnight.
Freezing
Freezing apple pops isn’t something I usually recommend because frozen apples get mushy when thawed, and that really changes the texture. If you try it, make sure to wrap each pop tightly and thaw in the fridge briefly before serving, but fresh is definitely best here.
Reheating
If your chocolate pops get too firm in the fridge, just pull them out about 15 minutes before serving to let the chocolate soften slightly at room temperature. Avoid microwaving or heating directly, as this can cause your chocolate to bloom or melt unevenly.
FAQs
-
Can I use other types of apples for this recipe?
Absolutely! I recommend using crisp, firm apples like Fuji or Honeycrisp if you want a sweeter alternative to granny smiths. Just be sure the slices are thick enough to hold the popsicle sticks securely.
-
What if I don’t have melting wafers – can I use regular chocolate chips?
You can absolutely use chocolate chips but they’ll need a little help melting smoothly. Add a teaspoon of coconut oil or shortening when melting to get a shinier, smoother dipping chocolate that hardens well.
-
How do I prevent the apple slices from browning?
Brush freshly sliced apples with lemon or lime juice right away. You can also keep the slices in cold water with a splash of lemon juice while prepping the rest of the ingredients. This slows oxidation and keeps the apples looking fresh.
-
Can kids help make these apple pops?
Definitely! Kids love decorating with sprinkles and drizzling chocolate. Just handle slicing and inserting sticks yourself for safety and best results. Once the prep is done, let the kids unleash their creativity!
Final Thoughts
This Halloween Chocolate Covered Apple Pops Recipe holds a special place in my heart because it brings my family together in the most delicious way every fall. They’re simple, beautiful, and just plain fun to make — whether you’re prepping for a big party or a cozy night in with the kids. Give this recipe a try, and I promise it’ll become one of your seasonal favorites. Let me know how you decorate yours — I’m always up for new ideas!
Print
Halloween Chocolate Covered Apple Pops Recipe
- Prep Time: 20 minutes
- Cook Time: 0 minutes
- Total Time: 35 minutes
- Yield: 20 servings
- Category: Snack
- Method: No-Cook
- Cuisine: American
- Diet: Vegetarian
Description
These Halloween Chocolate Covered Apple Pops are a fun and festive treat perfect for celebrating the spooky season. Crisp Granny Smith apple slices are dipped in rich dark cocoa and vibrant orange melting wafers, then decorated with colorful Halloween sprinkles. Easy to make and visually delightful, these pops are perfect for parties or a festive snack.
Ingredients
Apples
- 5 medium/small Granny Smith apples
Chocolate Coatings
- 12 ounces dark cocoa melting wafers
- 12 ounces orange melting wafers
Toppings
- Halloween sprinkles
Instructions
- Prepare the Apples: Cut each apple into 4 slices, making sure to avoid the core. Each slice should be slightly less than 1/2 inch thick to ensure stability. Insert a popsicle stick carefully into the center of each apple slice to create the apple pops.
- Melt the Chocolate: In separate microwavable bowls, melt the orange and dark cocoa melting wafers for 2 minutes each. Stir well, then continue to melt in 30-second increments until smooth, stirring between each to prevent burning.
- Dip the Apple Pops: Take an apple pop and dip each side into the melted dark cocoa chocolate. Use a spoon to lightly drizzle orange chocolate over the dip-coated apple pop.
- Add Sprinkles and Set: Immediately top the dipped apple pop with Halloween sprinkles. Place on a sheet of parchment paper or a metal rack to set.
- Repeat and Alternate Coatings: Repeat this dipping process for 9 more apple pops using the dark cocoa chocolate first. Then, dip the remaining apple pops in the orange chocolate, drizzle with dark cocoa chocolate, and add sprinkles.
- Allow to Set: Place all decorated apple pops on parchment paper or wire racks and allow the chocolate coatings to fully set before serving.
Notes
- These apple pops are best eaten the same day but can be stored in the refrigerator for up to 1 day.
- Prepare all ingredients and toppings beforehand to prevent apple slices from browning while waiting to be dipped.
- To prevent browning, brush apple slices with lemon or lime juice prior to dipping.
- Avoid using the core when slicing apples, and keep slices just under 1/2 inch thick to ensure popsicle sticks stay firmly in place.
- If the popsicle sticks are hard to insert, press a dab of melted chocolate onto one side of the apple slice and attach the stick, letting it set before coating.
- Dry apple slices with a paper towel if too wet to help chocolate adhere better.
- If melted chocolate is too thick, stir in 1 tablespoon of Crisco to thin it.
- Get creative with decorations such as mini chocolate chips, M&Ms, crushed Oreos, chopped nuts, mini marshmallows, shredded coconut, or other Halloween-themed toppings.
- Try making themed apple slices like spider webs or monsters using melted white chocolate or other colored melts.
Nutrition
- Serving Size: 1 apple pop
- Calories: 150 kcal
- Sugar: 18 g
- Sodium: 5 mg
- Fat: 7 g
- Saturated Fat: 4 g
- Unsaturated Fat: 2 g
- Trans Fat: 0 g
- Carbohydrates: 22 g
- Fiber: 3 g
- Protein: 1 g
- Cholesterol: 0 mg


