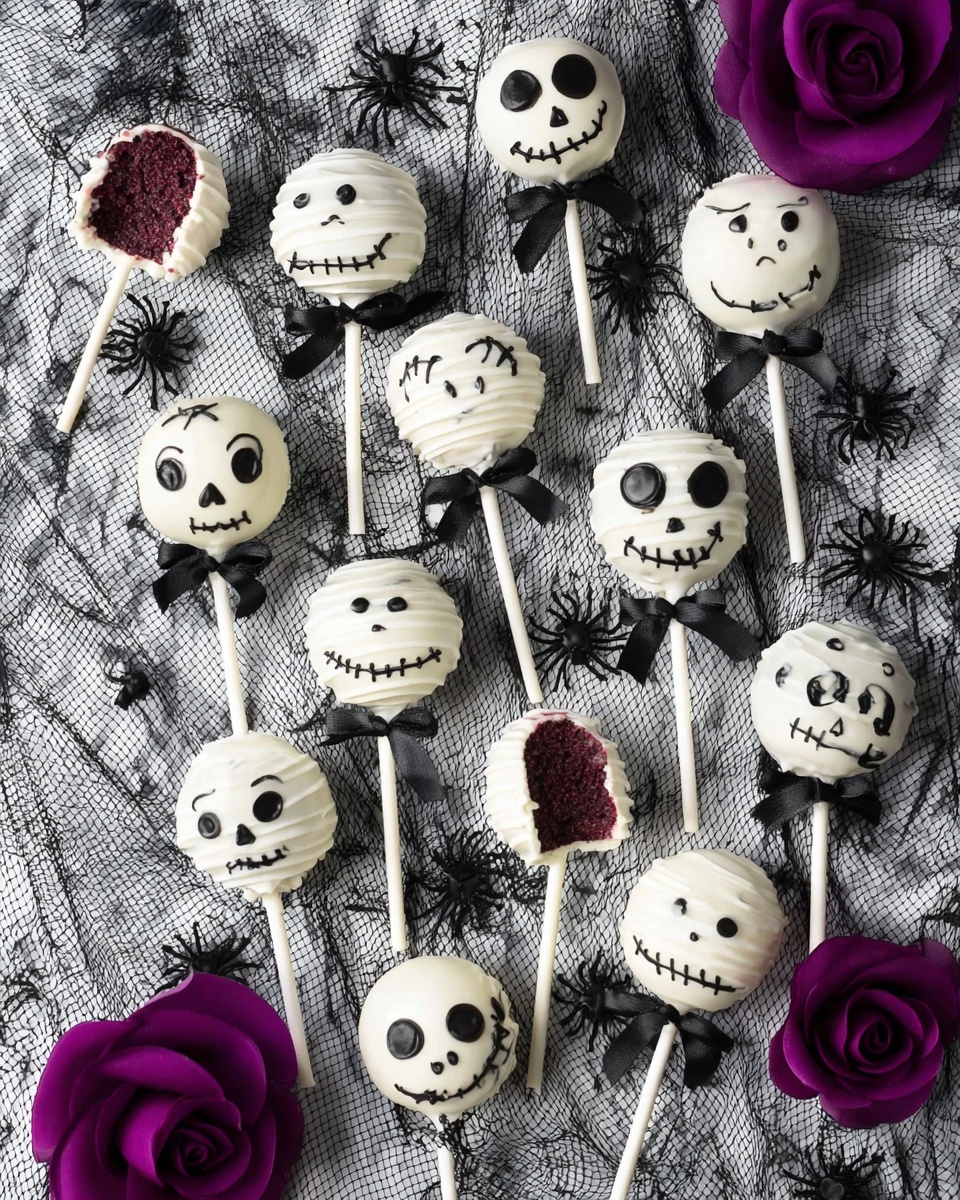
Halloween Cake Pops Recipe
If you’re hunting for a 🎃 fun and festive treat that’s as delightful to make as it is to eat, you’re in the right kitchen! This Halloween Cake Pops Recipe is exactly the kind of sweet project that’ll get your hands a little messy and your guests impressed. I’ve spent many a Halloween perfecting these little spooky spheres of joy, and trust me—they’re not only adorable but irresistibly tasty too. So grab your apron, and let’s dive into a treat that’s as fun to decorate as it is delicious to devour!
Why This Recipe Works
- Perfect Texture: Starting with a boxed red velvet cake mix keeps things moist and gives you that vivid color that’s perfect for Halloween vibes.
- Cream Cheese Frosting Binding: It holds the cake crumbs together perfectly, making it easy to mold without being too sticky or crumbly.
- White Chocolate Coating: Melting wafers combined with vegetable shortening create a smooth, shiny dip that hardens just right around each pop.
- Creative Decoration: Using gel food coloring and candy eyeballs lets you turn these cake pops into spooky mummies, ghosts, and even Jack Skellington – so fun and festive!

Ingredients & Why They Work
Every ingredient in this Halloween Cake Pops Recipe has a role in making your pops taste delicious and look impressive, without stressing you out. From the cake mix to the decorations, here are my thoughts on why they’re the perfect picks and what you might look for when shopping.
- Red Velvet Cake Mix: The base flavor and color that saves you from baking a cake from scratch but still tastes homemade.
- Eggs: Essential for structure and binding in the cake, making sure it bakes properly.
- Oil: Keeps the cake tender and moist, which is key for cake pops that won’t dry out.
- Water: Hydrates the cake mix and helps activate leavening agents.
- Cream Cheese Frosting: Acts as glue for the cake crumbs, adding richness and a slightly tangy flavor that complements red velvet.
- White Chocolate Candy Melting Wafers: Easy to melt and dip, they harden with a lovely, smooth finish perfect for decorating.
- Black Gel Food Color: Intense, vibrant color for decorating; gel is preferred over liquid for no dilution.
- Vegetable Shortening: Mixed with the melting wafers for a thinner, shinier dip that sets nicely.
- Candy Eyeballs: Ready-made spooky decorations that instantly add character without fuss.
- Black/White Ribbon: Adds a cute finishing touch to the cake pops when tied around the sticks.
- Cake Pop Sticks: Essential for dipping and handing out—make sure they’re sturdy!
Tweak to Your Taste
I love that this Halloween Cake Pops Recipe leaves plenty of room for personalization. Whether you want to make them spookier, sweeter, or more kid-friendly, there are so many easy ways to make these your own.
- Flavor Variety: Sometimes I swap out red velvet cake mix for chocolate or pumpkin spice to match the mood of the party.
- Frosting Choices: Cream cheese frosting is classic, but you can experiment with buttercream or even peanut butter frosting for a different twist.
- Decoration Fun: Don’t hesitate to get creative with candy eyes, edible glitter, colored sugar, or even spooky sprinkles.
- Dietary Mods: For gluten-free friends, use a gluten-free cake mix and adjust the coating accordingly.
Step-by-Step: How I Make Halloween Cake Pops Recipe
Step 1: Bake your red velvet base
Start by preheating your oven to 350°F (175°C). In a big mixing bowl, beat together the red velvet cake mix, eggs, oil, and water at medium speed—about two minutes should do it—until everything is smooth. Pour this into a greased 9×13 baking dish and bake for 25-30 minutes. I always test by sticking a toothpick into the center; if it comes out clean, you’re good! Let the cake cool in the pan for 10 minutes before turning out onto a wire rack to cool completely. Patience here pays off—warm cake will make crumb handling a messier, stickier affair.
Step 2: Crumble and mix with frosting
Once your cake is cool, break it up into chunks and pulse it in a food processor to get fine crumbs. Don’t have a food processor? No worries—just break it up really well by hand. Transfer crumbs into a large bowl and mix in the cream cheese frosting. This is the secret to moldable cake pops that stay moist but firm. When combined, grab handfuls and roll into 2-inch balls with your hands. For the ghost shapes, roll a few balls into cylinders and fan out one end gently. This little shape tweaks make your pops instantly more festive.
Step 3: Secure sticks with melted candy coating
Melt about 15 wafers in the microwave, stirring every 30 seconds until smooth. Dip one end of each cake pop stick about an inch into the melted candy, then immediately push the stick about two-thirds into each cake pop while the coating is still wet—this acts like glue. Use your finger to smooth away any excess candy around the base. Pop them into the fridge for 15 minutes to let the candy set firmly. This step is crucial to avoid sticks falling off during dipping.
Step 4: Dip and chill—don’t let the coating slip!
Find a narrow jar or cup just wide enough to dip your pops without wasting extra coating. Melt half the white chocolate wafers with half the shortening until you get a smooth dip that’s thin enough to coat easily but thick enough to coat well. Dip each pop straight down into the coating and avoid stirring or twirling. Instead, gently move the container if you need to cover the whole pop. Let excess drip off by holding the pop upright and tapping the stick firmly but gently. Stand each pop upright in your holder and give them 15 minutes to set completely.
Step 5: Decorate your spooky creations
Melt the remaining coating, adding a little extra shortening if it’s too thick, then fill a piping bag fitted with a #3 tip. For mummy pops, pipe horizontal lines back and forth on the front and back to mimic wrapped bandages. Dot a small amount of coating as “glue” for candy eyeballs and place them quickly before it sets. For Jack Skellington faces, tint the remaining coating with the black gel color, then use a fine piping tip or bottle to draw his iconic face. Ghosts get simple black eyes and a big round mouth. Tie ribbons around sticks for that cute finishing touch, and place your pops back in the holder to dry completely.
Pro Tips for Making Halloween Cake Pops Recipe
- Don’t Overmix the Cake Batter: Keep mixing to just combine ingredients to preserve that tender cake texture.
- Chill Your Pops Well: Always refrigerate after inserting sticks and again after dipping so they hold their shape and stick!
- Use Narrow Containers for Dipping: This saves on melted coating and helps you control coverage without mess.
- Work Quickly with Decorations: Apply candy eyes before the coating fully sets to ensure they stick without smudging your designs.
How to Serve Halloween Cake Pops Recipe
Garnishes
I’m all about candy eyeballs—they’re the easiest way to turn an ordinary cake pop into spooky little characters with personality. Sometimes I add edible glitter or a dash of colored sugar to add shimmer for an extra festive touch. Ribbon tied around the sticks isn’t just cute, it makes them easier to hold too, especially when serving to kids at parties!
Side Dishes
These cake pops pair wonderfully with simple drinks like creamy hot chocolate or warm apple cider. For a larger spread, I like serving them alongside mini pumpkin muffins or spiced popcorn for a balanced, grab-and-go dessert table.
Creative Ways to Present
I love creating a little spooky scene with my cake pop holder—think fake cobwebs, mini pumpkins, and a fun Halloween-themed cake stand. Sometimes I arrange the pops like a bouquet in a mason jar filled with colored sand or candy corn, which makes for a seriously cute centerpiece at Halloween parties.
Make Ahead and Storage
Storing Leftovers
I keep leftover Halloween cake pops in an airtight container at room temperature, and they usually stay perfectly fresh for up to four days. If you want them to last longer, pop them in the fridge—just bring them back to room temperature before serving to get the best taste and texture.
Freezing
Freezing works like a charm! I arrange the pops on a tray lined with wax paper so they don’t touch, then transfer them to a sealed freezer-safe container layered with more wax paper. Frozen this way, they keep well for about 6-8 weeks. Just thaw overnight in the fridge before serving.
Reheating
Since cake pops are best enjoyed at room temperature, I usually just let frozen ones sit out for about 30 minutes after taking them from the fridge. Avoid microwaving, or you risk melting your decoration and coating. Patience here preserves their charm and texture!
FAQs
-
Can I use homemade cake instead of boxed mix for this Halloween Cake Pops Recipe?
Absolutely! Homemade cake works beautifully and lets you customize flavors even further. Just make sure your cake is fully cooled and slightly dry (stale texture works best) to hold together well when mixed with frosting.
-
What if I don’t have a food processor for crumbly cake?
No worries—you can break the cake into really small crumbs by hand using clean fingers or two forks. It takes a bit more elbow grease but works just fine.
-
Why do I need vegetable shortening in the coating?
Vegetable shortening thins out the melted white chocolate, making it easier to dip and creating a shinier, smoother finish that hardens perfectly around the cake pops.
-
How do I prevent the cake pop sticks from falling out while dipping?
Dip the stick into melted coating before inserting into the cake ball to “glue” it securely, then chill pops well before dipping. Avoid swirling the stick during dipping to keep it firmly in place.
-
Can I make these cake pops vegan or gluten-free?
Yes! Use a vegan or gluten-free cake mix and an alternative frosting like dairy-free cream cheese. Just be sure the melting wafers and decorations comply with your dietary needs.
Final Thoughts
This Halloween Cake Pops Recipe is one I turn to every year because it’s such a crowd-pleaser and a total blast to make. Beyond the delicious taste, I love how much joy decorating these little treats brings—kids and adults alike get so excited seeing their spooky faces come to life! Whether for a party, classroom treat, or just a bit of festive fun at home, I hope you’ll enjoy making these as much as I do. Happy haunting in the kitchen!
Print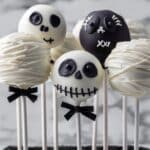
Halloween Cake Pops Recipe
- Prep Time: 50 minutes
- Cook Time: 30 minutes
- Total Time: 1 hour 20 minutes
- Yield: 14 servings
- Category: Dessert
- Method: Baking
- Cuisine: American
- Diet: Vegetarian
Description
Delight your Halloween party guests with these festive Halloween Cake Pops featuring red velvet cake, cream cheese frosting, and fun spooky decorations like mummy bandages, ghosts, and Jack Skellington faces. Easy to make and perfect for a festive treat!
Ingredients
Cake
- 1 box red velvet cake mix
- 3 large eggs
- ½ cup oil
- 1¼ cup water
Frosting and Coating
- 5 tbsp cream cheese frosting
- 20 oz white chocolate candy melting wafers
- ⅓ cup vegetable shortening
- 1½ tbsp black gel food color
Decorations
- Candy eyeballs for decorating
- 50 inch black and white ribbon for decorating
- Cake pop sticks
Instructions
- Preheat Oven: Preheat your oven to 350°F to prepare for baking the red velvet cake.
- Mix Cake Batter: In a large mixing bowl, beat the cake mix, eggs, oil, and water at medium speed for two minutes until smooth and well combined.
- Bake Cake: Pour the batter into a greased 9×13 inch baking dish and bake for 30 minutes or until a toothpick inserted in the center comes out clean.
- Cool Cake: Allow the cake to cool in the dish for 10 minutes, then turn it out onto a cooling rack to cool completely.
- Make Cake Crumbs: Break the cooled cake into pieces and process in a food processor until finely crumbled, then transfer to a large bowl.
- Combine with Frosting: Add the cream cheese frosting to the cake crumbs and mix thoroughly until well combined and moldable.
- Shape Cake Pops: Roll 2-inch balls from the mixture for standard cake pops. Roll 4 balls slightly longer and fan out one end to create ghost shapes.
- Attach Sticks: Melt about 15 of the white candy wafers. Dip one end of each cake pop stick about 1 inch deep into the melted candy, then insert it about two-thirds into the cake pops. Clean excess candy and refrigerate for 15 minutes to set.
- Prepare Coating: Melt half of the white candy wafers with half the vegetable shortening in a microwave-safe jar, stirring every 30 seconds until smooth and suitable for dipping.
- Dip Cake Pops: Dip each cake pop into the coating, submerging fully without twisting the stick. Hold above the container to let excess drip off, then place upright in a cake pop stand or container filled with rice or beans to set for 15 minutes.
- Decorate Mummies: Warm remaining coating and add more shortening if needed. Fill a piping bag with a #3 tip and pipe overlapping lines on four cake pops to mimic mummy bandages. Add dots of coating as glue and place candy eyeballs on top. Allow to set.
- Create Jack Skellington Pops: Melt the remaining candy wafers with shortening and black gel food color, mix well. Use a piping bag or dispensing bottle to draw Jack Skellington faces on round cake pops. Tie 10-inch ribbon bows around the sticks and secure.
- Decorate Ghosts: Use the black icing to add small dots for eyes and make a large round mouth on the ghost-shaped cake pops. Allow decorations to dry completely.
- Display: Arrange all decorated cake pops in the stand and display for your Halloween party.
Notes
- Store cake pops in an airtight container at room temperature for 3-4 days or refrigerate for 5-7 days.
- To freeze, place cake pops in a freezer-safe container separated by wax paper and freeze for 6-8 weeks.
- Use a narrow jar or cup for dipping cake pops to minimize excess coating and waste.
- Microwave melting should be done in 30-second increments for best results and to prevent burning.
- Use a cake pop stand or alternatives like a container filled with rice or beans to hold pops upright while coating and drying.
- Adding vegetable shortening to the candy melts helps achieve a smooth, dip-ready consistency.
Nutrition
- Serving Size: 1 cake pop
- Calories: 220 kcal
- Sugar: 18 g
- Sodium: 150 mg
- Fat: 13 g
- Saturated Fat: 7 g
- Unsaturated Fat: 5 g
- Trans Fat: 0 g
- Carbohydrates: 24 g
- Fiber: 1 g
- Protein: 2 g
- Cholesterol: 30 mg

