Halloween Brownies with Graveyard Cookies and Green Buttercream Frosting Recipe
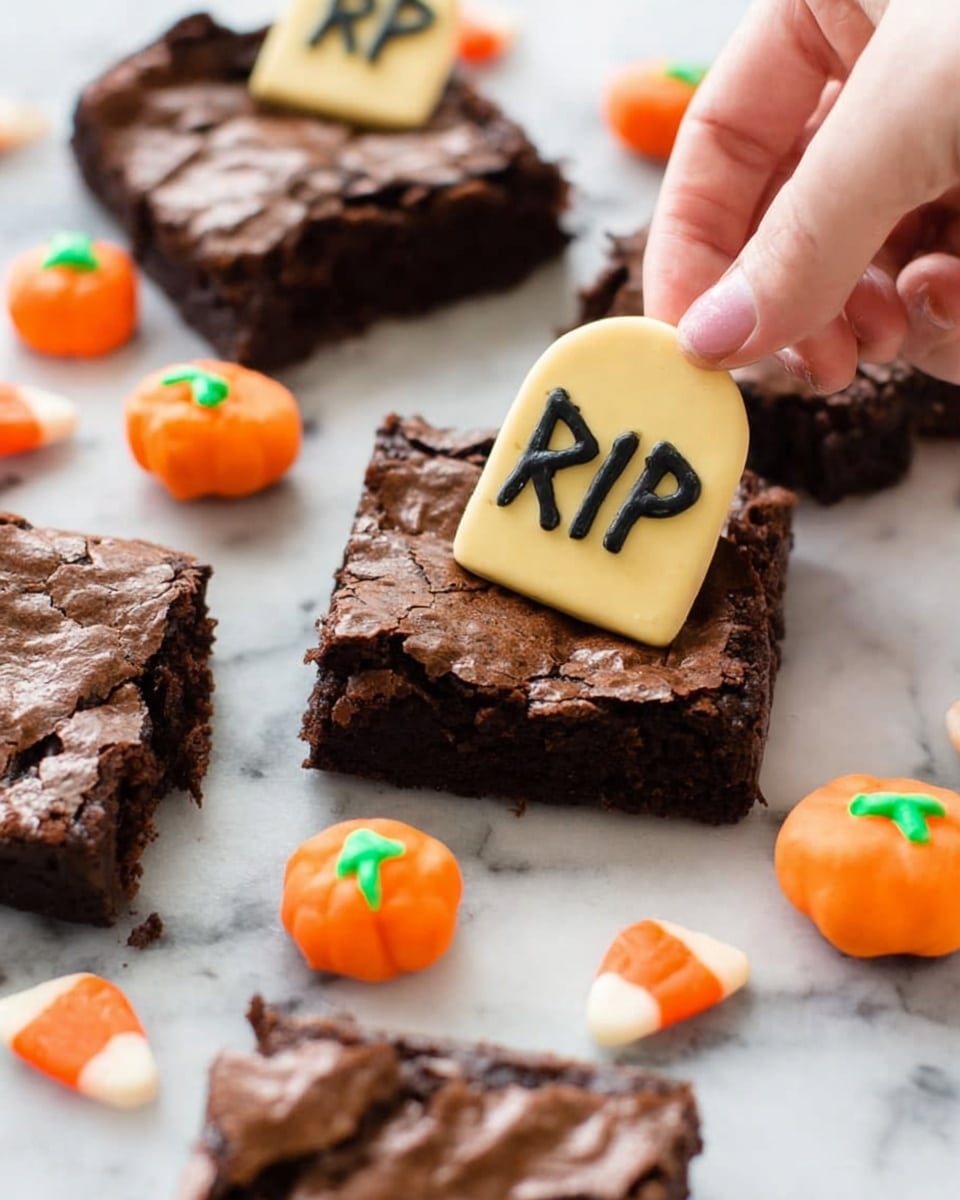
If you’re on the hunt for a show-stopping Halloween treat, you’re absolutely going to adore this Halloween Brownies with Graveyard Cookies and Green Buttercream Frosting Recipe. It’s got everything you want for a spooky celebration—fudgy brownies, eerie little graveyard cookie tombstones, and that perfect pop of color with the green frosting. Trust me, once you make these, they’ll be the star of your Halloween party (or just a wickedly fun dessert for your family). I can’t wait to walk you through every step so you nail it first try!
Why This Recipe Works
- Easy to Personalize: The base brownies can be homemade or from a mix, letting you adjust effort and flavor.
- Fun Presentation: Graveyard cookies and candy pumpkins instantly turn simple brownies into festive delights.
- Perfect Texture Balance: Fudgy brownies coupled with creamy green buttercream and crunchy cookies create a heavenly bite.
- Kid-Friendly Decorating: Writing RIP on cookies with black gel is super straightforward and a great activity for all ages.

Ingredients & Why They Work
The mix of ingredients here strikes a perfect balance between indulgence and fun. The brownie batter provides the rich base, while the cookies and candy pumpkins add that spooky charm and texture. The green buttercream frosting brings everything together with a fresh, creamy note and literal pop of Halloween color. When shopping, fresh butter and good-quality brownie mix or homemade batter will make all the difference.
- Prepared brownie batter: Using a quality batter means you get a perfect fudgy texture every time; I love Ghirardelli’s boxed mix if you’re short on time.
- Milano cookies: These are ideal because of their oval shape and sturdy texture, which makes the perfect tombstone canvas.
- Black decorating gel: You’ll find this in most grocery stores near birthday supplies—super important for writing the spooky “RIP.”
- Candy pumpkins: These mini treats add a burst of color and keep the Halloween vibe alive on top of each graveyard plot.
- Powdered sugar: Key for a smooth, sweet buttercream that spreads beautifully without being gritty.
- Butter (softened): Use salted or unsalted—either works well; just make sure it’s softened for easy mixing.
- Milk: Adds the right consistency for the frosting; you might tweak amounts to get it just right for your taste and texture.
- Green food coloring: Just a few drops to achieve that perfect creepy green color—go light or dark depending on your vibe.
Tweak to Your Taste
I like to think of this Halloween Brownies with Graveyard Cookies and Green Buttercream Frosting Recipe as a sweet canvas—you can tailor it however you want! Personally, I’ve played around with frosting colors and cookie types, and some tweaks really do make a difference without straying from the Halloween spirit.
- Variation: I once subbed Milano cookies for rectangular chocolate wafer cookies to give a darker, spookier tombstone look; it worked beautifully and was a hit with friends!
- Dietary Mod: Use dairy-free butter and a vegan brownie mix to make this recipe accessible to everyone.
- Texture Boost: Adding chopped nuts into the brownie batter gave mine extra crunch, which was surprisingly delightful.
Step-by-Step: How I Make Halloween Brownies with Graveyard Cookies and Green Buttercream Frosting Recipe
Step 1: Prep Your Pan and Batter
Start by lining an 8” baking pan with parchment paper—make sure to leave a little overhang on the sides so you can easily lift your brownies out after baking (this little trick changed my life!). Pour your brownie batter into the pan and smooth it out into an even layer using a spatula. Follow the baking instructions on your batter recipe or box carefully because under or overbaking will affect texture.
Step 2: Cool Completely and Cut
Once the brownies are out of the oven, let them cool at room temperature completely. I’ve learned that warm brownies can crumble or make messy cuts. When fully cool, use the parchment paper overhang to lift them onto a cutting board. Cut into 12 rectangles (I do 4 rows by 3 columns), which is the perfect size for graveyard scenes.
Step 3: Whip Up That Green Buttercream
Mix together powdered sugar, softened butter, and milk in a bowl. Beat for a couple of minutes until the frosting turns light and fluffy—this takes patience but is so worth it. Adjust the consistency by adding more powdered sugar if it’s too thin or a splash more milk if it’s too thick. Then add a few drops of green food coloring and mix until you get your desired spooky shade.
Step 4: Create the Graveyard Cookies
Grab your Milano cookies and your black edible decorating gel. A little tip I picked up: cut off the very bottom edge of each cookie to make your tombstones a bit shorter and sturdier, but you don’t have to. Use the gel to carefully write “RIP” on each cookie—don’t worry about perfection; rustic is charming here!
Step 5: Assemble Your Graveyard
Press each decorated cookie gently into the top of a brownie rectangle—these are your tombstones. Spoon a bit of green buttercream next to each cookie, then top the dollop with a candy pumpkin for that festive flair. The combo looks amazing and tastes like Halloween fun in every bite.
Pro Tips for Making Halloween Brownies with Graveyard Cookies and Green Buttercream Frosting Recipe
- Parchment Paper Hack: Always line your pan with parchment paper overhang—it guarantees perfect, clean brownie removal every time.
- Cookie Prep: Cutting the bottom edge off the cookies prevents them from toppling over and makes a sturdier tombstone look.
- Frosting Consistency: Beat your frosting until super fluffy—it spreads easier and looks more professional.
- Don’t Rush Cooling: Wait for brownies to fully cool before cutting or frosting to avoid crumbling and smearing.
How to Serve Halloween Brownies with Graveyard Cookies and Green Buttercream Frosting Recipe
Garnishes
I like to sprinkle a little edible glitter over the green buttercream—it adds a subtle shimmer that’s magical under Halloween lights. Sometimes a few extra candy bones or creepy crawlies around the plate up the spooky factor. Fresh mint leaves can also be a cool “grass” alternative if you want a more natural look.
Side Dishes
These brownies pair wonderfully with a simple cup of pumpkin spice latte or even a cold glass of milk for the kids. If you want to go full Halloween dessert spread, adding caramel popcorn and some candied apple slices rounds out the theme beautifully.
Creative Ways to Present
For a Halloween party, I once served the brownies on a platter lined with crushed Oreo “dirt,” and scattered some plastic spiders around for a seriously creepy vibe. Another time, I used a clear glass terrarium tray to frame the brownies like a real graveyard scene. Get creative—you’ll impress your guests and have a blast doing it!
Make Ahead and Storage
Storing Leftovers
After serving, I tightly cover any leftover brownies with plastic wrap or keep them in an airtight container. Storing them this way at room temperature keeps them moist for about 3-4 days—perfect if you want to make this a day ahead and enjoy later.
Freezing
If you want to save some for later, these brownies freeze well unassembled. Wrap the baked brownies tightly in plastic wrap and then foil, freeze for up to 3 months. When ready, thaw completely, then decorate with cookies and frosting fresh to keep everything vibrant and tasty.
Reheating
I typically don’t reheat the decorated brownies because the frosting and candies don’t react well to heat, but if you want to warm a plain brownie square, a quick 10-15 second zap in the microwave is enough to bring out that warm, fudgy feeling without drying it out.
FAQs
-
Can I use homemade brownie batter instead of box mix for Halloween Brownies with Graveyard Cookies and Green Buttercream Frosting Recipe?
Absolutely! Homemade batter works wonderfully and can add an extra level of freshness and flavor. Just be sure your brownies bake up fudgy and allow them to cool fully before decorating to replicate the perfect texture.
-
What if I can’t find Milano cookies for the graveyard tombstones?
No worries! You can substitute with any oval or rectangular cookies that are sturdy enough to stand upright, like chocolate wafers or even ginger snaps—just trim as needed to get the right shape.
-
How do I get the green buttercream frosting the right consistency?
Start by beating your butter and powdered sugar well to get a fluffy texture. Adjust thickness by adding more sugar if it’s too runny or milk if it’s too stiff. Adding a few drops of food coloring last helps you control the shade without compromising consistency.
-
Can this recipe be doubled for a larger batch?
You bet! If you’re baking in a 9×13 pan, just double the brownie batter and also the number of cookies, candy pumpkins, and the frosting quantities to keep everything balanced.
-
Any tips for writing “RIP” on the cookies perfectly?
Practice on a spare cookie or parchment first to get comfortable with the decorating gel pen. Writing slowly and with a firm but gentle hand helps keep the letters crisp. Remember, little imperfections add character!
Final Thoughts
Honestly, this Halloween Brownies with Graveyard Cookies and Green Buttercream Frosting Recipe has become my go-to seasonal treat because it’s as fun to make as it is to eat. It brings such a playful, festive spirit to any gathering—and the kids especially love helping decorate. I hope you give it a whirl this year; it’s that kind of recipe that feels like a little celebration in your kitchen. Happy baking and spooky snacking!
Print
Halloween Brownies with Graveyard Cookies and Green Buttercream Frosting Recipe
- Prep Time: 10 minutes
- Cook Time: 30 minutes
- Total Time: 40 minutes
- Yield: 12 servings
- Category: Dessert
- Method: Baking
- Cuisine: American
Description
These Halloween Brownies are a festive and fun treat featuring rich chocolate brownies topped with Milano cookie ‘headstones’ decorated with RIP in black gel, green buttercream frosting, and candy pumpkins to create a spooky graveyard effect perfect for Halloween celebrations.
Ingredients
Brownies
- Prepared brownie batter for an 8” pan
- 12 Milano cookies
- Black decorating gel
- 12 candy pumpkins
Green Buttercream Frosting
- 1 cup powdered sugar
- 1/4 cup butter (salted or unsalted), softened
- 2 teaspoons milk
- Green food coloring, a few drops to reach desired color
Instructions
- Prepare the Pan: Line an 8” baking pan with parchment paper, leaving overhang on the sides to easily lift out the brownies after baking.
- Bake the Brownies: Pour the prepared brownie batter into the lined pan and smooth into an even layer. Bake according to the brownie recipe instructions or box mix directions, usually about 30 minutes.
- Cool and Cut Brownies: Allow brownies to cool completely. Use the parchment paper overhang to lift brownies out of the pan. Cut into 12 rectangles (4 x 3 grid).
- Make Frosting: In a bowl, mix powdered sugar, softened butter, and milk for 2 minutes until light and fluffy. Adjust consistency by adding more powdered sugar for thickness or milk to thin. Add green food coloring and mix to desired shade.
- Decorate Cookies: Using black edible gel pen, write “R-I-P” on each Milano cookie. Optionally, trim the bottom edge of cookies to make shorter ‘headstones.’
- Assemble Graveyard: Press each decorated cookie upright into the top of each brownie piece, resembling headstones. Spoon a small amount of green frosting near each cookie and place a candy pumpkin on top of the frosting to resemble grass with pumpkins.
Notes
- For the brownies, use a reliable chocolate brownie recipe halved to fit an 8×8” pan or double the ingredients for a 9×13” pan.
- If using boxed brownie mix, Ghirardelli brand is recommended for best results.
- Black decorating gel is typically found near birthday candles or cake decorating supplies in grocery stores or Walmart.
- The green buttercream frosting consistency can be adjusted by adding more powdered sugar to thicken or a splash more milk to thin.
Nutrition
- Serving Size: 1 brownie
- Calories: 250 kcal
- Sugar: 20 g
- Sodium: 150 mg
- Fat: 12 g
- Saturated Fat: 7 g
- Unsaturated Fat: 4 g
- Trans Fat: 0 g
- Carbohydrates: 32 g
- Fiber: 2 g
- Protein: 3 g
- Cholesterol: 35 mg

