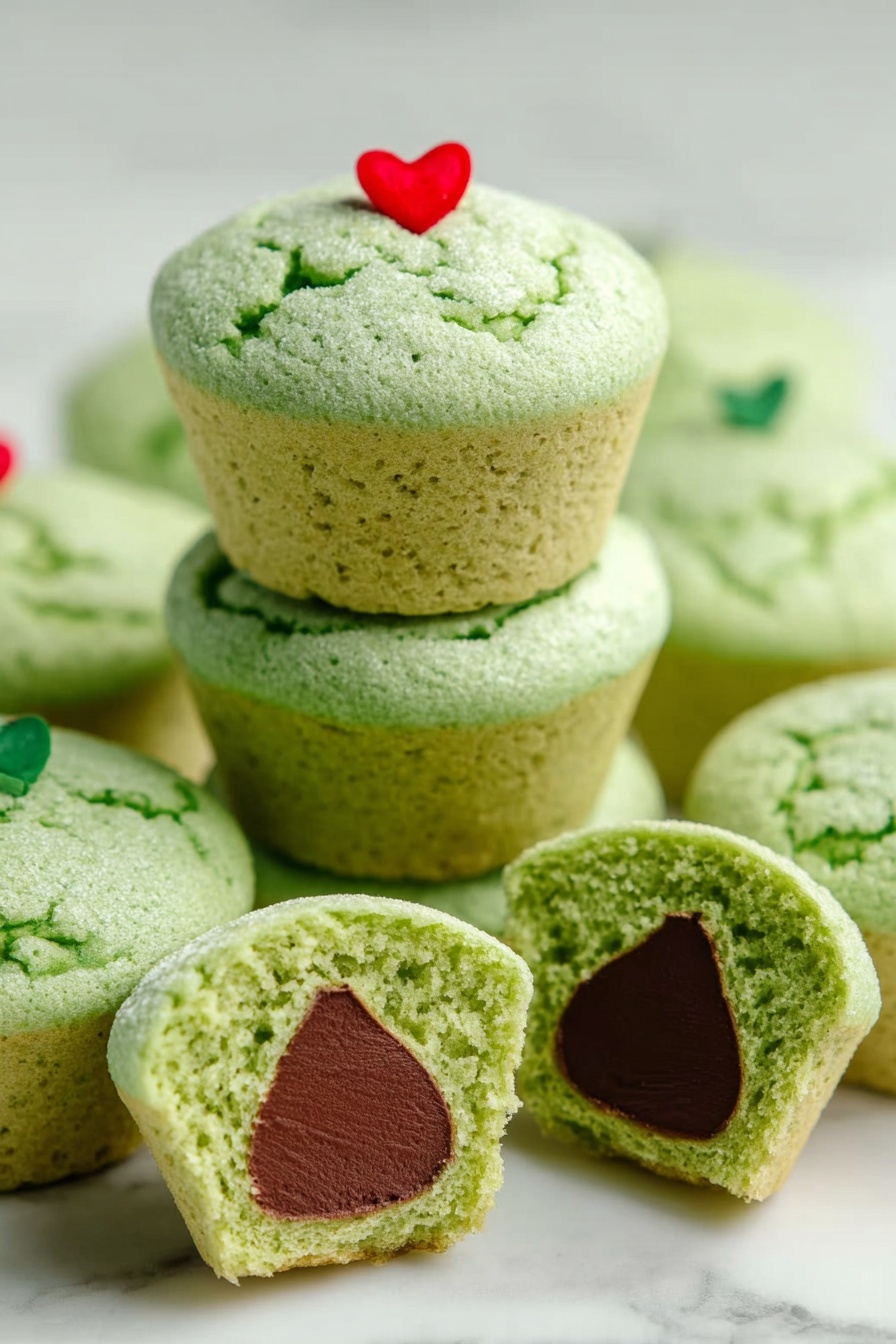
Green Hershey’s Kiss Cookie Cups Recipe
If you’re looking for a fun, festive, and downright delicious treat to brighten up your dessert table, you’re going to love this Green Hershey’s Kiss Cookie Cups Recipe. These little bundles combine the joy of sugar cookies with the surprise of melty chocolate inside—and that stunning green color makes them perfect for holidays like Christmas or St. Patrick’s Day. Stick around because I’m sharing all my tips to help you nail this recipe, making you look like a dessert pro in no time.
Why This Recipe Works
- Perfect balance: The tender sugar cookie dough is just thick enough to hold the chocolate center without spreading too much in the oven.
- Vibrant color: Mixing the green gel food coloring into the egg ensures an even, bright green hue every time.
- Cute presentation: Baking the dough in mini muffin tins keeps each cookie cup perfectly shaped and easy to serve.
- Surprise inside: The upright Hershey’s Kiss melts into a gooey chocolate center that delights with every bite.

Ingredients & Why They Work
The ingredients in this Green Hershey’s Kiss Cookie Cups Recipe come together to create a simple yet show-stopping treat. Using a sugar cookie mix cuts down prep time, while the extra flour helps give the dough the perfect thickness for wrapping around the chocolate. And let’s talk about the green gel food coloring — it’s much more vibrant and less watery than liquid food coloring, so your cookie cups get that festive pop of color without weakening the dough.
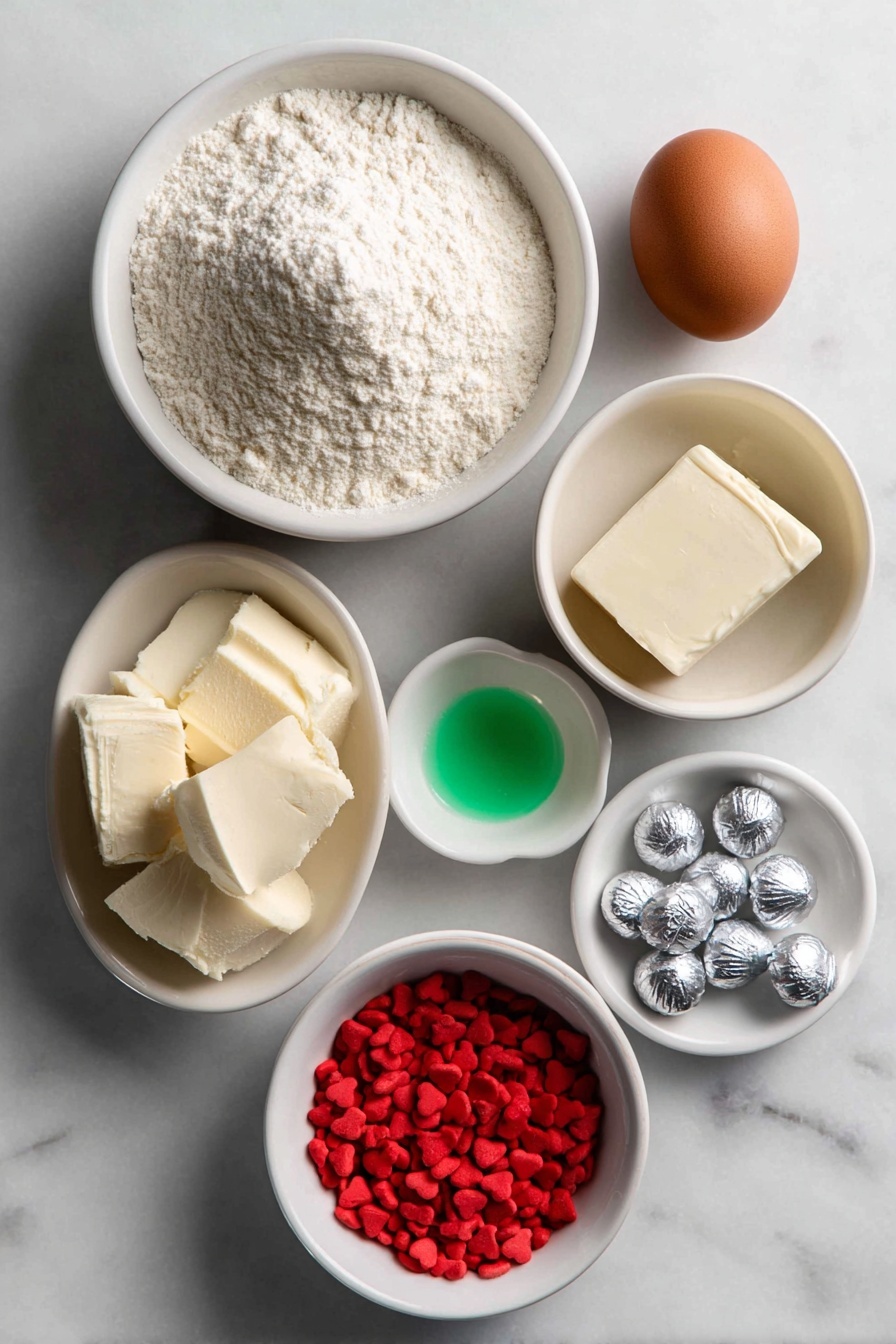
- Sugar cookie mix: The base for our cookies, simplifies the process and guarantees consistency every time.
- All-purpose flour: Adds extra structure so the dough stays thick enough to hug the Hershey’s Kiss snugly.
- Unsalted butter: Makes the dough rich and tender; room temperature butter is essential for easy mixing.
- Large egg: Binds everything together and, when mixed with the green gel food coloring, ensures even color.
- Green gel food coloring: Provides that iconic green tone without altering the dough’s texture.
- Hershey’s kisses (unwrapped): The sweet chocolate surprise inside each cookie cup that everyone loves.
- Large heart candy sprinkles: The finishing touch that adds charm and a pop of color on top.
Tweak to Your Taste
While the classic Green Hershey’s Kiss Cookie Cups Recipe is wonderful as is, I love how easy it is to customize. Sometimes I swap out the green gel for red to make a Valentine’s-themed version, or even try peppermint-flavored candies inside for a festive twist. You can totally make these your own!
- Variation: I once replaced the sugar cookie mix with a homemade gingerbread dough for a spicy touch, and it was a hit with family during the holidays.
- Dietary swaps: If you want gluten-free, just swap the sugar cookie mix and flour for gluten-free versions—just check the baking time.
- Seasonal colors: Change the gel food coloring to match the holiday—orange and black for Halloween, pastels for Easter—it works beautifully.
- Extra flavor: Add a teaspoon of almond or vanilla extract to the dough for a subtle but lovely flavor lift.
Step-by-Step: How I Make Green Hershey’s Kiss Cookie Cups Recipe
Step 1: Getting Ready & Coloring
Start by preheating your oven to 375°F and lightly greasing a mini muffin pan with baking spray or lining it with paper cups. In a small bowl, whisk together the egg and green gel food coloring really well—this step is key because it spreads the color evenly so you don’t end up with streaky or patchy green dough.
Step 2: Mix the Dough
In a large bowl, add your sugar cookie mix, all-purpose flour, and room-temperature butter. Using a handheld mixer on low speed, slowly add the egg and green coloring mixture. Keep mixing for about 2-3 minutes until you get a thick, uniform dough. It will be dense but that’s exactly what you want here—it helps the cookie cups hold their shape.
Step 3: Form the Cookie Cups
Grab about 1½ tablespoons of dough (I use a cookie scoop) and flatten it in your hand into roughly a 3-inch disc. Place a Hershey’s Kiss, pointing upright, in the center, then gently pull the dough sides around it, sealing the chocolate inside. Make sure it stays upright when you place it in the muffin tin—that little detail makes all the difference!
Step 4: Bake and Decorate
Bake for 10 to 12 minutes—but watch closely! You want the dough baked through but not browned. Right after taking them out of the oven, press one large heart candy sprinkle onto the side—not center!—of each cookie cup for a charming “Grinch” look. Let them cool for at least 10 minutes in the pan before transferring to a wire rack to cool completely.
Pro Tips for Making Green Hershey’s Kiss Cookie Cups Recipe
- Even Color Turns: Mixing the green gel into the egg rather than directly into the dough gives you that rich, vibrant color without overworking the dough.
- Keep the Kiss Upright: I can’t stress this enough—if the Hershey’s Kiss tips sideways, the chocolate won’t melt properly or might leak out during baking.
- Don’t Overbake: The cookies stay tender and soft if you catch them right before browning; set a timer and watch closely starting at the 10-minute mark.
- Cool Before Removing: Let the cookie cups rest in the pan for 10 minutes after baking so they set nicely and you can remove them without breaking.
How to Serve Green Hershey’s Kiss Cookie Cups Recipe
Garnishes
I love topping each cookie cup with a heart candy sprinkle—it adds a little charm and personality. But you can also dust them lightly with powdered sugar or drizzle some white chocolate over the top for extra flair. If you’re feeling festive, crushed candy canes sprinkled on top add a nice crunch and peppermint zing!
Side Dishes
These cookie cups shine as a stand-alone dessert, but they pair beautifully with a scoop of vanilla ice cream or a dollop of whipped cream. For a party spread, set them alongside hot chocolate or a festive coffee bar for an irresistible combo that will have guests coming back for more.
Creative Ways to Present
For holiday gatherings, I’ve arranged these cookie cups on a festive platter lined with fresh evergreen sprigs or colorful napkins. Wrapping each one in clear mini treat bags tied with a ribbon makes for adorable party favors. And on Valentine’s Day, swapping the green for red and heart sprinkles just makes everyone swoon!
Make Ahead and Storage
Storing Leftovers
I like to store any leftover cookie cups in an airtight container at room temperature. They stay soft and chewy for about 3 days—perfect for snacking during the week! If you live somewhere warm, I recommend popping them in the fridge to prevent the chocolate from melting.
Freezing
These cookie cups freeze beautifully. I wrap them individually in plastic wrap and then put them in a freezer-safe container or bag. When you’re ready to enjoy, just let them thaw at room temperature for about an hour, and they taste almost as fresh as the day they were baked.
Reheating
If you want to warm them up, I gently heat them in the microwave for 10-second bursts just until the chocolate softens again. Avoid overheating or your cookies can get dry. Reheating brings back that gooey center and fresh-baked vibe that everyone loves.
FAQs
-
Can I use a different cookie dough for this Green Hershey’s Kiss Cookie Cups Recipe?
Absolutely! While the sugar cookie mix provides the perfect texture for these cookie cups, you can experiment with other doughs like chocolate chip or gingerbread. Just keep in mind the dough should be thick enough to wrap around the candy without spreading too much in the oven.
-
What’s the best way to keep the Hershey’s Kiss from melting too much or leaking?
Keeping the Hershey’s Kiss upright while shaping and baking the cookies helps the chocolate melt evenly inside without seeping out. Also, avoid overbaking, as it can cause the chocolate to spread beyond the cookie dough.
-
Can I make these cookie cups ahead of time for a party?
Yes! You can bake them ahead, store at room temperature in an airtight container, or freeze them for longer storage. They reheat beautifully and are perfect for prepping in advance when you have guests coming over.
-
What if I don’t have green gel food coloring?
While gel food coloring is best for this recipe, you can use liquid food coloring as a substitute. Just use less liquid and mix it thoroughly into the egg to avoid making the dough too soft. The color may not be as vivid but still delicious!
-
How do I make the cookies extra soft and chewy?
Be careful not to overbake, and try adding a tablespoon of cornstarch to the dough to keep cookies tender. Also, using room-temperature butter rather than melted gives you a softer crumb.
Final Thoughts
This Green Hershey’s Kiss Cookie Cups Recipe has become one of my go-to festive treats—not only because it’s fun to make, but because it always brings smiles. There’s something truly special about hiding that melty chocolate surprise right inside a cookie that’s dressed up in bright green. I’m excited for you to give it a try and put your own spin on it. Whether you’re baking for kids, a holiday party, or just because, these cookie cups are sure to become a favorite in your recipe box, too!
Print
Green Hershey’s Kiss Cookie Cups Recipe
- Prep Time: 5 minutes
- Cook Time: 12 minutes
- Total Time: 17 minutes
- Yield: 18 servings
- Category: Dessert
- Method: Baking
- Cuisine: American
Description
These Grinch Cookies are festive green sugar cookie cups filled with a Hershey’s Kiss center and topped with a heart-shaped candy sprinkle. Perfect for holiday celebrations, they feature a fun twist on classic sugar cookies with a vibrant green color and a surprise chocolate center.
Ingredients
Cookie Dough
- 17.5 ounces sugar cookie mix
- 1/4 cup all-purpose flour
- 1 large egg
- 1/2 cup unsalted butter, room temperature
- 3/4 teaspoon green gel food coloring
Filling and Topping
- 18 Hershey’s kisses, unwrapped
- 18 large heart candy sprinkles
Instructions
- Preheat and Prepare Pan: Preheat the oven to 375°F. Lightly spray a mini muffin pan with baker’s spray or line it with paper cups, then set aside.
- Mix Egg and Food Coloring: In a small bowl, whisk together the egg and green gel food coloring until fully combined, ensuring an even green color throughout the dough.
- Combine Dough Ingredients: In a large mixing bowl, use a handheld mixer on low speed to combine the sugar cookie mix, all-purpose flour, unsalted butter, and the egg mixture. Mix for 2 to 3 minutes until the dough is thick and well combined.
- Shape Dough Around Candy: Using a 1½ tablespoon cookie scoop, scoop out dough and flatten each ball into a 3-inch disc. Place a Hershey’s Kiss upright in the center and carefully pull the dough edges around the candy to enclose it, forming a ball.
- Place Dough in Pan and Bake: Arrange the dough balls in the mini muffin tin, keeping the Hershey’s kiss upright. Bake for 12 minutes, ensuring the cookies do not brown but are cooked through in the center.
- Add Sprinkles and Cool: Immediately after baking, place one heart candy sprinkle offset to the right from center on each cookie cup. Let the cookies cool in the pan for at least 10 minutes before transferring to a wire rack to cool completely.
Notes
- Whisking the egg with the green gel food coloring ensures the color is evenly distributed throughout the dough.
- Keep the Hershey’s kiss candy upright in the dough to create the signature look and proper filling inside the cookie cups.
- Do not overbake; the cookies should not brown but be cooked through to retain softness around the candy center.
- Using a cookie scoop helps provide uniform cookie sizes for even baking.
Nutrition
- Serving Size: 1 cookie
- Calories: 150 kcal
- Sugar: 10 g
- Sodium: 90 mg
- Fat: 7 g
- Saturated Fat: 4 g
- Unsaturated Fat: 2 g
- Trans Fat: 0 g
- Carbohydrates: 20 g
- Fiber: 0.5 g
- Protein: 1 g
- Cholesterol: 20 mg

