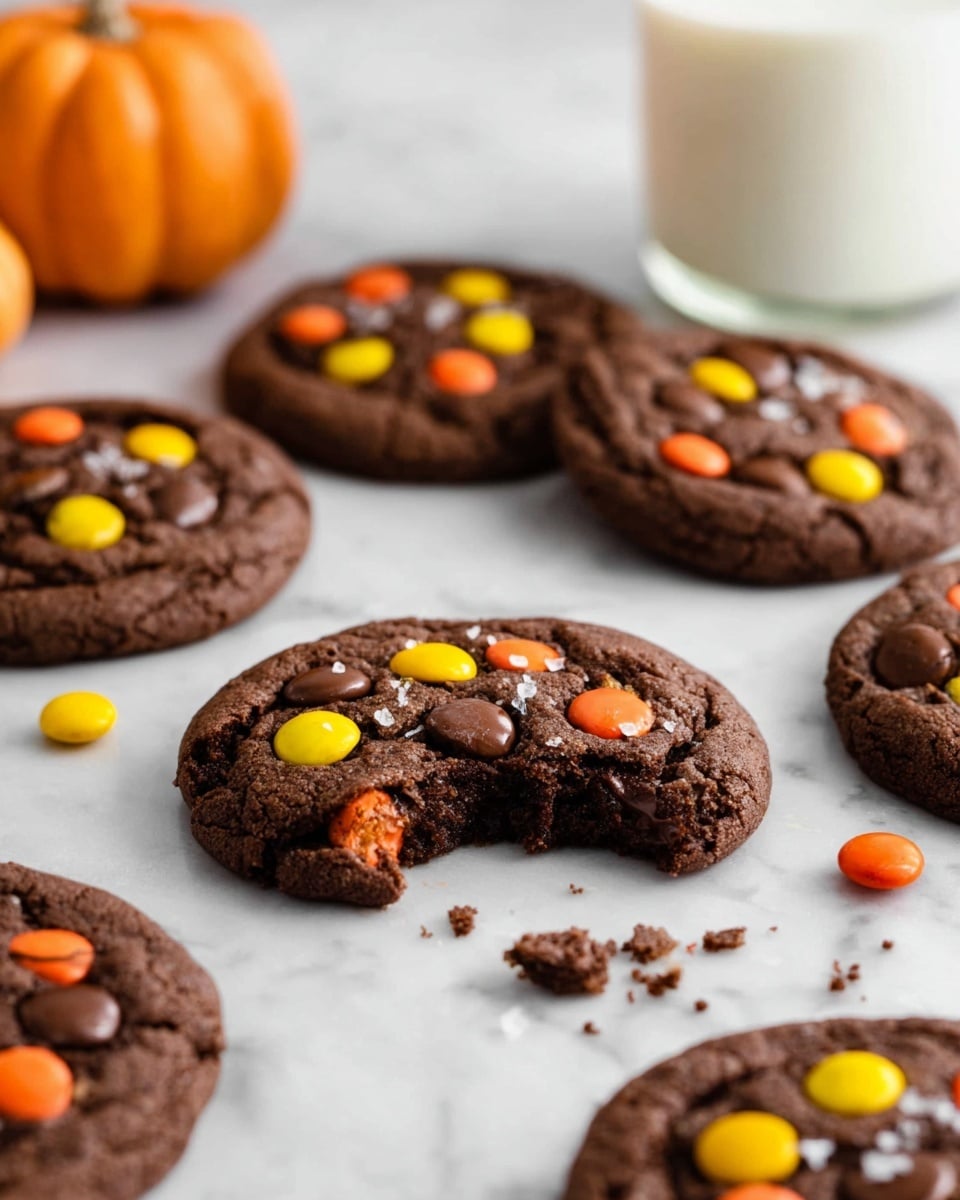
Gluten-Free Halloween Cookies Recipe
If you’re looking to whip up something festive and delicious this season, you’re going to absolutely love this Gluten-Free Halloween Cookies Recipe. These cookies are not only packed with cozy chocolate and festive candy colors but also super reliable for those of us avoiding gluten. Trust me, I’ve tried every trick in the book, and this one truly hits the sweet spot between fudgy, chewy, and just plain fun. Stick with me, and I’ll show you how to make your Halloween extra special with a batch of these cookies that everyone will rave about!
Why This Recipe Works
- Perfect Gluten-Free Flour Blend: Combines gluten-free 1:1 baking flour with almond flour for extra moisture and texture.
- Rich Chocolate Flavor: Unsweetened cocoa powder and melty chocolate chips bring that indulgent, deep chocolate cookie vibe.
- Candy-Coated Fun: Tossing in Reese’s Pieces not only adds bursts of peanut buttery sweetness but also makes these cookies pop with Halloween colors.
- Chilling the Dough: Refrigerating the dough helps prevent spreading so you get perfectly shaped cookies every time.

Ingredients & Why They Work
Let’s talk ingredients — this recipe balances classic baking staples with gluten-free swaps that actually taste delicious. Each one plays a part in making sure your cookies come out tender, flavorful, and festive.
- Gluten-free 1:1 baking flour: This blend makes baking gluten-free a breeze, giving structure without that gritty texture you sometimes find.
- Almond flour: Adds moisture and a subtle nutty richness which keeps the cookies soft and tasty.
- Unsweetened cocoa powder: For that deep, rich chocolate flavor that’s pure delight.
- Butter: Room temperature for creamy mixing and that buttery richness everyone loves in cookies.
- Coconut oil: I prefer it softened for easier creaming; it adds a subtle hint of coconut and keeps cookies tender.
- Brown sugar: Provides moisture and chewiness for that perfect cookie texture.
- Granulated sugar: Adds sweetness and helps the cookies spread slightly without going flat thanks to chilling.
- Eggs: Bind everything together and add richness.
- Vanilla extract: Elevates the flavor with classic warmth.
- Reese’s Pieces: The festive candy bursts are iconic and add that Halloween pop you want.
- Chocolate chips: I usually go for semi-sweet, but milk chocolate builds melty pockets of gooey goodness.
- Halloween sprinkles (optional): Because if it’s Halloween, go all out with fun festive colors!
Tweak to Your Taste
One of the things I love about this Gluten-Free Halloween Cookies Recipe is how easy it is to make it your own. I mean, Halloween is all about creativity, right? So why not customize your cookies a bit? Here are a few ways I’ve played around with the base recipe that you might want to try too.
- Make it Dairy-Free: I once swapped the butter for vegan butter and used dairy-free chocolate chips—worked like a charm and made it allergy-friendly without losing any flavor.
- Nut-Free Option: Simply skip the almond flour and replace it with extra gluten-free flour; it still keeps the texture just right.
- Add a Spooky Twist: Try adding orange zest or a pinch of cinnamon for a warm fall vibe in every bite.
- Change the Candy Mix: Instead of Reese’s Pieces, I’ve used mini peanut butter cups (chopped) or plain chocolate chips – both are yummy and totally Halloween-appropriate.
Step-by-Step: How I Make Gluten-Free Halloween Cookies Recipe
Step 1: Whisk Together the Dry Ingredients
Start by combining that gluten-free 1:1 flour, almond flour, cocoa powder, salt, baking powder, and baking soda in a medium bowl. Whisking well here is key because it evenly distributes those leavening agents and cocoa, so no patchy spots in your cookies. Once it’s smooth and mixed—set it aside for a bit. It’s like laying a good foundation before building a house!
Step 2: Cream the Butter, Coconut Oil, and Sugars
In your stand mixer (or with a hand mixer in a large bowl), beat the softened butter, coconut oil, brown sugar, and granulated sugar for 2-3 minutes until creamy and fluffy. This step is when your cookies gain that wonderful tender crumb and slight chewiness. Don’t rush this part — patience here pays off yummy dividends later.
Step 3: Add Eggs and Vanilla
Crack in the eggs and pour the vanilla extract. Beat them well until everything’s smooth and homogenous. The eggs are crucial for structure and moisture, so make sure they’re fully combined before moving on.
Step 4: Slowly Incorporate Dry Ingredients
With your mixer on low, add the dry mix in three parts, mixing after each addition until there are no streaks of flour left. Gluten-free flours can sometimes be tricky to mix evenly, so slow and steady wins here. Once mixed, the dough will start coming together nicely.
Step 5: Fold in Candy and Chocolate Chips, Then Chill
Gently fold in the Reese’s Pieces and chocolate chips, reserving some for topping if you like. Cover the dough and pop it in the fridge for at least one hour, but overnight is best if you can wait. I’ve found chilling makes the dough more manageable and the cookies less prone to spreading, which is especially important with gluten-free batter.
Step 6: Scoop and Bake to Perfection
Preheat your oven to 350°F and line baking sheets with parchment or silicone mats. Scoop tablespoon-sized balls (I love using a #40 cookie scoop for even sizing) and space them 2 inches apart. Top with extra sprinkles or candy if you’re feeling festive. Bake for 9-11 minutes, watching for those edges to set and centers to look mostly done. Let them cool on the pan for a few minutes before transferring to a wire rack.
Pro Tips for Making Gluten-Free Halloween Cookies Recipe
- Use Room Temperature Ingredients: Makes creaming easier and ensures better mixing of fats and sugars.
- Chill the Dough Thoroughly: This step prevents your cookies from spreading too thin and keeps them chewy and thick.
- Watch Your Bake Time: Gluten-free cookies might need extra minutes; keep a close eye on edges firming up to avoid underbaking.
- Don’t Skip the Xanthan Gum: It’s the little helper that keeps your dough together and cookies from crumbling.
How to Serve Gluten-Free Halloween Cookies Recipe
Garnishes
I usually finish these cookies with Halloween-themed sprinkles right before baking. It adds just the right pop of color. Sometimes I press a few extra chocolate chips or even mini peanut butter cups on top for a fun texture twist. A dusting of edible glitter or spooky sugar crystals can also amp up the festive vibes if you’re hosting a Halloween party.
Side Dishes
These cookies go fantastically with seasonal drinks like pumpkin spice lattes, hot cocoa, or even a simple glass of cold milk (dairy or plant-based). For a party spread, pairing them with some fresh fruit or a spicy pumpkin dip makes the table feel extra special.
Creative Ways to Present
I’ve had fun presenting these cookies stacked up like little towers on rustic wooden boards with mini pumpkins and fall leaves around them. For kids, making a cookie decorating station with extra sprinkles and different colored icing is a blast and lets everyone customize their spooky snacks. You can also package them in clear cellophane bags tied with orange and black ribbons for charming party favors.
Make Ahead and Storage
Storing Leftovers
I store extra cookies in an airtight container at room temperature, and they usually stay fresh and chewy for about 4 days. If your kitchen is especially warm, a cool spot like the pantry is best. Just make sure they’re fully cooled before storing—otherwise, they can get soggy.
Freezing
You can freeze both the cookie dough and baked cookies. For the dough, scoop balls onto a tray, freeze until firm, then transfer to a freezer bag. Baking straight from frozen adds a minute or two to the baking time. Baked cookies freeze well in airtight containers layered with parchment paper and thaw quickly at room temperature.
Reheating
To refresh cookies after freezing or storing, pop them in a preheated oven at 300°F for 5 minutes or so. This warms them through and revives the softness without drying them out. Microwaving can work for a quick fix but can make them a bit chewy if overdone.
FAQs
-
Can I use a different type of gluten-free flour?
Absolutely! I recommend a gluten-free 1:1 baking flour blend that already contains xanthan gum for best results, as it’s balanced for baking. If your blend lacks xanthan gum, you may need to add it separately to ensure your cookies hold together well.
-
What if I don’t have almond flour?
No worries! You can swap the almond flour for an equal amount of your gluten-free 1:1 baking flour. This makes the cookies nut-free but may slightly affect the moistness—adding a bit of extra fat like coconut oil can help balance that.
-
How long should I chill the cookie dough?
At least one hour is great, but I honestly get the best texture when I chill the dough overnight. It firms up the dough, prevents spreading, and lets the flavors develop. If you’re in a rush, an hour will still do the trick.
-
Can I make these cookies vegan?
You can! Replace butter with vegan butter and use flax eggs in place of chicken eggs. Also, swap in dairy-free chocolate chips and skip the Reese’s Pieces or substitute with your favorite vegan candy. The texture will be a bit different but still delicious.
-
How do I prevent my gluten-free cookies from becoming dry?
My biggest tip is chilling the dough for that moisture balance and not overbaking. Gluten-free flours don’t absorb fat as well, so resting the dough lets it hydrate properly. Also, keeping an eye on the cookies in the oven so they don’t dry out is crucial—usually when edges are set but centers still soft is the perfect time to pull them out.
Final Thoughts
This Gluten-Free Halloween Cookies Recipe holds a special place in my heart because it brings together two things I love: festive holiday fun and baking for family and friends who need gluten-free options. There’s something so joyful about seeing everyone’s faces light up when they bite into a cookie that’s both safe and sinful. I promise, once you try these, you’ll keep them in your Halloween baking arsenal year after year. So grab your mixing bowl, add a little magic, and make some memories with these irresistible treats!
Print
Gluten-Free Halloween Cookies Recipe
- Prep Time: 20 minutes
- Cook Time: 15 minutes
- Total Time: 1 hour 35 minutes
- Yield: 24 cookies
- Category: Dessert
- Method: Baking
- Cuisine: American
- Diet: Gluten Free
Description
Delicious gluten-free Halloween cookies made with a blend of gluten-free flours, cocoa, and festive Reese’s Pieces and chocolate chips. Perfectly chewy with a rich chocolate flavor, these cookies are easy to prepare and great for holiday celebrations or everyday treats.
Ingredients
Dry Ingredients
- 1 1/2 cups gluten-free 1:1 baking flour
- 1/4 cup almond flour
- 1/2 cup unsweetened cocoa powder
- 1/4 teaspoon salt
- 1 teaspoon baking powder
- 1/2 teaspoon baking soda
Wet Ingredients and Mix-ins
- 1/2 cup butter, room temperature
- 1/4 cup coconut oil, preferably softened solid form
- 3/4 cup lightly packed brown sugar
- 1/2 cup granulated sugar
- 2 large eggs
- 1 teaspoon vanilla extract
- 3/4 cup Reese’s Pieces
- 1/2 cup chocolate chips, milk chocolate or semi-sweet
- Halloween sprinkles (optional)
Instructions
- Combine Dry Ingredients: In a medium bowl, whisk together gluten-free baking flour, almond flour, cocoa powder, salt, baking powder, and baking soda. Set aside.
- Cream Fats and Sugars: In the bowl of a stand mixer or large bowl with a hand mixer, add butter, coconut oil, brown sugar, and granulated sugar. Beat together for 2-3 minutes until the mixture is smooth and well combined.
- Add Eggs and Vanilla: Add eggs and vanilla extract to the creamed mixture and beat until fully incorporated.
- Incorporate Dry Ingredients: With mixer on low speed, slowly add the dry ingredients in three additions, mixing well after each addition to ensure a smooth dough.
- Mix in Chocolate and Candy: Stir in chocolate chips and Reese’s Pieces by hand or with the mixer on low. Cover the dough and refrigerate for at least 1 hour, preferably overnight, to help cookies hold their shape.
- Preheat Oven and Prepare Baking Sheets: When ready to bake, preheat oven to 350°F. Line two rimmed baking sheets with parchment paper or silicone liners for easy cleanup.
- Shape Dough Balls: Scoop heaping tablespoon-sized balls of dough using a #40 cookie scoop or spoon and place on prepared baking sheets, spacing them a couple of inches apart.
- Add Sprinkles: Optional: top each dough ball with Halloween sprinkles for festive decoration.
- Bake Cookies: Bake in the preheated oven for 11 minutes or until the edges are set and centers are mostly set. Monitor cookies to avoid overbaking.
- Cool Cookies: Let cookies cool on baking sheets for 3-4 minutes, then transfer to wire racks to cool completely before serving. Enjoy your festive gluten-free Halloween cookies!
Notes
- Make it dairy-free by substituting vegan butter (such as Earth Balance buttery sticks) for butter and using 1 ½ cups dairy-free chocolate chips instead of Reese’s Pieces and regular chocolate chips.
- Make it nut-free by replacing the almond flour with an additional 1/4 cup gluten-free 1:1 baking flour.
- Refrigerating the dough prevents cookies from spreading too much and keeps the texture chewy and moist.
- Ensure xanthan gum is included in your gluten-free flour blend to stabilize the dough and prevent crumbling.
- Bake carefully and consider adding 2-3 extra minutes if cookies appear underdone; gluten-free cookies often need longer baking time than regular cookies.
Nutrition
- Serving Size: 1 cookie
- Calories: 150 kcal
- Sugar: 12 g
- Sodium: 90 mg
- Fat: 8 g
- Saturated Fat: 4 g
- Unsaturated Fat: 3 g
- Trans Fat: 0 g
- Carbohydrates: 18 g
- Fiber: 2 g
- Protein: 2 g
- Cholesterol: 25 mg

