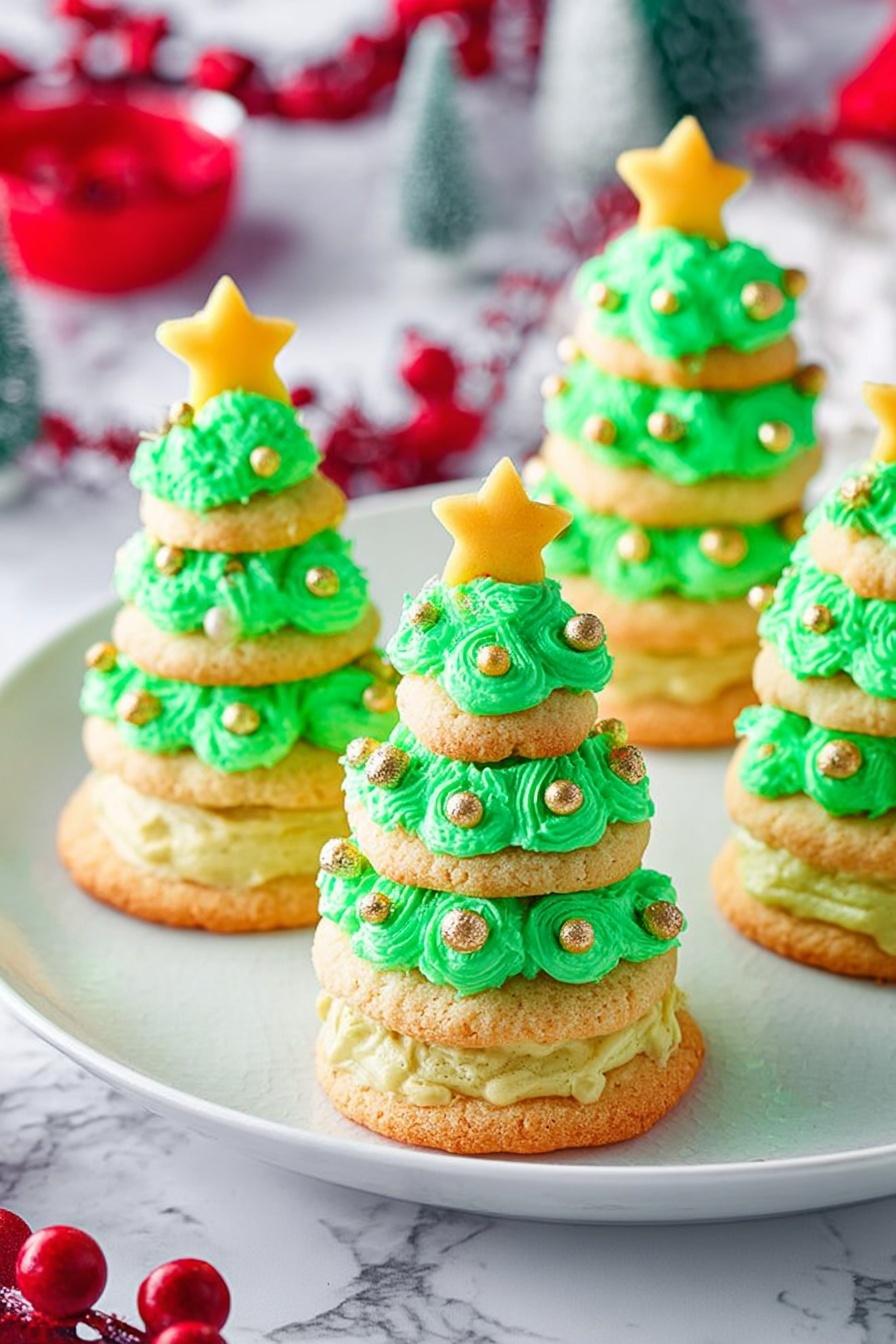
Festive Stacked Christmas Tree Cookies Recipe
If you’re looking to add a little extra magic to your holiday baking, this Festive Stacked Christmas Tree Cookies Recipe is absolutely perfect. I promise, once you try these charming little cookie trees, you’ll want to make them every Christmas! They’re not only delicious but so much fun to assemble and decorate, making them a fantastic activity to share with kids or friends during the holiday hustle.
Why This Recipe Works
- Perfect Texture: The cookie dough is tender with just enough structure to hold your stacked trees together beautifully.
- Rich Buttercream: The frosting is silky smooth and the right consistency for piping festive Christmas tree shapes.
- Visual Appeal: Stacking differently sized cookies creates a whimsical 3D effect that’s irresistibly festive.
- Customizable Decoration: You have freedom with sprinkles and frosting shades to make these uniquely yours every year.

Ingredients & Why They Work
This Festive Stacked Christmas Tree Cookies Recipe uses simple, classic ingredients that blend perfectly to give you cookies that are soft yet sturdy enough to stack—and a frosting that pipes like a dream. Before you start, I always recommend using the freshest butter you can find and good-quality vanilla for the best flavor.
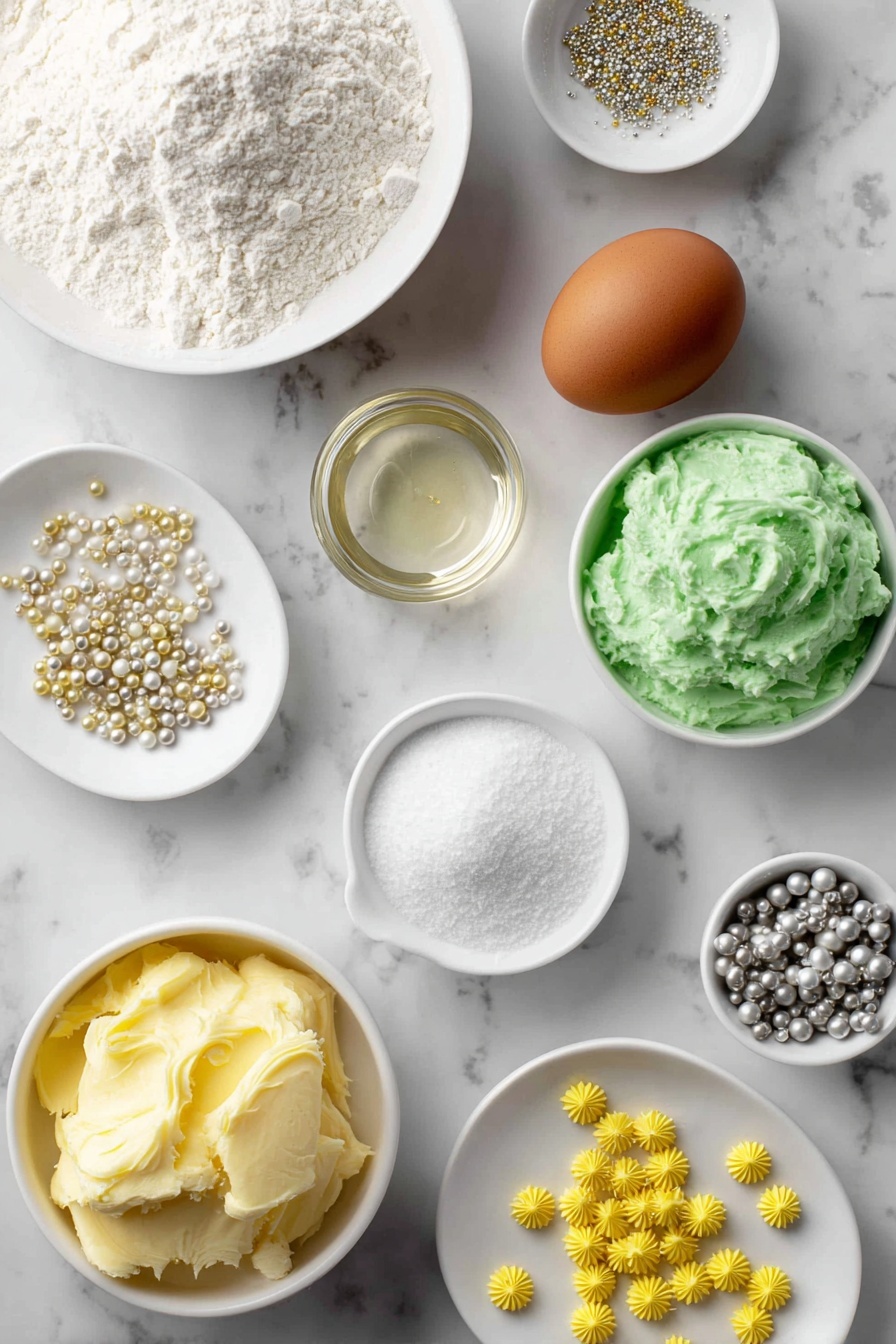
- Unsalted Butter: Using unsalted butter lets you control the saltiness precisely, important for balance in both the cookies and frosting.
- Confectioners’ Sugar: This gives the cookies their tender crumb and the frosting its silky smooth texture.
- Egg: Acts as a binder to hold the dough together without making it dense.
- Vanilla Extract: Adds warmth and a hint of sweetness that makes these cookies so comforting.
- All-Purpose Flour: Provides structure, allowing the cookies to keep their shape when baked and stacked.
- Baking Soda: Gives a gentle lift so the cookies aren’t overly dense.
- Salt: Enhances flavors and balances the sweetness.
- Green Food Coloring: Just enough to get that perfect evergreen tree color in your frosting.
- Yellow Star Sprinkles & Pearl Sprinkles: For that magical touch that transforms cookies into festive trees.
Tweak to Your Taste
I love making this Festive Stacked Christmas Tree Cookies Recipe my own by playing with the frosting colors and sprinkles. You can really make it your own — after all, Christmas cookies should be as joyful and colorful as the season!
- Variation: I’ve tried adding peppermint extract into the frosting instead of vanilla for a refreshing seasonal twist—totally loved the cool minty surprise it brought!
- Dietary Modifications: For gluten-free, swap the all-purpose flour with a measured gluten-free blend and keep an eye on texture; it works surprisingly well.
- Seasonal Changes: Switch up the green frosting for red or white during other holidays, or make miniature rainbow stacks for a fun birthday treat.
Step-by-Step: How I Make Festive Stacked Christmas Tree Cookies Recipe
Step 1: Creaming Butter and Sugar
Start by softening the unsalted butter; it’s key that it’s not melted but nicely softened for that creamy texture. Beat it on high speed until it becomes light and fluffy—about 2 to 3 minutes. This step traps air, giving your cookies a tender, melt-in-your-mouth feel. Then add the confectioners’ sugar and keep beating until the mixture is silky smooth and well-combined. Remember to scrape down the bowl; I do this several times to avoid any unmixed bits.
Step 2: Adding the Egg and Vanilla
Next up, crack in your large egg along with the vanilla extract. These ingredients add richness and a lovely aroma. Beat these in until everything comes together, scraping the bowl again to keep your batter even.
Step 3: Folding in Dry Ingredients
Whisk together your flour, baking soda, and salt separately, then add them slowly to your wet ingredients. Stir on low speed just until everything is incorporated—overmixing will make the cookies tough, and we definitely don’t want that! The dough should feel soft but not sticky.
Step 4: Portioning and Baking the Cookies
This part’s fun—I form the dough into balls in three sizes: small (1 teaspoon), medium (2 teaspoons), and large (3 teaspoons). The varying sizes are what create the stacked Christmas tree effect. Lay them out on baking sheets lined with Silpat liners or parchment paper. For best results, bake one sheet at a time on the center rack, rotating halfway through.
Large ones bake about 10 minutes, medium for 7-8 minutes, and small for 5-6 minutes. You’ll know they’re done when the edges are firm but the centers may still look slightly soft—they’ll set as they cool, so don’t overbake.
Step 5: Making the Buttercream Frosting
While the cookies cool, whip up your frosting. Beat softened butter until creamy and light, then gradually mix in confectioners’ sugar in two batches. Add vanilla, salt, and green food coloring a few drops at a time until you reach that perfect evergreen shade. Take your time with coloring—you don’t want it too dull or neon, just merry and bright!
Step 6: Decorating and Stacking Your Cookie Trees
Grab a piping bag fitted with a star tip (I’m partial to the classic 1M). Pipe generous swirls of frosting on the large and medium cookies. For the small cookies that top your trees, pipe a cute little swirl and top each with a yellow star sprinkle to mimic a shining Christmas tree topper.
Here comes the best part—stack your cookies: large at the base, medium in the middle, small on top. Repeat with your remaining cookies, and then sprinkle those gold and silver pearls or any holiday sprinkles you have on hand. Watching the trees come together never gets old!
Pro Tips for Making Festive Stacked Christmas Tree Cookies Recipe
- Perfect Dough Consistency: If your dough feels too sticky after mixing, chill it for 30 minutes—this makes rolling and portioning much easier.
- One Tray at a Time: I bake a single sheet of cookies at a time on the center rack, rotating halfway through to get even baking and avoid underdone spots.
- Smooth Frosting Swirls: Warm your frosting slightly by letting the piping bag sit in warm water (dry it first!) to help it pipe smoothly without tearing cookies.
- Avoid Overstacking: Stack no more than three cookies per tree to keep them from toppling—trust me, gravity can be tricky with these little beauties.
How to Serve Festive Stacked Christmas Tree Cookies Recipe
Garnishes
I love to keep it classic with gold and silver pearl sprinkles for that elegant sparkle, plus bright yellow star sprinkles for the tree toppers—because what’s a Christmas tree without a shining star? But honestly, have fun with it! Red and green jimmies or edible glitter can transform these cookies for a party table centerpiece.
Side Dishes
These stacked cookies go wonderfully with cozy drinks like hot cocoa or mulled cider. For a holiday party, pair them with a cheese platter or a warm batch of gingerbread men for a festive flavor fest. Trust me, everyone will be coming back for more!
Creative Ways to Present
One year, I arranged these Stacked Christmas Tree Cookies Recipe on a wooden board dusted lightly with powdered sugar to mimic snow. Add a few sprigs of fresh rosemary or pine branches around the edges for a rustic holiday feel. Another favorite is to tie each cookie stack with a little red ribbon as an edible gift—guaranteed crowd-pleaser!
Make Ahead and Storage
Storing Leftovers
After decorating, I store my cookie trees in an airtight container. I usually keep them at room temperature since the sugar content helps preserve them for up to four days without losing any softness. If you feel more comfortable refrigerating, they’ll keep for 1 to 2 weeks but may firm up a bit.
Freezing
I freeze baked but undecorated cookies in zip-top bags or airtight containers. This way, when the holiday rush hits, I just thaw and decorate fresh. Freezing with frosting on isn’t ideal because the texture can change and colors might bleed.
Reheating
If you happen to have leftovers and want to refresh that just-baked warmth, pop the cookies in the oven at 300°F for about 3-5 minutes. This softens them back up gently without melting the frosting. Just watch carefully so they don’t overheat!
FAQs
-
Can I make these Festive Stacked Christmas Tree Cookies Recipe without food coloring?
Absolutely! If you prefer to avoid food coloring, the frosting will have a classic creamy butter color. You could also try natural alternatives like spinach powder for green or beet powder for a pink hue, but keep in mind that flavor and intensity may vary.
-
What’s the best way to prevent cookies from spreading too much during baking?
Make sure your butter is softened but not melted when you mix the dough. Also, chilling the dough balls for 10-15 minutes before baking can help keep their shape nice and tight, which is especially important for the smaller sizes in this recipe.
-
Can I use a different frosting instead of buttercream?
You can swap buttercream for cream cheese frosting or royal icing if you prefer, but keep in mind their textures are different—so stacking might be trickier with runny frostings. Buttercream gives the best balance of flavor and structural support here.
-
How far in advance can I make these cookies?
You can bake the cookies up to a week ahead and store them undecorated in an airtight container. Decorate the day before serving for the freshest appearance and taste. Freeze extra baked cookies for up to three months as mentioned above.
Final Thoughts
I have to say, this Festive Stacked Christmas Tree Cookies Recipe holds a special place in my heart—it’s not just about the taste but the joy of gathering around the kitchen, stacking and decorating these little cookie trees with loved ones. Plus, they make your holiday table look absolutely stunning! So next time you’re torn between a classic sugar cookie and something new, give these a try. I’m sure they’ll become a festive tradition you treasure, just like I have.
Print
Festive Stacked Christmas Tree Cookies Recipe
- Prep Time: 30 minutes
- Cook Time: 10 minutes
- Total Time: 1 hour 10 minutes
- Yield: 20 servings
- Category: Dessert
- Method: Baking
- Cuisine: American
- Diet: Vegetarian
Description
These festive Stacked Christmas Tree Cookies are a delightful holiday treat featuring soft, buttery sugar cookies in three sizes, layered with creamy green buttercream frosting and decorated with sparkling sprinkles. Perfect for holiday parties and gift-giving, they combine classic flavors with charming presentation to bring seasonal joy to any table.
Ingredients
Cookies
- ¾ cup unsalted butter, softened
- ¾ cup confectioners’ sugar
- 1 large egg
- 1 teaspoon vanilla extract
- 2 ¼ cups all-purpose flour
- 1 teaspoon baking soda
- ½ teaspoon salt
Buttercream Frosting
- 1 cup unsalted butter, softened
- 4 cups confectioners’ sugar
- 1 teaspoon pure vanilla extract
- ¼ teaspoon salt
- Drops green food coloring, as desired
Garnishing
- Yellow star sprinkles
- Silver and gold pearl-shaped sprinklers
Instructions
- Preheat oven: Preheat your oven to 350°F and line at least two baking sheets with Silpat liners or parchment paper; then set aside.
- Cream butter: In a stand mixer bowl fitted with the paddle attachment, or using a large bowl and handheld electric mixer, beat the softened butter on high speed until creamy, about 2 to 3 minutes. Scrape down the bowl sides.
- Add sugar: Add the confectioners’ sugar and continue beating until fully combined and creamy, approximately 3 minutes.
- Incorporate egg and vanilla: Beat in the egg and vanilla extract until well combined, scraping down the sides as needed.
- Add dry ingredients: Add the all-purpose flour, baking soda, and salt, then beat just until incorporated—avoid overmixing.
- Shape cookie dough balls: Form cookie dough balls in three sizes—1 teaspoon, 2 teaspoons, and 3 teaspoons—with about 20 balls per size, totaling around 60 balls.
- Bake cookies: Bake the largest balls (3 teaspoons) for 10 minutes, medium balls (2 teaspoons) for 8 minutes, and small balls (1 teaspoon) for 6 minutes, or until edges are set. Cool on baking sheets for 10 minutes before transferring to a wire rack to cool completely. Bake one sheet at a time on the center rack and rotate halfway for best results.
- Make buttercream frosting: Beat the softened butter until smooth and creamy, about 3 to 4 minutes. Gradually add the confectioners’ sugar in two parts, beating on medium speed and scraping down sides as needed. Mix in vanilla extract and salt. Add green food coloring a few drops at a time until reaching the desired shade.
- Decorate cookies: Fit a piping bag with a star tip (size 1M recommended) and pipe frosting onto the largest cookies first, then the medium ones. Pipe a swirl on the smallest cookies to resemble the top of the tree and place a yellow star sprinkle on top.
- Assemble cookie trees: Stack cookies starting with a large cookie base, topped with a medium cookie, then the small ones, repeating for all cookies.
- Garnish: Decorate the assembled cookie trees with gold and silver pearl sprinkles or any sprinkles of your choice, such as red and green jimmies.
Notes
- Baking times vary depending on the precise size of cookie dough balls, oven variations, and altitude. Watch cookies closely and judge doneness by set edges rather than solely time.
- Store decorated cookies in an airtight container in the refrigerator for 1 to 2 weeks, or at room temperature for up to 4 days, depending on preference.
- For freezing, freeze baked but undecorated cookies in an airtight container or zip-top bag, then frost after thawing for best texture and flavor.
Nutrition
- Serving Size: 1 serving
- Calories: 250 kcal
- Sugar: 18 g
- Sodium: 90 mg
- Fat: 15 g
- Saturated Fat: 9 g
- Unsaturated Fat: 5 g
- Trans Fat: 0 g
- Carbohydrates: 28 g
- Fiber: 1 g
- Protein: 2 g
- Cholesterol: 35 mg


