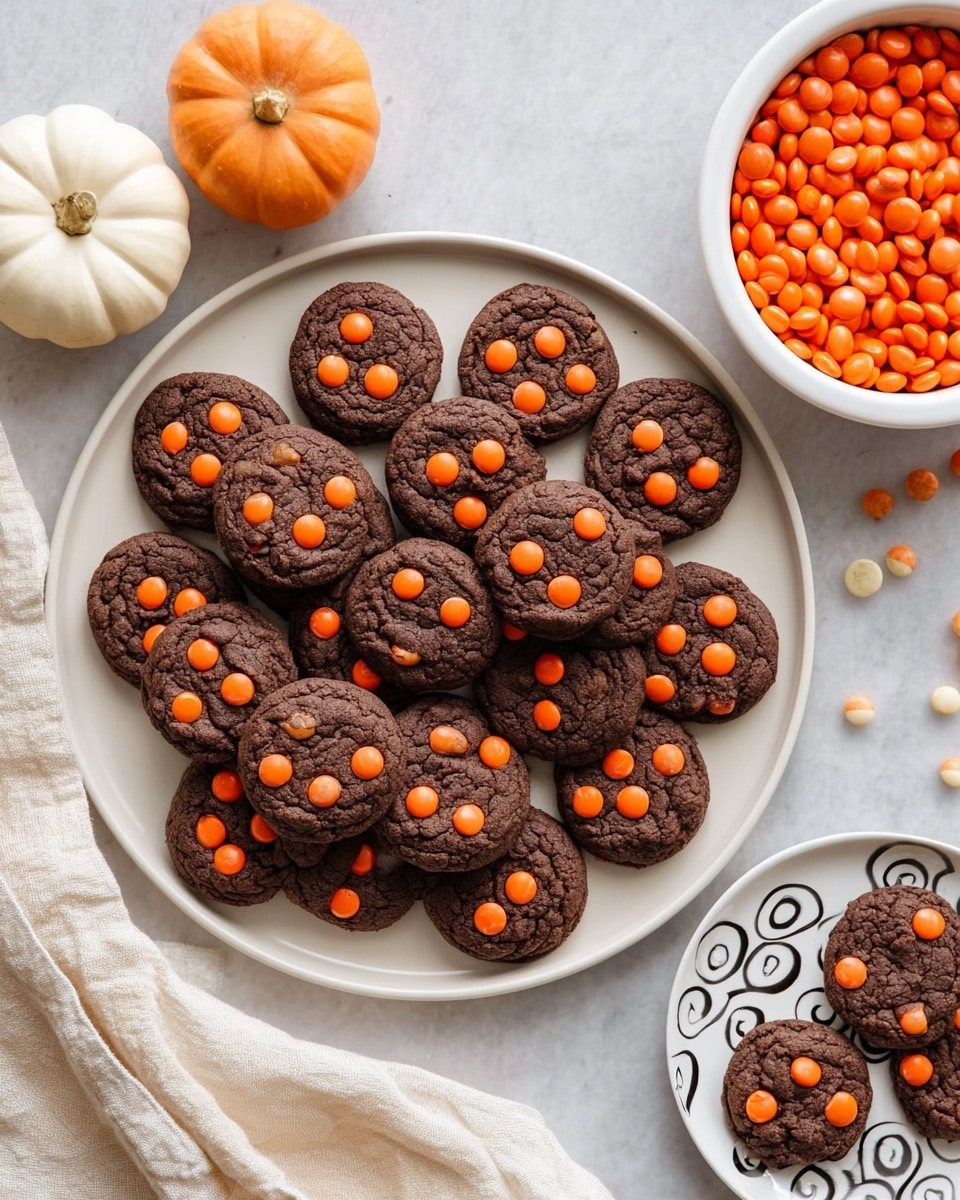
Dark Chocolate Halloween Cookies Recipe
If you’re on the hunt for a festive, indulgent treat this spooky season, you’re going to love this Dark Chocolate Halloween Cookies Recipe. These cookies balance rich, deep cocoa flavor with fun bursts of orange candy, creating not just a dessert but an experience that’s perfect for Halloween parties, trick-or-treat giveaways, or cozy nights in with a mug of hot cocoa. I’m excited to share all the little secrets that make these cookies irresistibly soft, fudgy, and full of chocolatey goodness!
Why This Recipe Works
- Perfect balance of flavors: The mix of brown sugar and cocoa powder creates a rich but tender cookie with that bittersweet deep chocolate taste we all crave.
- Soft and fudgy texture: Careful mixing and the right bake time keep these cookies soft in the center and just set without drying out.
- Fun Halloween flair: The orange coated candies add festive color and a sweet crunch, making these cookies truly seasonal.
- Simple and approachable: With common pantry ingredients and straightforward steps, these cookies are great for bakers of all levels.

Ingredients & Why They Work
This Dark Chocolate Halloween Cookies Recipe uses a few simple ingredients that come together beautifully to create depth of flavor and that perfect cookie texture. Shopping tip? Try to find good quality cocoa powder and chocolate chips since they make a big flavor difference here.
- Unsalted butter: At room temperature, butter contributes to the soft texture and rich flavor without making the dough greasy.
- Light brown sugar: Adds moisture and a touch of caramel-like sweetness which pairs perfectly with cocoa.
- Granulated sugar: Helps add a slight crispness on the edges, balancing out the softness.
- Egg: Binds everything together and adds structure without making cookies cakey.
- Vanilla extract: Enhances the chocolate notes and rounds out the flavor profile.
- All-purpose flour: The base that holds the cookies together, ensuring they have enough body without being tough.
- Cocoa powder: The star of the show—this brings that intense, dark chocolate flavor I know you want.
- Baking soda: Helps these cookies rise just enough so they stay tender but aren’t flat and hard.
- Salt: Balances the sweetness and sharpens the chocolate flavors.
- Chocolate chips: For melty pockets of chocolate that make each bite a little celebration.
- Orange colored chocolate coated candies: Adds festive color and a fun crunchy contrast, making these cookies perfect for Halloween.
Tweak to Your Taste
I love how versatile this Dark Chocolate Halloween Cookies Recipe is. You can easily mix up the chocolate types or candy toppings to suit your mood or dietary needs. Don’t be afraid to add your own personal flair — that’s part of the fun of baking!
- White chocolate chips instead of dark: I tried swapping in white chocolate for a sweeter contrast, and it gave the cookies a totally different vibe — still delicious, but more mellow.
- Use peanut butter chips: For a nutty twist, adding peanut butter chips pairs wonderfully with the dark cocoa flavor.
- Gluten-free flour blend: I’ve also tested this recipe with a gluten-free all-purpose flour and it worked great; just watch the texture as it might need a little extra moisture.
- Spice it up: Adding a teaspoon of cinnamon or a pinch of cayenne pepper brings a cozy warmth that really complements the chocolate.
Step-by-Step: How I Make Dark Chocolate Halloween Cookies Recipe
Step 1: Cream the Butter and Sugars
Start by preheating your oven to 350˚F and lining two large baking sheets with parchment paper — trust me, it saves cleanup anxiety later. In a stand mixer fitted with the paddle attachment, cream together the soft unsalted butter, light brown sugar, and granulated sugar on medium speed. This step takes about 4 minutes and is key because you want the mixture light and fluffy to help create tender cookies. If you don’t have a stand mixer, a sturdy hand mixer or even vigorous hand creaming with a wooden spoon will work — takes a bit longer but you’ll get there.
Step 2: Add the Egg and Vanilla
Once your butter and sugars are fluffy, scrape down the sides of the bowl with a spatula to ensure everything is well combined. Add your room temperature egg and vanilla extract, mixing again for about 30 seconds until smooth. Using room temperature eggs here helps the dough come together more easily — cold eggs can make mixing clumpy.
Step 3: Combine the Dry Ingredients
In a separate bowl, sift together the all-purpose flour, cocoa powder, baking soda, and salt. Sifting is a little step that’s well worth the effort — it breaks up lumps and makes sure everything is perfectly distributed, so your cookies bake evenly. Then, add these dry ingredients gently to the wet mixture and mix on low speed just until no flour streaks remain. Overmixing here can lead to tough cookies, so be gentle!
Step 4: Fold in the Chocolate Chips
Remove the dough from the mixer and fold in your chocolate chips with a rubber spatula. Folding by hand gives you more control so you don’t overwork the dough. These melty chips are the best part — little bursts of chocolate heaven in every bite.
Step 5: Scoop and Bake
Using a spring-loaded cookie scoop (1.5 tablespoons works perfectly), drop dough balls about 2 inches apart on your lined baking sheets. This spacing gives the cookies room to spread without merging into one giant cookie. Bake at 350˚F for 10-12 minutes until the edges look crinkly and the centers are just set — not too soft or shiny. This timing is a sweet spot for a fudgy soft center that still holds its shape.
Step 6: Add the Orange Candies
Remove the cookies from the oven and let them sit for about a minute to cool slightly but remain warm and soft. Then, working quickly but gently, press the orange chocolate coated candies into the tops of each cookie. This is my favorite part because the popping orange color screams Halloween and gives a festive crunch. Let the cookies sit on the pan for 2-3 minutes more so the candies stick well before transferring them to a wire rack to cool completely.
Pro Tips for Making Dark Chocolate Halloween Cookies Recipe
- Butter Temperature Matters: Always use room temperature butter to help your sugars cream up perfectly and give those soft cookie edges.
- Don’t Overbake: Pull the cookies out as soon as the edges look dry and crinkly; the centers will set as they cool and stay soft inside.
- Candy Adhesion Trick: If your orange candies don’t stick, melt a bit of chocolate and use it like glue to press the candies on—this saves so much frustration!
- Even Scoops for Even Baking: Using a cookie scoop helps you get uniform sizes so all cookies bake evenly and finish at the same time.
How to Serve Dark Chocolate Halloween Cookies Recipe
Garnishes
I like to keep it simple by letting the orange candies shine as the main garnish. Sometimes I sprinkle a few extra mini chocolate chips or dust a little powdered sugar for an extra Halloween-y ghostly effect that kids love.
Side Dishes
These cookies pair wonderfully with a cold glass of milk, a cup of rich hot chocolate, or even a spiced pumpkin latte. For parties, I like serving them alongside bowls of assorted nuts and fruit for a balanced snack table.
Creative Ways to Present
For Halloween gatherings, I’ve arranged these cookies on a black or orange platter surrounded by edible spiderwebs and plastic spiders — it’s a simple touch that makes the treats instantly festive and fun. Wrapping them in clear cellophane tied with orange ribbon also makes them perfect for party favors or classroom treats!
Make Ahead and Storage
Storing Leftovers
I usually store leftover cookies in an airtight container at room temperature. They stay fresh and soft for up to 4 days, but honestly, they rarely last that long in my house!
Freezing
You can freeze these cookies either before baking (shape dough balls and freeze on a tray, then transfer to a bag) or after baking and cooling. Just thaw at room temperature and they taste just as amazing. I’ve found freezing unbaked dough is great for quick batch baking whenever the mood strikes.
Reheating
To enjoy a fresh-baked feel, I pop leftover cookies in a microwave for 10-15 seconds or warm them briefly in a 300˚F oven for about 5 minutes. This softens the chocolate chips just right without drying out the cookies.
FAQs
-
Can I substitute the orange chocolate candies with something else?
Absolutely! You can use any candy coated chocolate pieces or even mini M&Ms for color. If you want to avoid candies, sprinkle some festive-colored sprinkles right after baking while the cookies are warm for a similar fun look.
-
What if I don’t have a stand mixer?
No worries! You can mix this recipe by hand using a sturdy wooden spoon or a hand mixer. Just make sure your butter is soft enough to cream easily with the sugars to get that fluffy base.
-
How do I know when the cookies are done baking?
Look for crinkly, slightly dry edges and centers that look set but still soft and slightly shiny. The cookies will firm up more as they cool, so it’s better to underbake slightly than to overbake.
-
Can I make these cookies vegan or dairy-free?
With some ingredient swaps—like using vegan butter and egg replacer, plus dairy-free chocolate chips—this recipe can be adapted. You might need to tweak the bake time slightly and watch the texture closely, but it’s definitely doable!
Final Thoughts
This Dark Chocolate Halloween Cookies Recipe has become one of my go-to festive treats because it combines simple ingredients with just the right chocolate hit and a splash of holiday color. It’s the kind of cookie that’s perfect for sharing (if you can resist eating them all yourself). Give it a try—you’ll be amazed how easily you can bring a little magic and decadence into your kitchen this Halloween!
Print
Dark Chocolate Halloween Cookies Recipe
- Prep Time: 15 minutes
- Cook Time: 12 minutes
- Total Time: 27 minutes
- Yield: 24 cookies
- Category: Dessert
- Method: Baking
- Cuisine: American
Description
Delight in these rich Dark Chocolate Halloween Cookies, perfect for a spooky celebration. These cookies combine a deep cocoa flavor with melty chocolate chips and festive orange chocolate candies, baked to a tender-crinkly perfection. Ideal for sharing at Halloween parties or enjoying as a sweet seasonal treat.
Ingredients
Cookie Dough
- 1 stick unsalted butter at room temperature
- ½ cup packed light brown sugar
- ¼ cup granulated sugar
- 1 egg at room temperature
- ½ teaspoon vanilla extract
- 1 cup all-purpose flour
- 3 tablespoons cocoa powder
- ½ teaspoon baking soda
- pinch salt
Add-ins and Toppings
- 1 cup chocolate chips
- ¼ cup orange colored chocolate coated candies
Instructions
- Preheat Oven: Preheat your oven to 350˚F and line two large baking sheets with parchment paper to prepare for baking.
- Cream Butter and Sugars: In the bowl of a stand mixer fitted with the paddle attachment, combine the butter, light brown sugar, and granulated sugar. Beat at medium speed for about 4 minutes until the mixture is light and fluffy.
- Add Egg and Vanilla: Scrape down the sides of the bowl. Add the egg and vanilla extract, then mix on medium speed for 30 seconds to incorporate fully.
- Combine Dry Ingredients: In a separate medium bowl, sift together the all-purpose flour, cocoa powder, baking soda, and salt to ensure even distribution.
- Mix Dry Ingredients into Wet: Gradually add the dry ingredients to the butter and sugar mixture. Mix at low speed just until no streaks of flour remain to avoid overmixing.
- Fold in Chocolate Chips: Remove the bowl from the mixer and fold in the chocolate chips using a rubber spatula until evenly distributed throughout the dough.
- Scoop Dough Balls: Using a 1.5 tablespoon-sized spring-loaded cookie scoop, place 12 dough balls on each prepared baking sheet, spacing them about 2 inches apart to allow for spreading.
- Bake Cookies: Bake in the preheated oven for 12 minutes or until the cookies have crinkly edges and are just set in the center.
- Add Candies: Let the cookies rest for about 1 minute, then quickly and carefully press the orange colored chocolate coated candies into the warm cookies.
- Cool the Cookies: Allow the cookies to sit on the baking sheet for 2-3 minutes after adding the candies, then transfer them to a wire cooling rack to cool completely.
Notes
- If orange candies do not stick well, melt a little chocolate and add drops to the top of each cookie. Gently press the candies into the melted chocolate and let dry for a secure hold.
- Room temperature ingredients such as butter and egg help in achieving the perfect cookie texture.
- Do not overmix the dough once flour is added to prevent tough cookies.
- Use parchment paper for easy removal and cleanup after baking.
- Store cookies in an airtight container to maintain freshness for up to 5 days.
Nutrition
- Serving Size: 1 cookie
- Calories: 140 kcal
- Sugar: 12 g
- Sodium: 90 mg
- Fat: 7 g
- Saturated Fat: 4 g
- Unsaturated Fat: 3 g
- Trans Fat: 0 g
- Carbohydrates: 18 g
- Fiber: 1 g
- Protein: 2 g
- Cholesterol: 25 mg


