Danish Butter Cookies Recipe
There’s something magically irresistible about buttery, crisp cookies that just melt on your tongue — and that’s exactly what my Danish Butter Cookies Recipe delivers every single time. Whether you’re after that perfect afternoon treat or a charming holiday gift, these cookies are so easy to make and absolutely delicious. Stick with me and I’ll spill all my secrets to getting these iconic cookies just right — I promise, once you try this recipe, it’ll become your go-to!
Why This Recipe Works
- Perfect Butter Texture: Using European salted butter at just the right temperature creates that melt-in-your-mouth richness.
- Balanced Flours: A mix of all-purpose and cake flour delivers the classic crispness without toughness.
- Chill Time Magic: Refrigerating the shaped cookies prevents spreading so the details hold beautifully after baking.
- Simple Ingredients, Big Flavor: With just a handful of pantry staples, you get an authentic, buttery flavor that rivals your favorite store-bought tins.

Ingredients & Why They Work
This Danish Butter Cookies Recipe is all about quality ingredients and the right balance. I love how the European salted butter provides a deeper flavor, and the combo of flours keeps the texture just right. Here’s a quick rundown of why I choose each ingredient and my favorite shopping tips.
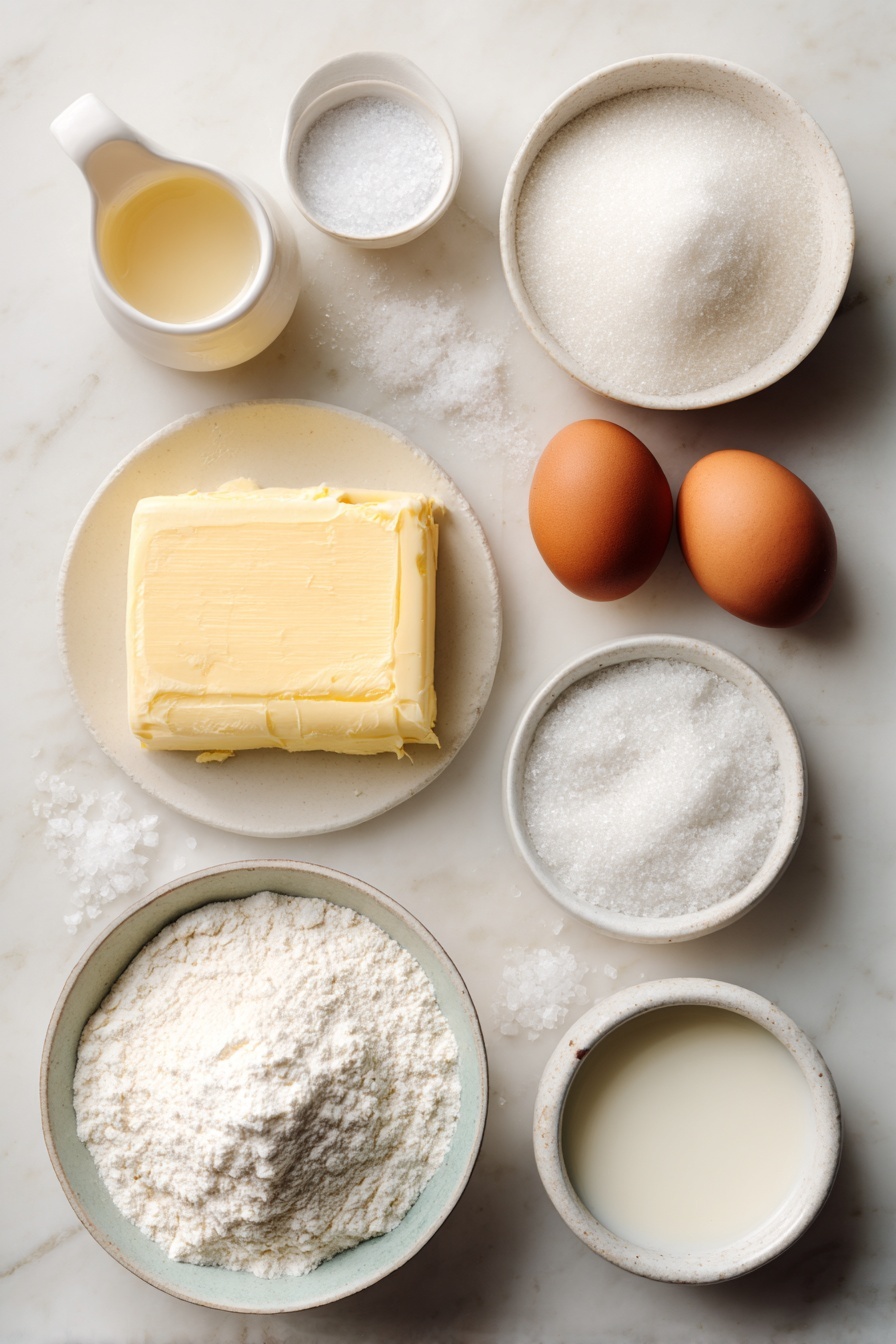
- European salted butter: This butter has a richer taste and a slightly higher fat content than regular butter, making the cookies extra luscious. If you only have unsalted butter, add a pinch more salt.
- Granulated sugar: Adds sweetness and a slight crunch; I always opt for fine granulated sugar to help the cookies smooth out nicely.
- Salt: Enhances all the flavors and balances the sweetness perfectly.
- Egg yolks: Bring richness and help bind the dough without making it tough.
- Vanilla extract: Adds warm flavor that complements the buttery base so well. Pure vanilla is best if you can swing it.
- Whole milk: Just enough to soften the dough for piping, which makes shaping the cookies effortless.
- All-purpose flour: Provides structure and body to the cookies.
- Cake flour: This is the secret ingredient for that tender and delicate crumb; it lightens the texture wonderfully.
- Coarse sugar: Optional but perfect for sprinkling on top for a little sparkle and extra crunch.
Tweak to Your Taste
I’m a big fan of customizing this Danish Butter Cookies Recipe depending on the occasion or mood. Sometimes I add a little almond extract for a twist, or swap in peppermint sugar for festive holidays. Feel free to play around — these cookies are a fantastic base ripe for creativity.
- Cinnamon Sugar Variation: Sprinkling a mixture of cinnamon and sugar on top before baking gives a cozy, warm kick — my family especially loves this in the winter.
- Gluten-Free Twist: Use a 1:1 gluten-free all-purpose flour blend and reduce cake flour accordingly — results are surprisingly good, just be mindful of the dough consistency.
- Chocolate Drizzle: Once cooled, drizzle melted dark or white chocolate over the cookies for a fancy touch that’s sure to impress guests.
Step-by-Step: How I Make Danish Butter Cookies Recipe
Step 1: Prep and Chill for Success
First off, make sure to clear some space in your fridge — you’ll need it! Line two baking sheets with parchment paper or silicone mats so the cookies won’t stick. Having the baking sheets ready is key because once you pipe the dough, it’s chilling time. Trust me, without that chill, your beautiful shapes will just spread into blobs in the oven.
Step 2: Cream the Butter and Sugar
Using room temperature European salted butter really makes the difference here. Pop it into a stand mixer fitted with a paddle attachment and beat it on medium until it’s silky smooth. Then slowly add your sugar and salt while mixing on low, gradually increasing speed until it’s light and fluffy — about 3-4 minutes. This step builds the cookie’s delicate structure.
Step 3: Add the Wet Ingredients
Next, toss in your egg yolks, vanilla extract, and milk while the mixer runs on medium. Keep mixing until everything’s well combined and silky. Don’t forget to scrape down the sides a couple times — uneven mixing is a common newbie mistake that can lead to dry spots or uneven dough.
Step 4: Incorporate the Flours Gently
In a separate bowl, whisk together your all-purpose and cake flour, then add it to the wet ingredients in two batches to avoid overworking the dough. Mix on low just until it comes together — no more! You want to keep it soft and tender. If the dough feels too stiff to pipe, gently mix in a little extra milk.
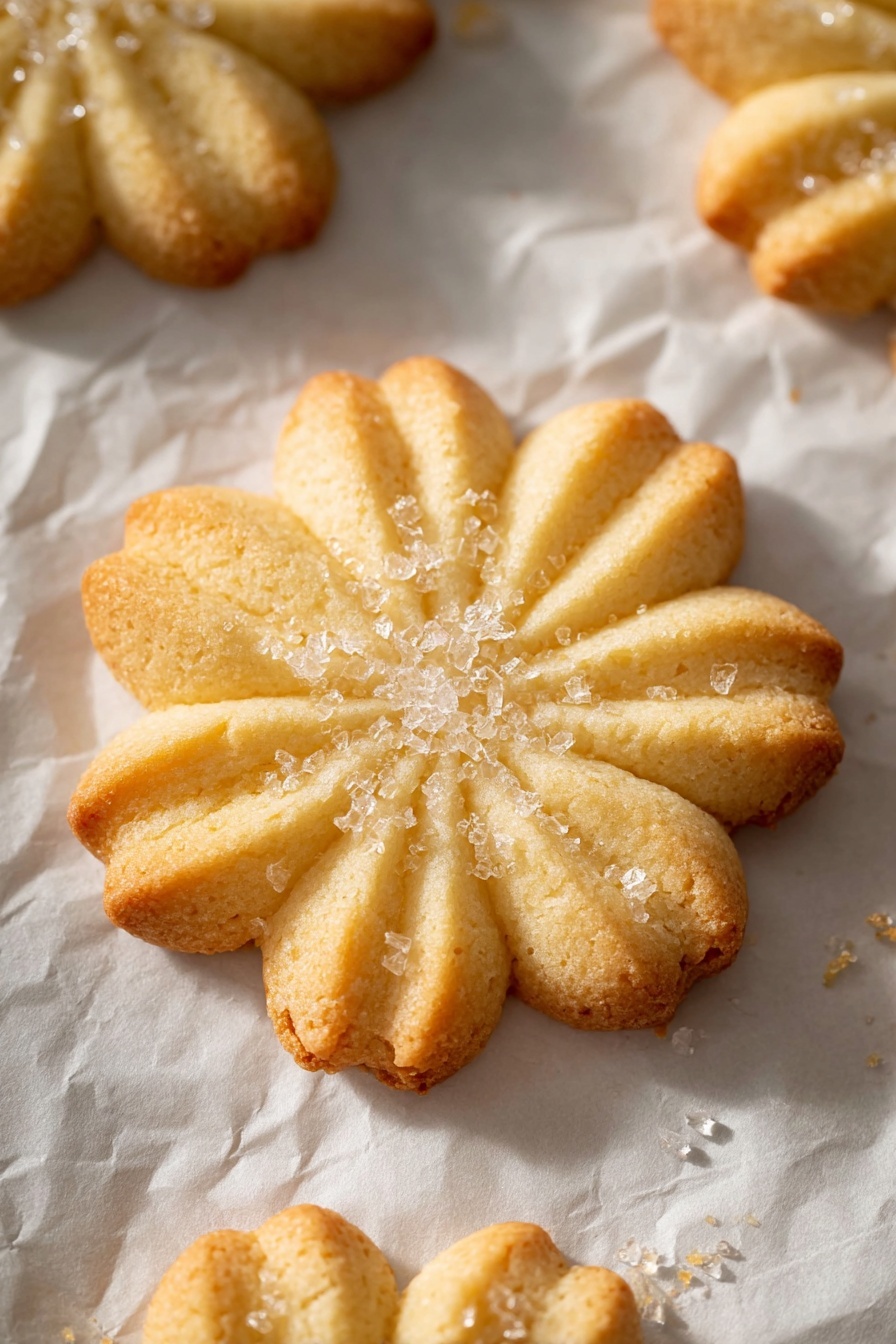
Step 5: Pipe, Decorate, and Chill
Fill a large piping bag fitted with a ½-inch open star tip with your cookie dough. You can pipe classic rosettes, pretzels, or even simple rounds — get creative! Place cookies about 2 inches apart on the prepared sheets, and if you want, lightly sprinkle with coarse sugar or sprinkles for that extra festive sparkle. Then refrigerate the pans for 20-30 minutes — don’t skip this step, it really helps hold the shape and prevents spreading.
Step 6: Bake to Golden Perfection
Preheat your oven to 350°F, placing the rack in the center position. Once chilled, bake your cookies for 10-15 minutes — keep a close eye as they can go from perfect to overdone quickly. You’re aiming for just lightly golden edges. Let the cookies cool for about 5 minutes on the baking sheet before transferring to a wire rack to cool fully. This chilling on the sheet helps them set and finish crisping up beautifully.
Pro Tips for Making Danish Butter Cookies Recipe
- Butter Temperature Matters: Let your butter sit out 45 minutes until soft but still cool to get that perfect creamy texture during creaming.
- Don’t Overskip Chill Time: Chilling the shaped cookies not only controls spreading but boosts flavor and texture. I never bake without this!
- Use a Piping Bag: Piping gives you those classic, pretty shapes — skip the spoon and give it a try, you’ll love the results.
- Watch the Oven Closely: Cookies can brown fast; I start checking at 10 minutes and remove when edges blush golden to keep them tender inside.
How to Serve Danish Butter Cookies Recipe
Garnishes
I love keeping it simple with just a sprinkle of coarse sugar on top before baking for a subtle sparkle. Around the holidays, I sometimes add colorful sugar crystals or roll half the dough in crushed pistachios before piping for an elegant touch.
Side Dishes
These cookies pair beautifully with a warm cup of tea or coffee — perfect for an afternoon fika break. For festive gatherings, I like serving them alongside mulled wine or hot cocoa with a cinnamon stick for an indulgent treat.
Creative Ways to Present
For special occasions, I arrange the cookies in pretty tins lined with parchment paper or on tiered trays with fresh berries and mint leaves for a charming spread. Gift-wise, wrapping them up in cello bags tied with ribbon never fails to impress friends and family.
Make Ahead and Storage
Storing Leftovers
I store these Danish Butter Cookies at room temperature in an airtight container — they stay fresh and crisp for up to 5 days. Just make sure the container seals well to keep humidity out, which can soften the cookies.
Freezing
If you want to prepare ahead, pipe your cookies and freeze them on baking sheets, then transfer to airtight containers or bags. They freeze beautifully for up to 3 months. When you’re ready, just pop frozen cookies straight into the oven without thawing, adding a couple extra minutes to baking time.
Reheating
If your cookies lose some crispness after storage, warming them in a low oven (about 300°F) for 3-5 minutes restores that fresh-baked crunch without drying them out. Just keep an eye so they don’t brown too much.
FAQs
-
Can I make Danish Butter Cookies without cake flour?
Absolutely! While cake flour lends a tender crumb, you can substitute the cake flour with an equal amount of all-purpose flour plus 1 tablespoon of cornstarch to mimic the light texture. Your cookies will still be deliciously crisp and buttery.
-
Why do I need to chill the cookie dough before baking?
Chilling the shaped dough firms it up, which prevents the cookies from spreading too much during baking. It also helps preserve the piped shapes and enhances the flavor and texture, giving you those iconic crisp edges and tender centers.
-
Can I use unsalted butter instead of salted butter?
Yes, you can! Just add an extra 1/4 teaspoon of kosher salt to the dough to compensate. The salt balances the sweetness and brings out the rich buttery flavor.
-
How should I store Danish Butter Cookies for freshness?
Keep your cookies in an airtight container at room temperature away from heat and humidity. They’ll stay fresh for up to 5 days this way. For longer storage, freeze them in airtight containers for up to 3 months.
Final Thoughts
Making this Danish Butter Cookies Recipe has been such a joyful kitchen ritual for me — it’s simple, satisfying, and creates those little moments of happiness with every crisp bite. Whether you’re baking for yourself, your family, or as gifts, I’m confident you’ll fall in love with these cookies just like I did. So grab your piping bag, preheat that oven, and let’s get baking — your new favorite cookie awaits!
Print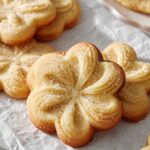
Danish Butter Cookies Recipe
- Prep Time: 15 minutes
- Cook Time: 15 minutes
- Total Time: 1 hour 30 minutes
- Yield: 24 cookies
- Category: Dessert
- Method: Baking
- Cuisine: Danish
Description
These Danish Butter Cookies are delightfully crisp and melt in your mouth. Made with a combination of European salted butter, granulated sugar, egg yolks, vanilla, and a blend of all-purpose and cake flours, they have a light, buttery texture perfect for any occasion. They are piped into charming shapes, chilled to prevent spreading, and baked until just golden at the edges.
Ingredients
Main Ingredients
- 1 cup (227 g) European salted butter room temperature
- ½ cup (100 g) granulated sugar
- ⅛ teaspoon salt
- 2 egg yolks
- 2 teaspoons (10 g) vanilla extract
- 1 tablespoon (15 g) whole milk or more to soften
- 2 cups (220 g) all-purpose flour
- ½ cup (50 g) cake flour
- coarse sugar for decorating
Instructions
- Prepare refrigeration and baking mats: Make space in your refrigerator for a baking sheet to chill the shaped cookies for 20-30 minutes to prevent over-spreading. Line two baking sheets with parchment paper or silicone baking mats and set aside.
- Cream butter, sugar, and salt: In a stand mixer fitted with a paddle attachment, cream the room temperature butter on medium speed until smooth. With the mixer on low, slowly add the granulated sugar and salt. Continue mixing on medium speed until the mixture is light and fluffy.
- Add egg yolks, vanilla, and milk: While mixing on medium speed, incorporate the egg yolks, vanilla extract, and milk. Mix until well combined, scraping down the sides of the bowl as needed to ensure thorough mixing.
- Combine dry ingredients and add to mixture: Whisk together the all-purpose flour and cake flour in a separate bowl. Add the flour mixture to the mixer in two additions, scraping down the sides of the bowl between additions. Mix on low speed until fully combined with no visible flour. If the dough is too thick to pipe, add another tablespoon of milk to soften.
- Pipe the cookies: Transfer the cookie dough into a large piping bag fitted with a ½-inch open star tip. Pipe 2-inch shapes such as rosettes, pretzels, circles, or squares on the prepared baking sheets. Space cookies at least 2 inches apart. Optionally, sprinkle the cookies with coarse sugar or festive sprinkles. Chill the shaped cookies in the refrigerator for 20-30 minutes.
- Preheat the oven: Preheat your oven to 350°F (175°C), placing the rack in the middle position.
- Bake the cookies: Bake for 15 minutes or until the edges are just lightly golden brown. Let the cookies cool on the baking sheet for about 5 minutes before transferring them to a wire rack to cool completely to room temperature.
Notes
- Use room temperature butter (around 67°F or 19°C) for easy mixing and smooth incorporation.
- Use room temperature eggs for even baking; warm cold eggs quickly by placing them in slightly warm water for 5 minutes.
- Do not overmix the dough to avoid tough cookies caused by gluten development.
- Closely watch the cookies during baking as times vary with cookie size and shape.
- You can substitute all-purpose flour for the cake flour by using 260 grams all-purpose flour instead for a slightly different texture.
- Measure flour accurately using a kitchen scale or spoon and level method to prevent adding too much flour.
- If using unsalted butter, add ¼ teaspoon kosher salt to the dough.
- Store cookies in an airtight container at room temperature for up to 5 days or freeze for up to 3 months.
- The shaped cookies can be chilled for up to 2 days before baking; cover with plastic wrap or foil if chilling beyond 30 minutes.
- The unbaked shaped dough can be frozen for 2-3 months and baked directly from frozen, adding a couple of extra minutes to baking time.
Nutrition
- Serving Size: 1 cookie
- Calories: 110 kcal
- Sugar: 6 g
- Sodium: 45 mg
- Fat: 7 g
- Saturated Fat: 4 g
- Unsaturated Fat: 3 g
- Trans Fat: 0 g
- Carbohydrates: 12 g
- Fiber: 0.3 g
- Protein: 1 g
- Cholesterol: 25 mg

