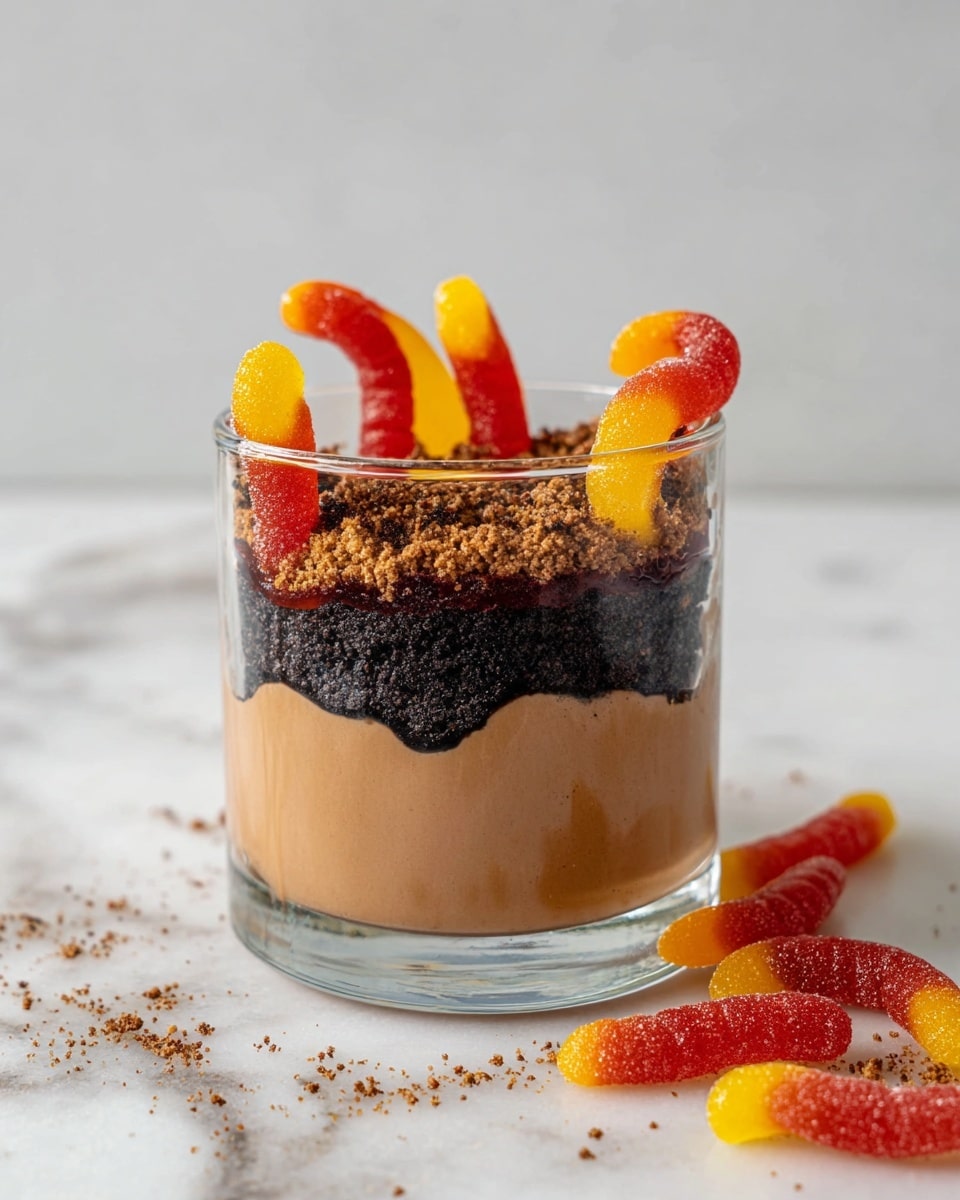
Dairy-Free Dirt Worm Pudding Recipe
Hey friend, if you’re on the hunt for a fun, nostalgic, and absolutely delightful dessert that’s completely free of dairy, you’ve got to try this Dairy-Free Dirt Worm Pudding Recipe. I first stumbled on it when looking for a kid-friendly treat to bring to a family gathering where a few guests couldn’t have dairy. Not only did it satisfy my sweet tooth, but the gummy worms sprinkled on top brought out smiles from everyone — seriously, it’s that good! Whether you’re making it for little ones, someone’s with allergies, or just craving a whimsical dessert, this recipe nails that rich, chocolatey goodness without any of the cream or milk you might expect.
Why This Recipe Works
- Rich Coconut Cream Base: Using full-fat coconut milk gives it that creamy, indulgent texture without dairy.
- Unflavored Gelatin for Perfect Set: It firms up the pudding beautifully while keeping the texture smooth and silky.
- Gummy Worms & Crushed Cookies for Fun: They add playful texture and that nostalgic dirt-and-worm vibe every kid (and kid at heart) loves.
- Simple Ingredients, Big Impact: No weird additives—just real cocoa, maple syrup, and vanilla to hit those classic flavor notes.

Ingredients & Why They Work
The beautiful thing about this Dairy-Free Dirt Worm Pudding Recipe is how straightforward and intentional each ingredient is. I stick to ingredients that give creamy texture, rich chocolate flavor, and that iconic “dirt” feel from the cookies, all while keeping it dairy-free and super approachable. Here’s a quick lowdown.
- Full-fat coconut milk: This is your creamy base. The fat content helps mimic the richness of traditional dairy pudding, and I always grab the kind in a can for thickness.
- Unsweetened cocoa powder: Adds deep chocolate flavor without extra sugar.
- Maple syrup: I love this natural sweetener for its subtle flavor and smooth sweetness.
- Unflavored gelatin: The secret weapon that sets your pudding without altering the taste.
- Vanilla extract: Elevates all the flavors and adds warmth.
- Gluten-free chocolate sandwich cookies: Crushing these creates the perfect “dirt” texture on top. Make sure they’re dairy-free if that matters to you!
- Gummy worms: The fun final touch! Pick your favorite brand, just double-check they’re gelatine-based and dairy-free if needed.
Tweak to Your Taste
One of the things I love about this Dairy-Free Dirt Worm Pudding Recipe is how easy it is to make your own tweaks. I’ve played around with sweetness levels, tried different toppings, and even swapped in fruit for a fresh twist. Feel free to adapt it so it feels just right for you and your crowd.
- Less Gelatin for Creaminess: I sometimes cut back the gelatin a bit when I want a super creamy, spoonable pudding rather than one that’s super firm.
- Alternative Sweeteners: If maple syrup isn’t your thing, honey or agave work beautifully too.
- Fruit Add-In: I’ve tossed in some chopped strawberries or raspberries underneath the gummy worms to add a surprising pop of freshness.
- Cookie Variations: Try using crushed Oreos if you’re not strictly gluten-free — just make sure they’re dairy-free!
Step-by-Step: How I Make Dairy-Free Dirt Worm Pudding Recipe
Step 1: Warm the Coconut Milk Gently
Start by pouring those two cans of full-fat coconut milk into a heavy-bottomed saucepan. Warm it over medium heat, stirring occasionally until it just begins to simmer. Avoid boiling—it’s all about getting warm enough to activate that gelatin. I’ve found this gentle heating helps everything blend smooth and thick later on. It only takes about 5 minutes, so don’t wander off!
Step 2: Blend All Ingredients Until Lusciously Smooth
Carefully pour the warm coconut milk into your blender. Add the cocoa powder, maple syrup, unflavored gelatin, and vanilla extract. Blend everything on medium-high for about 30-45 seconds until you have a silky, even mixture. This step is key because it ensures the gelatin dissolves completely, giving you a perfectly smooth pudding without lumps. Trust me, the blender makes all the difference here!
Step 3: Portion and Chill
Divide the pudding evenly into your jars or plastic cups—five 4-ounce servings works perfectly. Pop them into the fridge for at least 3 to 4 hours or until fully set. This hands-off time is perfect for getting other things done or prepping your garnish!
Step 4: Top with Crushed Cookies & Gummy Worms
Just before serving, sprinkle a generous layer of crushed chocolate sandwich cookies on top to create that classic dirt effect. Place as many gummy worms as you like — I like to tuck a few crawling out of the “dirt” for maximum fun. This little touch is always a hit, especially with kids (and really, who can resist?).
Pro Tips for Making Dairy-Free Dirt Worm Pudding Recipe
- Warm Coconut Milk, Not Boil: Heating gently activates gelatin without breaking down fats in the coconut milk, ensuring smooth pudding.
- Use a Blender: I can’t stress this enough—blending fully incorporates the gelatin and cocoa, making for a silky texture.
- Chill Long Enough: Resist the urge to eat it early! The chill time really lets it set so the pudding doesn’t fall apart.
- Double Check Your Cookies and Gummies: Some brands sneak in dairy, so read labels carefully if you’re strict about it.
How to Serve Dairy-Free Dirt Worm Pudding Recipe
Garnishes
I’m all about keeping it simple and playful here. Crushed gluten-free chocolate sandwich cookies are a must—they nail that dirt texture every time. Then, of course, gummy worms are non-negotiable in my book. When I want to jazz it up, I sometimes add tiny edible flowers or a sprinkle of toasted coconut flakes to contrast textures. Kids especially love digging into it with a spoon and discovering those worms hidden inside!
Side Dishes
This pudding is pretty rich and sweet, so I like pairing it with something light and fresh on the side. A crisp green salad or some fresh berries work well if it’s part of a larger meal. For casual parties, I sometimes just serve it alongside popcorn or simple nut mixes for a fun variety of textures.
Creative Ways to Present
For Halloween or kids’ birthday parties, I’ve served this Dairy-Free Dirt Worm Pudding Recipe in mini mason jars with layered crushed cookies in between pudding layers for extra “dirtiness.” Making little “worm caves” by using chocolate cups instead of jars is cute, too! A fun idea I love is serving it inside hollowed-out mini pumpkins or gourds for fall-themed treats.
Make Ahead and Storage
Storing Leftovers
Once your Dairy-Free Dirt Worm Pudding is set, you can cover the jars or cups tightly and store them in the fridge for 3 to 4 days. I keep the toppings separate when possible—adding fresh crushed cookies and gummy worms just before serving keeps everything crisp and the pudding fresh.
Freezing
I’ve tried freezing this pudding, but because of the gelatin and texture, it’s not my favorite. The consistency changes on thawing, becoming a little watery. I’d recommend enjoying it fresh and chilled rather than freezing for the best experience.
Reheating
This dessert is best enjoyed cold straight from the fridge, so I don’t reheat it. If you want a warmer chocolate treat, I’d suggest a different recipe that’s designed for warm serving. The Dairy-Free Dirt Worm Pudding shines chilled to highlight its creamy texture and playful garnishes.
FAQs
-
Can I use agar agar instead of gelatin in this Dairy-Free Dirt Worm Pudding Recipe?
Yes, you can! Agar agar is a great plant-based alternative, but it sets differently. You’ll want to dissolve agar in boiling liquid and may need to adjust the amount used. It tends to set firmer and faster, so watch the chilling and blending steps closely to maintain smoothness.
-
Is this recipe suitable for gluten-free diets?
Absolutely! Just make sure to use gluten-free chocolate sandwich cookies for the topping. The rest of the ingredients naturally don’t contain gluten, so as long as those cookies are safe, your dessert will be too.
-
Can I make this pudding less sweet?
Of course. You can reduce the maple syrup amount to suit your taste. Keep in mind the chocolate cookies and gummy worms add sweetness too, so taste your pudding base before chilling and adjust accordingly.
-
Can I prepare this pudding ahead of time for a party?
Yes! In fact, I recommend making it a few hours ahead or even the night before to give it plenty of time to set firmly in the fridge. Just add the crushed cookies and gummy worms right before serving for best texture and appearance.
-
What if I don’t have gummy worms? Any alternatives?
If gummy worms aren’t your thing, you can get creative with other candies or fresh fruit slices like kiwi or strawberries to mimic that “worm-in-dirt” vibe. Or keep it simple with just crushed cookies on top—you’ll still get that delicious chocolate pudding experience.
Final Thoughts
This Dairy-Free Dirt Worm Pudding Recipe holds a special place in my recipe box because it’s so joyful and approachable. It’s perfect for any occasion that calls for a comforting, cheerful dessert that everyone can enjoy—even those avoiding dairy. When I make it, I always get little squeals of delight from the kiddos (and adults, too!), and isn’t that what food is all about? I really hope you give it a go and find the same happiness. Grab your jars, your gummy worms, and let’s make some pudding magic happen!
Print
Dairy-Free Dirt Worm Pudding Recipe
- Prep Time: 5 minutes
- Cook Time: 5 minutes
- Total Time: 4 hours 10 minutes
- Yield: 5 servings
- Category: Dessert
- Method: No-Cook
- Cuisine: American
- Diet: Gluten Free
Description
A creamy and fun dairy-free dessert featuring rich coconut milk pudding layered with crushed chocolate cookies and gummy worms for a playful dirt-inspired treat.
Ingredients
Pudding Base
- 2 13.5-ounce cans full-fat coconut milk
- ¼ cup unsweetened cocoa powder
- ¼ cup maple syrup
- 4 teaspoons unflavored gelatin
- 2 teaspoons vanilla extract
Toppings
- 1 cup gluten-free chocolate sandwich cookies, crushed
- 1 cup gummy worms
Instructions
- Heat Coconut Milk: In a heavy-bottomed saucepan, warm the coconut milk over medium heat until it simmers, ensuring it doesn’t boil over.
- Blend Ingredients: Pour the warmed coconut milk into a blender and add the cocoa powder, maple syrup, gelatin, and vanilla extract. Blend until smooth and well combined.
- Chill Pudding: Transfer the blended mixture into five 4-ounce jars or disposable plastic cups. Refrigerate for 3 to 4 hours until the pudding is fully set.
- Add Toppings and Serve: Just before serving, sprinkle the crushed gluten-free chocolate cookies over the pudding and decorate with gummy worms to create the dirt worm effect. Serve immediately and enjoy.
Notes
- For a creamier texture, reduce the amount of gelatin used.
- Be careful not to boil the coconut milk to prevent separation.
- Use gluten-free cookies to keep the dessert gluten free.
- Gummy worms add a fun and playful touch, but can be omitted for a simpler dessert.
- This dessert should be kept refrigerated until served.
Nutrition
- Serving Size: 1 serving
- Calories: 280 kcal
- Sugar: 18 g
- Sodium: 40 mg
- Fat: 22 g
- Saturated Fat: 20 g
- Unsaturated Fat: 2 g
- Trans Fat: 0 g
- Carbohydrates: 18 g
- Fiber: 2 g
- Protein: 3 g
- Cholesterol: 0 mg
