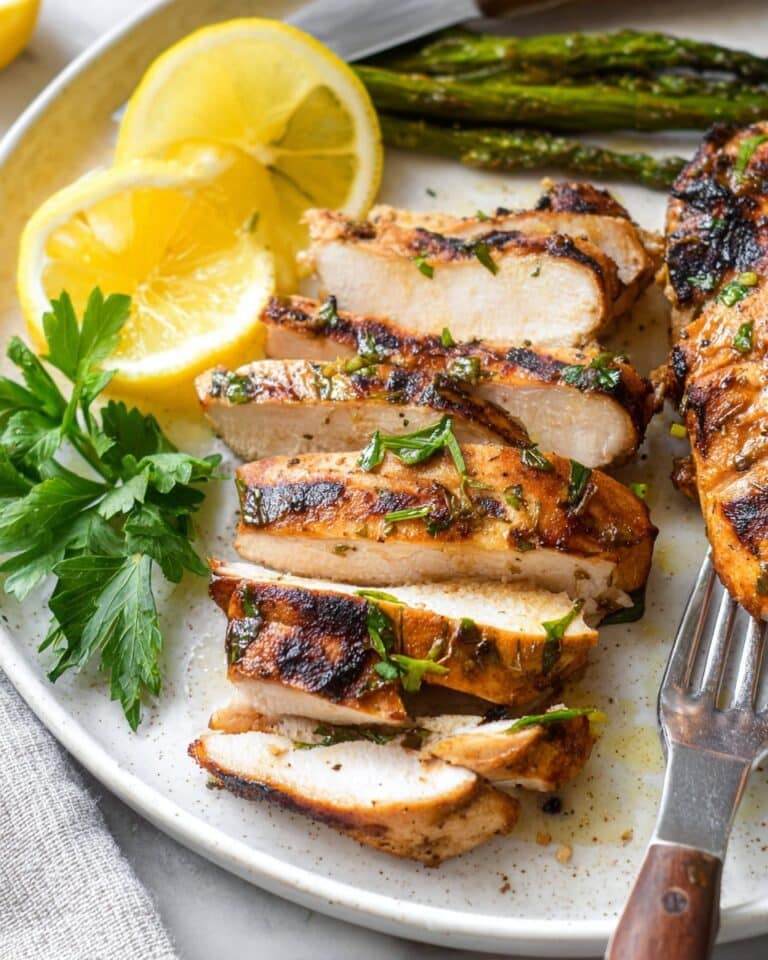
Crispy Panko Chicken Breasts Recipe
If you’re craving juicy, tender chicken with an irresistibly golden, crunchy crust, you’re going to want to stick around for this one. My Crispy Panko Chicken Breasts Recipe is a total game-changer—perfectly seasoned, extra crunchy on the outside, and juicy on the inside. Whether you’re cooking for family dinner or just need a simple, fuss-free meal that feels kinda fancy, this recipe has got you covered.
Why This Recipe Works
- Double Coating Delight: The combination of cornstarch and egg before the panko breadcrumb layer creates the crispiest crust you’ll find without frying in too much oil.
- Parmesan Adds Depth: Mixing parmesan into the panko brings a subtle, savory richness that takes the crust beyond basic breadcrumbs.
- Oven Finish for Juiciness: Searing on the stove first locks in crunch, then finishing in the oven ensures the chicken cooks evenly and stays juicy.
- Balanced Seasoning: Garlic powder, paprika, and onion powder add layers of flavor to the crust, so you don’t need a complicated marinade or extra sauces.

Ingredients & Why They Work
Everything in this Crispy Panko Chicken Breasts Recipe plays an important role—you’ve got that perfect balance of seasoning, coating, and cooking technique. Let me break down why each ingredient matters and a few tips for picking the best ones.

- Boneless skinless chicken breasts: Pound them to even thickness for consistent cooking and to avoid dryness.
- Cornstarch: Creates a light base layer that helps the egg and panko stick and promotes extra crispiness.
- Salt: Enhances the natural flavor of the chicken and the crust—don’t skip it!
- Garlic powder: Adds a savory punch without overpowering the chicken.
- Paprika: Brings warmth and a subtle smoky hint that pairs wonderfully with the parmesan.
- Onion powder: Boosts umami and layers flavor into every bite.
- Ground black pepper: A little kick that brightens the overall flavor.
- Large eggs: Acts as the glue between the cornstarch and breadcrumb layers.
- Panko breadcrumbs: The star of the show—light, airy, and extra crunchy compared to regular breadcrumbs.
- Finely grated parmesan cheese: Adds savory depth, melts into the crispy coating for extra deliciousness.
- Vegetable oil: Perfect for pan-frying since it has a high smoke point and neutral flavor.
Tweak to Your Taste
I always encourage you to make this Crispy Panko Chicken Breasts Recipe your own. Sometimes I swap up the spices or add herbs depending on what I have on hand or what mood I’m in. It’s super easy to customize and still get that unbeatable crispy crust.
- Variation: Adding cayenne pepper or chili powder for a little kick has been a personal favorite—I love a bit of heat but keep it manageable for the family.
- Herbs: Toss in some dried oregano or thyme with the breadcrumbs to bring a fresh, aromatic touch to the crust.
- Cheese swap: If you don’t have parmesan, a good aged asiago or pecorino romano works great for a different but still savory bite.
- Gluten-free: I’ve used gluten-free panko breadcrumbs and cornstarch instead of flour, and it still crisps up wonderfully.
Step-by-Step: How I Make Crispy Panko Chicken Breasts Recipe
Step 1: Pound Your Chicken to Perfection
This step is a game changer. I take my boneless, skinless chicken breasts and pound them gently between two sheets of plastic wrap or inside a zip-top bag until they’re about ½-inch thick. This not only makes the breasts cook evenly but also ensures they stay juicy without drying out. Don’t rush this step—it helps every time!
Step 2: Prep Your Delicious Coatings
In one shallow bowl, I mix the cornstarch with salt, garlic powder, paprika, onion powder, and black pepper to create a flavorful, slightly spicy base coat. In another bowl, I beat the eggs until smooth. In a third, I combine panko breadcrumbs and finely grated parmesan cheese. This triple combo is everything here — trust me, don’t skip the parmesan in the panko!
Step 3: The Dredge Dip and Coat Dance
Now for the fun part! I dredge each chicken breast first in the cornstarch mixture, shaking off excess. Then I dip it into the beaten eggs to let the breadcrumbs stick, followed by a generous coating of the parmesan-panko mixture. Press the breadcrumbs firmly onto the chicken to make sure they adhere well. It might take a minute, but it’s worth it for that crunch!
Step 4: Searing for Goldenness
I heat vegetable oil in a large skillet over medium-high heat until shimmering. Then I carefully add the chicken, working in batches if needed. Sear each piece for 2 to 3 minutes per side until the crust is golden and crispy. Don’t fuss too much—just let it develop that lovely crust before flipping.
Step 5: Oven Finish for Juicy Chicken
After searing, I transfer the chicken breasts to a baking sheet and pop them in a 375°F oven for about 10 to 12 minutes. This step lets the chicken cook all the way through without overcooking the crust. I always use a meat thermometer to check for 165°F internal temp; it’s the best way to nail perfect juiciness every time.
Step 6: Rest, Then Serve
Once out of the oven, I let the chicken rest for a few minutes. This helps the juices redistribute, making every bite tender and flavorful. Then you’re ready to dig in and enjoy the crunchy magic you just made!
Pro Tips for Making Crispy Panko Chicken Breasts Recipe
- Pound Evenly: Make sure all chicken breasts are the same thickness; uneven pieces lead to some drying out while others are undercooked.
- Press Your Panko: When coating the chicken, press the panko mixture firmly onto the surface to avoid it flaking off during frying or baking.
- Oil Temperature Is Key: Heat the oil until hot but not smoking—this helps the crust crisp immediately without absorbing too much oil.
- Don’t Crowd the Pan: Fry in batches if necessary; crowding cools the oil and results in soggy coating instead of crisp.
How to Serve Crispy Panko Chicken Breasts Recipe

Garnishes
I love sprinkling fresh chopped parsley or a little lemon zest right on top before serving—it brightens up the savory flavors and adds a fresh pop. A squeeze of fresh lemon juice is my go-to finishing touch; it cuts through the richness and makes every bite sing.
Side Dishes
This crispy chicken pairs beautifully with a light, refreshing side salad or roasted vegetables like asparagus or brussels sprouts. For something heartier, garlic mashed potatoes or creamy coleslaw make excellent complements. And of course, steamed rice or buttery noodles work without overpowering the chicken.
Creative Ways to Present
For a special dinner, I’ve sliced the chicken into strips and served it on a platter with dips like honey mustard or a garlicky aioli—instantly turns it into a fun shareable meal. You can also layer it on sandwiches with crisp lettuce and tomato for a deluxe chicken sandwich that’s crispy all the way through.
Make Ahead and Storage
Storing Leftovers
I usually store leftovers in an airtight container in the fridge, separating pieces with parchment paper so the crust doesn’t get soggy. They last well for about 3 days, and it’s just as tasty warmed up.
Freezing
When I make extra, I flash-freeze the coated chicken before frying, laying them out on a tray so they don’t stick together. Once frozen, I pop them into a resealable freezer bag. Later, you can bake or fry straight from frozen for a quick meal.
Reheating
To keep that crunchy coating on leftovers, I reheat in a hot oven or toaster oven at 375°F for about 10 minutes instead of the microwave. It revives the crisp and keeps the chicken juicy without turning the crust gummy.
FAQs
-
Can I use chicken thighs instead of chicken breasts for this recipe?
Absolutely! Boneless skinless chicken thighs work great and tend to be a bit juicier and more forgiving if overcooked. Just adjust cooking time slightly—thighs may need a few minutes longer in the oven to reach 165°F.
-
Is it necessary to bake the chicken after frying?
Baking after searing is key to making sure the chicken is cooked all the way through without burning the crust. It also helps keep the inside juicy while maintaining the crisp outside.
-
How do I keep the panko coating from falling off?
Be sure to press the panko mixture firmly onto the chicken during coating, and make sure each layer (cornstarch, egg, panko) adheres well. Also, don’t move the chicken around too much when frying—let it form a crust first.
-
Can I make this recipe gluten-free?
Yes! Just swap the panko breadcrumbs with a gluten-free alternative and use cornstarch for dredging. You’ll still get a wonderfully crispy crust without gluten.
Final Thoughts
This Crispy Panko Chicken Breasts Recipe is one of those dishes I keep coming back to because it’s simple enough for a weeknight but looks and tastes like you spent hours in the kitchen. That crispy, cheesy crust paired with tender, juicy chicken always feels like a hug on a plate. I hope you enjoy making it as much as I do—don’t forget to experiment a bit and make it your own. Trust me, your taste buds will thank you!
Print
Crispy Panko Chicken Breasts Recipe
- Prep Time: 10 minutes
- Cook Time: 20 minutes
- Total Time: 30 minutes
- Yield: 4 servings
- Category: Main Course
- Method: Frying
- Cuisine: American
Description
This Fried Panko Chicken recipe features tender boneless, skinless chicken breasts coated in a flavorful seasoned cornstarch mix, dipped in egg, then coated with a crispy panko and parmesan breadcrumb crust. The chicken is first seared to golden perfection in vegetable oil and finished in the oven for a juicy, crispy main dish perfect for dinner.
Ingredients
Chicken and Coating
- 4 boneless skinless chicken breasts (6-8 oz each)
- ½ cup cornstarch
- 1 teaspoon salt
- 1 teaspoon garlic powder
- 1 teaspoon paprika
- 1 teaspoon onion powder
- ½ teaspoon ground black pepper
- 2 large eggs, beaten
- 1 cup panko breadcrumbs
- ¼ cup finely grated parmesan cheese
For Frying
- ¼ cup vegetable oil
Instructions
- Preheat Oven: Preheat your oven to 375°F to prepare for finishing the chicken after searing.
- Pound Chicken: Pound the 4 boneless skinless chicken breasts to an even thickness of about ½-inch thick each to ensure they cook evenly.
- Mix Dry Coating: In a shallow dish, combine ½ cup cornstarch, 1 teaspoon salt, 1 teaspoon garlic powder, 1 teaspoon paprika, 1 teaspoon onion powder, and ½ teaspoon ground black pepper.
- Beat Eggs: In a separate shallow dish, beat the 2 large eggs until smooth.
- Prepare Breadcrumb Mixture: In a third shallow dish, mix 1 cup panko breadcrumbs with ¼ cup finely grated parmesan cheese.
- Coat Chicken: Dredge each chicken breast in the cornstarch mixture, shaking off any excess. Then dip into the beaten eggs, followed by coating thoroughly in the panko and parmesan mixture, pressing gently to adhere.
- Sear Chicken: Heat ¼ cup vegetable oil in a large skillet over medium-high heat. Add chicken breasts (in batches if necessary) and sear for 2 to 3 minutes on each side until golden brown and crispy.
- Bake Chicken: Transfer the seared chicken breasts onto a baking sheet and bake in the preheated oven for 10 to 12 minutes or until the internal temperature reaches 165°F.
- Rest and Serve: Remove from the oven and let the chicken rest for a few minutes before serving to allow juices to redistribute.
Notes
- To ensure even cooking, pound the chicken breasts to an even thickness.
- If desired, substitute vegetable oil with canola or peanut oil for frying.
- For extra crispiness, allow the coated chicken to rest in the refrigerator for 15 minutes before frying.
- Use a meat thermometer to confirm the internal temperature reaches a safe 165°F for chicken.
- Panko breadcrumbs can be substituted with regular breadcrumbs but will yield a less crispy texture.
Nutrition
- Serving Size: 1 chicken breast (approx. 6-8 oz)
- Calories: 450 kcal
- Sugar: 1 g
- Sodium: 700 mg
- Fat: 25 g
- Saturated Fat: 6 g
- Unsaturated Fat: 17 g
- Trans Fat: 0 g
- Carbohydrates: 20 g
- Fiber: 1 g
- Protein: 38 g
- Cholesterol: 130 mg

