Christmas Tree Sheet Cake with White Chocolate Buttercream Recipe
If you’re on the hunt for a festive, crowd-pleasing dessert that brings both nostalgia and a beautiful presentation to your holiday table, you’ve got to try this Christmas Tree Sheet Cake with White Chocolate Buttercream Recipe. Trust me, it’s a fan-freaking-tastic blend of fluffy yellow cake, luscious whipped cream filling, and the creamiest white chocolate buttercream you can imagine—all dressed up like a sparkling Christmas tree. I’ve baked this gem for family gatherings, and it never fails to get a chorus of “ooooohs” and “aaaaahs.” So grab your apron and let’s dive into making a showstopping holiday treat you’ll love as much as I do!
Why This Recipe Works
- Easy Layering: Using a cake leveler to slice and layer ensures a smooth, professional look without the stress.
- Creamy White Chocolate Buttercream: The ganache-infused buttercream is silky, rich, and perfectly balanced with just a touch of salt.
- Whipped Cream Filling: Light and fluffy, the filling adds moisture without overwhelming sweetness.
- Festive Decor: Simple sprinkles and sanding sugar create a dazzling look that’s easier than it appears.

Ingredients & Why They Work
This Christmas Tree Sheet Cake with White Chocolate Buttercream Recipe brings together tried-and-true cake basics combined with decadent details. Each ingredient plays its part to balance moisture, texture, and flavor—making sure your Christmas dessert isn’t just pretty but incredibly delicious and crowd-friendly. I always recommend room temperature dairy and eggs for smooth batter, and high-quality white chocolate for that luxurious buttercream.
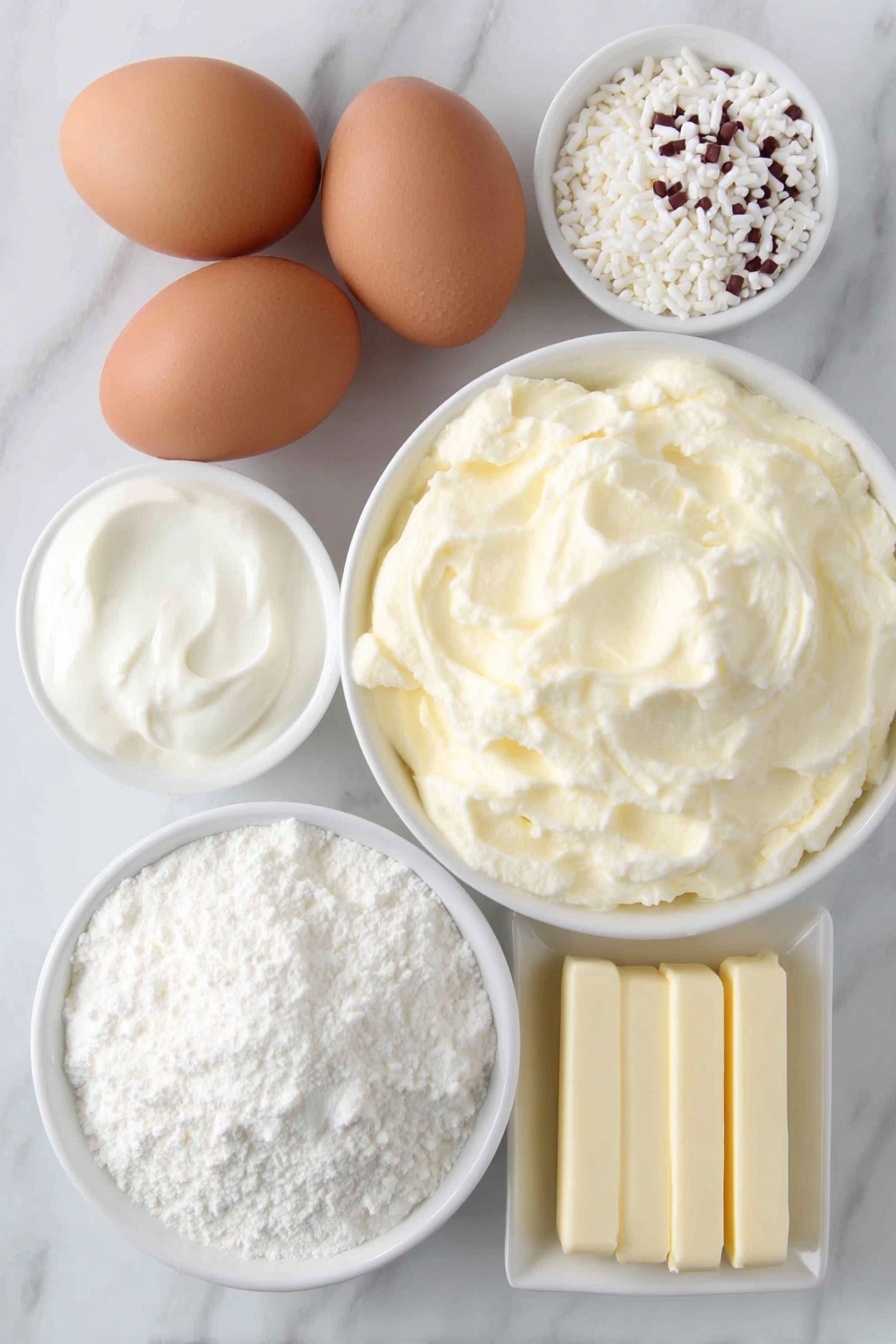
- Buttermilk: Adds tang and tenderness, making the cake moist and tender.
- Sour Cream: Boosts richness, enhancing the cake’s soft crumb.
- Whole Eggs: Act as natural binders, plus bring richness and color.
- Vegetable Oil: Keeps the cake incredibly moist without weighing it down.
- Vanilla Extract: Balances and deepens all the sweet flavors.
- Duncan Hines Yellow Cake Mix: A convenient base that’s reliable and delicious.
- Heavy Whipping Cream: For dreamy whipped cream filling and buttery ganache in the frosting.
- Powdered Sugar: Sweetens without grit, perfect for smooth whipped cream and buttercream.
- White Chocolate Chips: Melted into cream for a silky, sweet, and flavorful frosting twist.
- Unsalted Butter: The main body of the buttercream, softened to blend easily and whip light.
- Salt Pinch: Enhances sweetness and rounds out flavor.
- Red Gel Coloring & Green Sanding Sugar: Classic Christmas colors bring festive cheer to frosting and decorations.
- Holiday Sprinkles: Adds playful texture and boosts visual appeal without extra fuss.
Tweak to Your Taste
I love to keep this Christmas Tree Sheet Cake with White Chocolate Buttercream Recipe quite traditional, but you can absolutely make it your own! Whether you want to dial up the almond flavor or tweak the frosting’s sweetness, there’s room to play here. The key? Have fun and tailor it to your holiday vibes.
- Add a Flavor Twist: I once swapped the almond extract for orange zest in the whipped cream filling—worked beautifully for a fresh citrusy note.
- Go Nut-Free: Just skip the almond extract to keep it safe for nut allergies without losing flavor.
- Color Customization: Use different gel food colorings in the buttercream to match your party’s theme or add a metallic shimmer for extra sparkle.
- Make It Vegan: I haven’t tried this yet, but swapping butter for vegan alternatives and using coconut cream instead of heavy cream might work well with some tweaks.
Step-by-Step: How I Make Christmas Tree Sheet Cake with White Chocolate Buttercream Recipe
Step 1: Whisk the Wet Ingredients & Mix the Cake Batter
Start by preheating your oven to 325°F and prepping your 9×13 pan with your favorite non-stick method—I usually use a combo of shortening and flour. In a large bowl, whisk together the room temperature buttermilk, sour cream, eggs, vegetable oil, and vanilla until smooth. Then, sift the yellow cake mix in to avoid lumps and fold gently until just combined. The batter will be creamy and smooth—don’t overmix to keep it light.
Step 2: Bake and Cool the Cake Layers
Pour the batter evenly into your prepared pan and bake for about 22-25 minutes, or until a toothpick inserted in the center comes out clean. Cooling completely is key here—rushing this step can make cutting and layering tricky. Once cooled, carefully flip the cake out onto parchment paper to prepare for slicing.
Step 3: Slice the Cake Horizontally
Using a cake leveler or serrated knife, slice the cake horizontally into two even layers. This step makes the cake feel extra special with that surprise whipped cream filling inside. For safety and ease, slide a thin cutting board under the top layer to lift and transfer it gently back into the pan.
Step 4: Whip the Cream for Filling
Pop a metal mixing bowl and whisk attachment in the freezer for about 5 minutes—cold tools are a whip’s best friend! Pour the heavy whipping cream into the chilled bowl and beat gradually—start on low, then medium, and finally high speed to get stiff peaks. Add vanilla, almond extract if you like, and powdered sugar, then whip a bit more for a sweet, fluffy whipped cream. Spread this generously onto the bottom cake layer right in the pan.
Step 5: Assemble the Cake Layers
Carefully place the top cake layer back over the whipped cream filling. The chilled whipped cream helps keep the layers stable, so be gentle as you add the top. Now your cake is ready for the grand frosting!
Step 6: Make the White Chocolate Buttercream
Heat the heavy cream and white chocolate chips in brief bursts in the microwave (start with 30 seconds), stirring until silky smooth. This is your ganache base for the buttercream. In a stand mixer, whip softened unsalted butter with salt and vanilla until light and fluffy, then slowly incorporate the white chocolate ganache. Gradually add powdered sugar, whipping on high until the buttercream becomes lighter in color and texture—usually about 2 minutes. If it’s too thick, a splash of heavy cream can help loosen it up.
Step 7: Frost and Decorate Your Cake
Smooth most of the white chocolate buttercream over your cake using a flat cake scraper. Reserve about 2 ½ to 3 cups of the buttercream for decoration. Add red gel coloring drops to the reserved buttercream and pipe a charming red wavy line over the cake with a small circle tip. Then, with a large star tip, pipe a red shell border around the edges. Sprinkle green sanding sugar in the center to mimic a tree’s lush boughs, then add Christmas tree sprinkles or other fun holiday decorations around the borders. Voilà—your cake is ready to wow!
Pro Tips for Making Christmas Tree Sheet Cake with White Chocolate Buttercream Recipe
- Room Temperature Ingredients: Always bring your eggs, buttermilk, sour cream, and butter to room temp beforehand for the smoothest batter and frosting.
- Chill Tools for Whipping: A cold mixing bowl and whisk help the heavy cream whip up faster and hold stiff peaks better—don’t skip this step!
- Gentle Folding: When mixing the cake batter, fold gently after adding the mix to keep the cake airy instead of dense.
- Lift Cake Layers Carefully: Using a thin cutting board or spatula under the sliced cake layer keeps it intact, preventing crumbling or breaking.
How to Serve Christmas Tree Sheet Cake with White Chocolate Buttercream Recipe

Garnishes
I always stick to the classic green sanding sugar and holiday-themed sprinkles because they give the cake a festive sparkle that feels like the perfect winter party vibe. If you want to get creative, try edible gold leaf or tiny white chocolate snowflakes for an elegant twist.
Side Dishes
This cake is the star, but I love pairing it with a light peppermint hot chocolate or a cup of brewed coffee to balance all the sweetness. Fresh fruit like sliced pears or clementines also adds a refreshing contrast during dessert time.
Creative Ways to Present
For a festive presentation, I sometimes serve the cake on an elegant wooden board decorated with sprigs of fresh pine or holly (just be sure those greens don’t touch the frosting!). You could also cut the sheet cake into smaller tree-shaped pieces for individual servings, perfect for parties and easier portion control.
Make Ahead and Storage
Storing Leftovers
After serving, I cover any leftovers tightly with plastic wrap and store the cake in the refrigerator. Because of the whipped cream filling and white chocolate buttercream, refrigeration keeps the texture fresh and the frosting stable. It’ll stay moist and delicious for 3-4 days.
Freezing
Freezing the whole cake can be tricky due to the delicate whipped cream filling, but individual cake slices freeze quite well. I wrap slices in plastic wrap and foil, then freeze for up to 2 months. Thaw overnight in the fridge before serving for best results.
Reheating
This cake is best enjoyed cold or at room temperature, so I recommend letting refrigerated leftovers sit out for about 20 minutes before slicing to soften the buttercream and whipped cream layers. Avoid heating in the microwave, as that melts the frosting and changes the texture.
FAQs
-
Can I use homemade yellow cake instead of cake mix for this Christmas Tree Sheet Cake with White Chocolate Buttercream Recipe?
Absolutely! If you have a favorite yellow cake recipe, feel free to substitute it. Just make sure it yields about the same volume as the cake mix combined with the wet ingredients here so your layers bake evenly and fit nicely in a 9×13 pan.
-
What if I don’t have a cake leveler to slice the layers?
No worries! A long serrated knife works too—place your hand flat on the knife blade and carefully saw horizontally through the cake, taking your time for an even cut. Using a ruler or toothpicks as guides can help keep the layer straight.
-
Can I make the white chocolate buttercream ahead of time?
Yes, you can! Store it tightly in an airtight container in the fridge for up to 3 days. Before frosting, bring it back to room temperature and whip it again to restore the fluffy texture.
-
What if I don’t want to use almond extract in the whipped cream filling?
Simply leave it out or replace it with more vanilla extract. The whipped cream filling will still be delightful and creamy without it.
Final Thoughts
This Christmas Tree Sheet Cake with White Chocolate Buttercream Recipe is one of those holiday desserts that I keep coming back to year after year. Not only does it capture the festive spirit with its beautiful presentation, but it also fills your home with the warm scent of vanilla and chocolate as it bakes. Best of all, you don’t have to be a baking pro to make it shine. I can honestly say once you try this recipe, it’ll be a sweet tradition you reach for when you want a crowd-pleaser that’s as stunning as it is delicious. So go ahead—make it, share it, and enjoy every festive bite with your loved ones!
Print
Christmas Tree Sheet Cake with White Chocolate Buttercream Recipe
- Prep Time: 30 minutes
- Cook Time: 25 minutes
- Total Time: 1 hour 15 minutes
- Yield: 12 servings
- Category: Dessert
- Method: Baking
- Cuisine: American
Description
This Little Debbie Christmas Tree Sheet Cake is a festive, multi-layered dessert featuring a moist yellow cake, fluffy whipped cream filling, and rich white chocolate buttercream frosting. Decorated with a red buttercream border and holiday sprinkles, it’s perfect for celebrating the Christmas season.
Ingredients
Classic Yellow Cake
- 3/4 cup buttermilk, room temperature
- 2/3 cup sour cream, room temperature
- 3 whole eggs, room temperature
- 1/3 cup vegetable oil
- 1 Tablespoon vanilla
- 1 15.25 oz box Yellow Duncan Hines Cake Mix
Whipped Cream Filling
- 4 cups heavy whipping cream
- 1 teaspoon vanilla
- 1/2 teaspoon almond extract (optional)
- 2 cups powdered sugar
White Chocolate Buttercream
- 1/2 cup white chocolate chips
- 1/2 cup heavy cream
- 3 sticks (1 1/2 cup) unsalted butter, room temperature
- Pinch of salt
- 1 Tablespoon vanilla
- 8-9 cups powdered sugar
- 1/4 cup heavy cream (if needed to thin)
Red Buttercream Border & Decorating Elements
- 1/2 cup green sanding sugar
- 1 cup Wilton Christmas Tree Sprinkles or other holiday sprinkles
- 2-3 drops red gel coloring
Instructions
- Prepare the Yellow Cake: Preheat the oven to 325 degrees Fahrenheit. Prepare a 9×13-inch cake pan by greasing it with baking spray, cake goop, or shortening and flour. Set aside. In a large bowl, hand-whisk together buttermilk, sour cream, eggs, vegetable oil, and vanilla. Sift in the yellow cake mix and gently stir until combined. Pour batter into the prepared pan and bake for 25 minutes. Let the cake cool completely.
- Slice the Cake: Once cooled, flip the cake onto a countertop lined with parchment paper. Using a cake leveler or serrated knife, carefully slice the cake horizontally in half. Slide a thin cutting board under the top layer and lift it off. Place the bottom layer back into the 9×13 pan.
- Make the Whipped Cream Filling: Chill a metal bowl and whisk attachment in the freezer for 5 minutes. Pour heavy whipping cream into the chilled bowl and whip using a stand mixer starting on low speed, gradually increasing to high over 2-3 minutes: 1 minute on low, 1 minute on medium, and 1 minute on high until stiff peaks form. Add vanilla, almond extract (if using), and powdered sugar, then whip again until combined. Spread this filling evenly over the bottom cake layer.
- Assemble Cake Layers: Carefully place the top cake layer over the whipped cream filling to form the cake sandwich.
- Prepare White Chocolate Buttercream: In a small microwave-safe bowl, heat heavy cream and white chocolate chips for 30 seconds, stirring until smooth. Add additional 10-second intervals and stirring if chocolate isn’t fully melted. In a stand mixer fitted with a paddle attachment, whip the softened butter until light and fluffy. Add salt, vanilla, and the cooled white chocolate ganache; beat to combine. Gradually add powdered sugar, mixing well. Add 1/4 cup heavy cream if needed to thin the consistency. Mix on high speed for about 2 minutes until the buttercream lightens in color and texture. Use a wooden spoon to gently beat down air bubbles.
- Frost the Cake: Spread the white chocolate buttercream evenly over the entire cake using a flat cake scraper, reserving about 2 1/2 to 3 cups of buttercream for decorating.
- Decorate with Red Buttercream and Sprinkles: Add 2-3 drops of red gel coloring to the reserved buttercream and mix well. Using a piping bag fitted with a small circle tip, pipe a red wavy pattern on the cake and on the Christmas tree shapes. Then, using a large star piping tip, pipe a shell border around the edges of the cake with the red buttercream. Sprinkle green sanding sugar over the center of the cake and arrange festive Christmas tree sprinkles along the border. The cake is ready to serve and enjoy!
Notes
- Room temperature ingredients (eggs, buttermilk, sour cream) help create a smooth batter and even baking.
- Chilling the bowl and whisk for the whipped cream filling ensures better volume and stiffness.
- If you don’t have a cake leveler, use a serrated knife carefully to slice the cake in half horizontally.
- The white chocolate buttercream can be thinned slightly with heavy cream if too thick for spreading or piping.
- Use gel food coloring for vibrant red color without thinning the buttercream too much.
- Decorate with any holiday-themed sprinkles if Christmas tree shapes are unavailable.
Nutrition
- Serving Size: 1 slice
- Calories: 450 kcal
- Sugar: 40 g
- Sodium: 180 mg
- Fat: 25 g
- Saturated Fat: 15 g
- Unsaturated Fat: 8 g
- Trans Fat: 0 g
- Carbohydrates: 50 g
- Fiber: 1 g
- Protein: 4 g
- Cholesterol: 100 mg


