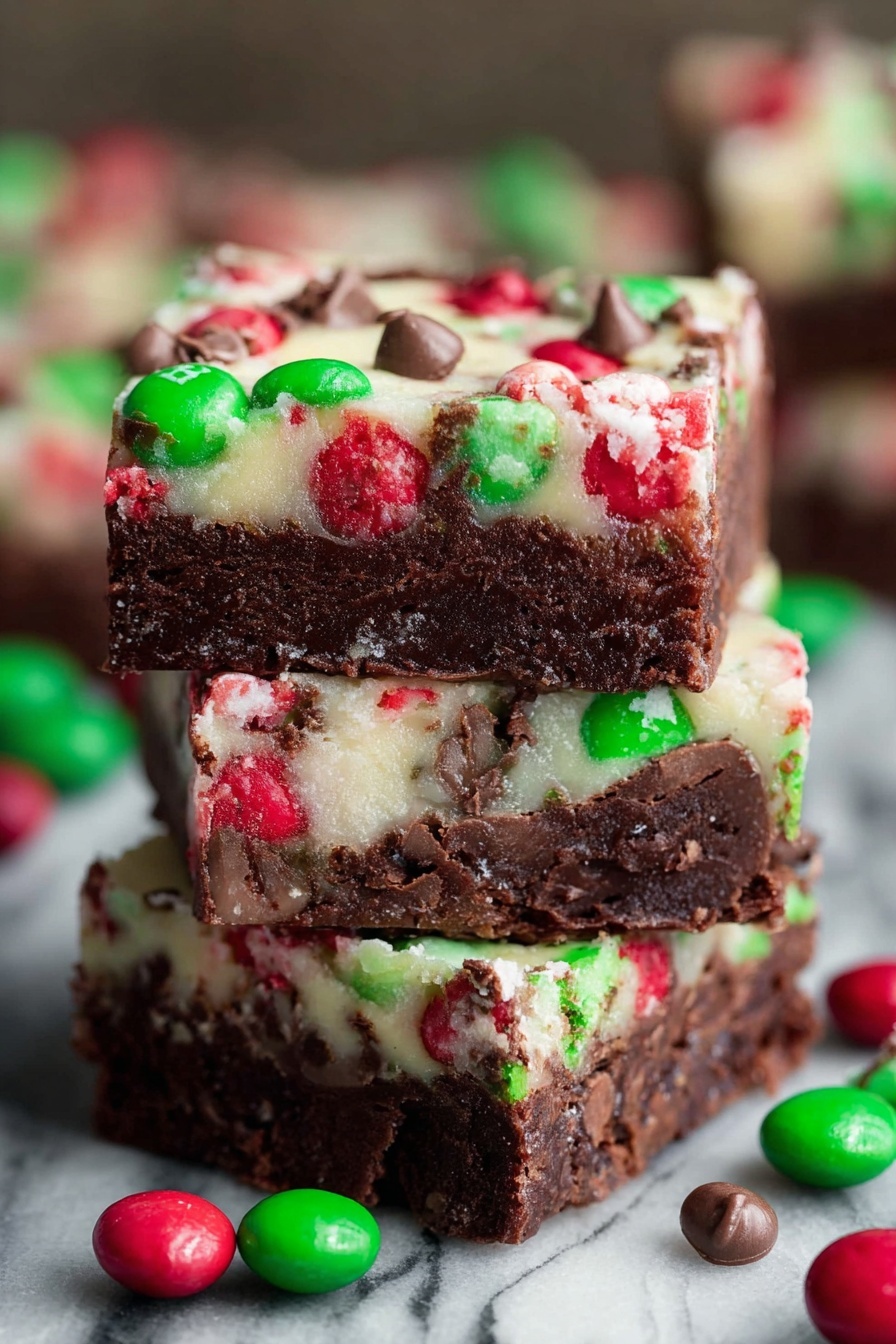
Christmas Magic Layer Brownie Bars Recipe
If you’re searching for a festive treat that brings all the joy of the season in every bite, then you’ve absolutely got to try this Christmas Magic Layer Brownie Bars Recipe. These bars combine gooey chocolate, crunchy nuts, colorful holiday M&Ms, and that luscious sweetened condensed milk topping that makes them truly magical. I’ve made these countless times during the holidays, and trust me—they don’t just taste incredible, they bring out smiles and spark a little Christmas magic every time. Keep reading, because I’ll walk you through everything you need to know to make them a showstopper at your next holiday gathering!
Why This Recipe Works
- Layered Texture: The combination of fudgy brownie base, crunchy nuts, and chewy coconut gives a delightful texture contrast you don’t get in regular brownies.
- Flavor Fusion: Mixing semi-sweet chocolate, sweetened condensed milk, and festive M&Ms delivers a perfect balance of rich, sweet, and colorful holiday vibes.
- Easy to Customize: You can swap nuts or candies to suit your taste or dietary needs—plus it still bakes up perfectly every time.
- Moist & Gooey Every Time: The sweetened condensed milk layer ensures these bars stay moist and indulgent, never dry, even days later.

Ingredients & Why They Work
What really makes these Christmas Magic Layer Brownie Bars Recipe special is how every ingredient plays its part—bringing rich chocolate, crispy crunch, and a creamy finish together in perfect harmony. Just make sure to grab good quality chocolate chips and fresh sweetened condensed milk; they truly make a difference.
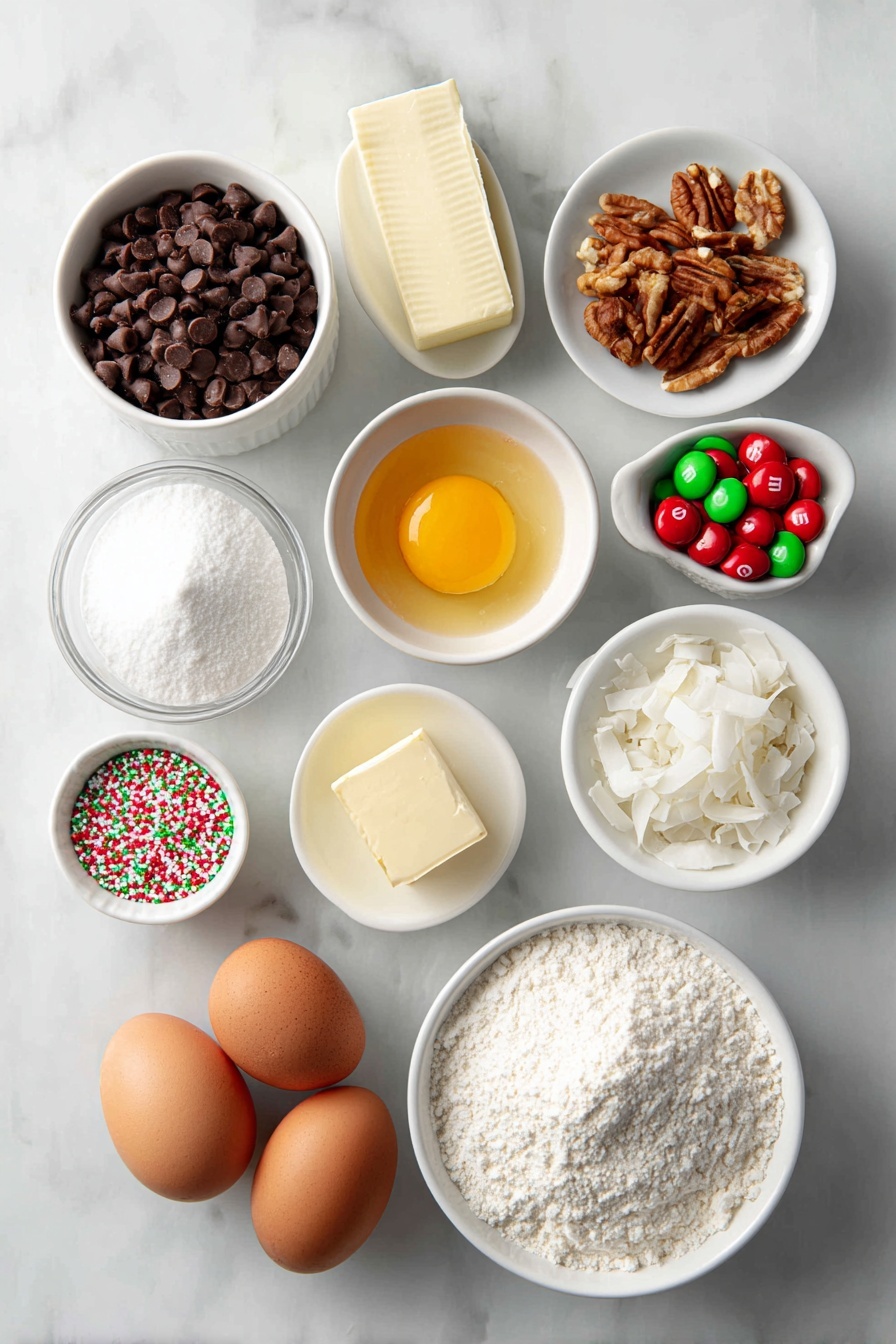
- Semi-sweet chocolate chips: These provide the deep chocolate flavor and melt beautifully to give fudgy texture.
- Salted butter: Adds richness and balances sweetness, plus helps create that luscious, tender crumb.
- Granulated sugar: Sweetens the bars and helps with that classic brownie crust.
- Eggs & egg yolk: Give structure and moisture to keep the brownies chewy but not cakey.
- All-purpose flour: Just enough here to set the bars without making them dense.
- Vanilla extract: Enhances the chocolate’s depth and rounds out the flavor.
- Nuts (walnuts or pecans): Optional, but highly recommended for crunch and that added holiday feel.
- Mini & regular holiday M&Ms: For festive color pops and a little candy crunch.
- Sweetened flaked coconut: Adds chewy texture and a subtle tropical sweetness to complement the chocolate.
- Sweetened condensed milk: The magic ingredient that makes the top layer silky, sweet, and gooey.
- Holiday sprinkles: Just to finish the bars with cheerful sparkle.
Tweak to Your Taste
One of the things I love about this Christmas Magic Layer Brownie Bars Recipe is how easy it is to make your own. Over the years, I’ve experimented with different nuts and even swapped M&Ms for peppermint candies for an extra festive peppermint kick. You can totally make these bars your own—don’t be afraid to mix up the toppings based on what you love!
- Nut-free version: I once made these for a class party and left out nuts altogether—still fudgy and festive thanks to coconut and M&Ms.
- Peppermint twist: Swap regular M&Ms for crushed peppermint candies or peppermint bark pieces for holiday mint magic.
- Extra chocolatey: Add a handful of white chocolate chips alongside the semi-sweet for a cool contrast I adore.
- Dietary swaps: Use gluten-free flour blend if you need a GF version—just watch the baking time closely.
Step-by-Step: How I Make Christmas Magic Layer Brownie Bars Recipe
Step 1: Prep Like a Pro
First off, preheat your oven to 350°F and line a 9-inch baking pan with foil or parchment paper—spraying it lightly with nonstick spray. This makes cleanup a breeze and helps you lift the bars out easily later. Trust me, this small step saves you frustration after baking!
Step 2: Melt Chocolate and Butter Smoothly
Pop the butter and semi-sweet chocolate chips in a microwave-safe bowl. Microwave in 30-second bursts, stirring well between each, until everything’s melted and silky smooth. Don’t rush this part or microwave too long at once—you want to prevent scorching the chocolate! Stirring well after each interval is key.
Step 3: Mix Up the Batter
Once the chocolate mixture is velvety, beat in the sugar until combined. Then add vanilla, eggs, and the extra egg yolk, mixing until the batter is glossy and thick. Gently fold in the flour just until it disappears—don’t overmix or your brownies will get tough.
Step 4: Bake the Brownie Base
Pour the batter into your prepared pan and smooth the top. Bake for 20 minutes—don’t worry if the center jiggles a bit; it will set more with the topping layers. Pull it out right when the edges are starting to firm up but before it’s fully baked through.
Step 5: Layer on the Magic
This is when the Christmas Magic Layer Brownie Bars Recipe really comes to life! Sprinkle half the nuts, half the chocolate chips, half the mini and regular M&Ms, then all the coconut evenly over the warm brownie base. Pour the sweetened condensed milk evenly on top and gently spread it without mixing into the base. Then top with the remaining chips, M&Ms, and festive sprinkles.
Step 6: Final Bake & Cool
Pop the pan back in the oven for about 25 minutes. You’ll know it’s ready when the edges are golden and the center is set with a slight brown tint. If the top starts to brown too quickly, tent it loosely with foil to prevent burning. Let the bars cool completely before slicing—trust me, this step is non-negotiable for neat squares.
Pro Tips for Making Christmas Magic Layer Brownie Bars Recipe
- Use Fresh Ingredients: Make sure your chocolate chips and sweetened condensed milk are fresh for the best melting and flavor.
- Don’t Overbake the Base: Taking the brownies out when they still jiggle slightly ensures the base stays fudgy after the topping layers bake.
- Layer Carefully: Pour the condensed milk slowly and spread gently to keep the layers distinct and gooey.
- Let Them Cool Fully: Patience pays off! Cooling completely makes cutting clean squares much easier.
How to Serve Christmas Magic Layer Brownie Bars Recipe
Garnishes
I like to add a dusting of powdered sugar right before serving—it feels like fresh snow on the bars and adds a subtle sweetness. Sometimes, I sprinkle a few extra holiday-themed sprinkles on top for that extra festive sparkle. If you want to get fancy, a drizzle of melted white chocolate complements the colors beautifully.
Side Dishes
These bars are rich, so I often serve them alongside something light like a scoop of vanilla ice cream or a dollop of whipped cream. A warm cup of peppermint tea or hot chocolate pairs perfectly, giving a complete cozy holiday experience.
Creative Ways to Present
For holiday parties, I love arranging these bars on a festive platter surrounded by fresh holly sprigs or pine cones (just for decoration, not eating!). You can cut them into mini bite-sized squares for easy sharing or wrap individual bars in clear cellophane tied with a pretty ribbon for adorable edible gifts. Presentation makes the magic even more memorable!
Make Ahead and Storage
Storing Leftovers
I store leftover bars in an airtight container at room temperature layered with parchment paper between them to avoid sticking. They keep beautifully for up to a week and still taste just as indulgent the day after baking.
Freezing
Whenever I have extra, I lift the cooled bars out of the pan, wrap them tightly in plastic wrap and then foil, and freeze for up to three months. You can also freeze individual squares for a quick sweet treat anytime. Just thaw at room temperature for about an hour before enjoying.
Reheating
To reheat, I warm individual bars in the microwave for 15-20 seconds to bring back that fresh-baked gooeyness without drying them out. If you prefer, a quick 5-minute warm-up in a preheated 300°F oven wrapped loosely in foil works great too.
FAQs
-
Can I use different types of chocolate in the Christmas Magic Layer Brownie Bars Recipe?
Absolutely! While semi-sweet chocolate chips work beautifully, you can substitute with milk chocolate, dark chocolate, or even white chocolate chips to customize your flavor profile. Just keep in mind the sweetness level and melting properties may vary slightly.
-
Is it necessary to use sweetened condensed milk for the topping?
Yes, sweetened condensed milk is key to achieving that gooey, custardy layer on top. It helps bind the toppings together and adds moisture, making these bars extra indulgent and keeps them from drying out.
-
Can I prepare the brownie base the day before?
You can bake the brownie base a day ahead and keep it tightly covered at room temperature. When ready, add the toppings and do the final bake just before serving for the freshest, gooiest results.
-
What’s the best way to cut the bars cleanly?
Make sure the bars are completely cool before cutting. Use a sharp knife and clean it between cuts to avoid crumb buildup. If the topping feels sticky, chilling the bars briefly can help make slicing easier.
Final Thoughts
I genuinely treasure this Christmas Magic Layer Brownie Bars Recipe because it’s more than just a dessert—it’s a festive tradition in my home. Every time I bake them, I’m reminded of cozy holiday afternoons filled with laughter and sweet treats. If you want to bring that kind of magic to your holiday table (or just treat yourself!), give this recipe a try. I promise it’ll become a favorite that’s requested again and again.
Print
Christmas Magic Layer Brownie Bars Recipe
- Prep Time: 15 minutes
- Cook Time: 45 minutes
- Total Time: 1 hour
- Yield: 9 bars
- Category: Dessert
- Method: Baking
- Cuisine: American
Description
These Christmas Magic Layer Brownie Bars are a delightful holiday treat featuring a rich brownie base topped with layers of nuts, chocolate chips, M&Ms, shredded coconut, sweetened condensed milk, and festive sprinkles. Perfect for festive gatherings and gift-giving, these bars combine chewy, crunchy, and sweet textures for irresistible flavor.
Ingredients
Brownie Layer:
- 1½ cups semi-sweet chocolate chips
- ½ cup salted butter (1 stick)
- 1 cup granulated sugar
- 2 large eggs
- 1 large egg yolk
- 1 cup all-purpose flour
- ½ teaspoon vanilla extract
Toppings Layer:
- ¾ cup nuts (optional, divided)
- ¼ cup mini holiday M&Ms (divided)
- ¾ cup regular holiday M&Ms (divided)
- ½ cup semi-sweet chocolate chips (divided)
- 1 cup sweetened flaked coconut
- ¾ cup sweetened condensed milk (from a 14-ounce can)
- ¼ cup holiday sprinkles
Instructions
- Preheat oven: Preheat your oven to 350 degrees Fahrenheit. Line a 9-inch baking pan with foil or parchment paper and lightly spray with nonstick cooking spray to ensure easy removal of the bars.
- Melt chocolate and butter: Place the butter and 1½ cups of semi-sweet chocolate chips in a large microwave-safe bowl. Microwave on high for 30 seconds, then stir. Continue microwaving in 30-second intervals, stirring after each, until the mixture is completely melted and smooth.
- Mix in sugar, vanilla, and eggs: Beat in 1 cup granulated sugar until combined. Add ½ teaspoon vanilla extract followed by 2 large eggs and 1 large egg yolk, mixing thoroughly after each addition.
- Incorporate flour: Gently stir in 1 cup all-purpose flour until just combined, being careful not to overmix. Pour the batter into the prepared 9-inch pan and spread evenly.
- Bake brownie base: Bake in the preheated oven for 20 minutes. The brownies will jiggle slightly but should be set on top.
- Add toppings: Remove the pan from the oven and layer the toppings as follows: sprinkle ¾ cup nuts (if using), then half of the ½ cup semi-sweet chocolate chips, half of the mini holiday M&Ms, followed by half of the regular holiday M&Ms, and finally all of the sweetened flaked coconut. Pour ¾ cup sweetened condensed milk evenly over the top and spread gently to distribute.
- Finish topping and bake: Sprinkle the remaining chocolate chips, remaining mini and regular holiday M&Ms, and ¼ cup holiday sprinkles over the condensed milk layer. Return the pan to the oven and bake for an additional 25 minutes, or until the edges are golden and the center is set and beginning to brown. If the top browns too quickly, loosely tent with foil.
- Cool and serve: Allow the bars to cool completely in the pan before using a sharp knife to cut into 9 square bars. Store in a tightly sealed container.
Notes
- Store at room temperature in an airtight container for up to one week.
- For extended storage, refrigerate for up to two weeks; separate layers with parchment paper to prevent sticking.
- Freeze whole pan or individual bars by wrapping tightly with plastic wrap and aluminum foil; freeze for up to three months. Thaw at room temperature for about one hour before serving.
- Optional nuts can be substituted with your favorite variety or omitted for a nut-free version.
- Use holiday-themed M&Ms and sprinkles to enhance the festive appearance.
Nutrition
- Serving Size: 1 bar
- Calories: 380 kcal
- Sugar: thirty-five grams
- Sodium: 120 mg
- Fat: 20 g
- Saturated Fat: 12 g
- Unsaturated Fat: 7 g
- Trans Fat: 0 g
- Carbohydrates: 48 g
- Fiber: 3 g
- Protein: 4 g
- Cholesterol: 80 mg

