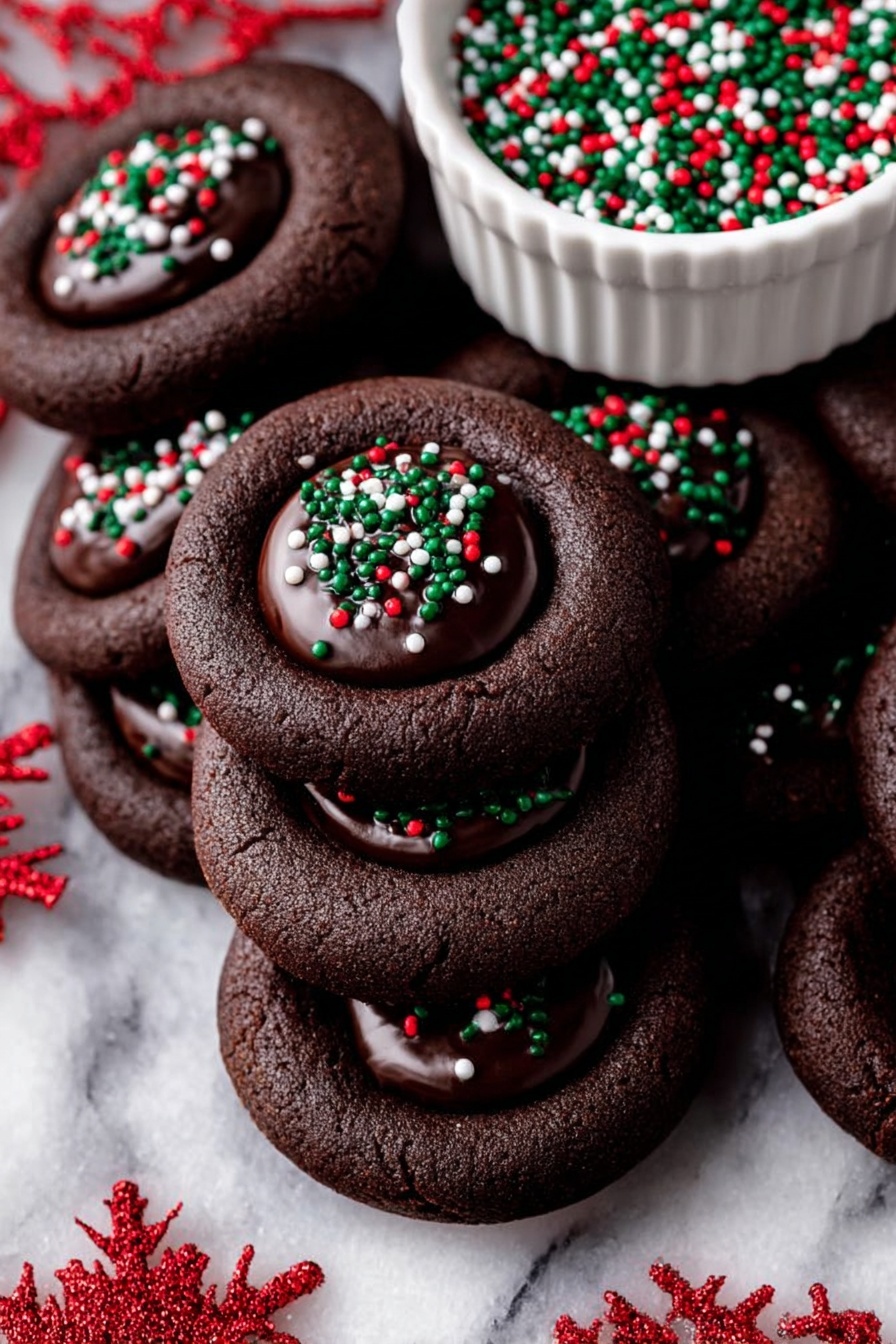
Chocolate Thumbprint Cookies with Ganache Recipe
If you’re on the hunt for a cookie that’s fudgy, rich, and utterly irresistible, let me introduce you to my secret weapon: the Chocolate Thumbprint Cookies with Ganache Recipe. These cookies have this perfect balance of soft cocoa-flavored dough with a silky, luscious ganache nestled right in the middle. Whether you’re a seasoned baker or just craving a cozy kitchen project, this recipe will quickly become your go-to. I promise, once you taste them, you’ll want to make a big batch—and maybe double the ganache!
Why This Recipe Works
- Rich Chocolate Flavor: Using Dutch-process cocoa powder gives these cookies a deep, intense chocolate taste that pairs beautifully with the silky ganache.
- Soft but Structured Dough: The mix of brown and white sugar with key egg yolks creates a tender cookie that holds its shape, especially with the chill time before baking.
- Silky Ganache Filling: Pouring warm cream over semi-sweet chocolate chips results in that melt-in-your-mouth ganache that makes these thumbprints stand out.
- Perfect Presentation: Pressing the dough centers again after baking ensures the indent stays just right for filling, giving you that professional bakery look.

Ingredients & Why They Work
Every ingredient in this Chocolate Thumbprint Cookies with Ganache Recipe plays a part in creating that delicate texture and rich flavor. I always tell friends to use quality cocoa powder and chocolate—they really do make a noticeable difference. Also, ensuring your butter is properly softened makes mixing easier and helps achieve that wonderful, fluffy consistency in the dough.

- All-purpose flour: Spoon and level the flour to avoid a dense dough; weighing is even better for perfect texture.
- Dutch-process cocoa powder: Gives a smoother, less acidic chocolate flavor that complements the ganache beautifully.
- Salt: Enhances the chocolate and balances the sweetness.
- Baking powder: Helps the cookies rise just enough without spreading too much.
- Unsalted butter: Softened to the right temperature so it creams smoothly with sugars.
- Light brown sugar: Adds moisture and a slight caramel depth.
- Granulated white sugar: Provides crunch and balances moisture from brown sugar.
- Egg yolks: Give richness and tenderness without making the dough too wet.
- Vanilla bean paste or extract: Adds warmth and complexity to the chocolate flavor.
- Semi-sweet chocolate chips: Melt perfectly in the ganache for a smooth filling.
- Heavy whipping cream: Creates that luscious creaminess in the ganache filling.
- Nonpareils (optional): Add a little festive crunch and charm on top.
Tweak to Your Taste
I love how adaptable this Chocolate Thumbprint Cookies with Ganache Recipe is, and I almost always play around with it depending on what’s in my pantry or who I’m baking for. Don’t be afraid to make it your own!
- Sea salt sprinkle: Adding a tiny pinch of flaky sea salt on top of the ganache after filling adds this incredible contrast that amps up the chocolate’s richness—trust me, it’s like magic.
- Flavored ganache: Once, I swapped half the semi-sweet chocolate chips with dark chocolate and stirred in a teaspoon of espresso powder—your coffee lover friends will thank you!
- Nutty twist: Rolled the dough balls lightly in finely chopped toasted hazelnuts before chilling; it gave a gorgeous texture and flavor.
- Dietary swaps: For dairy-free, I’ve used coconut cream and dairy-free dark chocolate chips with great success, just expect a slightly different flavor profile.
Step-by-Step: How I Make Chocolate Thumbprint Cookies with Ganache Recipe
Step 1: Prepping Your Dry and Wet Ingredients
Begin by lining two baking sheets with parchment paper—this will save you from a sticky situation later. In a medium bowl, whisk together the flour, cocoa powder, salt, and baking powder until evenly mixed. Setting these dry ingredients aside helps streamline the next step when you mix them into the buttery base.
Step 2: Creaming Butter and Sugars
In a large bowl, beat your softened butter with light brown and white sugar for about two minutes using an electric mixer. I like to stop and scrape down the sides to make sure everything gets fluffy and well combined. This creaming step is essential for tender cookies that hold on to that melt-in-your-mouth quality.
Step 3: Adding the Egg Yolks and Vanilla
Next, add the room-temperature egg yolks and vanilla bean paste. Beat again until the mixture becomes pale and fluffy—this usually takes 1 to 2 minutes. This fluffy texture is a telltale sign that your cookies will bake up nicely without spreading too much.
Step 4: Combining the Dry Ingredients
Slowly add your dry ingredients into the wet mixture, mixing only until just combined. Overmixing here can lead to tougher cookies, so I usually stop as soon as I don’t see any flour streaks. You’ll notice a thick, luscious dough that’s perfect for shaping.
Step 5: Shaping and Indenting the Dough
Scoop about a tablespoon of dough at a time and roll into balls—that’s roughly 34 in total. Place them evenly spaced on your prepared baking sheets. Using a 1/4 tsp, gently press an indent into the center of each ball. If your dough feels a little sticky, sometimes a quick dip in water for your finger helps achieve a neat well.
Step 6: Chill Time (Patience Pays Off!)
This chilling step is a game-changer. Pop the prepared dough balls into the fridge for at least an hour so the butter firms up, which helps prevent excess spreading during baking. If you’re pressed for time, I’ve also left them in the freezer for about 20 minutes with decent results.
Step 7: Baking Your Cookies Just Right
Preheat your oven to 350°F (175°C). Arrange your chilled dough balls about 1 1/2 inches apart on the baking sheets. Bake for 9 to 11 minutes, but I find 10 minutes hits a sweet spot—cookies come out soft but set perfectly. Don’t skip the next step while they’re still warm!
Step 8: Restoring the Perfect Indent
While the cookies are still warm, lightly press the centers again with a 1/4 tsp. This refreshes the indent, which can shrink a bit during baking. I also like to gently run a circular cookie cutter around the edges to tidy them up and return them to a uniform size—small touches like these make a big difference.
Step 9: Cooling Completely
Let the cookies cool on the baking sheet for about 5 minutes before transferring them to a wire rack. Cooling completely helps the ganache stay beautifully nestled in the center instead of melting or sliding off.
Step 10: Making the Chocolate Ganache
Place your semi-sweet chocolate chips in a small bowl. Heat the heavy whipping cream until it’s just about to boil—this can be done in the microwave or on the stove. Pour the hot cream over the chocolate and let it sit for one minute to soften. Stir gently until it’s perfectly smooth and glossy.
Step 11: Filling and Finishing Touches
Spoon about a teaspoon of your ganache into each cookie indent. If you want to go fancy, sprinkle some nonpareils on top for a pop of color and crunch. Chill them for 10-15 minutes to let the ganache set properly—you’ll love how they look and taste when they’re ready.
Pro Tips for Making Chocolate Thumbprint Cookies with Ganache Recipe
- Measure Flour Correctly: I can’t stress this enough—spooning and leveling your flour or preferably weighing it ensures your cookies have the perfect tender texture instead of being dry or crumbly.
- Chill That Dough: Taking the time to chill really controls spreading and gives you those perfectly shaped thumbprints every time.
- Press Indents Twice: Pressing the cookie centers again right after baking helps keep your ganache nestled nicely without overflowing or closing up.
- Use Quality Chocolate: I learned the hard way that the ganache tastes vastly better when you use good quality semi-sweet chips—not just generic brands.
How to Serve Chocolate Thumbprint Cookies with Ganache Recipe
Garnishes
I usually keep it simple and classic with some colorful nonpareils or a few sea salt flakes. Sometimes, I’ll toss on a few shaved chocolate curls or a dusting of cocoa powder for an elegant touch, especially if I’m gifting these cookies or taking them to a party.
Side Dishes
These cookies pair beautifully with a hot cup of coffee or a glass of cold milk—my personal favorite. For an afternoon tea, a scoop of vanilla ice cream alongside complements the rich ganache and makes it feel indulgent but cozy.
Creative Ways to Present
For holiday gatherings, I love placing these cookies on a tiered dessert stand with fresh berries and sprigs of mint for a festive flair. Wrapping them individually in parchment and tying with twine also makes charming homemade gifts. You can also drizzle white chocolate over them for a contrast that dazzles.
Make Ahead and Storage
Storing Leftovers
I store leftover cookies in an airtight container, layering parchment paper between them to avoid sticking. They keep wonderfully for up to three days at room temperature, though I usually devour them faster than that!
Freezing
If I’m making these ahead for a special event, I freeze the baked cookies (without ganache) in a single layer on a baking sheet, then transfer to a freezer bag. When ready, I let them thaw in the fridge overnight before filling with ganache—this keeps the cookies fresh and the ganache luscious.
Reheating
To enjoy leftovers warm, gently microwave a cookie for 8-10 seconds to soften the ganache slightly without melting it too much. It’s like biting into a little warm chocolate cloud—delicious every time.
FAQs
-
Can I use regular cocoa powder instead of Dutch-process?
Yes, you can substitute regular cocoa powder, but expect slightly different flavor and acidity. Dutch-process cocoa is smoother and less acidic, which pairs beautifully with the ganache. If using regular cocoa, you might notice a bit more tang, but your cookies will still be delicious.
-
What’s the best way to make sure the indent holds during baking?
Chilling the dough balls for at least an hour before baking is crucial. Also, pressing gently but firmly to create the indent helps maintain the shape. If the indents shrink during baking, simply press them again right out of the oven while the cookies are still warm.
-
Can I make the ganache ahead of time?
Absolutely! You can prepare the ganache a few days before baking. Keep it covered in the fridge and gently rewarm it to pouring consistency just before filling the cookies.
-
How do I make these cookies dairy-free?
Swap the butter for a plant-based alternative and use coconut cream instead of heavy cream in the ganache. Also, pick dairy-free dark chocolate chips. While the flavor varies slightly, the cookies remain wonderfully rich and satisfying.
Final Thoughts
Making these Chocolate Thumbprint Cookies with Ganache Recipe has become one of my favorite sweet projects to share with family and friends. There’s just something so special about that first bite—from the cozy chocolate dough to the luscious, creamy ganache center—that makes baking feel like love on a plate. I hope you try this recipe soon and enjoy it just as much as I do. Trust me, these cookies will quickly become a staple in your baking repertoire!
Print
Chocolate Thumbprint Cookies with Ganache Recipe
- Prep Time: 15 minutes
- Cook Time: 11 minutes
- Total Time: 1 hour 26 minutes
- Yield: 34 cookies
- Category: Dessert
- Method: Baking
- Cuisine: American
- Diet: Vegetarian
Description
These Chocolate Thumbprint Cookies feature a rich cocoa dough topped with a smooth and glossy chocolate ganache filling. Perfectly soft with a delightful chocolate punch, these cookies are a must-have treat for chocolate lovers.
Ingredients
For the Chocolate Thumbprint Cookies
- 1 1/2 cups (188 g) all-purpose flour, spooned and leveled
- 1/2 cup (40 g) cocoa powder, Dutch process
- 1/2 tsp salt
- 1/2 tsp baking powder
- 3/4 cup (168 g) unsalted butter, softened
- 3/4 cup (165 g) light brown sugar, packed
- 1/4 cup (50 g) granulated white sugar
- 2 egg yolks, at room temperature
- 1 1/2 tsp vanilla bean paste or extract
For the Chocolate Ganache
- 1 cup (200 g) semi-sweet chocolate chips
- 1/2 cup (120 ml) heavy whipping cream
- Nonpareils for sprinkling on top, optional
Instructions
- Prepare dry ingredients: Line two baking sheets with parchment paper and set aside. In a medium bowl, whisk together flour, cocoa powder, salt, and baking powder.
- Cream butter and sugars: In a large bowl, cream softened butter, light brown sugar, and granulated white sugar together with an electric mixer for two minutes until fluffy.
- Add egg yolks and vanilla: Mix in the egg yolks and vanilla bean paste or extract until the mixture becomes pale and fluffy, about 1-2 minutes.
- Combine dough: Gradually add the dry ingredients to the wet mixture and mix just until combined, taking care not to overmix.
- Shape cookie dough: Scoop the dough into 34 portions (about 1 tablespoon each) and roll into balls. Place them on the prepared baking sheets.
- Create indentations: Using a 1/4 teaspoon, press down on the dough balls to make an indent in the center.
- Chill dough: Chill the indented dough balls for at least one hour. You may chill them all on one baking sheet and redistribute before baking.
- Bake cookies: Preheat the oven to 350 degrees Fahrenheit. Arrange dough balls about 1 1/2 inches apart on the baking sheets and bake for 11 minutes.
- Refine the centers: When baked, lightly press down on cookie centers again with a 1/4 teaspoon to re-establish the indent. While still hot, use a circular cookie cutter to perfect shape and size.
- Cool cookies: Let cookies cool on the baking sheet for 5 minutes then transfer to a cooling rack to cool completely.
- Make ganache: Place chocolate chips in a small bowl. Heat heavy cream until just boiling, then pour over the chocolate chips. Let sit for 1 minute, then stir gently until smooth and glossy.
- Fill cookies: Spoon about 1 teaspoon of chocolate ganache into the center of each cooled cookie. Add more ganache if space allows.
- Optional garnish and chill: Sprinkle nonpareils on top if desired. Chill cookies in the refrigerator for 10-15 minutes to allow ganache to set.
- Storage: Store leftover cookies in an airtight container for up to three days.
Notes
- Measure flour properly by spooning it into the measuring cup and leveling with a knife or weigh it to ensure accuracy and avoid dense cookies.
- Chilling the dough is crucial for retaining shape and creating distinct indents for the ganache.
- Using Dutch processed cocoa powder gives a richer chocolate flavor and darker color.
- If you don’t have vanilla bean paste, pure vanilla extract works well as a substitute.
- Ensure the heavy cream is hot enough to fully melt the chocolate for a smooth ganache.
- Cookies are best enjoyed within three days stored at room temperature or refrigerated.
Nutrition
- Serving Size: 1 cookie
- Calories: 130 kcal
- Sugar: 12 g
- Sodium: 60 mg
- Fat: 7 g
- Saturated Fat: 4 g
- Unsaturated Fat: 2 g
- Trans Fat: 0 g
- Carbohydrates: 16 g
- Fiber: 2 g
- Protein: 2 g
- Cholesterol: 25 mg

