Chocolate Pinwheel Cookies Recipe
If you’ve ever been mesmerized by those elegant swirled treats on a bakery shelf, let me tell you—my Chocolate Pinwheel Cookies Recipe will bring that wow factor right into your kitchen. They’re not just beautiful to look at but also delightfully buttery, with that perfect balance of chocolate and vanilla flavors. I’m so excited to share my step-by-step tips to make these pinwheel cookies a dependable show-stopper every time you bake them!
Why This Recipe Works
- Perfect Dough Texture: Balances just the right amount of softness and firmness, making it super easy to roll into those iconic pinwheel shapes.
- Distinctive Flavor Pairing: Classic vanilla dough paired with rich cocoa creates a timeless, delicious contrast you won’t get tired of.
- Chilling Technique: Proper chilling ensures dough isn’t too sticky or too hard, which makes shaping and slicing a breeze.
- Customizable Finishes: From dipping in chocolate to rolling in sprinkles, you can easily personalize this cookie to suit any occasion.

Ingredients & Why They Work
This Chocolate Pinwheel Cookies Recipe uses classic, simple ingredients that come together to make buttery, tender cookies with a beautiful two-tone design. Knowing why each ingredient is important really helps when substituting or tweaking the recipe.
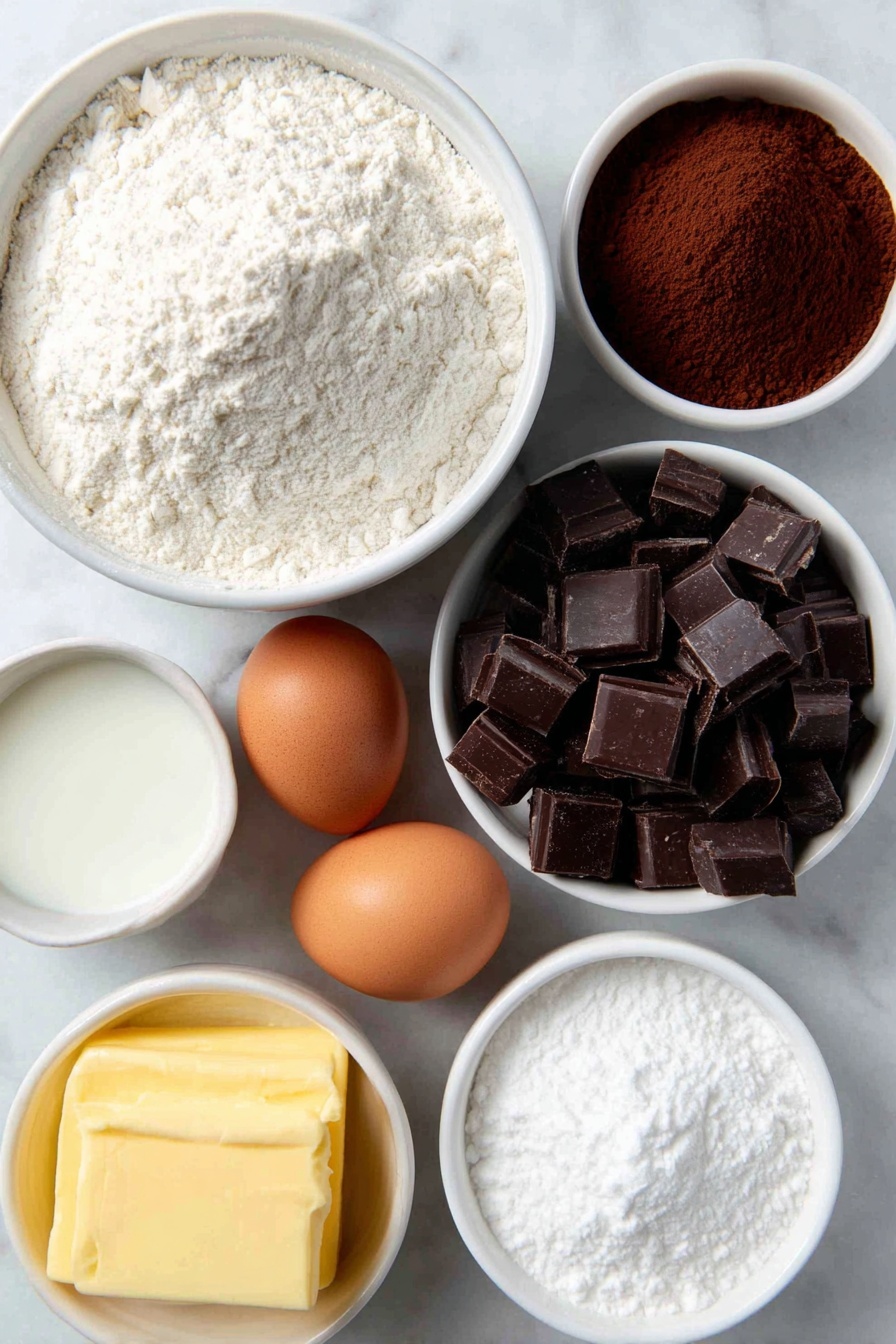
- All-Purpose Flour: The base for structure; spooning and leveling ensure you don’t end up with too dense a dough.
- Baking Powder: Adds a subtle lift so the cookies don’t turn out flat and dense.
- Salt: Enhances flavor and balances sweetness perfectly.
- Unsalted Butter: Softened to room temp to cream easily with sugar, delivering that rich, tender crumb.
- Granulated Sugar: Gives sweetness and helps with that classic cookie texture and slight crispness on the edges.
- Large Egg + Egg Yolk: For stability and moisture without making the dough too wet.
- Pure Vanilla Extract: Essential for that warm, familiar flavor in the vanilla dough.
- Cocoa Powder: Dutch-process or natural – either works! It gives deep chocolate flavor and the contrast you want in your pinwheels.
- Milk: Added to chocolate dough for just enough moisture to keep it pliable and moist without stickiness.
- Espresso Powder (Optional): Amplifies the chocolate notes without making the dough taste like coffee.
- Optional Chocolate for Dipping: Choose good-quality baking chocolate bars; they melt smoother and taste better than chips.
- Sprinkles (Optional): For a fun pop of color and texture, especially if you’re making these for a party or holiday.
Tweak to Your Taste
One of the things I love most about this Chocolate Pinwheel Cookies Recipe is how adaptable it is. You can play around with flavors and visuals to make it your own. Personally, I’ve tinted the vanilla dough with holiday colors and even swapped vanilla for peppermint extract during the winter – so festive and delicious!
- Flavor Variations: I’ve tried adding coconut or almond extract for a unique twist, and it’s always a crowd-pleaser.
- Color Fun: Try gel food coloring in the vanilla dough to create colorful pinwheels for kids’ parties or holidays.
- Dietary Adjustments: You can sub some butter for coconut oil for a dairy-free version, but keep an eye on dough consistency.
- Sprinkle Coating: Rolling your chilled dough logs in sprinkles before slicing adds a fun texture and festive look.
Step-by-Step: How I Make Chocolate Pinwheel Cookies Recipe
Step 1: Whip Up the Base Dough
Start by whisking together your dry ingredients—flour, baking powder, and salt—in a medium bowl and set aside. Then in a large bowl, cream the softened butter and sugar until light and fluffy. This step took me a few tries before I truly got the texture right – about 3 minutes on medium-high speed with a hand or stand mixer should do it. Scrape down the sides so everything blends evenly. Add in the egg, egg yolk, and vanilla, then beat on high until fully incorporated. The dough will be thick and sticky once you fold in the flour mixture – that’s exactly what you want!
Step 2: Divide and Chocolate-ify Half the Dough
Once your dough is mixed, divide it into two portions, a bit under two pounds total. Don’t worry if one portion is smaller – I usually use the slightly smaller half for the chocolate dough since it gains a bit of moisture from the milk and cocoa powder. Add cocoa powder, milk, and optional espresso powder to the chocolate half and mix gently on low speed until evenly combined. The dough becomes a luscious, rich chocolate color—yum!
Step 3: Chill and Shape the Dough
This chilling step is crucial. Form each dough portion into a rectangle about 4×5 inches and 1 inch thick. For the chocolate dough, I like dusting my hands and the surface lightly with cocoa powder to prevent sticking—that tip saved me many times! Wrap each dough block tightly and chill for 60–90 minutes until they’re firm but still pliable. The goal is a workable dough without the mess.
Step 4: Roll Out and Layer
Here’s where the magic happens. Roll the vanilla dough out on floured parchment paper into an 8×14-inch rectangle. One trick I swear by is rolling this on parchment placed on a silicone baking mat to keep it from slipping around. Chill the vanilla dough while you roll the chocolate dough onto another piece of parchment, aiming for the same size or slightly smaller rectangle. Carefully align the chocolate dough over the vanilla layer, seam side down, and gently press out any air bubbles or gaps. Patch any tears with bits of dough—you’re creating art here, so don’t stress about perfection!
Step 5: Roll Into the Iconic Pinwheel Log
Starting from the long edge, roll the layered dough into a tight log using the parchment paper as your guide. This can be a little tricky! I often start by smoothing the first inch with my fingers to get everything snug before continuing. Don’t worry if you see cracks or spots of vanilla peeking through—just gently meld them back together as you roll. Cut the log in half to make two dough rolls about 7 inches each, then wrap them up and chill again for 2 hours or up to 4 days if prepping ahead.
Step 6: Slice, Bake, and (Optional) Dip
Preheat your oven to 350°F (177°C) and line baking sheets with parchment paper or silicone mats. Slice each dough log into 14 pieces about half an inch thick and space them generously on your sheets—you’ll notice they spread quite a bit! If the dough feels soft, I like popping the trays in the fridge for 10 minutes before baking to firm them up. Bake for 14 to 15 minutes until barely golden at the edges, then let cool a bit on the sheet before transferring to a wire rack. If you’re up for the extra deliciousness, dip half the cooled cookies in melted chocolate and add sprinkles while wet—such a treat!
Pro Tips for Making Chocolate Pinwheel Cookies Recipe
- Use Room Temperature Butter: It creams easier with sugar and helps you get that fluffy texture crucial for tender cookies.
- Keep Dough Chilled But Pliable: Over-chilling makes rolling difficult, so aim for firm but bendable dough for easy shaping.
- Roll Between Parchment Sheets: This keeps the dough moving smoothly without sticking to your counter or rolling pin.
- Patch With Your Fingers: Don’t stress over imperfections—use dough bits to repair cracks so your pinwheel looks seamless after baking.
How to Serve Chocolate Pinwheel Cookies Recipe

Garnishes
When I serve these cookies, I tend to keep it simple because the pinwheel design is the star. But a light dusting of powdered sugar or colorful sprinkles right after dipping them in chocolate adds such a lovely festive finish. If it’s holiday season or a celebration, edible gold shimmer sprinkles really elevate their look in a subtle, elegant way.
Side Dishes
I love pairing these cookies with a classic glass of cold milk, of course! But they’re also wonderful alongside a mug of rich hot chocolate or a robust black coffee—it complements those chocolatey swirls so well. Perfect for a cozy afternoon snack or a dessert platter at your next gathering.
Creative Ways to Present
For a stunning party display, arrange the cookies upright in a clear glass jar or tiered dessert stand so guests can admire the pinwheels immediately. I also like stacking a few cookies with a small card indicating their flavors or customizations — it makes the presentation feel extra special and inviting.
Make Ahead and Storage
Storing Leftovers
I store leftover cookies in an airtight container at room temperature, layered with parchment paper, and they stay fresh and delicious for up to a week. Cookies dipped in chocolate, though, I prefer to refrigerate to prevent melting or stickiness, especially in warmer weather.
Freezing
One thing I’ve learned is freezing these dough logs before baking is a game-changer. Wrap each log tightly and freeze for up to 3 months. When you’re ready, thaw in the fridge overnight and slice to bake fresh cookies any time you crave them. Baked cookies can also be frozen in airtight containers and thawed gently before serving.
Reheating
To warm up the cookies, I pop them in a preheated oven at 300°F (150°C) for about 3-5 minutes. This refreshes their texture nicely without over-baking or drying them out. If they were dipped in chocolate, keep an eye on the chocolate to avoid softening too much.
FAQs
-
Can I make the Chocolate Pinwheel Cookies Recipe without cocoa powder?
Absolutely! You can skip the cocoa powder for a vanilla-only swirl effect by tinting one half of the dough with food coloring to maintain the pinwheel contrast. This also lets you experiment with different flavors or extracts like peppermint or almond.
-
Why do I need to chill the dough multiple times?
Chilling is key for workable dough that holds its shape. The first chill firms up the dough to make rolling easier and less sticky, while the second chill helps the rolled logs set firmly, preventing spreading during baking and preserving the pinwheel design.
-
Can I bake the cookies without dipping them in chocolate?
Yes! The cookies are delicious on their own. Dipping is just an optional step to add more flavor and visual appeal. If you prefer a simpler cookie or want to keep them dairy-free, just forgo the chocolate dip.
-
What’s the best way to slice the dough logs evenly?
I use a sharp, non-serrated knife and gently warm the blade under hot water, drying it completely before slicing. This helps make clean cuts without squishing or cracking the dough. Also, chilling the logs before slicing is essential for neat rounds.
-
Can I use chocolate chips for dipping instead of baking chocolate?
It’s best to use baking chocolate bars for dipping. Chocolate chips contain stabilizers that prevent smooth melting. Using good-quality baking bars like Ghirardelli or Bakers ensures your chocolate dip is silky and coats the cookies beautifully.
Final Thoughts
This Chocolate Pinwheel Cookies Recipe has become my go-to whenever I want to impress with minimal fuss. They’re a perfect blend of nostalgia, beauty, and irresistible flavors that people keep asking me to bring back. Whether you’re new to baking or a seasoned pro, these cookies are totally worth the love and attention, and I promise you’ll enjoy every buttery, chocolatey bite. So go ahead, make a batch (or two!) and watch these pinwheels spin their way to cookie stardom in your home.
Print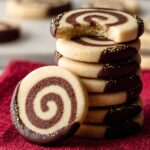
Chocolate Pinwheel Cookies Recipe
- Prep Time: 4 hours 15 minutes
- Cook Time: 15 minutes
- Total Time: 4 hours 30 minutes
- Yield: 28 cookies
- Category: Dessert
- Method: Baking
- Cuisine: American
- Diet: Vegetarian
Description
This classic Pinwheel Cookies recipe features two tones of tender buttery dough—one vanilla and one chocolate—rolled together to create a beautiful spiral pattern. Perfectly crisp on the edges and soft in the center, these cookies are ideal for holiday celebrations or anytime you want a fun and delicious treat. Optionally dipped in melted chocolate and decorated with sprinkles, they make for an impressive and tasty dessert.
Ingredients
Base Cookie Dough
- 2 and 2/3 cups (333g) all-purpose flour (spooned & leveled)
- 3/4 teaspoon baking powder
- 1/2 teaspoon salt
- 1 cup (16 Tbsp; 226g) unsalted butter, softened to room temperature
- 1 cup (200g) granulated sugar
- 1 large egg + 1 egg yolk, at room temperature
- 1 and 1/2 teaspoons pure vanilla extract
Chocolate Dough
- 2 Tablespoons (10g) unsweetened natural or dutch-process cocoa powder
- 1 Tablespoon (15ml) milk
- 1/2 teaspoon espresso powder (optional)
Optional for Dipping
- 6 ounces (170g) white, semi-sweet, or dark chocolate, finely chopped
- sprinkles (optional)
Instructions
- Make the dough: Whisk the flour, baking powder, and salt together in a medium bowl and set aside. In a large bowl, beat the butter and sugar on medium-high speed until creamed, about 3 minutes. Add the egg, egg yolk, and vanilla and beat until combined, about 1 minute. Scrape down the bowl as needed. Add the flour mixture and mix on low until combined; dough will be thick and sticky. Remove from the bowl.
- Divide the dough: Divide the dough in half (about 800–900g total). Use the slightly smaller portion for the chocolate dough.
- Make the chocolate dough: Place half the dough back into the mixing bowl. Add cocoa powder, milk, and espresso powder if using. Beat on low speed until combined.
- Shape and chill the doughs: On a lightly floured surface, form each dough into a 1-inch-thick rectangle about 4×5 inches. Wrap tightly with plastic wrap or parchment and refrigerate for 60–90 minutes until less sticky but still pliable.
- Roll out the doughs: Lightly flour a piece of parchment on a stable surface. Roll vanilla dough into an 8×14-inch rectangle about 1/8–1/4 inch thick. Refrigerate it on the parchment. Roll chocolate dough into a slightly smaller 8×14-inch rectangle using cocoa powder as the dusting flour. Peel the chocolate dough off the parchment and layer it onto the vanilla dough, patting down and fixing tears as needed.
- Roll into a log: Starting with a long side, tightly roll the two doughs together using the parchment to assist. Patch any bare or cracked spots with your fingers. Slice the log in half to form two 7-inch logs.
- Chill dough logs: Wrap the logs well and refrigerate for 2 hours, up to 4 days.
- Preheat oven and prepare baking sheets: Preheat to 350°F (177°C). Line two baking sheets with parchment paper or silicone mats.
- Slice and bake: Cut each log into 14 slices about 1/2 inch thick. Space cookies 2 inches apart on baking sheets. If the dough warmed up, chill cookies on baking sheets for 10 minutes before baking. Bake for 15 minutes or until edges are very lightly browned. Let cool on baking sheet for 5 minutes, then transfer to a wire rack to cool completely.
- Optional chocolate dipping: Melt chopped chocolate in a double boiler or microwave, stirring frequently. Dip half of each cooled cookie into chocolate and add sprinkles if desired. Let chocolate set at room temperature or refrigerate.
Notes
- Make ahead: Dough logs can be refrigerated for up to 4 days or frozen for 3 months. Baked cookies freeze well for 3 months. Thaw refrigerated dough or cookies before use.
- Use cocoa powder to dust when rolling out chocolate dough to prevent sticking.
- You can tint the vanilla dough with gel food coloring before chilling to create colorful pinwheels.
- If skipping chocolate dough, tint half the dough to maintain the pinwheel design and add flavor extracts if desired.
- For extra decoration, roll chill logs in sprinkles or coarse sugar before slicing. Use a pastry brush and water to help sprinkles stick.
- Use baking chocolate bars for melting and dipping, not chocolate chips, for best texture and melting.
- Cookies stay fresh covered at room temperature for 1 week; refrigerate dipped cookies after a few days.
Nutrition
- Serving Size: 1 cookie
- Calories: 140 kcal
- Sugar: 10 g
- Sodium: 70 mg
- Fat: 8 g
- Saturated Fat: 5 g
- Unsaturated Fat: 2 g
- Trans Fat: 0 g
- Carbohydrates: 16 g
- Fiber: 1 g
- Protein: 2 g
- Cholesterol: 25 mg


