Chocolate Hazelnut Yule Log Recipe
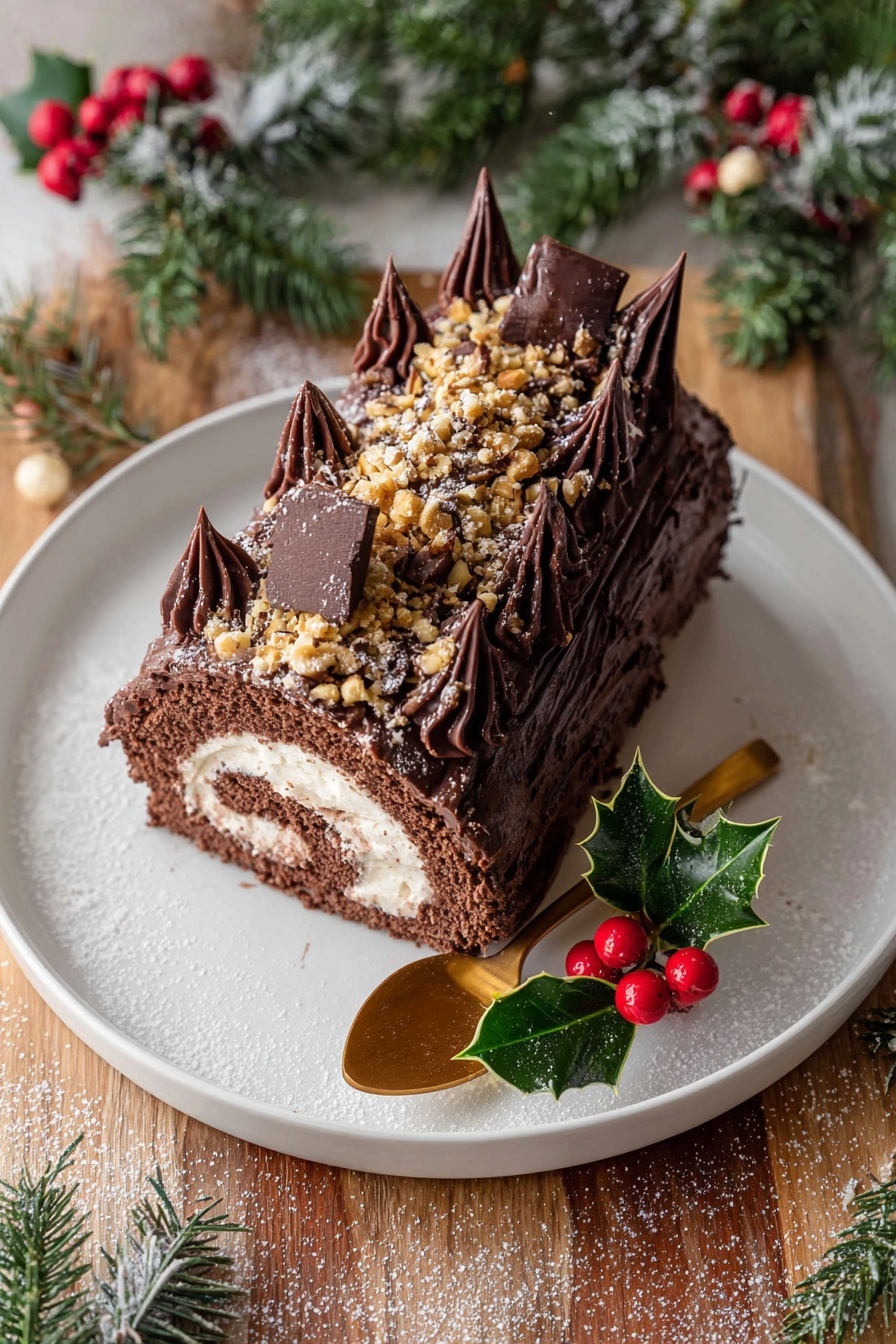
If you’re dreaming of a festive dessert that truly wows, I’ve got just the thing for you—a rich, tender, and downright irresistible Chocolate Hazelnut Yule Log Recipe. This isn’t just any chocolate roll; it’s a classic Bûche de Noël taken to a whole new level with that luscious hazelnut spread and a dreamy whipped cream combo. Stick with me and I’ll walk you through every step, sharing tricks to make sure your Yule log comes out looking gorgeous and tasting even better. Ready to wow your holiday guests (or treat yourself)? Let’s dive in!
Why This Recipe Works
- Light and Airy Sponge: Folding in whipped egg whites gently keeps the cake soft and perfect for rolling without cracking.
- Rich Chocolate Hazelnut Flavor: The combination of cocoa powder, espresso, and hazelnut spread creates a deep, nutty chocolate profile.
- Creamy, Sweetened Whipped Cream: A double-layer cream adding both texture and balance to the rich chocolate base.
- Beautiful Chocolate Bark Topping: Adds a stunning rustic look and a satisfying crunch to complement the cake’s softness.

Ingredients & Why They Work
This Chocolate Hazelnut Yule Log Recipe brings together just the right ingredients to give you a perfectly balanced dessert — chocolaty, light, and nutty, without being overwhelming. The ingredients are straightforward but quality matters, especially for your chocolate and cream.

- Eggs: Using room temperature eggs helps everything whip up nicely, especially the whites for that airy sponge.
- Caster Sugar: Also known as superfine sugar, it dissolves easily without graininess, leading to a smooth sponge.
- Vanilla Extract: Adds warmth and enhances the overall flavor without stealing the spotlight from the chocolate and hazelnuts.
- Plain Flour (All-Purpose Flour): Gives structure to the sponge but works best when carefully folded in to keep the texture soft.
- Cocoa Powder: Use unsweetened to get rich chocolate notes without extra sugar that could dry out the sponge.
- Espresso Powder: A tiny boost that intensifies the chocolate flavor, but you can skip it if you’re sensitive to coffee.
- Baking Powder: Ensures the sponge rises just enough to be light and springy without puffing up too much.
- Fine Salt: Balances sweetness and enhances all the chocolate and nutty notes.
- Double Cream (Heavy Cream): The backbone of the luscious whipped cream filling and coating — cold is key for best whipping results.
- Powdered Icing Sugar: Sweetens the cream smoothly without graininess.
- Vanilla Bean Paste or Extract: Adds extra depth and those lovely little vanilla specks when using the paste.
- Chocolate Hazelnut Spread: The star ingredient that brings creamy hazelnut richness; soften it slightly before spreading for ease.
- Dark Chocolate (70%): Used for the shards to decorate — choose quality chocolate for the best snap and flavor.
- Whole Hazelnuts (Optional): Toasted for extra crunch and that toasty flavor that complements the chocolate exquisitely.
Tweak to Your Taste
One of the joys of this Chocolate Hazelnut Yule Log Recipe is how easy it is to make your own. I love adding my little twists depending on the occasion or what I have on hand, so don’t be shy to get creative here!
- Nut-Free Variation: Substitute the hazelnut spread with a chocolate ganache or a nut-free chocolate spread if allergies are an issue — it’s still divine!
- Boozy Boost: Adding a teaspoon of hazelnut liqueur or your favorite orange liqueur into the whipped cream adds a festive adult twist that instantly elevates the dessert.
- Seasonal Touch: Try swirling in some crushed peppermint candy or orange zest into the cream for a fresh holiday spin I adore.
- Difficulty Level: If you’re short on time, you can skip the chocolate shards and simply dust with cocoa powder or powdered sugar — still gorgeous and tasty.
Step-by-Step: How I Make Chocolate Hazelnut Yule Log Recipe
Step 1: Whip Eggs and Prepare the Sponge Batter
Start by preheating your oven to 180°C (350°F) and prepping your baking pan with butter and parchment paper—you want that overhang to easily lift the sponge later without cracks. I usually grease the parchment too; it’s a game-changer to avoid stickiness. Next, whisk your egg whites until soft peaks form. Be patient here; this step sets the stage for a feather-light cake. Separately, whip the egg yolks with caster sugar and vanilla extract until the mixture is pale and leaves trails—usually about 5 minutes. Then sift together the flour, cocoa, espresso powder, baking powder, and salt. The two-step folding—dry ingredients and egg whites—into yolks is the trick to keeping the air in, so fold gently, friend!
Step 2: Bake and Roll the Sponge
Pour your batter into the pan and smooth the surface with an offset spatula. Bake the sponge for 10-12 minutes — watch closely as it can overbake quickly and crack when rolling. Once out, cool it for about 10 minutes to warm but not hot, then carefully invert it onto a cocoa-dusted tea towel. Peel away the parchment with love—this moment’s always a little magical to me. Roll the sponge up tightly in the towel, starting from the short edge, and let it rest to cool completely; this “resting” step helps prevent cracks when you unroll for filling.
Step 3: Make the Sweetened Whipped Cream
While the sponge chills, whip your double cream until soft peaks, then whisk in powdered sugar and vanilla until you get firm peaks. I always taste here—the cream should be lightly sweetened but balanced so it doesn’t overpower the cake. Take half of this cream out to use as the filling, and to the other half you’ll sift in cocoa powder to create that pretty chocolate whipped cream for the outside. Keep both covered in the fridge until you’re ready to assemble.
Step 4: Fill, Roll, and Chill
Carefully unroll the chilled sponge and spread a smooth layer of the chocolate hazelnut spread—all warmed slightly so it’s easy to spread without tearing the cake. Dollop and spread the plain whipped cream over the hazelnut layer evenly. Roll the cake back tightly but gently, making sure you don’t squeeze the filling out. Wrap it well in baking paper and plastic wrap, then pop it in the fridge for at least two hours to firm up—this is key to neat slicing and keeps your cream in place.
Step 5: Prepare the Chocolate Shards and Decorate
Melt your dark chocolate carefully over a double boiler or in short bursts in the microwave, stirring often. Spread it thinly on parchment and roll that parchment tightly like a scroll—this cools pretty fast and cracks into delicate shards. After the chocolate’s set, unwrap and gently break the bark into large shards for decorating. Now, smear the outside of your cake roll with that cocoa whipped cream, then press the shards all over, like the bark you’d see on an actual log. Sprinkle toasted hazelnuts in the cracks for crunch, dust with icing sugar and add a sprig of holly for festive flair. Voila—your masterpiece is ready!
Pro Tips for Making Chocolate Hazelnut Yule Log Recipe
- Don’t Skip the Cooling Step: Rolling the sponge while it’s still hot traps steam and causes sticking; waiting helps it roll cleanly without cracks.
- Use Digital Scales: Baking precision is your friend here—especially for the flour and cocoa to ensure a moist, tender sponge.
- Whip Your Cream Properly: Aim for firm peaks but don’t over-whip or it’ll turn grainy and start separating.
- Chill Thoroughly Before Decorating: This step helps your whipped cream stay firm and makes spreading chocolate shards easier and mess-free.
How to Serve Chocolate Hazelnut Yule Log Recipe
Garnishes
For the garnish, I’m a sucker for toasted hazelnuts sprinkled generously to add that irresistible crunch and nutty aroma. Dusting with just a bit of icing sugar evokes a snowy, wintery feel that guests adore. And don’t be shy with fresh holly sprigs or even some edible gold dust if you’re feeling fancy—these little touches make presentation pop.
Side Dishes
It’s a decadent dessert, so I like to keep the sides simple—a lightly brewed coffee or a creamy hot chocolate pairs beautifully. Alternatively, fresh berries or candied orange slices add a nice contrast and keep things lively on the palate.
Creative Ways to Present
For holiday dinners, I’ve wrapped the finished Yule log in a burlap ribbon, tucked some pine sprigs around the platter, and added fairy lights nearby—talk about festive charm! Another fun idea is slicing off a few pieces and serving them with whipped cream and a drizzle of hazelnut liqueur for a chic dessert plate that feels special but is so easy.
Make Ahead and Storage
Storing Leftovers
I store leftovers in an airtight container in the fridge, and honestly, the flavors meld even better after a day or two. Just be sure to bring slices to room temperature before serving so the cream and chocolate soften slightly for the best mouthfeel.
Freezing
Freezing works well if you make the sponge in advance without filling it. Wrap it tightly in plastic wrap and foil to keep freezer smells out, then thaw overnight in the fridge. I recommend filling and decorating fresh for a gorgeous texture, but freezing is a lifesaver for prepping ahead.
Reheating
Because it’s a no-bake decoration, reheating isn’t necessary. Just let refrigerated slices sit out for about 15 minutes so the cream softens slightly—this always makes the chocolate and fillings taste their best.
FAQs
-
Can I make the Chocolate Hazelnut Yule Log Recipe dairy-free?
Absolutely! Use coconut cream or a plant-based heavy cream alternative that whips well. Substitute the chocolate and hazelnut spreads with dairy-free versions too. Just note that texture and flavor might be slightly different, but just as delicious!
-
How do I prevent the sponge from cracking when rolling?
Make sure the sponge is warm, not hot, when you first roll it in the tea towel after baking. Letting it cool in the rolled shape “trains” the cake to be flexible. Also, don’t overbake — it should spring back when lightly pressed.
-
Can I prepare the cake in advance for a party?
Yes! You can bake and roll the sponge a day ahead, keep it wrapped in the refrigerator, and then fill, roll, and decorate on the day you want to serve. This breaks down the work and reduces stress.
-
What if I don’t have espresso powder?
No worries—espresso powder is optional and just enhances the chocolate flavor. If you don’t have it, omit it and your log will still be wonderfully chocolatey.
-
How should I slice the Yule log?
Use a sharp serrated knife and slice in a gentle sawing motion. For cleaner slices, you can warm your knife blade slightly under hot water and dry before cutting each slice.
Final Thoughts
Sharing this Chocolate Hazelnut Yule Log Recipe feels like passing along a little holiday love. I remember how excited I was the first time I brought this to a family gathering—it disappeared so fast, and everyone kept asking for the recipe! Whether you’re baking for Christmas or a special winter occasion, this dessert will bring smiles and maybe even a few happy tears. Give it a go—you’ll enjoy every step as much as the first bite.
Print
Chocolate Hazelnut Yule Log Recipe
- Prep Time: 30 minutes
- Cook Time: 12 minutes
- Total Time: 3 hours
- Yield: 12 slices
- Category: Dessert
- Method: Baking
- Cuisine: French
- Diet: Vegetarian
Description
This Chocolate Hazelnut Bûche de Noël is a festive and elegant Yule log cake featuring a light and airy chocolate sponge rolled with chocolate hazelnut spread and sweetened whipped cream. Decorated with chocolate shards and toasted hazelnuts, it’s a perfect centerpiece dessert for holiday celebrations.
Ingredients
Chocolate Sponge
- 4 large eggs, room temperature
- 100 g caster sugar (super-fine)
- 1 teaspoon vanilla extract
- 65 g plain flour (all-purpose)
- 35 g cocoa powder, plus extra for dusting
- 1 teaspoon espresso powder
- 1 teaspoon baking powder
- ¼ teaspoon fine salt
Sweetened Whipped Cream
- 480 ml double cream (heavy cream), cold
- 45 g powdered icing sugar (confectioners’ sugar)
- 1 teaspoon vanilla bean paste (or extract)
- 10 g cocoa powder
- 210 g chocolate hazelnut spread
Chocolate Shards
- 100 g dark chocolate 70%, finely chopped
To Serve
- 35 g whole hazelnuts, toasted, optional
Instructions
- Prepare the Chocolate Sponge: Preheat your oven to 180°C (350°F). Grease a 25x38cm (10×15-inch) Swiss roll pan with butter or non-stick spray, then line it with parchment paper that overhangs the sides. Grease the parchment paper to ensure easy removal after baking.
- Whisk Egg Whites: Using an electric mixer, whisk the egg whites on medium-high speed until soft peaks form.
- Whip Egg Yolks and Sugar: In a separate bowl, whip together the egg yolks, caster sugar, and vanilla extract on medium-high for 5 minutes until the mixture is light and creamy, forming trails when the whisk is lifted.
- Sift Dry Ingredients: Sift the plain flour, cocoa powder, espresso powder, baking powder, and salt into a bowl and whisk together.
- Combine Mixtures: Add half of the dry ingredient mixture to the egg yolk mixture, then fold in half of the egg whites gently with a rubber spatula. Repeat by adding the remaining dry ingredients and egg whites, folding carefully to maintain airiness without overmixing.
- Bake Sponge: Pour the batter into the prepared pan and smooth it out evenly. Bake for 12 minutes, until a toothpick inserted in the center comes out clean and the sponge springs back lightly when pressed.
- Cool and Prepare to Roll: Remove from oven and cool on a wire rack for 10 minutes. Meanwhile, lay a tea towel or parchment paper on your work surface and dust generously with cocoa powder. Invert the warm sponge onto the dusted surface and gently peel off the parchment paper from the bottom of the sponge.
- Roll the Sponge: Starting from the short end, roll the sponge gently but firmly with the tea towel inside and set aside seam-side down to cool completely.
- Make Sweetened Whipped Cream: Whisk cold double cream in a stand mixer until soft peaks form. Add powdered icing sugar, vanilla bean paste, and hazelnut liqueur (if used), then whisk until firm peaks form. Remove half of the whipped cream for the filling and set aside. Sift cocoa powder into the remaining cream and fold gently to combine for the outer coating. Refrigerate both bowls of cream.
- Fill and Re-roll the Cake: If the chocolate hazelnut spread is hard, microwave it for 10 seconds to soften. Unroll the cooled sponge and spread the hazelnut spread evenly over it. Dollop the reserved plain whipped cream on top and spread to an even layer. Carefully re-roll the sponge from the short end without squeezing out the filling. Wrap tightly in baking paper and plastic wrap, then refrigerate for at least 2 hours.
- Make Chocolate Shards: Melt the chopped dark chocolate in a bowl over simmering water, stirring until smooth. Spread the melted chocolate thinly onto a piece of parchment paper slightly wider than the cake roll. Cover with another piece of parchment and roll both together into a tube. Chill in the refrigerator until set.
- Prepare Chocolate Bark: Once the chocolate is firm, unroll the parchment carefully to create shards. Break any large pieces as needed.
- Decorate the Cake: Remove the cake roll from refrigeration and unwrap it. Smother the roll evenly with the chocolate whipped cream, ensuring it holds firm peaks. Press the chocolate shards over the top and sides, leaving the ends free and allowing some overlap for an authentic bark appearance. Sprinkle toasted hazelnuts into the cracks and around the base. Dust with powdered icing sugar and add a sprig of holly for decoration. Refrigerate until ready to serve.
Notes
- Step-by-step photos are available on the blog to guide you through the process.
- Store the Yule Log in an airtight container in the refrigerator for up to 5 days.
- The unfilled rolled sponge can be frozen for up to 2 months; thaw overnight in refrigerator before filling.
- Weigh flour and cocoa powder with digital scales for precision.
- Do not overbake the sponge to avoid cracking.
- Allow the sponge to cool for about 10 minutes before rolling to prevent sticking.
- Whip the cream until firm peaks to ensure it holds shape during rolling.
- Refrigerate the roll before applying the chocolate ganache to help it set well.
Nutrition
- Serving Size: 1 slice
- Calories: 450 kcal
- Sugar: 28 g
- Sodium: 120 mg
- Fat: 32 g
- Saturated Fat: 15 g
- Unsaturated Fat: 15 g
- Trans Fat: 0 g
- Carbohydrates: 35 g
- Fiber: 5 g
- Protein: 6 g
- Cholesterol: 110 mg


