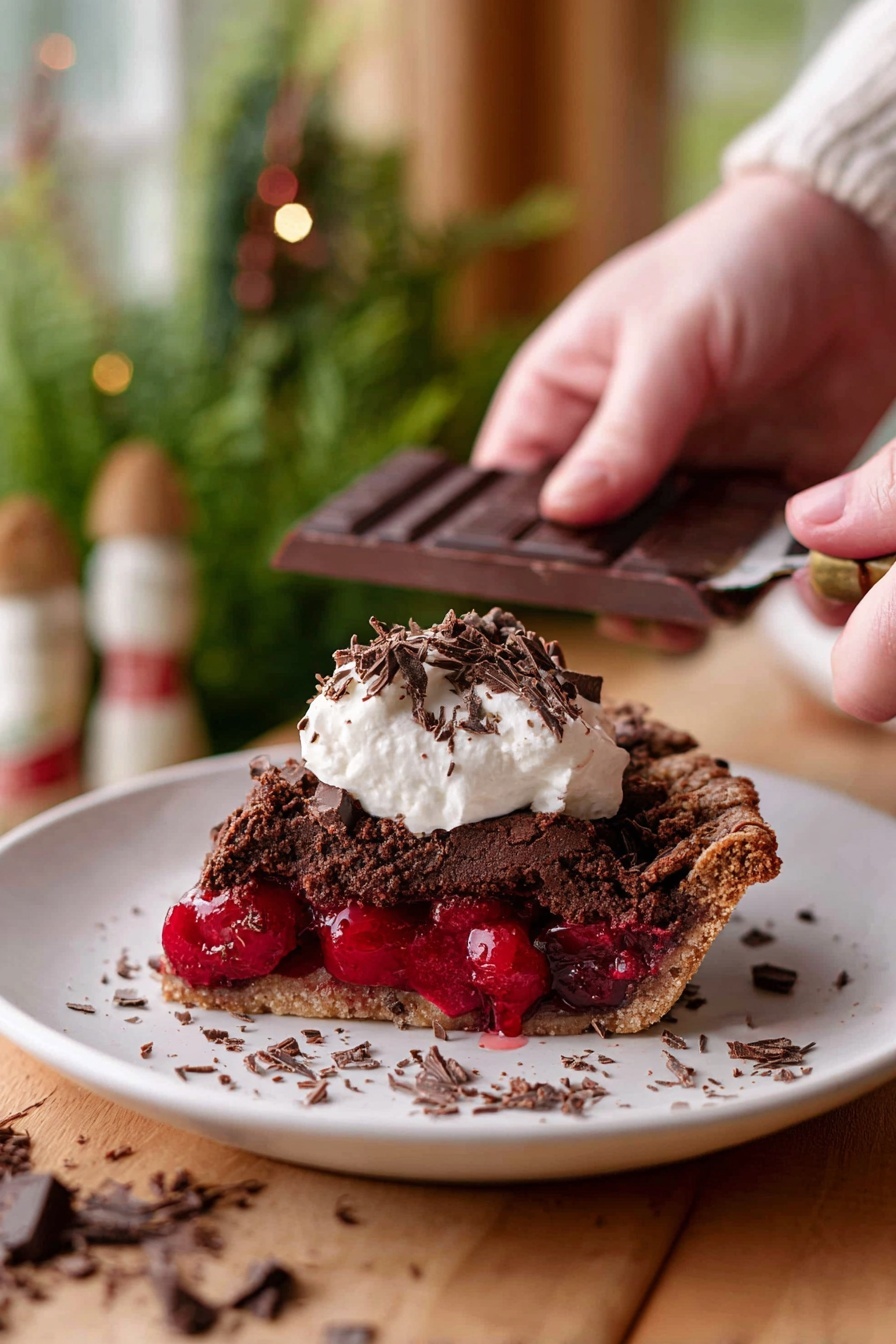
Chocolate Cherry Black Forest Pie Recipe
Alright, friend, if you love the dreamy flavors of chocolate and cherries together, you’re going to fall head over heels for this Chocolate Cherry Black Forest Pie Recipe. It’s like a rich chocolate dream hugged those tart cherries in a fluffy, buttery crust, topped with the creamiest mascarpone whipped cream. Trust me, once you make this pie, it’ll instantly become your go-to dessert for special gatherings or lazy weekend indulgences. If you want all the secrets to make it perfect — stick around, because this recipe is fan-freaking-tastic and I’ve got tons of tips to help you nail it every time!
Why This Recipe Works
- Perfect Balance of Flavors: The tart cherries provide a lively contrast to the rich, deep cocoa crust and creamy mascarpone topping.
- Textural Harmony: The crisp, chocolatey crust, bubbling cherry filling, and fluffy whipped cream all play off each other beautifully.
- Hands-On Yet Easy: It’s an approachable recipe that gives you room to get creative without feeling overwhelmed.
- From-Fridge to Oven: Using frozen cherries means less prep and the filling thickens perfectly as it bakes.

Ingredients & Why They Work
Each ingredient in this Chocolate Cherry Black Forest Pie Recipe plays a starring role. Whether it’s the cocoa in the crust for richness or the hint of almond in the filling, they all come together to create an irresistible classic with a twist. When shopping, grab the best quality ingredients you can—especially butter and fresh vanilla—to really boost flavor.

- All-purpose flour: The base of your crust, it gives structure without heaviness.
- Cocoa powder: Adds that earthy chocolate punch to the crust without sweetness.
- Unsalted butter: Using cold, cubed butter helps create those flaky, tender layers in the crust.
- Sour cream: A secret to tender, moist pie crust that’s not too crumbly.
- Frozen tart cherries: Keeping cherries frozen prevents excess juice from making the filling soggy.
- Cornstarch: Thickens the cherry filling as it bakes so it’s perfectly luscious, not runny.
- Cherry liquor (optional): A boozy boost that accentuates cherry flavor if you’re feeling fancy.
- Mascarpone cheese: Makes the whipped cream incredibly silky and rich—think cream cheese but lighter.
- Dark chocolate bar: For those beautiful shavings that add a crunchy, chocolatey finishing touch.
Tweak to Your Taste
I like to play around a little depending on the occasion. Sometimes I swap out the cherry liquor with kirsch or even a bit of almond liqueur for a different twist. Feel free to dial up the cinnamon for extra warmth or swap mascarpone for cream cheese if you want a tangier whipped topping. The best part is you can customize this Chocolate Cherry Black Forest Pie Recipe to make it truly yours!
- Dairy-free variation: Substitute vegan butter for the crust and coconut cream for the whipped topping; it’s surprisingly good and still decadent.
- Extra chocolate: Sprinkle mini chocolate chips into the filling for bursts of melty goodness.
- Less sweet: Reduce sugar in the filling if your cherries are extra tart or you prefer a less sugary dessert.
Step-by-Step: How I Make Chocolate Cherry Black Forest Pie Recipe
Step 1: Crafting the Chocolate Sour Cream Pie Crust
Start by whisking together the flour, cocoa powder, salt, and sugar in a big bowl — this powders the base for your magical crust. Then toss in the cubed, frozen butter and work it with your fingertips or a pastry cutter until it looks like chunky peas mixed with flour. The key here is to keep the butter cold and chunky — that’s what makes the crust flaky and tender, not tough. Next, stir in the sour cream and vanilla, then add cold water, just a tablespoon at a time, mixing until the dough just comes together. No kneading needed! I fold the dough three times and cut it into two disks before wrapping and chilling in the fridge for at least an hour. Pro tip—this chilling step is crucial for ease of rolling and flavor development.
Step 2: Preparing the Tart Cherry Filling
While your dough chills, preheat the oven to 355°F (180°C). In a large bowl, combine those frozen tart cherries with sugar, cornstarch, salt, cinnamon, cherry liquor (only if you want to), and almond extract. Toss everything together until the cherries are nicely coated. I love keeping the cherries frozen here because it prevents the filling from getting too watery, and it helps everything come together beautifully as it bakes. Once mixed, pop the filling back into the fridge while you roll out your dough.
Step 3: Rolling & Assembling the Pie
On a well-floured surface, roll out one dough disk to about ¼ inch thick, then gently lift and fit it into your pie plate—don’t stretch it, or the crust might shrink during baking. Pour in all that luscious cherry filling, making sure you get every sugary, cornstarch-coated bit in there. Next, roll out the second disk and cut it into 1.5-inch strips for a classic lattice top. Weave those strips over the cherries to form this pretty lattice pattern. Trim the edges, leaving about an inch, then fold and crimp the edges for a nice finish. Before baking, brush the top with heavy cream and generously sprinkle coarse sugar for that extra crunch and sparkle.
Step 4: Baking to Perfection
Place your pie on a larger baking sheet to catch drips and bake on the lower rack for about 60-75 minutes. You’ll know it’s done when the filling is bubbling nicely and the crust edges look golden and crisp. If you spot the crust browning too fast, tent it loosely with foil to avoid burning. Once baked, let the pie cool until warm or room temp—this helps the filling set perfectly so you can slice neat pieces without any ooze.
Step 5: Whipping Up Vanilla Mascarpone Cream
The best finish to this pie is a luscious dollop of vanilla mascarpone whipped cream. In a chilled bowl, combine cold heavy cream, sugar, vanilla, and salt. Whip with a whisk or mixer until you get medium-stiff peaks. Then gently fold in that creamy mascarpone cheese and whip just a bit more until stiff peaks form. Dollop it on your pie slices and finish with chocolate shavings from a dark chocolate bar—trust me, it’s the little wow factor everyone will ask about.
Pro Tips for Making Chocolate Cherry Black Forest Pie Recipe
- Keep Butter Cold: Always cube and freeze your butter before mixing; this creates flaky layers in the crust that melt in your mouth.
- Use Frozen Cherries: They reduce excess juice which helps the pie filling thicken better and the crust stay crisp.
- Watch Your Bake Time: Tent the edges with foil if they brown before filling bubbles to keep the crust perfectly golden.
- Serve Warm: This pie tastes best when served warm, so the crust is tender yet crisp and the filling is perfectly luscious.
How to Serve Chocolate Cherry Black Forest Pie Recipe
Garnishes
I always top slices with a generous spoonful of that fluffy vanilla mascarpone whipped cream and then shave dark chocolate right on top—it adds a nice textural contrast and a little extra chocolate hit. Sometimes I toss a few fresh cherries on for a pretty pop of color if they’re in season. It just makes the pie feel festive and extra special.
Side Dishes
This pie is rich and satisfying enough on its own, but I love pairing it with a simple espresso or a scoop of vanilla bean ice cream to balance the rich chocolate and tart cherries. For a brunch twist, it’s fantastic alongside fresh fruit salad or light whipped ricotta toast.
Creative Ways to Present
For parties, I’ve made mini versions using tart pans — they’re adorable and perfect for individual servings. Drizzling some warmed cherry sauce from the filling around the plate looks upscale. You can also pipe the mascarpone cream with a pretty star tip instead of dolloping, which elevates the presentation instantly.
Make Ahead and Storage
Storing Leftovers
I usually cover leftover pie with foil and keep it in the fridge — it stays fresh for up to 5 days. Because of the cornstarch in the filling, the texture is best if eaten within this timeframe. The whipped cream I store separately in an airtight container to keep it fluffy.
Freezing
Heads up: Freezing this Chocolate Cherry Black Forest Pie Recipe isn’t ideal because cornstarch can break down and get grainy when thawed. That said, if you want to freeze, try swapping cornstarch with arrowroot powder, which handles freezing better. Then wrap tightly in plastic and foil to prevent freezer burn.
Reheating
To reheat slices, I gently warm them in the oven at 300°F for about 10 minutes until the filling bubbles again but be careful not to melt the whipped cream topping. If you refrigerated the whipped cream separately, just add it after warming.
FAQs
-
Can I use fresh cherries instead of frozen for this Chocolate Cherry Black Forest Pie Recipe?
Great question! You can use fresh cherries if they’re in season, but I recommend cooking them down a bit beforehand or adding a bit more cornstarch since fresh cherries release more juice than frozen ones. Using frozen cherries generally gives a better consistency without extra prep because the pie bakes with the juices controlled.
-
Is there a substitute for sour cream in the chocolate pie crust?
Yes! If you don’t have sour cream on hand, you can use Greek yogurt or crème fraîche. Both provide the moisture and acidity that help tenderize the crust, which makes all the difference for that perfect crumbly but sturdy base.
-
How do I make the lattice top look neat and even?
Rolling your dough evenly and using a ruler to cut straight 1.5-inch strips helps a ton! When weaving the lattice, be gentle and give the dough strips enough space to avoid crowding—this prevents shrinking and cracking during baking.
-
Can I make the vanilla mascarpone whipped cream ahead of time?
Absolutely! You can whip up the cream and store it in the fridge for up to three days. Give it a quick whisk before serving to refresh the texture if needed—but honestly, it holds up beautifully when well chilled.
Final Thoughts
This Chocolate Cherry Black Forest Pie Recipe holds a special place in my heart because it’s exactly the kind of dessert that feels fancy but is totally doable. I remember bringing it to a small get-together, and everyone was begging for the recipe — it just hits all the right notes with chocolate, fruit, and creaminess. I hope you’ll enjoy making it as much as I do, and impress your friends and family with this stunning slice of comfort. Seriously, give it a try, and let me know how your pie turns out. I’m rooting for you!
Print
Chocolate Cherry Black Forest Pie Recipe
- Prep Time: 30 minutes
- Cook Time: 1 hour 15 minutes
- Total Time: 1 hour 45 minutes
- Yield: 12 slices
- Category: Dessert
- Method: Baking
- Cuisine: American
- Diet: Vegetarian
Description
This Chocolate Cherry Black Forest Pie combines a rich chocolate sour cream crust with a tart cherry filling, topped with a lattice crust and finished with a luscious vanilla mascarpone whipped cream. Perfect for dessert lovers who enjoy a balance of chocolate and fruit flavors in a classic Black Forest style.
Ingredients
Chocolate Sour Cream Pie Crust
- 2 ¼ cup all purpose flour
- ⅓ cup cocoa powder
- ½ teaspoon sea salt
- ¼ cup granulated sugar
- 1 cup unsalted butter cut into 1 cm cubes and frozen
- ⅓ cup sour cream cold
- 1 tablespoon pure vanilla extract
- ¼ cup cold water
Tart Cherry Pie Filling
- 1 ½ lbs tart cherries frozen, do not defrost (about 6 cups)
- ¾ cup granulated sugar
- 4 tablespoons cornstarch
- ¼ teaspoon sea salt
- ½ teaspoon ground cinnamon
- 2 tablespoons cherry liquor (optional)
- ½ teaspoon almond extract
- 2 tablespoons heavy whipping cream
- 2 tablespoons coarse demerara sugar
Vanilla Mascarpone Whipped Cream
- ¾ cup heavy whipping cream cold
- 2 tablespoons granulated sugar
- ½ teaspoon vanilla extract
- ⅛ teaspoon sea salt
- ½ cup mascarpone cheese cold
- ¼ bar dark chocolate for shaving on top
Instructions
- Prepare the Pie Crust: In a large bowl, combine the flour, cocoa powder, sea salt, and granulated sugar. Add the cold, cubed butter and work it into the mixture until it resembles coarse peas and flour. Mix in the sour cream and vanilla extract well with a spoon. Gradually add cold water, one tablespoon at a time, mixing with your hands until the dough comes together, approximately two tablespoons total. Flatten and fold the dough three times in the bowl, then divide it in half and form two disks. Wrap each disk and refrigerate for at least one hour or overnight.
- Prepare the Tart Cherry Filling: Preheat the oven to 355°F (180°C). In a large bowl, combine the frozen tart cherries, granulated sugar, cornstarch, sea salt, ground cinnamon, cherry liquor (if using), and almond extract. Mix well to coat all the cherries evenly. Set the filling aside in the refrigerator until ready to use.
- Roll Out Pie Crust and Assemble Filling: On a floured surface, roll out one dough disk to ¼ inch thickness. Transfer it carefully into a pie plate, allowing it to settle without stretching. Fill the crust with the tart cherry mixture, including all the dry bits for full flavor, piling it in the center of the crust.
- Create the Lattice Top: Roll out the second dough disk to the same thickness. Cut it into 1.5 inch wide strips and arrange them overlapping in a lattice pattern over the cherry filling. Trim the edges leaving about 1 inch excess and tuck the edges under the bottom crust edge. Crimp the edges using your fingers or a fork to seal the pie.
- Prepare for Baking: Brush the lattice crust with heavy whipping cream and sprinkle evenly with coarse demerara sugar. Place the pie plate on a larger cookie sheet to catch drips and bake in the bottom half of the oven for 75 minutes or until the filling is bubbling and the crust is crisp. If the edges or top crust brown too quickly, tent the pie with aluminum foil to prevent burning.
- Cool the Pie: Remove the pie from the oven and allow it to cool to warm or room temperature before slicing and serving.
- Make Vanilla Mascarpone Whipped Cream: In a large bowl or electric mixer, whip the cold heavy whipping cream with granulated sugar, vanilla extract, and sea salt using a wire whisk until medium-stiff peaks form. Add cold mascarpone cheese and continue to whip to stiff peaks. Use immediately or refrigerate for up to 3 days.
- Serve: Spoon a dollop of vanilla mascarpone whipped cream over each slice of pie. Use a vegetable peeler to shave dark chocolate over the whipped cream for garnish.
Notes
- Make ahead: The pie and whipped cream can be made a day in advance and stored separately in the refrigerator.
- Storage: Store the pie covered in the fridge for up to 5 days. Avoid freezing due to cornstarch thickener; substitute arrowroot starch if freezing is necessary.
- Do not overwork the butter in the crust to keep it flaky and tender.
- Keep cherries frozen until filling preparation to make assembly easier.
- Bake the pie until the filling bubbles, tenting with foil if the crust edges begin to brown prematurely.
- Serve the pie warm for the best texture with a tender, crisp crust.
Nutrition
- Serving Size: 1 slice (1/12 of pie)
- Calories: 370 kcal
- Sugar: 28 g
- Sodium: 150 mg
- Fat: 22 g
- Saturated Fat: 13 g
- Unsaturated Fat: 7 g
- Trans Fat: 0 g
- Carbohydrates: 38 g
- Fiber: 4 g
- Protein: 5 g
- Cholesterol: 55 mg


