Cherry Pie Bars Recipe
If you’re a fan of all things sweet and fruity, let me introduce you to my absolute favorite go-to treat: this Cherry Pie Bars Recipe. It’s got the delicious, nostalgic flavor of cherry pie but way easier to whip up, making it a total crowd-pleaser any time you want a dessert that feels like a warm hug. Trust me, once you try these cherry pie bars, you’ll want to keep them in your baking rotation.
Why This Recipe Works
- Perfect Balance of Sweet and Tart: The cherry pie filling brings the classic tangy flavor paired beautifully with the buttery cake-like base.
- Easy to Make: No complicated crust rolling or lattice weaving, just simple layering and dolloping that anyone can master.
- Versatile Serving: Great on its own, with ice cream, or drizzled with that luscious glaze on top.
- Reliable Texture: Soft, moist bars that hold together well without crumbling – perfect for sharing or packing for on-the-go treats.

Ingredients & Why They Work
Each ingredient in this Cherry Pie Bars Recipe plays a key role in creating the perfect balance of flaky, sweet, and tangy flavors. The shopping tip? Grab quality canned cherry pie filling and fresh butter to get those rich flavors shining through.

- Unsalted Butter: Softened butter creates that tender crumb and lets you control the saltiness perfectly.
- Granulated Sugar: Sweetens the bars without overpowering the cherries.
- Large Eggs: They bind everything together, giving the bars their sturdy yet moist texture.
- Vanilla Extract: Adds warmth and depth, smoothing out the flavors beautifully.
- Almond Extract: Just a hint enhances the cherry flavor and adds a subtle nutty undertone.
- All-Purpose Flour: The backbone of the bars, providing structure and that cake-bar feel.
- Salt: Heightens all the sweet and fruity notes — don’t skip it!
- Cherry Pie Filling: Canned filling is super convenient and delivers that classic cherry pie taste with juicy fruit and thick syrup.
- Powdered Sugar (for glaze): Creates a smooth and sweet finish, balancing tartness.
- Milk: Thins the glaze just enough to drizzle beautifully over the bars.
Tweak to Your Taste
One of the best parts about this Cherry Pie Bars Recipe is how easy it is to customize to your liking. Over the years, I’ve played around with adding my own twist to surprise friends and family—feel free to experiment, too!
- Swap the Filling: I sometimes switch out cherry for blueberry or mixed berry filling depending on the season and what’s in my pantry — both are fantastic alternatives.
- Make It Gluten-Free: Switching the flour to a gluten-free blend works well, just be aware the texture becomes slightly denser.
- Extra Crunch: Sprinkle some slivered almonds or chopped pecans on top before baking—I love the surprise crunch it adds!
Step-by-Step: How I Make Cherry Pie Bars Recipe
Step 1: Get the Oven and Pan Ready
First things first, preheat your oven to 350°F. I usually line a 9 x 13-inch pan with parchment paper and spray it lightly with pan spray—this helps with easy removal and clean-up later. Trust me, this small step saves a lot of hassle.
Step 2: Cream Butter and Sugar
In a large bowl, beat together 1 cup of softened unsalted butter and 2 cups of granulated sugar until light and fluffy. This usually takes about 3-4 minutes with a hand mixer. This step is super important because it builds the base texture — don’t rush it!
Step 3: Add Eggs and Extracts
Next, add your 4 large eggs one at a time, beating well after each addition. Then stir in 1 teaspoon vanilla and ¼ teaspoon almond extract. The almond extract is subtle but really makes those cherry flavors pop.
Step 4: Mix Dry Ingredients and Combine
In a separate bowl, whisk together 3 cups of all-purpose flour and 1 teaspoon salt. Gradually add this to your wet mixture, stirring just until everything comes together—overmixing can toughen the bars, so slow and steady wins the race.
Step 5: Layer It Up!
Spread about 3 cups of the batter evenly across the bottom of your prepared pan. Then spoon on the cherry pie filling, covering the batter evenly. Last, drop dollops of the remaining batter on top—don’t worry if it’s not perfectly smooth, it bakes into a beautiful rustic look.
Step 6: Bake and Cool
Bake for 35-40 minutes until the top is golden brown and a toothpick inserted into the crust (not the filling) comes out clean. If you use a bigger pan (15 x 10-inch), check around 30 minutes as it bakes faster. Cooling completely before glazing is key to prevent the glaze from melting away.
Step 7: Drizzle the Glaze
Whisk together 1 cup powdered sugar with ½ teaspoon each of vanilla and almond extract, plus 2 tablespoons milk. Drizzle this over the cooled bars for that extra sweet shine and flavor boost. It’s my favorite finishing touch!
Pro Tips for Making Cherry Pie Bars Recipe
- Soft Butter is Key: When creaming, make sure butter is soft but not melted for the best texture.
- Don’t Overmix Flour: Mix just until combined to keep your bars tender.
- Even Batter Layer: Use an offset spatula to spread the batter evenly—it helps keep the bars uniform and makes slicing easier later.
- Cool Completely Before Glazing: Otherwise, your glaze will soak right in and lose that pretty drizzle effect.
How to Serve Cherry Pie Bars Recipe

Garnishes
I love topping these cherry pie bars with a light dusting of powdered sugar or a few fresh cherries when in season. Sometimes a dollop of whipped cream or a scoop of vanilla ice cream turns them into an extra indulgent treat.
Side Dishes
If you’re serving these bars at a brunch or gathering, they pair beautifully with a hot cup of coffee or a chilled glass of milk. For a more festive setting, try them alongside simple savory bites like cheese platters or fresh fruit salad.
Creative Ways to Present
For parties, I like to cut the bars into bite-sized squares and arrange them on a rustic wooden board alongside fresh mint leaves for a pop of color. You can also serve them layered with whipped cream in small glass cups for an elegant twist!
Make Ahead and Storage
Storing Leftovers
I keep leftover cherry pie bars covered tightly in an airtight container at room temperature for up to 3 days. If your kitchen’s warm, I recommend storing them in the fridge to keep the glaze from getting sticky.
Freezing
These bars freeze beautifully! Just wrap them tightly in plastic wrap and foil, then store in a freezer-safe container. When I’m ready to enjoy them, I thaw on the counter for a few hours or overnight in the fridge.
Reheating
To warm up a bar or two, I pop them in the microwave for about 15-20 seconds or heat gently in a 300°F oven for 5-7 minutes. Either way, it refreshes the flavors and softens the texture without drying them out.
FAQs
-
Can I use fresh cherries instead of canned pie filling?
You absolutely can! If you want to use fresh cherries, you’ll need to macerate them with sugar and maybe a bit of lemon juice to bring out their juices, then thicken the filling with a bit of cornstarch before layering. It’s a bit more work but yields a fresh, summery twist.
-
What pan size works best for cherry pie bars?
A 9 x 13-inch pan is the classic choice, giving you bars with a nice thickness. If you use a larger pan, like 15 x 10 inches, the bars will be thinner and bake a bit faster, so just keep an eye on them.
-
Can I make these bars ahead of time for a party?
Yes! They actually taste even better a few hours after baking, as the flavors meld beautifully. Just bake the day before and store covered at room temp or refrigerated; glaze just before serving for that fresh look.
-
Any substitute if I don’t have almond extract?
If almond extract isn’t on hand, you can skip it or add a little extra vanilla extract instead. The almond adds that classic cherry flavor hint, so a little makes a big difference but it’s not essential.
Final Thoughts
I remember the first time I baked these cherry pie bars—they instantly became a family favorite and a staple for potlucks and weeknight desserts. I love how they capture the charm of homemade pie without the fuss. Give this recipe a try—you’ll love how simple and delicious it is, and I promise it’s one your friends and family will keep asking you to make again and again.
Print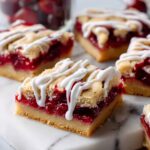
Cherry Pie Bars Recipe
- Prep Time: 20 minutes
- Cook Time: 40 minutes
- Total Time: 1 hour
- Yield: 24 bars
- Category: Dessert
- Method: Baking
- Cuisine: American
Description
Delight in the sweet and tangy flavors of these Cherry Pie Bars featuring a buttery crust, luscious cherry filling, and a smooth almond-vanilla glaze. Perfect for dessert or a special treat.
Ingredients
Base Batter
- 1 cup softened unsalted butter
- 2 cups granulated sugar
- 4 large eggs
- 1 teaspoon vanilla extract
- ¼ teaspoon almond extract
- 3 cups all-purpose flour
- 1 teaspoon salt
Filling
- 2 (21-ounce) cans cherry pie filling
Glaze
- 1 cup powdered sugar
- ½ teaspoon vanilla extract
- ½ teaspoon almond extract
- 2 tablespoons milk
Instructions
- Preheat and Prepare Pan: Preheat the oven to 350 degrees Fahrenheit and spray a 9 x 13 x 2-inch baking pan with pan spray. Set aside.
- Cream Butter and Sugar: In a large bowl, cream together 1 cup softened unsalted butter and 2 cups granulated sugar until smooth and fluffy.
- Add Eggs and Extracts: Beat in 4 large eggs until well incorporated. Then add 1 teaspoon vanilla extract and ¼ teaspoon almond extract, beating well to combine.
- Mix Dry Ingredients: In a separate bowl, whisk together 3 cups all-purpose flour and 1 teaspoon salt. Gradually add the flour mixture to the creamed butter and sugar mixture, mixing until just combined to form the batter.
- Assemble Bars: Spread 3 cups of the batter evenly on the bottom of the prepared pan. Top the batter with the 2 (21-ounce) cans of cherry pie filling, spreading evenly. Drop dollops of the remaining batter evenly over the cherry filling.
- Bake: Bake in the preheated oven for 40 minutes or until a toothpick inserted into the bars comes out clean and the top is lightly golden brown. If using a 15 x 10-inch pan, bake for about 30 minutes.
- Cool: Remove from oven and let the bars cool completely in the pan to allow the filling to set properly.
- Prepare and Drizzle Glaze: Whisk together 1 cup powdered sugar, ½ teaspoon vanilla extract, ½ teaspoon almond extract, and 2 tablespoons milk until smooth. Drizzle the glaze evenly over the cooled bars.
Notes
- For best results, fully cool the bars before applying the glaze to prevent it from melting.
- If you don’t have almond extract, you can increase the vanilla extract slightly as a substitute.
- Using a 15 x 10-inch pan will produce slightly thinner bars and reduce the baking time to about 30 minutes.
- Make sure the butter is softened to room temperature for easier creaming and better texture.
- Cherry pie filling can be swapped with other fruit fillings like blueberry or apple for variation.
Nutrition
- Serving Size: 1 bar
- Calories: 320 kcal
- Sugar: 28 g
- Sodium: 150 mg
- Fat: 14 g
- Saturated Fat: 8 g
- Unsaturated Fat: 5 g
- Trans Fat: 0 g
- Carbohydrates: 44 g
- Fiber: 1 g
- Protein: 3 g
- Cholesterol: 70 mg
