Cheesy Garlic Butter Pull Apart Rolls Recipe
If you’ve been hunting for a cozy, irresistible bread to make at home, I promise you’re going to love this Cheesy Garlic Butter Pull Apart Rolls Recipe. Imagine soft, fluffy rolls bursting with gooey mozzarella cheese and drenched in a rich garlic butter sauce—yes, please! These rolls are perfect for a weekend brunch, a comforting snack, or as a show-stopping side to your dinner. I’ll walk you through every little detail so you can nail it the first time (and every time).
Why This Recipe Works
- Perfectly Soft Dough: The combination of warm milk, yeast, and butter creates a tender dough that’s easy to work with and stays soft after baking.
- Flavor-Packed Garlic Butter: Melting garlic right into the butter and combining it with parmesan ensures every bite is rich, savory, and addictive.
- Cheesy Surprise Inside: Incorporating shredded mozzarella into each roll means every pull reveals stretchy, melty goodness—just what you want in pull-apart rolls!
- Easy to Customize: The dough and filling offer a great base to play around with herbs, cheese types, or spices, so you can tailor these rolls to your family’s favorites every time.

Ingredients & Why They Work
The ingredients for this Cheesy Garlic Butter Pull Apart Rolls Recipe come together in a way that makes the bread incredibly soft, lightly sweet, and loaded with flavor. From the milk that feeds the yeast to the combination of cheeses that bring it all together, each item plays an important role. Here are some tips as you shop and prep.
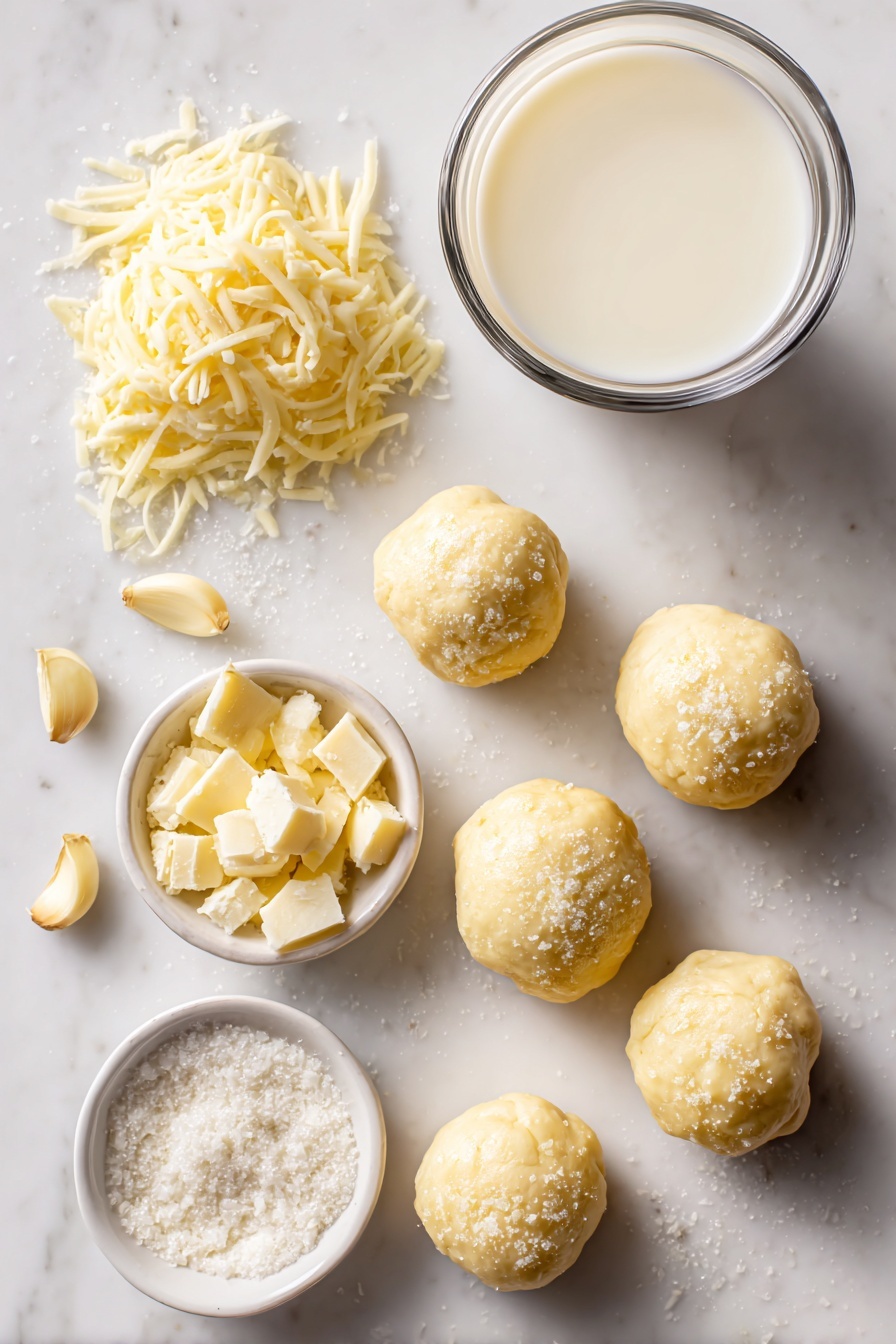
- Whole or 2% Milk: Warmed just right, it activates the yeast without killing it, ensuring your dough rises perfectly.
- Instant Dry Yeast: Easy to use and reliable, it gives those rolls their airy texture.
- Granulated Sugar: Feeds the yeast and adds a subtle touch of sweetness to balance savory flavors.
- Salt: Enhances all the flavors while controlling yeast activity for proper rise.
- Salted Butter (softened & melted): Adds richness — softened butter goes into the dough for tenderness, while melted butter mixes with garlic for that shiny, flavorful coating.
- Large Egg: Binds the dough together, enriching the texture and color.
- All-Purpose Flour: Gives structure; be sure to add it gradually to reach the perfect soft but not sticky dough consistency.
- Shredded Mozzarella Cheese: Melts beautifully inside each roll for gooey pull-apart bites that everyone loves.
- Minced Garlic: Fresh garlic is a must here — it’s the star that flavors the butter and makes these rolls irresistible.
- Grated Parmesan Cheese: Adds a salty, nutty kick to the garlic butter coating, layering flavors for depth.
Tweak to Your Taste
One of the things I love about this Cheesy Garlic Butter Pull Apart Rolls Recipe is how easy it is to make it your own. Once you’ve mastered the basics, don’t be afraid to mix things up! I’ve played around with adding herbs and even swapped cheeses for different flavor profiles.
- Herb Infusion: Add fresh rosemary or thyme to the garlic butter before baking—my friends adore the fresh herbal aroma it brings.
- Cheese Variations: Try a blend of mozzarella and sharp cheddar or even pepper jack for a little spice—you’ll get a fun twist with the same comforting texture.
- Garlic Intensity: Love garlicky flavors? Add a bit more minced garlic or crush a clove for a punchier taste, but be mindful not to overpower the roll’s softness.
- Dietary Modifications: For dairy-free butter, use plant-based alternatives and consider nutritional yeast in place of parmesan for that cheesy vibe.
Step-by-Step: How I Make Cheesy Garlic Butter Pull Apart Rolls Recipe
Step 1: Warm Milk and Activate Yeast
Start by warming your milk to about 100°F–110°F—body temperature is perfect. I usually microwave it in 30-second bursts, stirring in between, or gently warm it in a saucepan over medium-low heat. The wrong temp can kill your yeast, so take a thermometer if you have one, or just trust your finger: it should feel warm, not hot. Once warm, stir in your yeast and sugar and let it sit for a few minutes if you want – though with instant yeast, you can add it directly to dry ingredients, but I find this warms the process up nicely.
Step 2: Mix and Knead the Dough
In your mixer bowl or large mixing bowl if kneading by hand, combine your warm milk mixture with butter, egg, salt, sugar, and a portion of your flour. I like to start mixing on low speed to combine, then ramp it up to medium as the flour incorporates. Slowly add more flour bit by bit until your dough pulls cleanly from the bowl sides. You’re aiming for a soft dough that’s slightly tacky but not sticky enough to cling to your fingers. This soft texture makes for tender rolls, so don’t over-flour!
Step 3: First Rise (Patience is Key!)
Transfer your dough to a lightly greased bowl and cover it with a towel or plastic wrap. Find a cozy, draft-free spot and let it rise until doubled in size — about 90 minutes. Watching it slowly puff up is one of those satisfying moments in bread making. If it’s chilly in your kitchen, I sometimes preheat the oven to 170°F for a minute, turn it off, and set the dough inside—it speeds things up a bit!
Step 4: Shape Your Rolls with Cheese Inside
Once risen, gently punch down the dough and divide it into 12 equal pieces. Here’s my favorite little trick: roll each piece into a smooth ball by cupping your hand and rolling it on the counter for about 15-30 seconds—that helps develop surface tension so rolls bake up beautifully. Then, gently press your thumb into the center, add a pinch of shredded mozzarella, and pinch the dough back around it to seal. This way, every roll hides a cheesy surprise!
Step 5: Drench Rolls in Garlic Butter and Second Rise
Mix melted butter with minced garlic and parmesan, then dip each roll to coat it fully before arranging them closely in your greased pan or cast iron skillet. Don’t be shy—this is what makes them so rich and flavorful. Tuck extra mozzarella between rolls for that ooey-gooey pull-apart effect. Cover again and let the rolls rise for another hour until doubled and billowy.
Step 6: Bake Until Golden and Irresistible
Preheat your oven to 375°F (190°C) and bake for 18-20 minutes. You’re looking for a golden top and bubbling cheese peeking through. Once out, let them cool just a bit so the cheesy insides set—but honestly, I’m usually diving in while still warm! Grab a roll, pull apart, and enjoy the garlicky, cheesy deliciousness.
Pro Tips for Making Cheesy Garlic Butter Pull Apart Rolls Recipe
- Perfect Dough Consistency: Don’t add too much flour—rather aim for tacky dough; this keeps your rolls soft and moist.
- Garlic Butter Timing: Melt and cool butter slightly before mixing garlic so it doesn’t cook the garlic harshly, preserving that fresh flavor.
- Use Cast Iron for a Crispy Edge: Baking in a cast iron skillet gives edges a lovely crispness, balancing soft, cheesy centers.
- Seal Cheese Properly: When enclosing mozzarella, pinch the dough tightly so it doesn’t leak during baking, keeping rolls neat and cheesy inside.
How to Serve Cheesy Garlic Butter Pull Apart Rolls Recipe

Garnishes
I love sprinkling chopped fresh parsley or chives over the rolls right out of the oven—it adds a pop of color and a fresh, mild oniony note that complements the garlic butter nicely. Sometimes, a little more parmesan on top straight from the oven is my go-to garnish for an extra cheesy finish.
Side Dishes
For dinner, I often pair these rolls with a hearty tomato soup or a big family-style pasta dish like baked ziti or lasagna. They soak up sauces perfectly. On casual nights, they’re just right alongside a fresh salad and roasted veggies for a balanced meal with a touch of indulgence.
Creative Ways to Present
For special occasions, I’ve baked these rolls in a bundt pan to create a stunning pull-apart “wreath” that looks gorgeous on any table. You can even stuff in bits of cooked bacon or jalapeño for a fun surprise. Serve alongside bowls of marinara or ranch dipping sauces to add a playful, party vibe.
Make Ahead and Storage
Storing Leftovers
I store leftover rolls in a large resealable plastic bag at room temperature for up to 3-4 days. They stay surprisingly moist thanks to the garlic butter, but if you want to freshen them up, a quick reheat helps revive that just-baked softness.
Freezing
These rolls freeze beautifully! After baking and cooling completely, I wrap them tightly in plastic wrap and then a freezer bag or container. When you’re ready, thaw overnight in the fridge, then warm in the oven to bring back their fresh-baked charm.
Reheating
To reheat, I pop the rolls in a 325°F oven for about 10-12 minutes, loosely covered with foil to keep them from drying out. You’ll get warm, soft, cheesy rolls just like the first day, perfect for whenever those cravings hit.
FAQs
-
Can I make these Cheesy Garlic Butter Pull Apart Rolls without a mixer?
Absolutely! You can mix the ingredients with a spoon at first until it gets too stiff, then turn the dough onto a clean surface and knead it by hand. Knead for about 8-10 minutes until the dough feels soft, elastic, and slightly tacky. This hand-kneading method produces great texture and lets you connect with the dough.
-
What’s the best cheese to use for these pull apart rolls?
I use shredded mozzarella for its melty, stretchy quality, but you can mix in other cheeses like cheddar, Monterey Jack, or provolone depending on your taste preferences. Avoid pre-shredded cheese with anti-caking agents as it sometimes doesn’t melt as smoothly.
-
How do I know when my dough has risen enough?
Dough should roughly double in size. A good test is gently pressing your finger into the dough—if the indentation stays and doesn’t spring back quickly, it’s ready. This means the yeast has done its job, and the dough will bake into soft, airy rolls.
-
Can I make the dough ahead and bake later?
Yes! You can prepare the dough and do the first rise, then refrigerate it overnight in a lightly oiled bowl covered with plastic wrap. When you’re ready to bake, bring it to room temperature, shape the rolls, complete the second rise, and bake as usual.
Final Thoughts
If you want a crowd-pleaser that’s as fun to make as it is to eat, this Cheesy Garlic Butter Pull Apart Rolls Recipe checks all the boxes. Making these rolls is one of those kitchen moments I look forward to—kneading the dough, smelling the garlic butter baking, and watching everyone dig in. You’ll get soft, cheesy, buttery rolls that are downright addictive, and I can’t wait for you to try them. Trust me, once you do, this recipe will become a staple in your baking rotation!
Print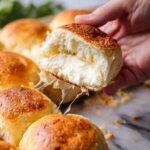
Cheesy Garlic Butter Pull Apart Rolls Recipe
- Prep Time: 20 minutes
- Cook Time: 20 minutes
- Total Time: 3 hours 10 minutes
- Yield: 12 rolls
- Category: Snack
- Method: Baking
- Cuisine: American
- Diet: Vegetarian
Description
These Cheesy Garlic Butter Pull Apart Rolls are soft, fluffy, and loaded with melted mozzarella and parmesan cheese. Perfectly brushed with garlic butter and baked to golden perfection, these rolls make a delicious side or snack that’s easy to share and irresistible to eat warm.
Ingredients
For the Rolls
- 1 cup milk whole or 2%
- 1 tablespoon instant dry yeast
- 2 tablespoons granulated sugar
- 1 teaspoon salt
- 3 tablespoons salted butter softened
- 1 large egg
- 3 to 3 1/2 cups all-purpose flour
- 2 cups shredded mozzarella cheese
For the Garlic Butter
- 1/2 cup salted butter melted
- 4 teaspoons minced garlic (about 4 cloves)
- 1/2 cup grated parmesan cheese
Instructions
- Warm the milk: Microwave 1 cup milk in 30-second increments until it reaches 100℉ to 110℉, or warm in a small saucepan on the stove over medium-low heat.
- Mix the dough: In a large mixing bowl or stand mixer fitted with a dough hook, combine the warm milk, 1 tablespoon instant dry yeast, 2 tablespoons granulated sugar, 1 teaspoon salt, 3 tablespoons softened salted butter, 1 large egg, and 2 1/2 cups of the flour. Mix on low speed, then increase to medium once flour starts to incorporate. Slowly add more flour, a little at a time, until the dough pulls away from the sides of the bowl. The dough should be soft, elastic, and tacky but not sticky.
- First rise: Transfer the dough to a large lightly greased bowl. Cover with a towel or plastic wrap and set aside to rise until double in size, about 90 minutes.
- Melt butter for garlic butter: In a small microwave-safe bowl, melt 1/2 cup salted butter and set aside to cool while shaping the rolls.
- Shape the rolls: Lightly grease a 9×13 pan or 12-inch cast iron skillet with nonstick cooking spray. Divide the dough into about 12 equal pieces and shape each into a ball by rolling on the counter. Use thumbs to gently press open the center, add a pinch of shredded mozzarella, then pinch the dough closed to seal.
- Prepare garlic butter coating: Stir 4 teaspoons minced garlic and 1/2 cup grated parmesan cheese into the melted butter. Dip each roll into the garlic butter to coat and place into the prepared pan. Tuck extra shredded mozzarella between each roll. Spoon any remaining garlic butter over the tops of the rolls.
- Second rise: Cover again and set aside to rise until doubled in size, about 1 hour.
- Bake the rolls: Preheat the oven to 375°F (190°C). Bake the rolls for 20 minutes or until lightly browned.
- Serve or store: Serve warm or allow to cool completely. Store cooled rolls in a plastic bag for 3 to 4 days.
Notes
- If you don’t have a mixer, stir the ingredients with a spoon until difficult, then turn dough onto a clean surface and knead by hand, gradually adding flour until soft and smooth but tacky.
- To shape rolls, cup your hand parallel to the counter, roll dough ball in circular motion between palm and countertop for 15 to 30 seconds until smooth.
Nutrition
- Serving Size: 1 roll
- Calories: 250 kcal
- Sugar: 3 g
- Sodium: 350 mg
- Fat: 12 g
- Saturated Fat: 7 g
- Unsaturated Fat: 4 g
- Trans Fat: 0 g
- Carbohydrates: 28 g
- Fiber: 1 g
- Protein: 8 g
- Cholesterol: 40 mg


