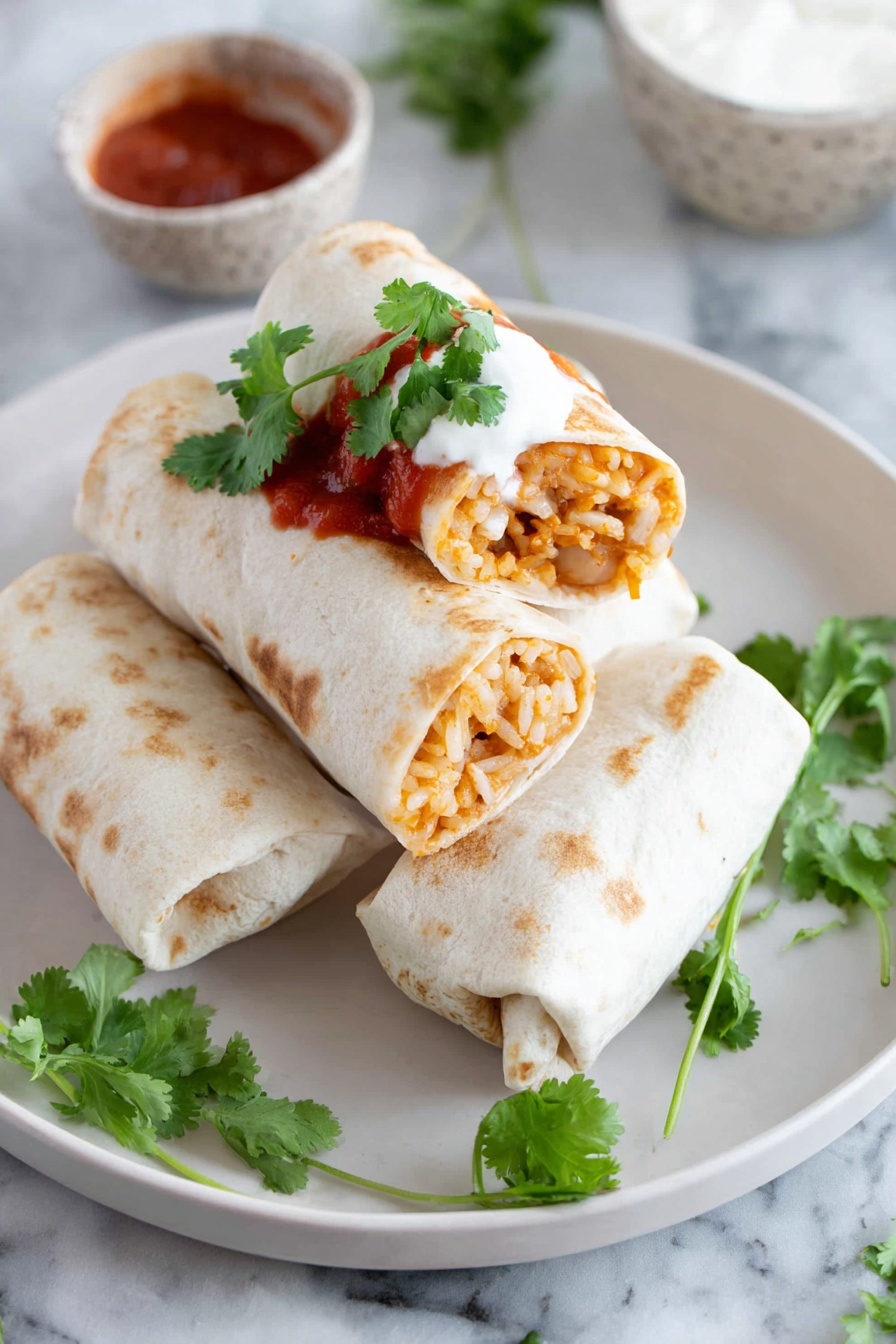
Cheesy Bean and Rice Burritos Recipe
If you’re craving something hearty, comforting, and sprinting with melty cheese and bold flavors, you’ve come to the right place. This Cheesy Bean and Rice Burritos Recipe is one of those go-to meals I turn to when I want a crowd-pleaser that’s super simple but still feels like a warm hug on a plate. Seriously, it’s packed with creamy beans, fluffy Mexican-style rice, and plenty of cheese all wrapped up in soft tortillas—baked until golden and irresistibly gooey. Stick with me, and I’ll walk you through everything you need to nail this at home, no stress.
Why This Recipe Works
- Simple, Accessible Ingredients: You probably have most of these pantry staples on hand, making it super easy to pull together anytime.
- Balanced Flavors and Textures: Creamy beans, fluffy rice, and melty cheese combine with a touch of salsa spice to hit all the comforting notes.
- Hands-Off Baking: Baking the burritos produces a crisp exterior while locking in gooey cheesy goodness inside—no frying mess here!
- Versatile and Customizable: Whether you’re vegan, love extra spice, or have kids at the table, this recipe adapts with ease.

Ingredients & Why They Work
This Cheesy Bean and Rice Burritos Recipe comes together with just a handful of ingredients that complement each other perfectly. Each component adds a unique texture or flavor, and with a few smart shopping tips, you’ll breeze through prep like a pro.

- Refried Beans: Use your favorite brand or homemade version for creamy, savory depth that forms the burrito’s heart.
- Jarred Salsa: This gives a quick flavor boost and a bit of moisture; choose mild or spicy depending on your palate.
- Homemade Taco Seasoning Mix: Mixing your own ensures fresh, punchy flavors without the sodium overload of store-bought blends.
- Flour Tortillas (8-inch): Soft but sturdy, perfect for folding and holding all that delicious filling without breaking.
- Restaurant Style Mexican Rice: Fluffy, flavorful rice anchors the filling and balances the creamy beans (or swap in a homemade version to cut corners).
- Sharp Cheddar Cheese: Brings tanginess and melts beautifully to ooze in every bite.
- Monterey Jack Cheese: Mild and creamy, it helps create that gooey cheesy effect decisive for this recipe.
Tweak to Your Taste
One of the great things about this Cheesy Bean and Rice Burritos Recipe is how flexible it is. I love adding a handful of fresh cilantro or a squeeze of lime juice to brighten things up, but feel free to play around with what suits your cravings.
- Vegetarian or Vegan Option: Swap refried beans and cheese for plant-based versions, and use vegan sour cream—trust me, you won’t miss a thing.
- Spice it Up: Add chopped jalapeños or a splash of hot sauce into the bean mixture if you like a little kick; I do this when we have friends who crave heat.
- Fuller Burritos: If you want more filling per burrito, don’t hesitate to stuff them a little fuller—it’ll just make for bigger, heartier bites.
- With Protein: For a non-vegetarian twist, I sometimes add shredded rotisserie chicken or cooked ground beef before adding cheese—it’s always a hit.
Step-by-Step: How I Make Cheesy Bean and Rice Burritos Recipe
Step 1: Prep Your Oven and Pan
First things first: heat your oven to 400°F and line a large baking sheet with foil. I always give the foil a good spray with nonstick cooking spray so the burritos won’t stick when they bake—that step saves you a lot of scrubbing later!
Step 2: Mix the Bean Filling
In a small bowl, combine your refried beans with taco seasoning and salsa. This combo really packs a punch with simple pantry staples—make sure everything is well mixed so every spoonful is bursting with flavor.
Step 3: Warm and Fill the Tortillas
Give the stack of tortillas a quick 20-second zap in the microwave to soften them up. This makes rolling so much easier and helps prevent cracking. Lay one tortilla flat, then spread a couple of tablespoons of the bean mixture in the center, layer on some Mexican rice, and sprinkle both cheeses on top. Fold in the sides and roll it up tight, like wrapping a little gift.
Step 4: Bake and Brown Those Burritos
Place your rolled burritos seam side down on the prepared sheet, spray the tops lightly with cooking spray, and pop them in the oven for about 10 minutes. Then, grab some tongs, flip each burrito carefully to brown the other side, and bake for another 5 to 10 minutes. The goal is a golden, crispy outside and melty, hot inside.
Step 5: Serve It Up!
Pull those beauties out, and serve with extra salsa and sour cream on the side for dipping or drizzling. Trust me, the contrast of cool sour cream with warm, cheesy burritos is downright addictive.
Pro Tips for Making Cheesy Bean and Rice Burritos Recipe
- Don’t Overfill: It’s tempting to stuff those tortillas, but leaving a little room to fold prevents tearing and messes while rolling.
- Toast the Tortillas First: If you want extra flavor, lightly toast tortillas in a dry skillet before filling—they get nutty and more pliable.
- Use a Mix of Cheeses: Sharp cheddar gives a tangy bite while Monterey Jack melts smoothly, creating an epic cheese pull.
- Flip With Care: Use tongs gently when flipping burritos in the oven to keep their shape intact and avoid cheese spillage.
How to Serve Cheesy Bean and Rice Burritos Recipe
Garnishes
I usually top mine with a sprinkle of fresh cilantro and a dollop of sour cream—it’s both refreshing and cooling against the warm, cheesy filling. Sometimes, I add a few slices of avocado or a squeeze of fresh lime for that extra zing!
Side Dishes
For sides, I love pairing these burritos with a simple tortilla chips and guacamole, a fresh tomato salad, or even a light corn salad. It balances out the richness and makes the meal feel complete without extra fuss.
Creative Ways to Present
When I’ve made these for gatherings, I slice the burritos in half at a slight angle, showing off the cheesy, bean and rice layers inside. Plated up with colorful salsa and a scattering of chopped scallions, they always disappear fast! For a fun twist, try serving a burrito bar where everyone adds their own toppings.
Make Ahead and Storage
Storing Leftovers
I store leftover burritos in a zip-top plastic bag in the fridge, making sure they cool completely before sealing. That way, they keep for up to 4 days, ready to reheat for a quick lunch or snack.
Freezing
If you want to prep in bulk, freeze the burritos before baking for best texture. I wrap each burrito tightly in wax paper or plastic wrap, then foil, and pop them all in a freezer bag. They last up to 3 months, perfect for when you need a ready-made meal.
Reheating
When reheating, I usually bake leftover burritos at 400°F for about 5–6 minutes on a baking sheet with a little nonstick spray to crisp the outside back up. Alternatively, a quick microwave zap works, but you might miss that lovely crunch.
FAQs
-
Can I use canned beans instead of refried beans?
Absolutely! You can mash canned black beans or pinto beans and season them with taco spices and salsa to mimic the refried beans. Just make sure the mixture is thick enough to hold inside the burrito without leaking.
-
How do I make the burritos less messy?
Warming the tortillas before filling helps make them more pliable, so they fold without cracking. Also, don’t overfill—leave space on the edges to tuck in the filling neatly before rolling.
-
Can I make these burritos gluten-free?
Yes, swap the flour tortillas for your favorite gluten-free tortillas. Just watch the size, as smaller or thinner versions might need gentler handling during rolling.
-
What’s the best salsa to use for this recipe?
I tend to go for a medium-spiced salsa that’s not too watery. Chunky salsas with fresh tomato, onion, and a hint of lime add brightness, but you can adjust to your preferred heat level.
Final Thoughts
This Cheesy Bean and Rice Burritos Recipe holds a special place in my heart because it combines so many simple joys—comfort food, cheesy indulgence, and easy prep—into one delicious bite. Whether you’re feeding family, friends, or just yourself after a long day, these burritos bring warmth and satisfaction every time. Give this recipe a try, and I promise you’ll be making it again and again. Grab your favorite salsa and cheese, and let’s bake some happiness together!
Print
Cheesy Bean and Rice Burritos Recipe
- Prep Time: 10 minutes
- Cook Time: 20 minutes
- Total Time: 30 minutes
- Yield: 10 small burritos
- Category: Main Course
- Method: Baking
- Cuisine: Mexican
- Diet: Vegetarian
Description
These Cheesy Baked Bean and Rice Burritos are a delicious and easy-to-make meal perfect for any time of day. Soft flour tortillas are filled with flavorful refried beans seasoned with taco spices and salsa, combined with savory Mexican rice, and topped with a blend of sharp cheddar and Monterey jack cheeses. Baked until golden and crispy, these burritos are great served with salsa and sour cream on the side.
Ingredients
Filling
- 16 ounces refried beans
- 2 tablespoons jarred salsa
- 1 teaspoon Homemade Taco Seasoning Mix (or store bought)
- 1 cup Restaurant Style Mexican Rice
- 1 cup shredded sharp cheddar cheese
- 1 cup shredded Monterey jack cheese
Tortillas
- 10 8-inch flour tortillas (soft taco sized)
Other
- Nonstick cooking spray for baking sheet and tops of burritos
Instructions
- Preheat and prepare baking sheet: Preheat your oven to 400 degrees F. Line a large rimmed baking sheet with foil and generously coat the foil with nonstick cooking spray to prevent sticking.
- Make refried bean mixture: In a small mixing bowl, combine the refried beans with the taco seasoning mix and salsa until well blended. Set aside.
- Warm tortillas: Warm the entire stack of 10 tortillas in the microwave for about 20 seconds to soften them slightly, making them easier to roll.
- Assemble burritos: Lay one tortilla flat on a cutting board. Spread a couple tablespoons of the refried bean mixture down the center of the tortilla, then add a couple tablespoons of Mexican rice on top, and sprinkle with some shredded cheddar and Monterey jack cheese. Fold in both sides of the tortilla and then roll it up tightly. Place the burrito seam side down on the prepared baking sheet. Repeat this process with the remaining tortillas and fillings.
- Prepare for baking: Lightly coat the tops of the assembled burritos with additional nonstick cooking spray to help them brown and crisp during baking.
- Bake and brown first side: Place the baking sheet in the preheated oven and bake for about 10 minutes until the bottoms are golden and crisp.
- Flip and brown other side: Carefully pull the baking sheet out, use tongs to flip each burrito so the other side is on the baking sheet. Return to oven and bake for an additional 10 minutes or until the other side is equally browned and the cheese inside has melted.
- Serve: Remove the burritos from the oven and serve warm with additional salsa and sour cream on the side for dipping.
Notes
- This recipe makes 10 small burritos using 8-inch tortillas. For larger and more filling burritos, you can stuff fewer tortillas, making about 6 to 8 bigger burritos.
- Store leftover burritos in a zippered plastic bag in the refrigerator. Reheat quickly in the microwave or re-crisp in the oven at 400 degrees F for 5 to 6 minutes.
- For freezing, wrap burritos tightly in wax paper or freezer-safe plastic wrap, then in foil. Store in a freezer-safe bag for up to 3 months. Bake frozen burritos longer than fresh to ensure heating through.
- Nonstick spray on the baking sheet and tops of burritos helps achieve a crispy exterior while baking.
Nutrition
- Serving Size: 1 burrito
- Calories: 320 kcal
- Sugar: 3 g
- Sodium: 450 mg
- Fat: 14 g
- Saturated Fat: 7 g
- Unsaturated Fat: 6 g
- Trans Fat: 0 g
- Carbohydrates: 35 g
- Fiber: 6 g
- Protein: 12 g
- Cholesterol: 30 mg


