Candy Corn Rice Krispies Treats Recipe
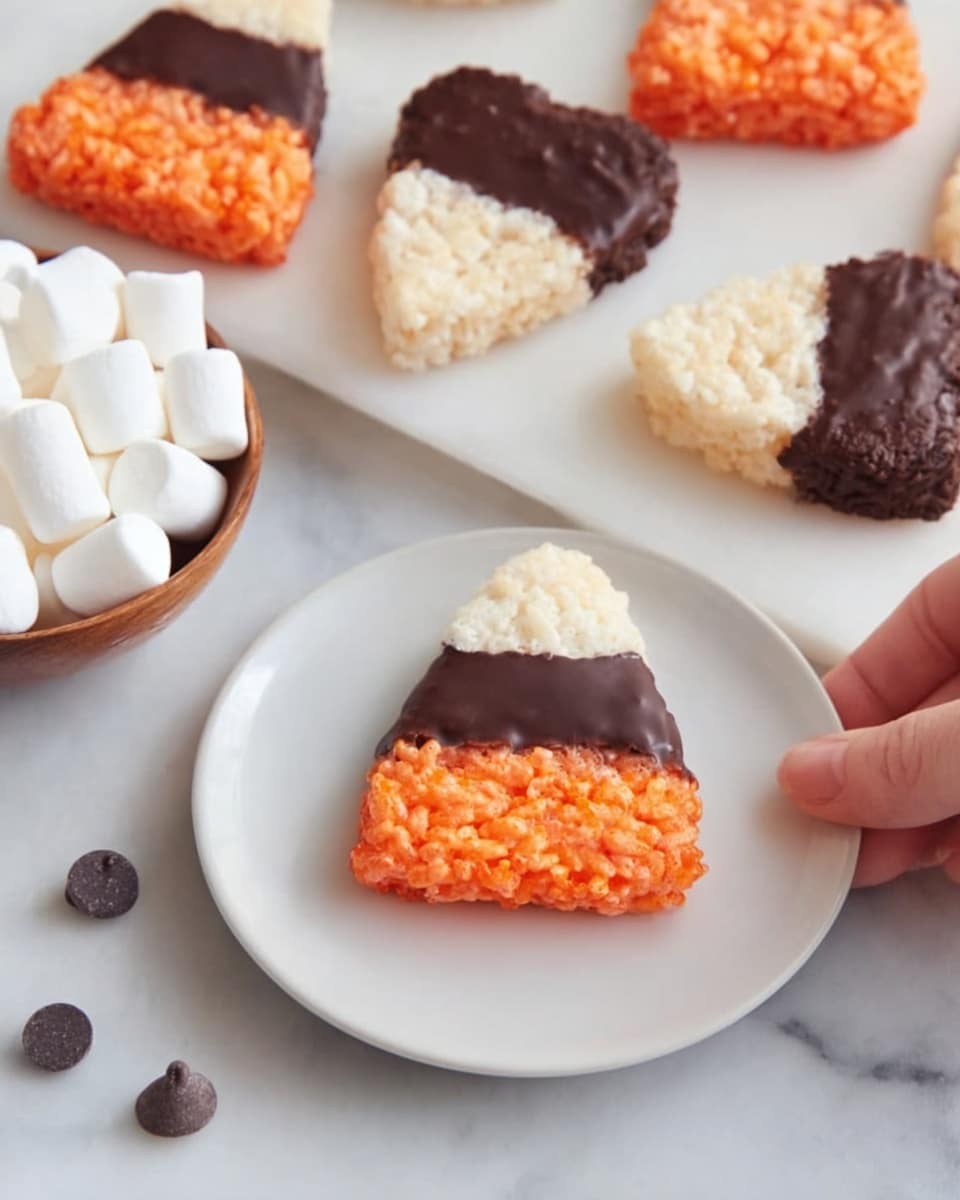
If you’re on the hunt for the ultimate seasonal treat that’s both fun to make and absolutely delicious, I’ve got you covered with my **Candy Corn Rice Krispies Treats Recipe**. This one is a fan-freaking-tastic twist on a classic, merging the nostalgic charm of rice krispies with the festive colors and flavors of candy corn. Trust me, once you try this, it’s going to be your go-to for Halloween parties, autumn gatherings, or whenever you crave that perfect mix of crispy, sweet, and chocolatey goodness.
Why This Recipe Works
- Balanced Sweetness: The combo of marshmallows, vanilla, and chocolate chips hits every sweet note without overwhelming.
- Textural Delight: Crispy Rice Krispies paired with smooth melted chocolate create a satisfying crunch and creaminess.
- Visual Appeal: The three-layer candy corn colors made from food coloring and chocolate dips make it festive and irresistible.
- Simple yet Impressive: Uses basic pantry staples but comes together to look like a showstopper treat.

Ingredients & Why They Work
This Candy Corn Rice Krispies Treats Recipe blends simple, accessible ingredients that complement each other beautifully. Each one adds a bit of flavor, texture, or color to elevate the treat beyond your typical rice krispies bar. When shopping, look for mini marshmallows and good-quality chocolate chips—they really make a difference in melting and taste.
- Rice Krispies cereal: The base with that classic crunch; don’t swap out for puffed rice or you’ll miss the iconic texture.
- Mini marshmallows: They melt easier and blend smoother for that perfect gooey binding.
- Butter: Adds richness and helps the marshmallows melt evenly without burning.
- Orange food coloring: This is your candy corn’s iconic middle—just a few drops go a long way.
- Vanilla extract: Brings warmth and depth to balance the sweetness.
- Mini chocolate chips: Used for the black tip of the candy corn shape; melts nicely with coconut oil.
- White chocolate chips: Cozy white section on top, creamy and sweet.
- Coconut oil: Keeps the chocolate smooth and prevents seizing when melting.
Tweak to Your Taste
While I adore this classic Candy Corn Rice Krispies Treats Recipe as-is, I’m all for customizing things to match your flavor mood or dietary needs. Don’t hesitate to make it your own!
- Variation: One of my favorite tweaks is to swap the white chocolate with festive colored candy melts, like yellow or green, to fit other holidays or party themes—super fun for birthdays too.
- Dietary tweaks: Try vegan marshmallows and dairy-free butter to keep the treat plant-based without losing that chewy magic.
- Extra crunch: Toss in some chopped nuts or toffee bits for added texture and flavor blasts.
Step-by-Step: How I Make Candy Corn Rice Krispies Treats Recipe
Step 1: Melt Butter and Marshmallows
Start by dropping your stick of butter and the 10-ounce bag of mini marshmallows into a large microwave-safe bowl. I usually nuke this for 2 minutes, but microwave times vary, so watch closely for the perfect melty, gooey texture. Stir halfway through to avoid any hot spots or burning — the last thing you want is scorched marshmallows. This step sets the foundation for that luscious, sticky base you’ll mix with the cereal.
Step 2: Add Orange Food Coloring and Vanilla
Once your marshmallow mixture is melty and smooth, stir in a few drops of orange food coloring until you get that classic candy corn hue. Add the teaspoon of vanilla extract, too, and mix it all until combined. The vanilla is subtle but gives the treat that homey, comforting flavor we all love.
Step 3: Mix in Rice Krispies and Shape
Pour the orange marshmallow mix over the 6 cups of Rice Krispies cereal and fold gently but thoroughly until the cereal is evenly coated. This step is key—if you don’t coat every piece, you can end up with dry, crumbly bites. Split this mix in half, and press each half evenly into disposable pie pans (trust me, pie pans make clean-up easy and the perfect size). Then let them sit for two hours at room temp to fully set.
Step 4: Cut Into Triangles
After your rice krispies have set and firmed up, cut each pan’s treat slab into 8 even triangle-shaped pieces. This shape mimics the candy corn shape perfectly. If you want cleaner cuts, use a sharp knife and wipe it between slices — sticky marshmallows can gum up your blade fast.
Step 5: Dip Tips in White Chocolate
Melt your white chocolate chips with 1 teaspoon of coconut oil (this keeps the chocolate silky and stops it from seizing). Dip the pointed tips of each triangle into the melted white chocolate, then place them on parchment paper and let sit for about 10 minutes to firm up. This is the “top” of the candy corn and creates a lovely creamy contrast.
Step 6: Dip Wide Ends in Chocolate Chips
Now melt the mini chocolate chips with the remaining 1 teaspoon of coconut oil, and dunk the wide base of each rice krispie triangle into the melted chocolate. Let these set on parchment paper until the chocolate is firm. This final step gives you that classic dark bottom layer resembling candy corn’s black tip, edging it out from ordinary rice krispies treats.
Pro Tips for Making Candy Corn Rice Krispies Treats Recipe
- Timing is Everything: Don’t rush the marshmallow melting step—watch closely so you don’t scorch and get a grainy texture.
- Food Coloring Hint: Use gel food coloring instead of liquid for more vibrant orange without watering down the marshmallow mixture.
- Clean Cuts: Keep your knife warm and dry by running it under hot water and drying it before slicing to cut cleaner triangles.
- Chocolate Melting: Always melt chocolate chips gently using a double boiler or microwave in short bursts to avoid burning and seizing.
How to Serve Candy Corn Rice Krispies Treats Recipe
Garnishes
I usually keep garnishes simple since these treats are already so visually striking. But a light dusting of edible gold glitter or some festive sprinkles around the serving plate adds an elegant touch when I’m making these for parties. If you want a little extra crunch, sometimes I sprinkle chopped toasted pumpkin seeds on the side for a fall twist.
Side Dishes
These are wonderful alongside a cup of hot apple cider or a pumpkin spice latte if you’re serving at a fall gathering. I also like pairing them with simple cheese plates or fresh fruit for a nice balance of sweet and savory.
Creative Ways to Present
For Halloween or fall parties, I’ve used decorative cupcake liners and arranged the treats on a tiered stand for an eye-catching dessert buffet. Wrapping each piece individually in cellophane and tying with a seasonal ribbon also makes fabulous party favors or classroom treats.
Make Ahead and Storage
Storing Leftovers
I store my Candy Corn Rice Krispies Treats in an airtight container at room temperature. They keep perfectly for up to a week, though honestly they rarely last that long in my house! Just make sure to separate layers with parchment paper to keep the chocolate from sticking.
Freezing
If you want to freeze leftover treats, wrap each piece tightly in plastic wrap, then place in a freezer-safe bag or container. When I’ve done this, they maintain their texture well and thaw quickly on the counter without losing that chewy-crisp combo.
Reheating
Honestly, these treats are best enjoyed as-is, but if you want to soften them up a bit after fridge or freezer storage, microwaving for 5–7 seconds works wonders. Don’t overdo it though—you want that perfect balance of chewy marshmallow and crunch!
FAQs
-
Can I use regular marshmallows instead of mini?
Yes, you can! However, mini marshmallows melt more quickly and evenly, which helps create a smoother base for your Candy Corn Rice Krispies Treats Recipe. If using large marshmallows, chop them a bit before melting.
-
Can I make these without food coloring?
Absolutely. The food coloring is primarily for the candy corn look, so if you prefer a classic rice krispies treat with chocolate-dipped ends, just skip the coloring step and proceed as usual.
-
How do I prevent chocolate from seizing when melting?
The trick is to melt chocolate slowly and gently, either using a double boiler or short intervals in the microwave, stirring often. Adding a little coconut oil—as I do in this recipe—also helps keep the chocolate fluid and glossy.
-
Can I make these gluten-free?
Definitely! Just be sure to use gluten-free crispy rice cereal since some brands contain barley malt. The rest of the ingredients—marshmallows, chocolate, and butter—are typically gluten-free.
Final Thoughts
The Candy Corn Rice Krispies Treats Recipe is one of those easy, foolproof recipes that somehow feels extra special when you make it. I love how it brings nostalgic flavors and festive colors together in a way that’s both playful and sophisticated. Whether you’re making these for kids, friends, or just for yourself, they deliver that perfect sweet crunch every time. I promise you’ll want to make this recipe again and again—both for the smiles it brings and the simple joy of dunking those crispy triangles into luscious chocolate. Give it a whirl, and don’t forget to share your own twists—because the best treats are the ones made with a little love and a lot of fun.
Print
Candy Corn Rice Krispies Treats Recipe
- Prep Time: 20 minutes
- Cook Time: 2 hours
- Total Time: 2 hours 20 minutes
- Yield: 16 treats
- Category: Dessert
- Method: No-Cook
- Cuisine: American
Description
Candy Corn Rice Krispies Treats are a fun and festive dessert perfect for Halloween or any candy corn craving. These treats combine classic Rice Krispies cereal with melted marshmallows, colored to resemble candy corn, and are decorated with white and mini chocolate chips to mimic candy corn colors. Easy to make and delightfully sweet, these treats are sure to be a hit with kids and adults alike.
Ingredients
Main Ingredients
- 6 cups Rice Krispies cereal
- 10 oz mini marshmallows
- 1 stick butter
- Orange food coloring (about 10-15 drops)
- 1 tsp vanilla extract
Decoration Ingredients
- 2 cups mini chocolate chips
- 1 cup white chocolate chips
- 2 tsp coconut oil, separated (1 tsp for white chocolate, 1 tsp for mini chocolate chips)
Instructions
- Melt Marshmallows and Butter: In a large microwavable bowl, add the mini marshmallows and butter. Microwave for 2 minutes until melted and smooth.
- Add Color and Flavor: Stir in the orange food coloring and vanilla extract into the melted marshmallow mixture until evenly incorporated.
- Combine with Cereal: Pour the colored marshmallow mixture over the Rice Krispies cereal in a large bowl and mix until the cereal is fully coated.
- Divide and Press Mixture: Split the mixture into two equal parts and press each into a disposable pie pan, shaping them flat and even.
- Set the Treats: Allow the Rice Krispies treats to set and harden for 2 hours at room temperature.
- Cut into Triangles: Once set, cut each Rice Krispies pan into 8 even triangle pieces for a total of 16 treats.
- Melt White Chocolate: In a microwave-safe bowl, melt the white chocolate chips with 1 tsp of coconut oil to prevent seizing, stirring until smooth.
- Dip Tips in White Chocolate: Dip the narrow tips of each triangle into the melted white chocolate. Place them on parchment paper and let set for 10 minutes.
- Melt Mini Chocolate Chips: Melt the mini chocolate chips with the remaining 1 tsp of coconut oil until smooth.
- Dip Wide Ends in Chocolate: Dip the wide ends of each triangle into the melted mini chocolate. Place treats on parchment paper and allow the chocolate to set completely before serving.
Notes
- Store leftovers in an airtight container at room temperature for up to 3 days to keep them fresh.
- You can substitute mini chocolate chips with regular size chips if mini are not available, just adjust melting times slightly.
- Orange food coloring quantity can be adjusted depending on desired color intensity.
- Use parchment paper to prevent chocolate from sticking during the setting process.
- For a firmer texture, refrigerate the treats after setting the chocolate dips.
Nutrition
- Serving Size: 1 treat
- Calories: 150 kcal
- Sugar: 15 g
- Sodium: 70 mg
- Fat: 6 g
- Saturated Fat: 4 g
- Unsaturated Fat: 2 g
- Trans Fat: 0 g
- Carbohydrates: 22 g
- Fiber: 0 g
- Protein: 1 g
- Cholesterol: 10 mg


