Candied Kielbasa Bites Recipe
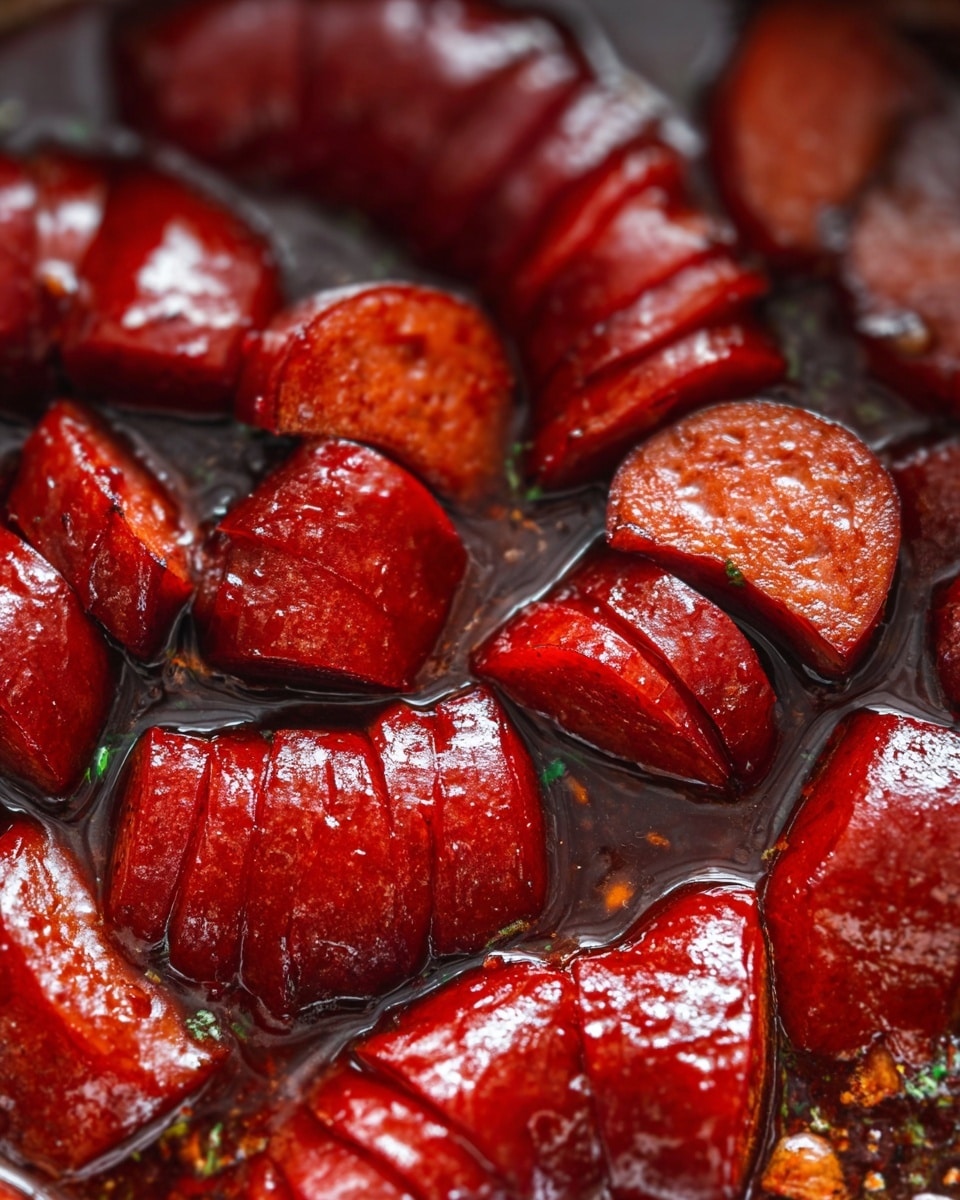
If you’re looking for a snack that’s both savory and sweet, with a little kick of tang, you absolutely need to try this Candied Kielbasa Bites Recipe. It’s one of those treats I keep coming back to—whether for casual family dinners or when friends come over and I want something to wow them without much fuss. The combination of browned edges with that glossy, caramelized sauce makes every bite addictive.
What makes this Candied Kielbasa Bites Recipe truly special is how easy it is to prepare but still feels festive and elevated. It’s perfect for game days, potlucks, or even just a cozy night in when you want something simple but not boring. Plus, if you’re a fan of snacks that balance smokiness with a sweet glaze, this recipe’s going to fit right into your favorites list.
Why This Recipe Works
- Balanced Flavors: The sweet brown sugar pairs perfectly with the tangy ketchup and sharp horseradish, creating a complex yet approachable taste.
- Unique Hasselback Technique: Slicing the kielbasa partially with chopsticks allows the sauce to seep in, maximizing flavor infusion and texture contrast.
- Hands-Off Baking: Once in the oven, it mostly requires you to stir occasionally, freeing you to prep other dishes or relax with guests.
- Widely Loved Crowd-Pleaser: Whether you’re serving family or a party crowd, these bites disappear fast because they’re just that good.

Ingredients & Why They Work
Every ingredient here plays a simple but important role to build layers of flavor without complication—great when you want a delicious result without hunting down hard-to-find items.
- Kielbasa Sausage: Look for a good-quality kielbasa with a nice smoky flavor as the star of the dish.
- Brown Sugar: Adds sweetness and helps create that irresistible caramelized glaze when baked.
- Ketchup: Brings tang and moisture, balancing out the sweetness and adding a familiar savory note.
- Prepared Horseradish: Adds a subtle heat and piquancy that wakes up your taste buds without overpowering.
Tweak to Your Taste
I often like to tweak this Candied Kielbasa Bites Recipe to suit whatever mood I’m in or what I have on hand. It’s pretty flexible, so don’t be shy about experimenting—you might find a new favorite combo.
- Variation: Once, I swapped horseradish for a bit of spicy mustard and loved how it added a different kind of tang.
- Heat lovers: Adding a pinch of cayenne or a few dashes of hot sauce can boost the kick without ruining the sweet balance.
- Sweet substitute: If you want something less sweet, try reducing the brown sugar or using a natural sweetener like maple syrup.
- Make it smoky: A quick toss with smoked paprika before baking can make the flavors even more robust.
Step-by-Step: How I Make Candied Kielbasa Bites Recipe
Step 1: Preheat and Prepare Your Kielbasa
First things first, pop your oven to 375°F to get it nice and hot. Next, slice your kielbasa into 1-inch rounds—that thickness is perfect for bite-sized snacks that still have some meaty heft. Then comes the fun part: using two chopsticks or skewers, place one on each side of a kielbasa slice and carefully slice about 1/4 inch apart without cutting all the way through. This little trick creates those awesome “hasselback” sections that soak up the sauce wonderfully while keeping everything held together. It took me a few tries to perfect this, so be gentle and steady with your knife!
Step 2: Mix and Coat
Place your kielbasa pieces in a baking dish and pour in the brown sugar, ketchup, and prepared horseradish. Stir everything gently so each piece gets a good coat—but don’t worry about getting every nook perfect, the baking process will do the rest. At first, it looks a bit messy, but trust me, it all comes together as it cooks.
Step 3: Bake and Stir
Pop the dish into your preheated oven and let those flavors develop. The total baking time is about 60-90 minutes, depending on how crispy you like your bites. Every 20 minutes or so, give the mixture a gentle stir to help the sauce caramelize evenly and keep the edges from burning. You’ll know it’s done when the sauce bubbles up and thickens to a sticky glaze, and those edges have a beautiful golden-brown crispness. This tends to be the golden moment I can’t wait to dig in.
Pro Tips for Making Candied Kielbasa Bites Recipe
- Steady Knife Control: Using chopsticks as a slicing guide helps you get even hasselback cuts without slicing through—practice a couple of times on a scrap piece to get comfy.
- Watch Your Sauce: If your sauce looks like it’s drying out, splash a little water or more ketchup to keep things moist and prevent burning.
- Consistent Stirring: Stirring every 20 minutes lets the glaze become evenly sticky and prevents sticking or burning on the pan’s bottom.
- Serving Warm: These bites taste best fresh and warm, but don’t worry if you want to save some—the flavors actually deepen overnight.
How to Serve Candied Kielbasa Bites Recipe
Garnishes
I like to sprinkle a little chopped fresh parsley or green onions over mine—it adds a pop of color and a fresh bite to balance the richness. Sometimes a tiny dollop of sour cream on the side works beautifully too if you crave something creamy alongside.
Side Dishes
These bites love company! I often serve them alongside a crisp mixed greens salad or even some roasted veggies for a fuller meal. For parties, a simple bowl of crunchy crackers or pita chips pairs wonderfully to scoop up any extra glaze.
Creative Ways to Present
For casual get-togethers, I sometimes arrange the candied kielbasa bites on a wooden board with little toothpicks ready to grab. On more festive occasions, they can be served in mini foil cups or atop slices of toasted baguette for a fancy canapé feel. Trust me, those small touches make a big impression!
Make Ahead and Storage
Storing Leftovers
I usually store any leftovers in an airtight container in the fridge. They keep well for about 3-4 days. When I grab them the next day, the flavors have had time to meld and actually taste even better sometimes, so it’s a win for leftovers.
Freezing
If you want to freeze, portion the bites into single-serving freezer-safe bags. From my experience, freezing works fine but it’s best to thaw in the fridge overnight for most tender results. Just note the texture may soften slightly compared to fresh.
Reheating
The easiest way to reheat is in a preheated oven at 350°F for about 10 minutes until warmed through and the glaze looks bubbly again. Alternatively, a quick zap in the microwave works if you’re in a hurry, but the oven gives you back some crispiness on the edges.
FAQs
-
Can I use other types of sausage for this recipe?
Absolutely! While kielbasa is classic here, smoked sausage or Polish sausage varieties work well too. Just pick one with good flavor and firmness to hold those hasselback cuts.
-
How spicy does the horseradish make the bites?
The prepared horseradish adds a gentle, pleasant heat rather than overpowering spiciness. If you prefer less heat, start with a smaller amount and adjust to taste.
-
Can I make the Candied Kielbasa Bites Recipe vegan or vegetarian?
Since this recipe centers on kielbasa, a vegan swap would need to use plant-based sausage alternatives that hold up to baking. Flavor and texture will differ, but you can try and adjust sauces accordingly.
-
Is it necessary to use the chopsticks for slicing?
The chopsticks act as a simple and effective guide for making the hasselback cuts without slicing through completely. If you don’t have chopsticks, wooden skewers or any similar tool works great too.
-
How crunchy do the candied bites get?
The edges get nicely caramelized and crisp, while the insides stay juicy and tender. You can adjust baking time from 60 to 90 minutes depending on whether you want more chew or crispness.
Final Thoughts
I’ve made this Candied Kielbasa Bites Recipe countless times and it’s always a hit, no matter the occasion. What I love most is how straightforward it is—anyone can whip it up and end up with something impressive and downright crave-worthy. So next time you want a simple snack that feels special, grab some kielbasa and give this a try. Trust me, you’ll be glad you did!
Print
Candied Kielbasa Bites Recipe
- Prep Time: 10 minutes
- Cook Time: 1 hour
- Total Time: 1 hour 10 minutes
- Yield: 8 servings
- Category: Appetizer
- Method: Baking
- Cuisine: American
Description
Candied Kielbasa Bites offer a sweet and tangy twist on traditional sausage with a caramelized glaze made from brown sugar, ketchup, and horseradish. This recipe features hasselback-style slicing for maximum flavor absorption and a delightful crispy texture, perfect as an appetizer or party snack.
Ingredients
Main Ingredients
- 2 lbs kielbasa sausage
- 1 cup brown sugar
- 1/2 cup ketchup
- 1/4 cup prepared horseradish
Instructions
- Preheat Oven: Set your oven to 375°F to prepare for baking the kielbasa bites.
- Slice Kielbasa: Cut the kielbasa into 1-inch pieces to create bite-sized portions.
- Hasselback Slice: Place each kielbasa piece between two chopsticks or skewers and slice about 1/4-inch thick slices without cutting all the way through, creating three hasselback sections per piece. The chopsticks act as a guide to prevent cutting completely through the sausage.
- Arrange in Baking Dish: Lay the hasselback sliced kielbasa pieces in a baking dish in a single layer for even cooking.
- Add Sauce: Pour brown sugar, ketchup, and horseradish over the kielbasa in the dish, stirring gently to coat the pieces thoroughly.
- Bake and Stir: Bake for 60 minutes, stirring every 20 minutes to ensure the sauce caramelizes evenly and edges brown to your desired crispness.
- Serve: Remove from oven once caramelized and browned, then serve hot as a crowd-pleasing appetizer.
Notes
- Using chopsticks or skewers prevents cutting all the way through the sausage, which helps hold the pieces together during baking.
- For a spicier kick, add a pinch of cayenne pepper or hot sauce to the glaze.
- Stirring periodically throughout baking helps achieve an even caramelization and prevents burning.
- These bites can be prepared a few hours ahead and reheated gently before serving.
- Adjust baking time depending on how crispy you prefer your sausage bites.
Nutrition
- Serving Size: 1 serving
- Calories: 300 kcal
- Sugar: 12 g
- Sodium: 650 mg
- Fat: 20 g
- Saturated Fat: 7 g
- Unsaturated Fat: 10 g
- Trans Fat: 0 g
- Carbohydrates: 18 g
- Fiber: 1 g
- Protein: 12 g
- Cholesterol: 40 mg


