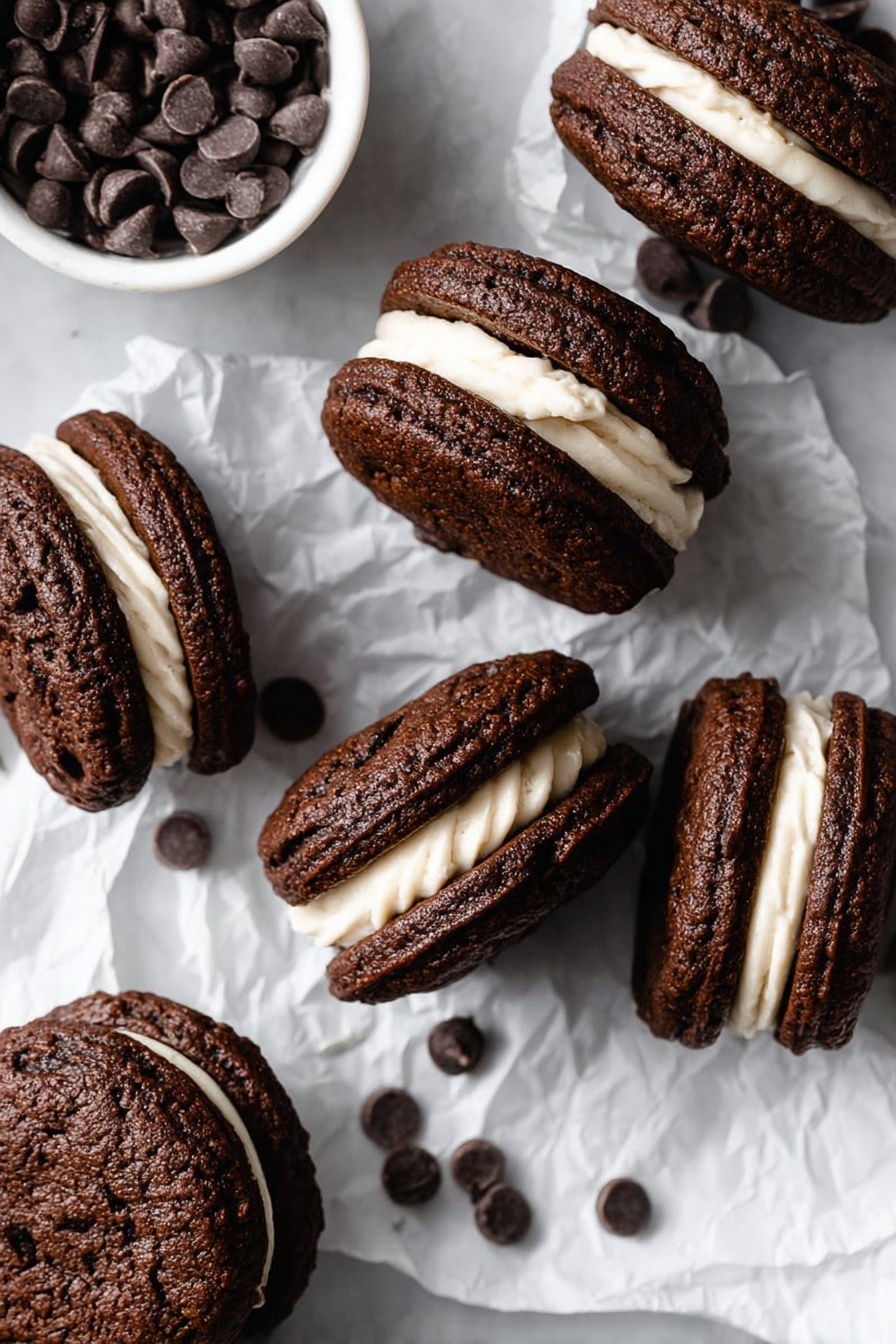
Brownie Cookie Sandwiches with Cookie Dough Buttercream Recipe
If you’re anything like me, a dessert that combines the fudgy goodness of brownies with the chewy charm of cookies AND a dreamy cookie dough buttercream sounds like a total win. That’s exactly why I adore this Brownie Cookie Sandwiches with Cookie Dough Buttercream Recipe — it’s a showstopper that’s surprisingly easy to make and absolutely irresistible. Trust me, once you try these sandwich cookies with their rich chocolatey cookie base and luscious, safe-to-eat cookie dough frosting, you’ll want to bake them again and again. Let me walk you through how to get these perfect every single time!
Why This Recipe Works
- Rich, fudgy texture: The blend of bittersweet chocolate and cocoa powder creates that signature brownie chew in a cookie form.
- Safe cookie dough buttercream: Heat-treated flour lets you indulge in the cookie dough frosting without worry.
- Balanced sweetness: Brown sugar and granulated sugar combo adds depth, so the cookies aren’t overly sugary.
- Perfect sandwich shape: The trick of nudging warm cookies into rounds gives a polished, bakery-level look.

Ingredients & Why They Work
Each ingredient in this Brownie Cookie Sandwiches with Cookie Dough Buttercream Recipe plays a crucial role in delivering flavor, texture, and that special cookie dough safety. Here’s a little rundown on why these work so well together, along with some tips on picking quality stuff when you shop.
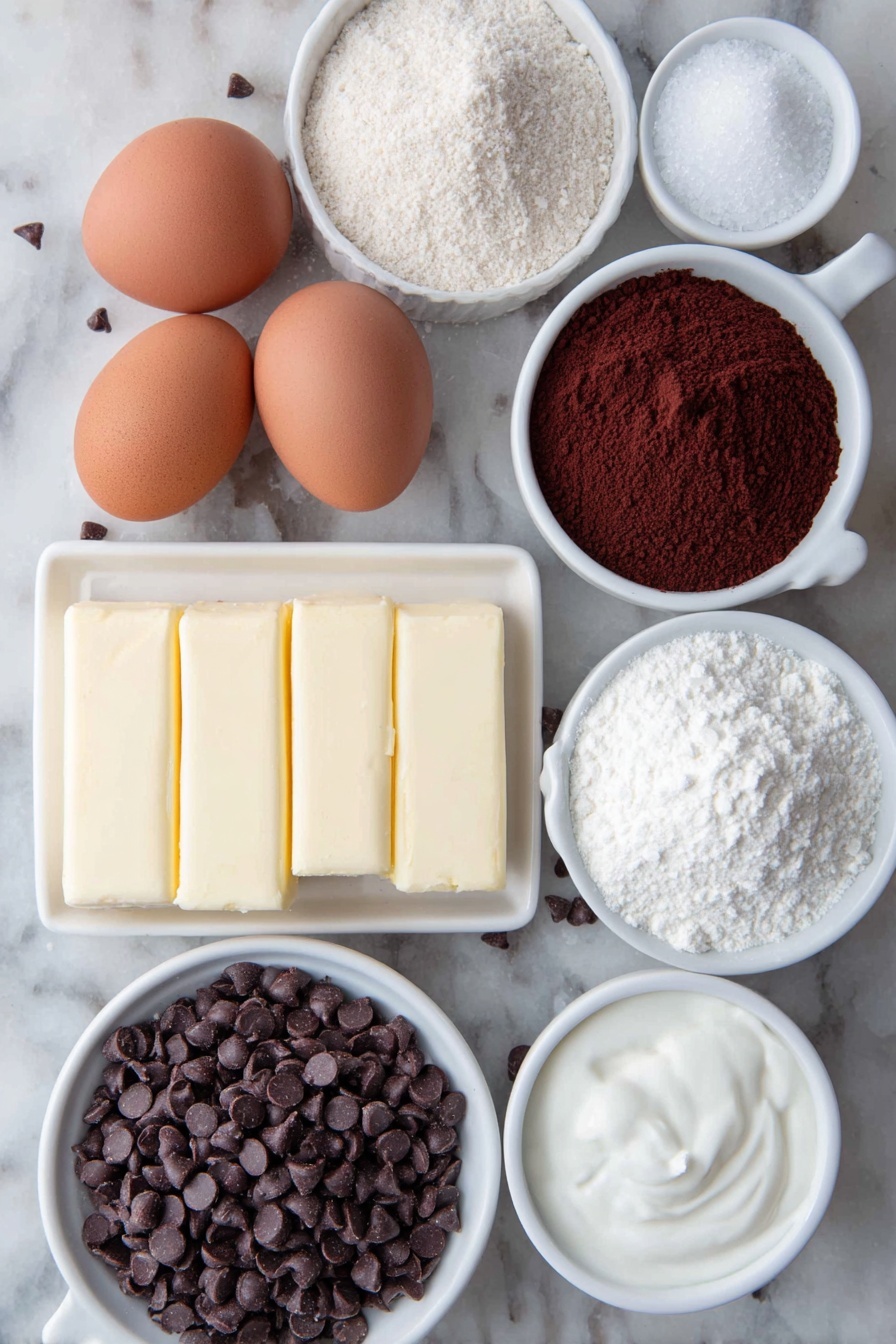
- Unsalted butter: Using unsalted lets you control the salt perfectly; it adds richness and helps keep cookies tender.
- Bittersweet chocolate chips: The bittersweet option balances sweetness and gives that intense chocolate flavor, but if you prefer, chopped chocolate works great too.
- Granulated sugar: Provides structure and a bit of crispness to the cookie edges.
- Light brown sugar: Adds moisture and warmth, plus the subtle molasses flavor really brings the depth out.
- Eggs: They bind everything, add moisture, and contribute to the chew.
- Vanilla extract: A flavor booster that brightens all the chocolatey notes.
- All-purpose flour: The base flour, for structure and crumb.
- Bread flour: Raises the protein content, which means better chewiness; if you don’t have bread flour, just add a bit more all-purpose.
- Dutch process cocoa powder: Gives a smoother chocolate flavor and enhances color; sifted to remove lumps for smooth dough.
- Baking powder & baking soda: These leavening agents help the cookies puff slightly and create that perfect cracked surface.
- Salt: Essential for balancing the sweetness and giving the flavors more punch.
- Confectioners sugar: For silky smooth buttercream that pipes beautifully.
- All-purpose flour (for buttercream): Heat treated to make the buttercream safe to eat and give it that true cookie dough vibe.
- Brown sugar (for buttercream): Adds that deep, caramel-like flavor to the frosting.
- Heavy cream: Used to smooth out the buttercream and get it to perfect pipeable consistency.
Tweak to Your Taste
I love sharing this recipe but also encouraging you to make it your own. Playing around with mix-ins and flavors has led me to some of my favorite versions — trust me, don’t hesitate to customize!
- Variation: I sometimes add a handful of toasted pecans or walnuts into the cookie dough to give an extra crunch and nutty flavor — it’s an addictive combo that adds great texture.
- Dietary Modification: If you want a gluten-free version, try swapping the flours with a 1:1 gluten-free flour blend, but be prepared for slightly different texture.
- Seasonal Twist: For a holiday spin, sprinkle cinnamon or pumpkin pie spice into the cookie dough before baking. It adds a cozy touch that everyone loves.
Step-by-Step: How I Make Brownie Cookie Sandwiches with Cookie Dough Buttercream Recipe
Step 1: Heat Treat the Flour for Safety
Before diving into cookie dough buttercream magic, start by heat treating your flour to make sure it’s safe to eat raw. Spread a bit extra flour on a baking sheet (about 1/2 cup more than you need). Bake it at 300°F, checking every couple of minutes and stirring/rotating to avoid hot spots. When the flour hits 165°F, it’s good to go. Let it cool completely before using in the frosting — I always do this the night before so I’m not rushing the next day.
Step 2: Melt Butter & Chocolate for the Cookie Base
Set up a double boiler (or a heatproof bowl over simmering water) and melt your butter with the bittersweet chocolate chips. Stir often until silky smooth, then remove from heat and let it cool slightly — don’t skip this step, because adding eggs to hot mixture can scramble them. I usually let it cool about 10 minutes while prepping the dry ingredients.
Step 3: Mix Dry Ingredients Separately
Whisk together the all-purpose flour, bread flour, cocoa powder, baking powder, baking soda, and salt in a separate bowl. Having these combined beforehand means a smooth mix later and avoids clumps slipping into your cookie dough.
Step 4: Combine Chocolate, Sugars & Eggs
Using a stand mixer with the whisk attachment, add eggs, granulated sugar, and brown sugar to the cooled chocolate mixture and beat on medium-low until the batter is evenly combined and glossy. Then add vanilla and mix just to incorporate. Resist the urge to whisk too fast or you’ll risk too much air, which can change the cookie’s texture.
Step 5: Incorporate Dry Ingredients & Chill
Switch to a paddle attachment or stir by hand and add the dry mix in two additions, folding gently until just combined — overmixing is the enemy here. Cover the bowl with plastic wrap and chill the dough for 30 minutes; this step helps the cookies spread less and develop that chewy, dense “brownie” feel.
Step 6: Scoop & Bake Perfect Cookies
Preheat the oven to 350°F and line sheets with parchment. Use a small cookie scoop or kitchen scale to portion dough balls around 0.07-0.08 ounces each — this little detail really ensures even baking and uniform sandwiches. Space them two inches apart so they have room to puff and crack. Bake 8-10 minutes; look for set edges and a slightly puffed, cracked center — trust me, resist the urge to overbake or you’ll lose that perfect fudgy middle.
Step 7: Shape Cookies While Warm
This is my favorite little trick: right out of the oven, while the cookies are warm but not hot, gently push the edges inward with the inside curve of a fork or swirl a cookie cutter around the cookie to make perfect rounds. It’s such a satisfying step that turns homemade into bakery-level beautiful. Let them cool about 8-10 minutes on the pan before transferring to the wire rack to cool completely before sandwiching.
Step 8: Make the Cookie Dough Buttercream
In your stand mixer bowl with paddle attachment, cream softened butter and brown sugar until fluffy (this can take 3-4 minutes). Meanwhile, whisk together the confectioners sugar and your heat-treated flour. Add the sugar-flour mix gradually while mixing on low. Then crank the speed to medium and beat for one more minute to get a nicely aerated frosting. Add vanilla and salt, and slowly add heavy cream one tablespoon at a time until your buttercream is smooth, fluffy, but still pipeable.
Step 9: Assemble the Brownie Cookie Sandwiches
Use a piping bag fitted with a medium round or star tip to add a swirl of cookie dough buttercream onto the flat side of one cookie. Top with another cookie (flat side down) and press gently to sandwich. A delicate sprinkle of flaky sea salt on top adds that extra pop of flavor that really elevates the dessert. If your kitchen is warm, pop the sandwiches in the fridge to set the filling for 20 minutes. Serve chilled or room temp — both are glorious.
Pro Tips for Making Brownie Cookie Sandwiches with Cookie Dough Buttercream Recipe
- Cool your chocolate but don’t chill it: Let melted chocolate cool to warm room temp or it won’t scramble the eggs, but avoid chilling else your dough gets stiff and harder to mix.
- Weigh your dough balls: This little extra step is a game changer for consistent bake time and cookie size – I use a small kitchen scale, and it’s totally worth it.
- Use the fork trick promptly: Don’t wait too long to nudge the edges in; once cookies cool they get too firm to shape.
- Don’t skip heat treating flour: It’s your safety net against raw flour bacteria, and it doesn’t affect taste – I promise it’s worth the extra step.
How to Serve Brownie Cookie Sandwiches with Cookie Dough Buttercream Recipe
Garnishes
Personally, I love finishing these sandwiches with a tiny pinch of flaky sea salt. It balances the sweetness perfectly and adds a subtle crunch. Sometimes I dust a few crushed chocolate shards or sprinkle rainbow nonpareils for birthdays — it makes them festive and extra eye-catching. You could also try mini chocolate chips on top for texture or a light cocoa powder dust for a sophisticated touch.
Side Dishes
These Brownie Cookie Sandwiches shine as the star dessert, but I often serve them alongside a scoop of vanilla bean ice cream for a decadent treat. They also pair beautifully with a hot cup of coffee or cold milk — the perfect cozy combo. For celebrations, I sometimes lay them out with fresh berries and a drizzle of chocolate sauce for a wow factor.
Creative Ways to Present
For birthday parties, I like arranging these sandwich cookies on a tiered dessert stand, adding colored edible glitter or festive sprinkles to the buttercream before assembling. Another fun idea I’ve tried is wrapping individual sandwiches in parchment squares tied with twine — great for gifting or party favors! If you’re serving a crowd, mini-sized versions piped with small dollops of buttercream look adorable and make them easier to handle.
Make Ahead and Storage
Storing Leftovers
I usually store these brownie cookie sandwiches in an airtight container layered with parchment paper in between. They keep beautifully at room temperature for up to 3 days, but I prefer refrigerating if your kitchen is warm — it helps the buttercream stay firm and fresh.
Freezing
Freezing is my secret weapon for making these ahead! I freeze the cookies alone first, uncovered on a baking sheet until firm (about an hour), then sandwich and wrap them tightly in plastic wrap and seal in a freezer bag. They last up to 2 months this way. When ready, thaw in the fridge overnight for best texture.
Reheating
If you want that “just-baked” feeling, let the sandwiches come to room temperature or warm gently in the microwave for 8-10 seconds (trust me, any longer and the buttercream could melt). This tip works especially well if the sandwiches have been refrigerated or frozen.
FAQs
-
Can I use regular flour without heat treating it in the buttercream?
I wouldn’t recommend it. Raw flour can contain harmful bacteria, so heat treating it by baking ensures the buttercream is safe to eat, especially since it’s uncooked. It’s a quick step and worth the peace of mind.
-
What if I don’t have bread flour? Can I use all-purpose only?
Definitely! If you don’t have bread flour, simply use all-purpose in place of it. The cookies might be slightly less chewy, but they’ll still be super fudgy and delicious.
-
How do I know when my cookies are done baking?
Look for edges that are just set and slightly firm, with a center that is puffed and cracked but not dry. Overbaking can make them cakey or crisp instead of fudgy — I recommend starting to check around 8 minutes and keeping a close watch.
-
Can I make the cookie dough buttercream without brown sugar?
You can try substituting with additional confectioners sugar, but brown sugar adds crucial moisture and flavor to the buttercream. Omitting it might make your frosting less flavorful and a bit drier.
Final Thoughts
Every time I make these Brownie Cookie Sandwiches with Cookie Dough Buttercream Recipe, I’m reminded why they’re such a crowd favorite — the fudge-like cookies paired with safe-to-eat cookie dough frosting create a dessert experience that’s both nostalgic and next level. Whether you’re baking for a special occasion or an everyday sweet craving, these tasty sandwiches will brighten your day and impress your guests. I can’t wait for you to try them — you’re going to love nibbling on these just as much as I do!
Print
Brownie Cookie Sandwiches with Cookie Dough Buttercream Recipe
- Prep Time: 30 minutes
- Cook Time: 10 minutes
- Total Time: 40 minutes
- Yield: 20 cookies
- Category: Dessert
- Method: Baking
- Cuisine: American
- Diet: Vegetarian
Description
These Brownie Cookie Sandwiches with Cookie Dough Buttercream combine rich, fudgy brownie cookies with a creamy, safe-to-eat cookie dough buttercream filling, creating a decadent and unique dessert perfect for any occasion.
Ingredients
For Brownie Cookies
- 8 tablespoons unsalted butter
- 9 ounces bittersweet chocolate chips (or chopped chocolate)
- 3/4 cup plus 2 tablespoons granulated sugar
- 1/2 cup light brown sugar, packed
- 3 large eggs, room temperature
- 1 teaspoon vanilla extract
- 1 cup all-purpose flour, spooned and leveled
- 3/4 cup bread flour, spooned and leveled (substitute with more all-purpose flour if needed)
- 1/4 cup Dutch process cocoa powder, sifted
- 1 teaspoon baking powder
- 3/4 teaspoon salt
- 1 teaspoon baking soda
For Cookie Dough Buttercream
- 12 tablespoons unsalted butter, room temperature
- 1/2 cup brown sugar
- 2 1/2 cups confectioners sugar, sifted
- 1/2 cup all-purpose flour
- 1 teaspoon vanilla extract
- 1/4 teaspoon salt
- 3-4 tablespoons heavy cream
Instructions
- Heat Treat Flour: Spread the flour for the buttercream onto a clean, dry baking sheet using 1/2 cup more than the recipe calls to ensure enough. Bake at 300°F for 5-8 minutes, stirring and rotating the pan every 2 minutes until the flour reaches 165°F. Remove and let cool completely.
- Prepare Chocolate Mixture: Place butter and bittersweet chocolate in a double boiler over medium heat and stir until melted and smooth. Remove from heat and let cool slightly.
- Mix Dry Ingredients: Whisk together all-purpose flour, bread flour, cocoa powder, baking powder, baking soda, and salt in a separate bowl, then set aside.
- Combine Wet Ingredients: In the stand mixer bowl with the whisk attachment, add eggs, brown sugar, and granulated sugar to the cooled chocolate mixture and mix on medium-low speed until combined. Add vanilla and mix briefly.
- Incorporate Dry Ingredients: Add the dry ingredients to the wet mixture and mix until the flour is fully incorporated. Avoid overmixing to keep the texture tender.
- Chill Dough: Cover the bowl with plastic wrap and chill the cookie dough for 30 minutes in the refrigerator.
- Preheat Oven and Prepare Baking Sheets: Preheat oven to 350°F and line two baking sheets with parchment paper.
- Scoop Cookies: Using a small cookie scoop or kitchen scale, portion dough balls weighing about 0.08 ounces each. Place them on the baking sheets about 2 inches apart.
- Bake Cookies: Bake for 10 minutes or until edges are set and centers puff and crack slightly. Avoid overbaking to keep them fudgy.
- Shape Cookies: Remove warm cookies and gently press the edges inward using the inside arch of a fork or swirl a round cookie cutter to create uniform rounds. Let cool on the sheet for 8-10 minutes, then transfer to a wire rack to cool completely.
- Make Cookie Dough Buttercream: In a stand mixer with paddle attachment, cream butter and brown sugar until light and fluffy. Gradually add sifted confectioners sugar and heat-treated flour, 1/2 cup at a time, mixing on low speed. Increase speed to medium and beat for 1 minute.
- Flavor and Adjust Consistency: Add vanilla and salt, mix well, then add heavy cream one tablespoon at a time until buttercream is smooth, fluffy, and pipeable but firm enough to hold shape.
- Assemble Sandwiches: Pipe a swirl of buttercream onto the flat side of one cookie, then top with another cookie’s flat side, gently pressing together. Optionally sprinkle with flaky sea salt.
- Chill and Serve: Refrigerate the assembled sandwiches if needed to set the buttercream. Serve chilled or at room temperature.
Notes
- Heat treating the flour is essential to ensure safety when consuming raw flour in the buttercream.
- Store cookies in an airtight container in a cool, dry place for up to 3 days.
- Cookies can be frozen by layering them on a baking sheet and freezing uncovered until firm, then wrapping as sandwiches in plastic wrap and placing in a freezer bag for up to 2 months.
- The bread flour in the brownie cookies can be fully substituted with all-purpose flour if unavailable.
- Use a kitchen scale for consistent cookie sizes and better even baking.
Nutrition
- Serving Size: 1 sandwich
- Calories: 320 kcal
- Sugar: 30 g
- Sodium: 150 mg
- Fat: 18 g
- Saturated Fat: 10 g
- Unsaturated Fat: 7 g
- Trans Fat: 0 g
- Carbohydrates: 35 g
- Fiber: 2 g
- Protein: 3 g
- Cholesterol: 65 mg


